Binary Editor (C++)
Caution
Editing resources such as dialog boxes, images, or menus in the Binary Editor is dangerous. Incorrect editing could corrupt the resource, making it unreadable in its native editor.
The Binary Editor allows you to edit any resource at the binary level in either hexadecimal or ASCII format. You can also use the Find command to search for either ASCII strings or hexadecimal bytes. Use the Binary Editor only when you need to view or make minor changes to custom resources or resource types not supported by the Visual Studio environment. The Binary Editor isn't available in Express editions.
To open the Binary Editor on a new file, go to menu File > New > File, select the type of file you want to edit, then select the drop arrow next to the Open button, and choose Open With > Binary Editor. The dropdown selection in the New file dialog isn't available in Visual Studio 2019, but is available in Visual Studio 2022.
To open the Binary Editor on an existing file, go to menu File > Open > File, select the file you want to edit, then select the drop arrow next to the Open button, and choose Open With > Binary Editor.

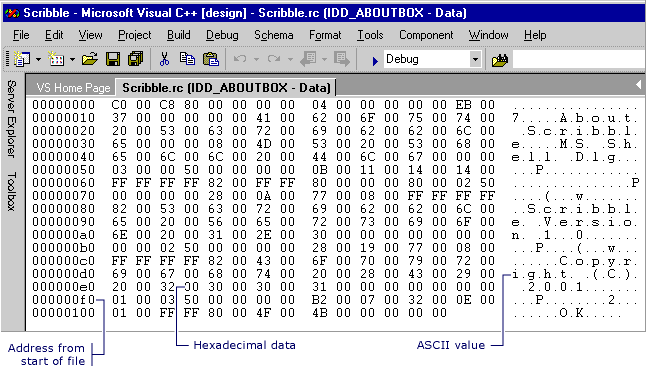
The binary editor is open on a file called Scribble.rc. mydata.rc. The file is split into three sections. The left section shows the address from the start of the file. The middle section shows columns of hexadecimal values from the file. The right section shows the ASCII characters that correspond to the hexadecimal values.
Binary data for a dialog box displayed in the Binary Editor
Only certain ASCII values are represented in the Binary Editor (0x20 through 0x7E). Extended characters are displayed as periods in the right panel ASCII value section of the Binary Editor. The printable characters are ASCII values 32 through 126.
Tip
While using the Binary Editor, in many instances you can right-click to display a shortcut menu of resource-specific commands. The commands available depend on what your cursor is pointing to. For example, if you right-click while pointing to the Binary Editor with selected hexadecimal values, the shortcut menu shows the Cut, Copy, and Paste commands.
How To
The Binary Editor enables you:
To open a Windows desktop resource for binary editing
In Resource View, select the specific resource file you want to edit.
Right-click the resource and select Open Binary Data.
Note
If you use the Resource View window to open a resource with a format that Visual Studio doesn't recognize, such as RCDATA or a custom resource, the resource is automatically opened in the Binary Editor.
To open a managed resource for binary editing
In Solution Explorer, select the specific resource file you want to edit.
Right-click the resource and select Open With.
In the Open With dialog box, choose Binary Editor.
Note
You can use the Image Editor and the Binary Editor to work with resource files in managed projects. Any managed resources you want to edit must be linked resources. The Visual Studio resource editors do not support editing embedded resources.
To edit a resource
If you want to use the Binary Editor on a resource already being edited in another editor window, close the other editor window first.
Select the byte you want to edit.
The Tab key moves the focus between the hexadecimal and ASCII sections of the Binary Editor. You can use the Page Up and Page Down keys to move through the resource one screen at a time.
Type the new value.
The value changes immediately in both the hexadecimal and ASCII sections and focus shifts to the next value in line.
Note
The Binary Editor accepts changes automatically when you close the editor.
To find binary data
You can search for either ASCII strings or hexadecimal bytes. For example, to find Hello, you can search for either the string Hello or its hexadecimal value, 48 65 6C 6C 6F.
Go to menu Edit > Find.
In the Find What box, select a previous search string from the drop-down list or type the data you want to find.
Select any of the Find options and choose Find Next.
To create a new custom or data resource
You can create a new custom or data resource by placing the resource in a separate file using normal resource script (.rc) file syntax, and then including that file by right-clicking your project in Solution Explorer and selecting Resource Includes.
Create a .rc file that contains the custom or data resource.
You can type custom data in an
.rcfile as null-terminated quoted strings, or as integers in decimal, hexadecimal, or octal format.In Solution Explorer, right-click your project's .rc file and select Resource Includes.
In the Compile-Time Directives box, type a
#includestatement that gives the name of the file containing your custom resource, for example:#include mydata.rcMake sure the syntax and spelling of what you type are correct. The contents of the Compile-Time Directives box are inserted into the resource script file exactly as you type them.
Select OK to record your changes.
Another way to create a custom resource is to import an external file as the custom resource, see How to: Manage Resources.
Note
Creating new custom or data resources requires Win32.
Requirements
None