Create TIBCO Rendezvous Send Handlers
This section explains how to create a schema to use TIBCO Rendezvous in a BizTalk Server orchestration.
Create a send port
In BizTalk Server Administration, expand BizTalk Group, expand Applications, and then expand your application.
Right-click Send Ports, point to New, and then click Static Solicit-Response Send Port.
In the Send Port Properties dialog box, do the following:
Type a name for the send port, for example,
SendToTIBCORV.From the Type drop-down list, select TIBCO Rendezvous.
From the Send handler drop-down list, select the URI.
From the Send Pipeline drop-down list, select Microsoft.BizTalk.DefaultPipelines.XMLTransmit. From the Receive Pipeline drop-down list, select Microsoft.BizTalk.DefaultPiplelines.XMLReceive.
Note
Microsoft BizTalk Adapter for TIBCO Rendezvous requires that you select XMLTransmit pipeline for send, and XMLReceive pipeline for receive.
Click Configure to configure the send port.
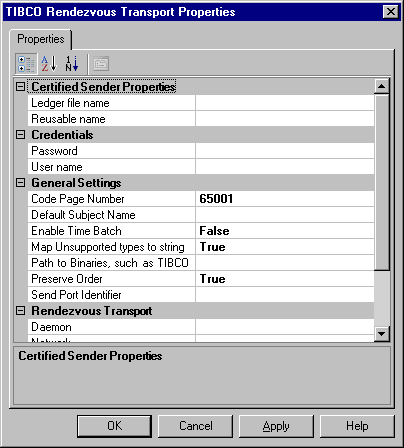
In the TIBCO Rendezvous Transport Properties dialog box, do the following:
Enter the properties.
You do not have to set the logon information.
In the list, select the SSO affiliate application you created to represent the TIBCO Rendezvous system.
For Use SSO, select Yes.
Click OK.
Click OK.
Set the transport properties
The TIBCO Rendezvous Transport property is used for run time. In the Transport Properties, you set the connection parameters that identify the TIBCO Rendezvous domain where you want to publish the generated messages.
On the TIBCO Rendezvous Transport Properties screen, expand Certified Sender Properties and enter the following information.

Use this To do this Ledger name Default value is blank. Ledger file name to use for persistent certified message delivery. Use local drives only. Reusable name Default value is blank. Reusable correspondent name to use for certified message delivery. The name must be unique among all certified message correspondent names on the network. Expand Credentials and enter the following information for connection to the server.
Use this To do this Password Default value is blank. Password for login to a Tibco Rendezvous daemon. User name Default value is blank. User name for Tibco Rendezvous daemon. Expand General Settings and enter the following information for connection to the TIBCO Rendezvous server.
Use this To do this Code Page Number Default value is 65001 (code page for UTF-8 encoding). This is the code page that the TIBCO Rendezvous SDK uses for String encoding. Default Subject Name Default is empty. The subject name is set in the orchestration. If a port is used for one message type, you can provide a default subject name, and you can simplify orchestrations by removing the need to set the Subject name property. Enable Time Batch Default value is False. Enable/Disable TIBCO Rendezvous Time Batch feature. Map Unsupported types to string Default value is True. If true, unsupported types are mapped to string if it is possible. If False, a run-time error is generated. Path to Binaries, such as TIBCO Rendezvous assemblies Provide this information if it is not already in the PATH environment variable. Preserver Order Default value is True. Enables logic to send messages to TIBCO Rendezvous in the same order they were received from BizTalk Server. This parameter forces publishing in the same order; it does not mean that subscribers receive them in the same order. Send Port Identifier This identifier appears in log messages associated with this port. It is provided as a convenience. Expand Rendezvous Transport and enter the information for connection to the TIBCO Rendezvous server, click Apply, and then click OK.
You must set connection parameters for Microsoft BizTalk Adapter for TIBCO Rendezvous to access TIBCO Rendezvous.
Use this To do this Daemon Default is empty.
Rendezvous Transport Daemon parameter.Network Default is empty.
Rendezvous Transport Network parameter.Service Default is empty.
Rendezvous Transport Service parameter.Provide credentials using Single Sign-On (SSO).
There are two methods that you can use to access the TIBCO Rendezvous system. You can use Credentials (User Name and Password parameters) or Single Sign-On.
Select Yes in the Use SSO to use Single Sign-On.
Note
See Security for information about how to set up SSO.
Select an affiliate application from the list.
An affiliate application, created by Enterprise Single Sign-On tools, represents an application such as TIBCO Rendezvous. Microsoft BizTalk Adapter for TIBCO Rendezvous uses the credentials of an application user. These credentials are retrieved from the SSO database for the server system for a specified affiliate application.
Note
For information about how to create an affiliate application, see Creating Affiliate Applications.
Click Apply, and then click OK after providing all required information to accept the connection information.
You must set connection parameters for BizTalk Adapter for TIBCO Rendezvous to access TIBCO Rendezvous .