Creating Send and Receive Ports
Use the following procedures to create BizTalk Server send and receive ports for BizTalk Adapter for JD Edwards OneWorld.
Creating a Port
To create a send port
Click Start, point to All Programs, point to Microsoft BizTalk Server, and then click BizTalk Server Administration.
In the BizTalk Server Administration console, expand BizTalk Server Administration, expand BizTalk Group, and expand Applications, and then expand the application for which you want to create a send port.
Right-click Send Ports and click New, and then click Static Solicit-Response Port.
In the Send Port Properties dialog box, do the following:
In the Name box, type a send port name (for example,
SSOSendToJDE OneWorld).From the Type drop-down list, select JDEdwards.
From the Send handler drop-down list, select the send handler address.
For the Send Pipeline, select Microsoft.BizTalk.DefaultPipelines.XMLTransmit.
For the Receive Pipeline, select Microsoft.BizTalk.DefaultPiplelines.XMLReceive.
Click OK.
Creating a Receive Port
To create a receive port
Click Start, point to All Programs, point to Microsoft BizTalk Server, and then click BizTalk Server Administration.
In the BizTalk Server Administration console, expand BizTalk Server Administration, expand BizTalk Group, and expand Applications, and then expand the application for which you want to create a send port.
Right-click Receive Ports and click New, and then click One-way Receive Port.
On the One-Way Receive Port Properties screen, in the Name field, type
ReceiveFromHttp, and then click OK.Enter the following information in the One-way Receive Port Properties window:
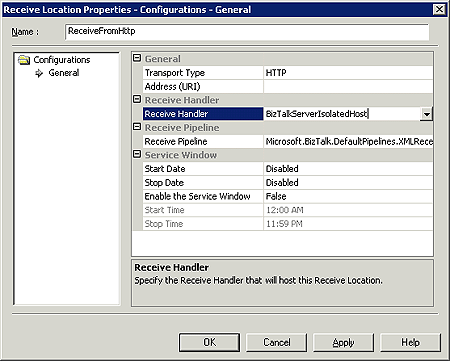
In the Name field, type
ReceiveFromHTTP.For the Transport Type, select HTTP.
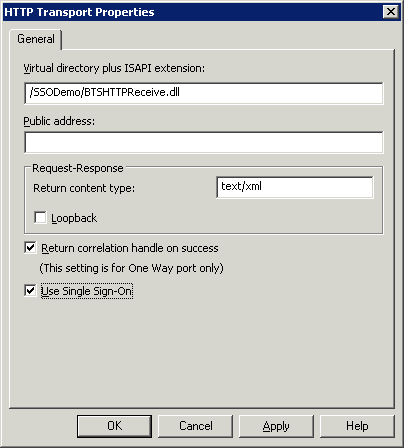
Click the ellipsis (…) button in the address (URI).

Set the Virtual directory plus ISAPI extension, /mySSODemo/BTSHTTPReceive.dll.
Select Return correlation handle on success.
Select Use Single Sign-On, and then click OK.
In the Receive Handler drop-down list, select BizTalkServerIsolatedHost.

For the Receive Pipeline, select Microsoft.BizTalk.DefaultPiplelines.XMLReceive, and then click OK.
See Also
Add the artifacts to BizTalk Administration
Add the artifacts to BizTalk Administration
Security in the adapter