Step 2: Send the Request Message to SQL Server and Receive Response

Time to complete: 10 minutes
Objective: In this step, you send the request message to execute the UPDATE_EMPLOYEE stored procedure and receive the response.
Prerequisites
You must have completed Step 1: Create the Request Message for UPDATE_EMPLOYEE Stored Procedure.
To send the request message and receive a response
To the existing orchestration, under the Insert block of the Decide shape, add a Message Assignment shape. From the Toolbox, drag the Message Assignment shape to the space indicated.
Note
When you drop the Message Assignment shape onto the design surface, Orchestration Designer creates the enclosing Construct Message shape for you.
On the design surface, right-click the ConstructMessage_1 shape, and then click Properties Window.
In the Properties pane for the ConstructMessage_1 shape, specify the following values.
Set this property To this value Messages Constructed UpdateEmployee Name ConstructRequestMessage Double-click the MessageAssignment shape to open the BizTalk Expression Editor.
In the BizTalk Expression Editor, add the following:
UpdateEmployee = UpdateEmployeeMessageCreator.UpdateEmployeeMessageCreator.XMLMessageCreator();
UpdateEmployee(WCF.Action) = "TypedProcedure/dbo/UPDATE_EMPLOYEE";
Here, UpdateEmployee is the message you created in Step 2: Create Messages for BizTalk Orchestrations for sending request messages for UPDATE_EMPLOYEE stored procedure. In the MessageAssignment shape, you invoke the UpdateEmployeeMessageCreator class to create a request message. Also, you set the WCF action for the request message.
Add the following shapes to the orchestration under the Message Assignment shape.
Shape Shape Type Properties SendUpdateMessage Send - Set Message to UpdateEmployee
- Set Name to SendUpdateMessageReceiveUpdateResponse Receive - Set Activate to False
- Set Message to UpdateEmployeeResponse
- Set Name to ReceiveUpdateResponseAdd a request-response send port to the orchestration. You will use this port to send request messages to the SQL Server and receive response. Set the following properties for the port.
Set this property To this value Communication Direction Send-Receive Communication Pattern Request-Response Identifier SQLOutboundPort Also, change the operation name from Operation_1 to UpdateEmp.
Connect the port to action shapes. In Orchestration Designer, on the design surface, drag the green arrow-shaped handle for the port to the corresponding green handle of the action shape.
Note
In this step, you use the drag-and-drop method to connect ports to action shapes. You could instead use the operation property of an action shape to connect the action shape to a port.
Connect the ports and action shapes as follows:
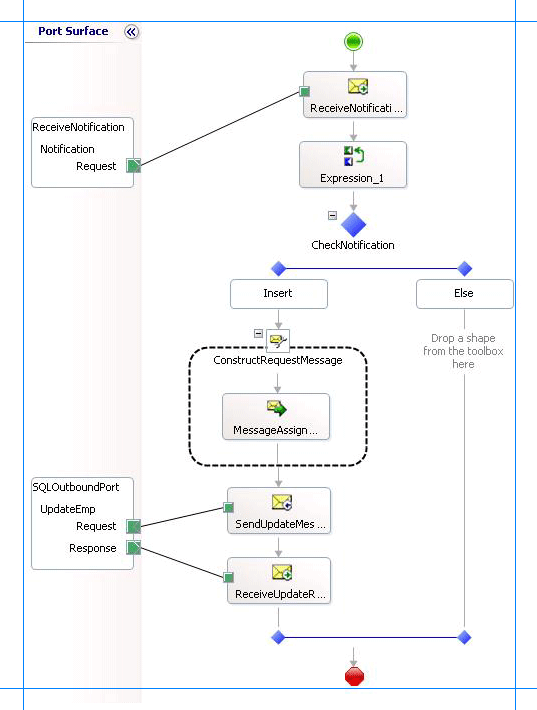
Connect the SendUpdateMessage action shape to the Request handle of the SQLOutboundPort.
Connect the ReceiveUpdateResponse action shape to the Response handle of the SQLOutboundPort.
The following figure shows the in-progress orchestration.

What did I just do?
In this step, you updated the orchestration by adding a MessageAssignment shape, Send and Receive shapes, and a port. You connected the shapes and ports to send request message to execute the UPDATE_EMPLOYEE request message and receive the response.
Next Steps
In the next step, you add orchestration shapes to invoke the Insert operation on the Purchase_Order table, as described in Lesson 4: Perform an Insert Operation on the Purchase Order Table.
See Also
Step 1: Create the Request Message for UPDATE_EMPLOYEE Stored Procedure
Lesson 3: Execute a Stored Procedure to Select New Employees Added