Step 1: Modify the vPrev BizTalk Project in Oracle Database

Time to complete: 10 minutes
Objective: In this step, you make the following changes to the existing vPrev BizTalk project:
Generate metadata for the Insert operation on the SCOTT.CUSTOMER table using the WCF-based Oracle Database adapter.
Map the request message for performing an Insert operation using the vPrev Oracle database adapter to a request message for performing an Insert operation using the WCF-based Oracle Database adapter.
Map the response message received using the WCF-based Oracle Database adapter to the response message for the vPrev Oracle database adapter.
Prerequisites
- You must have a vPrev BizTalk project to perform an Insert operation on the SCOTT.CUSTOMER table in the Oracle database.
Modify the vPrev BizTalk project
Generate metadata for the Insert operation on the SCOTT.CUSTOMER table using the WCF-based Oracle Database adapter. You can use the Consume Adapter Service BizTalk Project Add-in to generate metadata.
For instructions on how to generate metadata, see Get metadata for Oracle Database operations in Visual Studio. After the schema is generated, a file with the name similar to OracleDBBindingSchema.xsd is added to the BizTalk project. This file contains the schema for sending a message to perform an Insert operation on the SCOTT.CUSTOMER table in the Oracle database using the WCF-based Oracle Database adapter.
Generating the metadata for the Insert operation also creates a port binding file. In the next step, this binding file will be used to create a WCF-Custom send port to send messages to the Oracle database. The SOAP action for the operation is also set to the operation for which you generated metadata. For example, if you generate metadata for the Insert operation, the operation name in the SOAP action on the send port will be “Insert”. However, the operation name on the logical send port that you create as part of the orchestration could be different, for example, “Operation_1”. As a result, when you send messages to the Oracle database using the send port, you get an error. To prevent this, make sure the operation name on the logical send port in your orchestration is the same as the operation name for which you generated metadata.
So, in case of this tutorial, because you generate metadata for the Insert operation, change the name of the logical send port operation to “Insert”.
For the request message, map the schema generated using vPrev Oracle database adapter to the schema generated using the WCF-based Oracle Database adapter.
Add a BizTalk mapper to the BizTalk project. Right-click the BizTalk project, point to Add, and click New Item.
In the Add New Item dialog box, from the left pane, select Map Files. From the right pane, select Map. Specify a name for the map, such as RequestMap.btm. Click Add.
From the Source Schema pane, click Open Source Schema.
In the BizTalk Type Picker dialog box, expand the project name, expand Schemas, and select the schema for the request message for the vPrev Oracle database adapter. For this tutorial, select Oracle_Migration.CUSTOMERService_CUSTOMER_x5d. Click OK.
In the Root Node for Source Schema dialog box, select Insert and click OK.
From the Destination Schema pane, click Open Destination Schema.
In the BizTalk Type Picker dialog box, expand the project name, expand Schemas, and select the schema for the request message for the WCF-based Oracle Database adapter. For this tutorial, select Oracle_Migration.OracleDBBindingSchema. Click OK.
In the Root Node for Target Schema dialog box, select Insert and click OK.
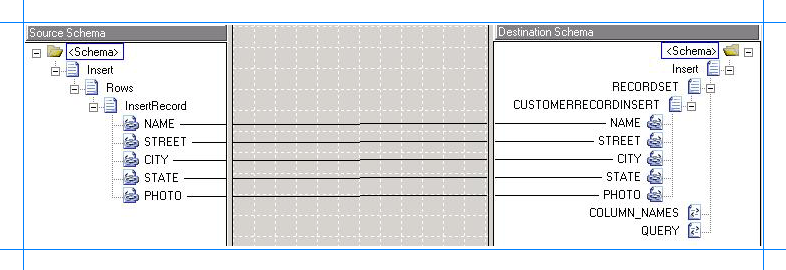
Map the respective elements in both the schemas as illustrated in the following figure.

Save the map.
For the response message, map the schema generated using vPrev Oracle database adapter to the schema generated using the WCF-based Oracle Database adapter.
Add a BizTalk mapper to the BizTalk project. Right-click the BizTalk project, point to Add, and click New Item.
In the Add New Item dialog box, from the left pane, select Map Files. From the right pane, select Map. Specify a name for the map, such as ResponseMap.btm. Click Add.
From the Source Schema pane, click Open Source Schema.
In the BizTalk Type Picker dialog box, expand the project name, expand Schemas, and select the schema for the response message for the WCF-based Oracle Database adapter. For this tutorial, select Oracle_Migration.OracleDBBindingSchema. Click OK.
In the Root Node for Source Schema dialog box, select InsertResponse and click OK.
From the Destination Schema pane, click Open Destination Schema.
In the BizTalk Type Picker dialog box, expand the project name, expand Schemas, and select the schema for the response message for the vPrev Oracle database adapter. For this tutorial, select Oracle_Migration.CUSTOMERService_CUSTOMER_x5d. Click OK.
In the Root Node for Target Schema dialog box, select InsertResponse, and then click OK.
You will notice that the schema for the response message conforming to the WCF-based Oracle Database adapter contains an additional InsertResult element. You must remove this from the schema and map the InsertResponse element in both the schemas.
To do so, from the Toolbox, drag the String Left Trim functoid and drop it on the mapper grid. Connect the InsertResponse element in the source schema to the functoid. Similarly, connect the InsertResponse element in the destination schema to the functoid. The following figure illustrates how the two elements are mapped via the functoid.

Note
For more information, see the String Left Trim Functoid in the UI guidance and developers API namespace reference.
Save the map.
Save and build the BizTalk solution. Right-click the solution, and then click Build Solution.
Deploy the solution. Right-click the solution, and then click Deploy Solution.
Next Steps
Create a WCF-custom send port and configure it to use the maps you created in this step, as described in Step 2: Configure the Orchestration in Biztalk Server Administration Console using the SQL adapter.