Tutorial: Create an application gateway with a Web Application Firewall using the Azure portal
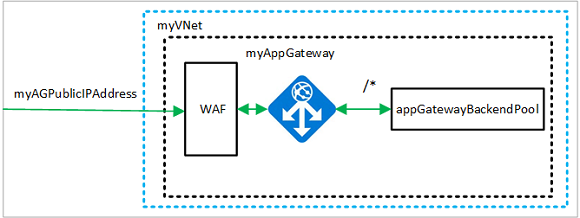
This tutorial shows you how to use the Azure portal to create an Application Gateway with a Web Application Firewall (WAF). The WAF uses OWASP rules to protect your application. These rules include protection against attacks such as SQL injection, cross-site scripting attacks, and session hijacks. After creating the application gateway, you test it to make sure it's working correctly. With Azure Application Gateway, you direct your application web traffic to specific resources by assigning listeners to ports, creating rules, and adding resources to a backend pool. For the sake of simplicity, this tutorial uses a simple setup with a public front-end IP, a basic listener to host a single site on this application gateway, two Linux virtual machines used for the backend pool, and a basic request routing rule.
In this tutorial, you learn how to:
- Create an application gateway with WAF enabled
- Create the virtual machines used as backend servers
- Create a storage account and configure diagnostics
- Test the application gateway
Note
We recommend that you use the Azure Az PowerShell module to interact with Azure. To get started, see Install Azure PowerShell. To learn how to migrate to the Az PowerShell module, see Migrate Azure PowerShell from AzureRM to Az.
Prerequisites
If you don't have an Azure subscription, create a free account before you begin.
Sign in to Azure
Sign in to the Azure portal.
Create an application gateway
Select Create a resource on the left menu of the Azure portal. The Create a resource window appears.
Select Networking and then select Application Gateway in the Popular Azure services list.
Basics tab
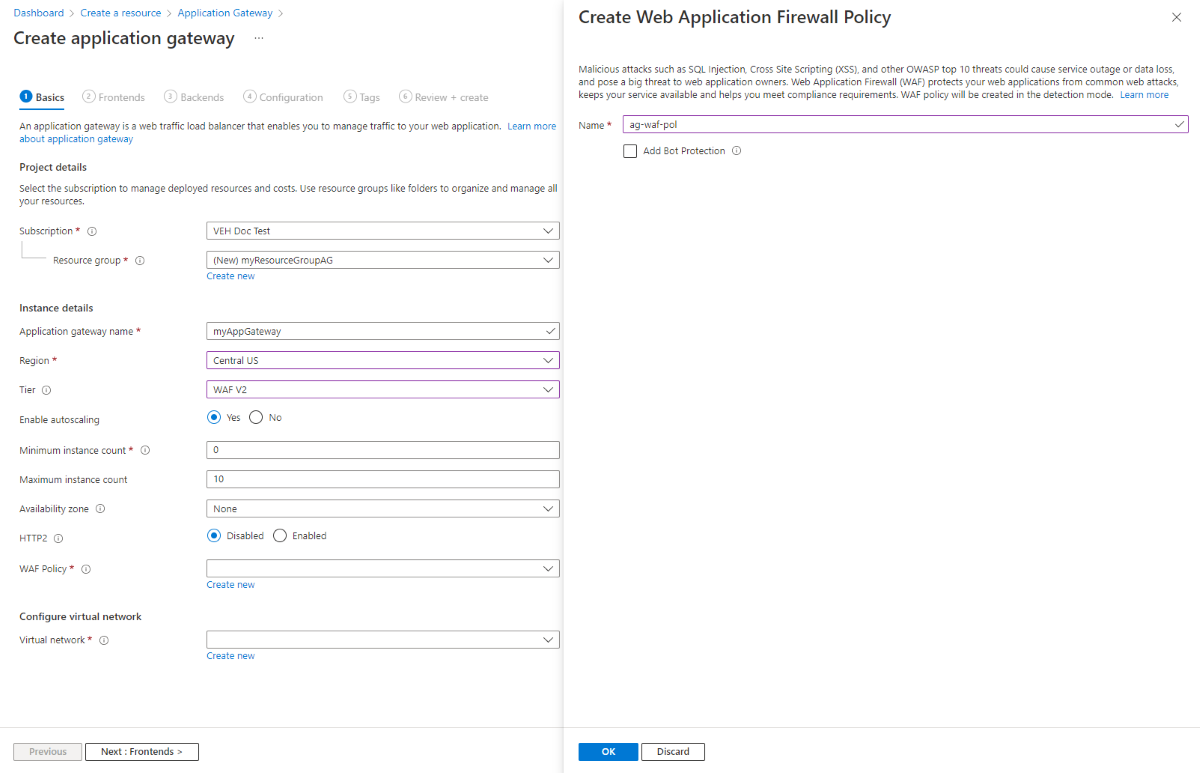
On the Basics tab, enter these values for the following application gateway settings:
Resource group: Select myResourceGroupAG for the resource group. If it doesn't exist, select Create new to create it.
Application gateway name: Enter myAppGateway for the name of the application gateway.
Tier: select WAF V2.
WAF Policy: Select Create new, type a name for the new policy, and then select OK. This creates a basic WAF policy with a managed Core Rule Set (CRS).
For Azure to communicate between the resources that you create, it needs a virtual network. You can either create a new virtual network or use an existing one. In this example, you create a new virtual network at the same time that you create the application gateway. Application Gateway instances are created in separate subnets. You create two subnets in this example: one for the application gateway, and then later add another for the backend servers.
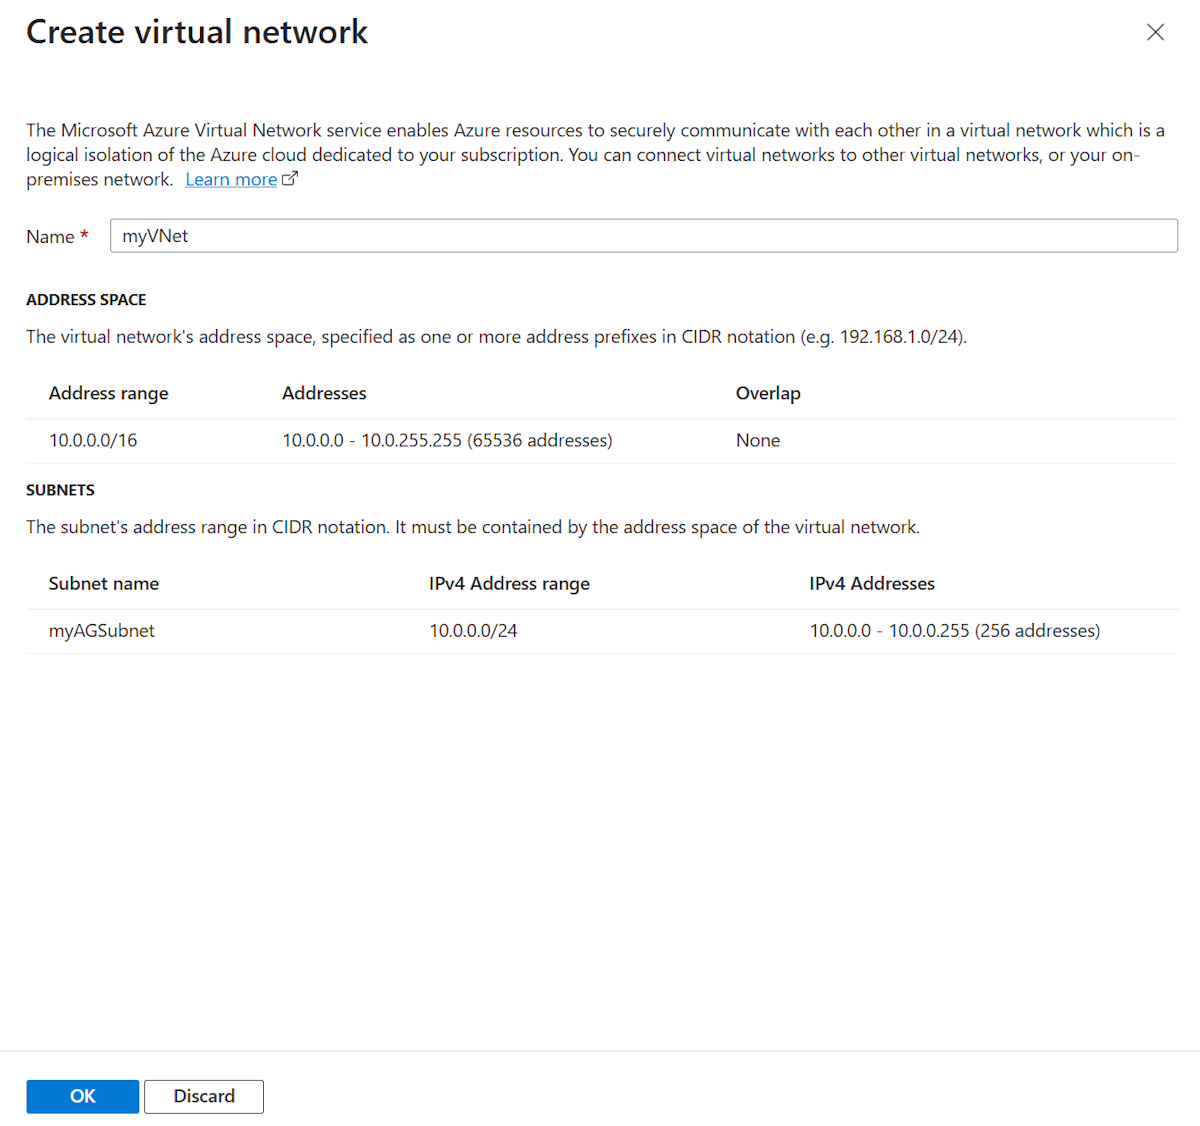
Under Configure virtual network, select Create new to create a new virtual network. In the Create virtual network window that opens, enter the following values to create the virtual network and a subnet:
Name: Enter myVNet for the name of the virtual network.
Address space : Accept the 10.0.0.0/16 address range.
Subnet name (Application Gateway subnet): The Subnets area shows a subnet named Default. Change the name of this subnet to myAGSubnet, and leave the default IPv4 Address range of 10.0.0.0/24.
The application gateway subnet can contain only application gateways. No other resources are allowed.Select OK to close the Create virtual network window and save the virtual network settings.
On the Basics tab, accept the default values for the other settings and then select Next: Frontends.
Frontends tab
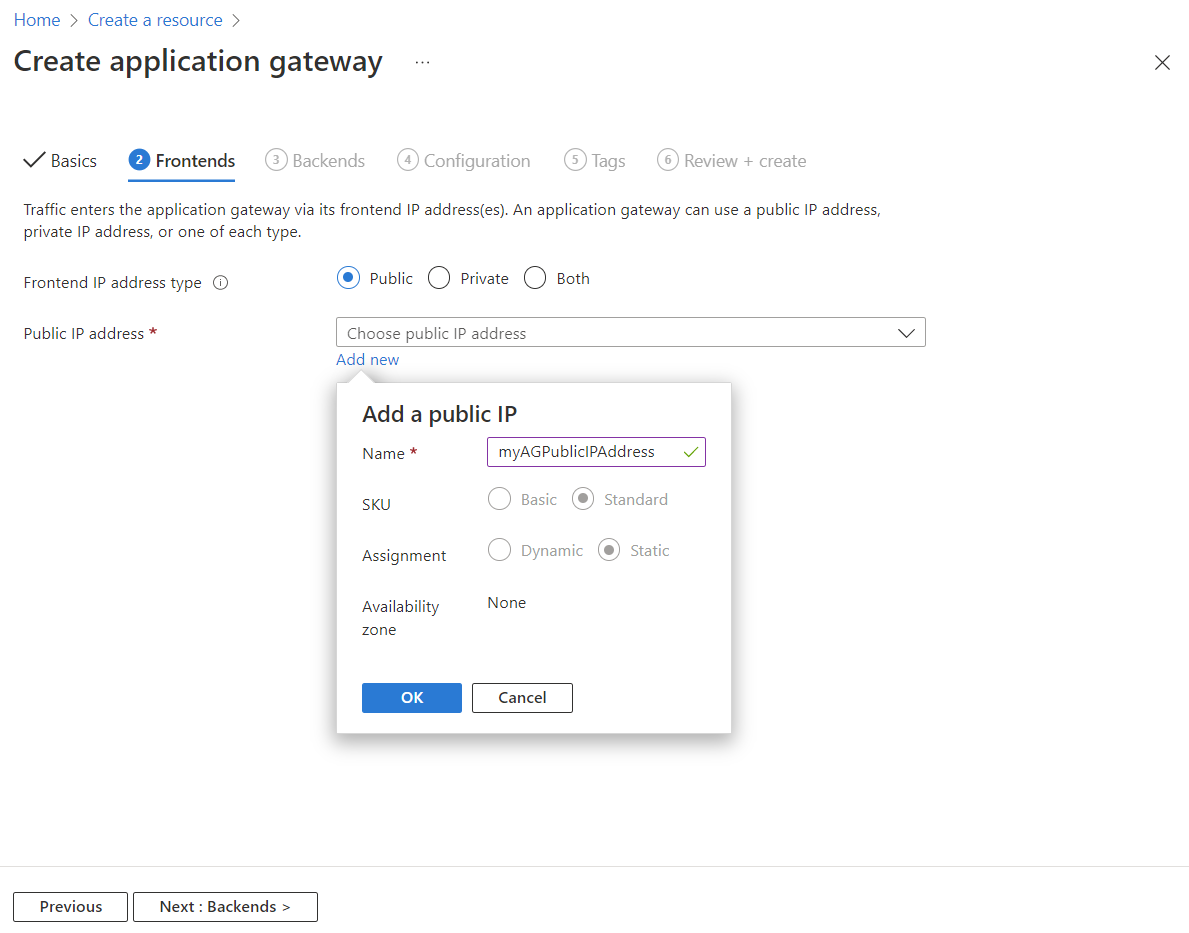
On the Frontends tab, verify Frontend IP address type is set to Public.
You can configure the Frontend IP to be Public or Both as per your use case. In this example, you choose a Public Frontend IP.Note
For the Application Gateway v2 SKU, Public and Both Frontend IP address types are supported today. Private frontend IP configuration only is not currently supported.
Choose Add new for the Public IP address and enter myAGPublicIPAddress for the public IP address name, and then select OK.
Select Next: Backends.
Backends tab
The backend pool is used to route requests to the backend servers that serve the request. Backend pools can be composed of NICs, virtual machine scale sets, public IPs, internal IPs, fully qualified domain names (FQDN), and multitenant back-ends like Azure App Service. In this example, you create an empty backend pool with your application gateway and then later add backend targets to the backend pool.
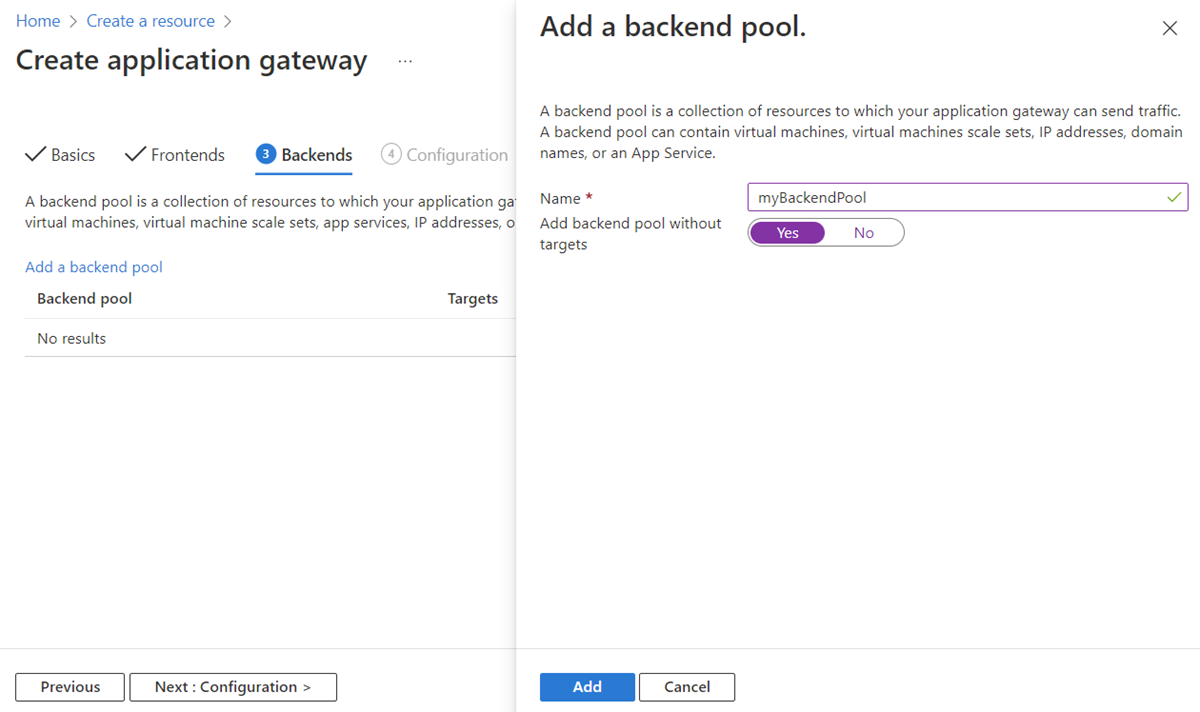
On the Backends tab, select Add a backend pool.
In the Add a backend pool window that opens, enter the following values to create an empty backend pool:
- Name: Enter myBackendPool for the name of the backend pool.
- Add backend pool without targets: Select Yes to create a backend pool with no targets. You'll add backend targets after creating the application gateway.
In the Add a backend pool window, select Add to save the backend pool configuration and return to the Backends tab.
On the Backends tab, select Next: Configuration.
Configuration tab
On the Configuration tab, you connect the frontend and backend pool you created using a routing rule.
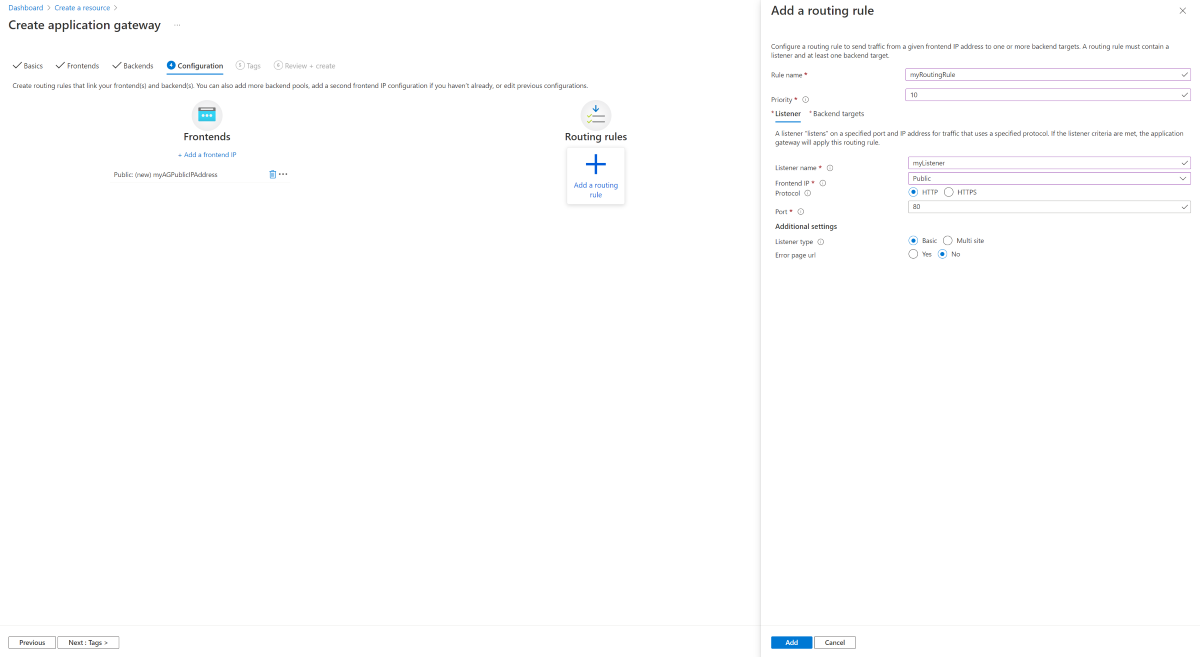
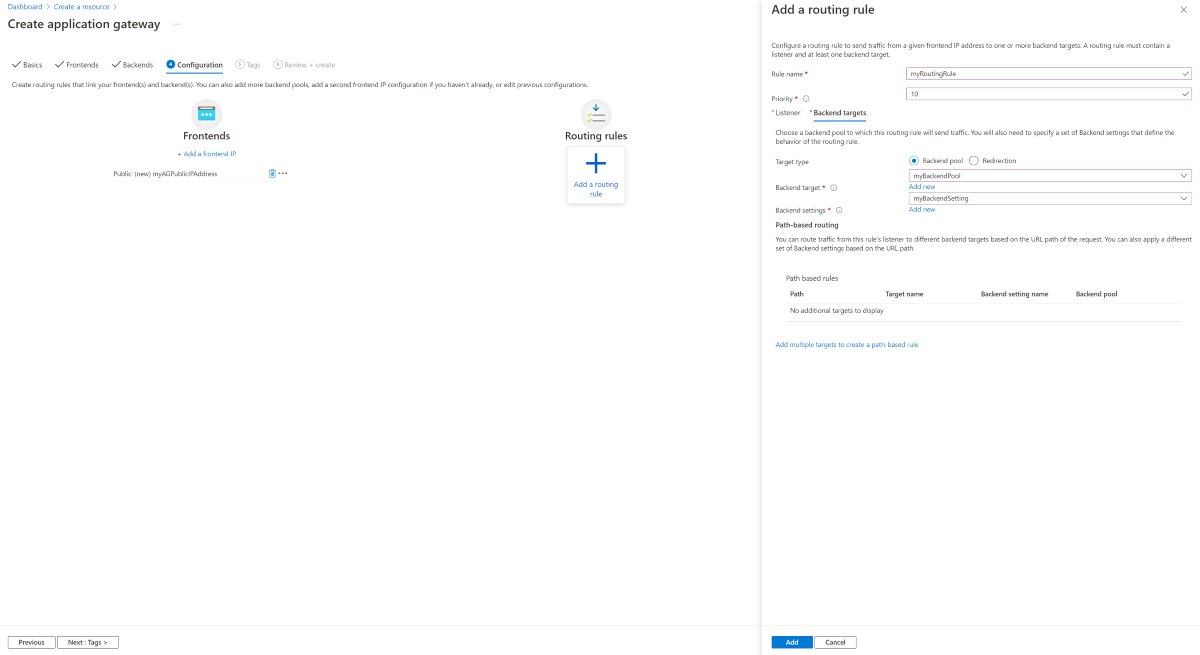
Select Add a routing rule in the Routing rules column.
In the Add a routing rule window that opens, enter myRoutingRule for the Rule name.
For Priority, type a priority number.
A routing rule requires a listener. On the Listener tab within the Add a routing rule window, enter the following values for the listener:
Listener name: Enter myListener for the name of the listener.
Frontend IP Protocol: Select Public IPv4 to choose the public IP you created for the frontend.
Accept the default values for the other settings on the Listener tab, then select the Backend targets tab to configure the rest of the routing rule.
On the Backend targets tab, select myBackendPool for the Backend target.
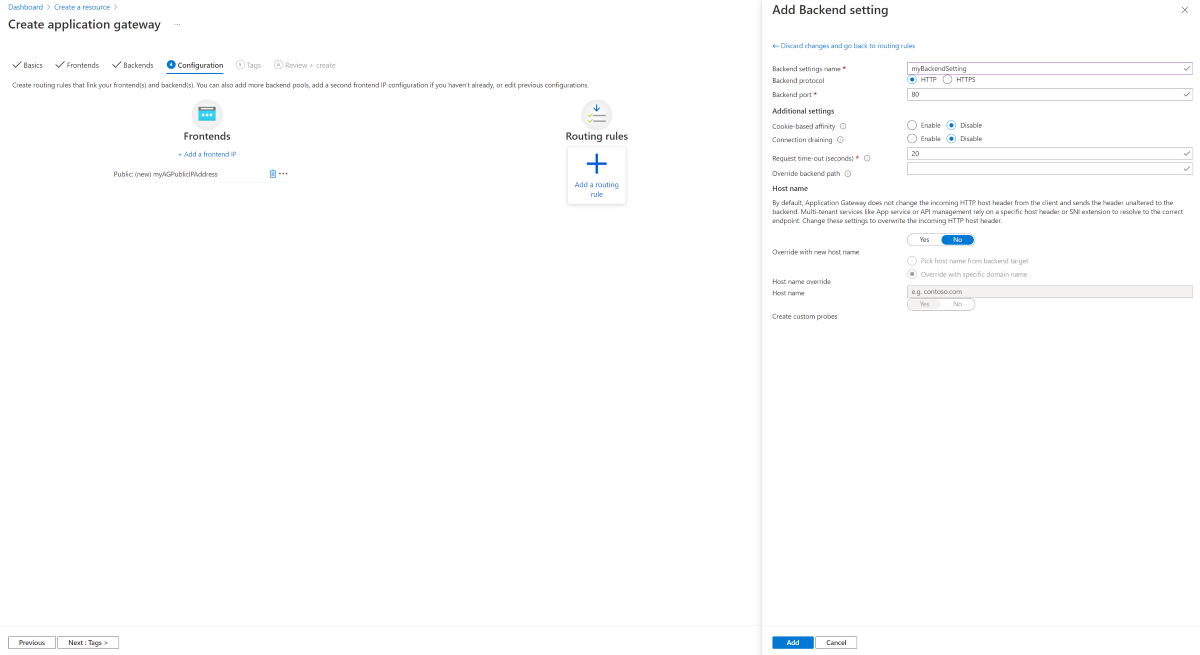
For the Backend settings, select Add new to create a new Backend setting. This setting determines the behavior of the routing rule. In the Add Backend setting window that opens, enter myBackendSetting for the Backend settings name. Accept the default values for the other settings in the window, then select Add to return to the Add a routing rule window.
On the Add a routing rule window, select Add to save the routing rule and return to the Configuration tab.
Select Next: Tags and then Next: Review + create.
Review + create tab
Review the settings on the Review + create tab, and then select Create to create the virtual network, the public IP address, and the application gateway. It might take several minutes for Azure to create the application gateway.
Wait until the deployment finishes successfully before moving on to the next section.
Add the backend server subnet
- Open the myVNet virtual network.
- Under Settings, select Subnets.
- Select + Subnet.
- For Name, type myBackendSubnet.
- For Starting address, type 10.0.1.0.
- Select Add to add the subnet.
Add backend targets
In this example, you use virtual machines as the target backend. You can either use existing virtual machines or create new ones. You create two virtual machines that Azure uses as backend servers for the application gateway.
To do this, you'll:
- Create two new Linux VMs, myVM and myVM2, to be used as backend servers.
- Install NGINX on the virtual machines to verify that the application gateway was created successfully.
- Add the backend servers to the backend pool.
Create a virtual machine
On the Azure portal, select Create a resource. The Create a resource window appears.
Under Virtual machine, select Create.
Enter these values in the Basics tab for the following virtual machine settings:
- Resource group: Select myResourceGroupAG for the resource group name.
- Virtual machine name: Enter myVM for the name of the virtual machine.
- Image: Ubuntu Server 20.04 LTS - Gen2.
- Authentication type: Password
- Username: Enter a name for the administrator username.
- Password: Enter a password for the administrator password.
- Public inbound ports: Select None.
Accept the other defaults and then select Next: Disks.
Accept the Disks tab defaults and then select Next: Networking.
On the Networking tab, verify that myVNet is selected for the Virtual network and the Subnet is set to myBackendSubnet.
For Public IP, select None.
Accept the other defaults and then select Next: Management.
Select Next: Monitoring, set Boot diagnostics to Disable. Accept the other defaults and then select Review + create.
On the Review + create tab, review the settings, correct any validation errors, and then select Create.
Wait for the virtual machine creation to complete before continuing.
Install NGINX for testing
In this example, you install NGINX on the virtual machines only to verify Azure created the application gateway successfully.
Open a Bash Cloud Shell. To do so, select the Cloud Shell icon from the top navigation bar of the Azure portal and then select Bash from the drop-down list.
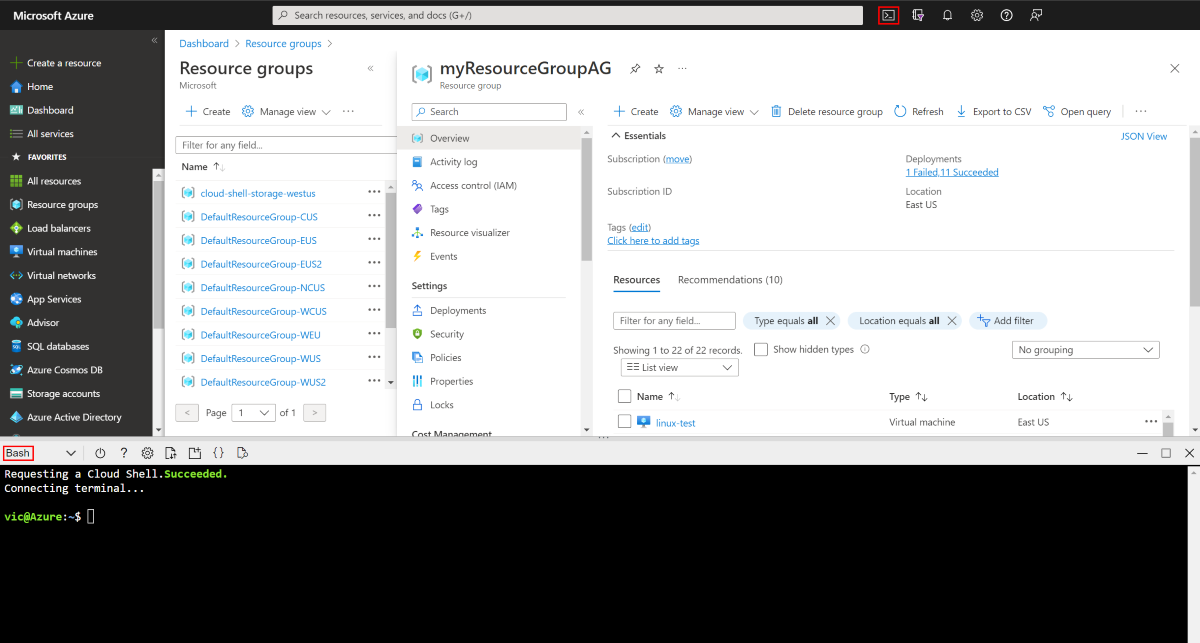
Ensure your bash session is set for your subscription:
az account set --subscription "<your subscription name>"Run the following command to install NGINX on the virtual machine:
 az vm extension set \
 --publisher Microsoft.Azure.Extensions \
 --version 2.0 \
 --name CustomScript \
 --resource-group myResourceGroupAG \
 --vm-name myVM \
 --settings '{ "fileUris": ["https://raw.githubusercontent.com/Azure/azure-docs-powershell-samples/master/application-gateway/iis/install_nginx.sh"], "commandToExecute": "./install_nginx.sh" }'
Create a second virtual machine and install NGINX using these steps that you previously completed. Use myVM2 for the virtual machine name and for the
--vm-namesetting of the cmdlet.
Add backend servers to backend pool
Select All resources, and then select myAppGateway.
Select Backend pools from the left menu.
Select myBackendPool.
Under Target type, select Virtual machine from the drop-down list.
Under Target, select the associated network interface for myVM from the drop-down list.
Repeat for myVM2.
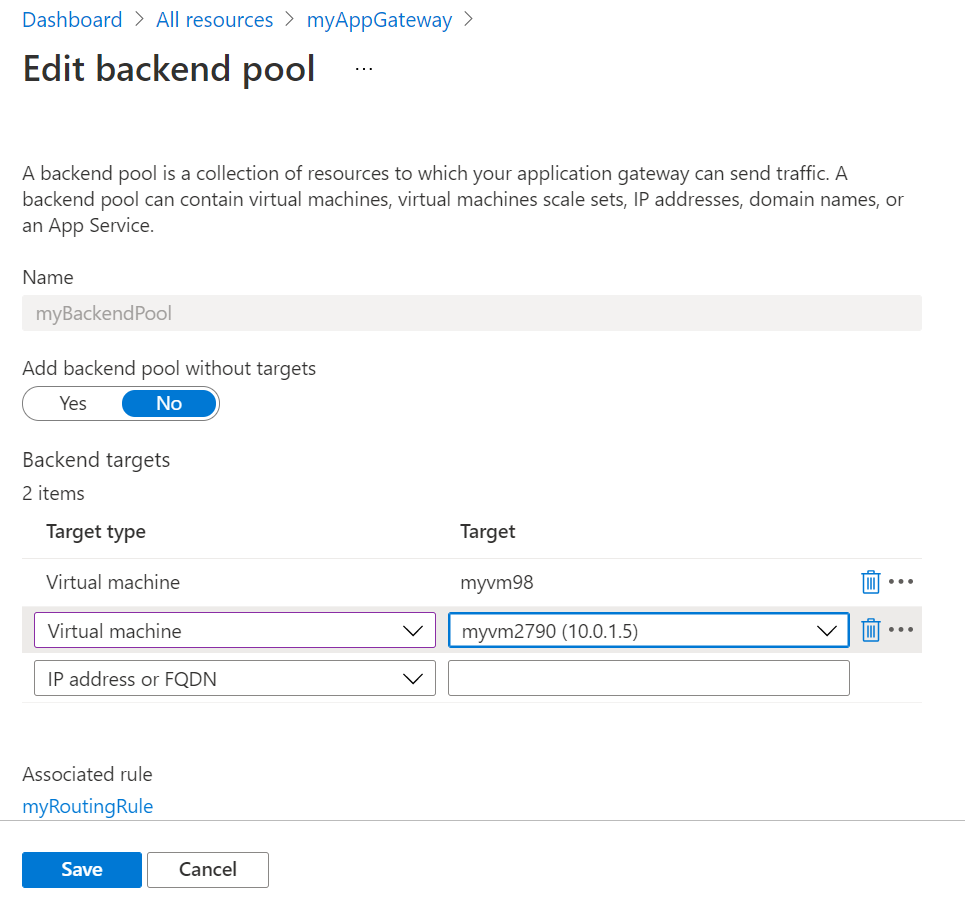
Select Save.
Wait for the deployment to complete before proceeding to the next step.
Test the application gateway
Although NGINX isn't required to create the application gateway, you installed it to verify whether Azure successfully created the application gateway. Use the web service to test the application gateway:
Find the public IP address for the application gateway on its Overview page.

Or, you can select All resources, enter myAGPublicIPAddress in the search box, and then select it in the search results. Azure displays the public IP address on the Overview page.
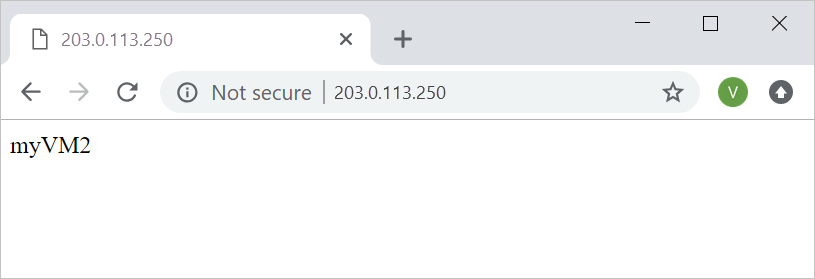
Copy the public IP address, and then paste it into the address bar of your browser.
Check the response. A valid response verifies that the application gateway was successfully created and it can successfully connect with the backend.
Clean up resources
When you no longer need the resources that you created with the application gateway, remove the resource group. By removing the resource group, you also remove the application gateway and all its related resources.
To remove the resource group:
- On the left menu of the Azure portal, select Resource groups.
- On the Resource groups page, search for myResourceGroupAG in the list, then select it.
- On the Resource group page, select Delete resource group.
- Enter myResourceGroupAG for TYPE THE RESOURCE GROUP NAME and then select Delete.
