How to migrate your classic storage accounts to Azure Resource Manager
Microsoft will retire classic storage accounts on August 31, 2024. To preserve the data in any classic storage accounts, you must migrate them to the Azure Resource Manager deployment model by that date. After you migrate your account, all of the benefits of the Azure Resource Manager deployment model will be available for that account. For more information about the deployment models, see Resource Manager and classic deployment.
This article describes how to migrate your classic storage accounts to the Azure Resource Manager deployment model. For more information, see Migrate your classic storage accounts to Azure Resource Manager by August 31, 2024.
Overview of the migration process
Before you get started with the migration, read Understand storage account migration from the classic deployment model to Azure Resource Manager for an overview of the process.
To migrate your classic storage accounts, you should:
- Identify classic storage accounts in your subscription.
- Locate and delete any disk artifacts in classic accounts.
- Migrate your classic storage accounts.
- Update your applications to use Azure Resource Manager APIs.
Identify classic storage accounts in your subscription
To list classic storage accounts in your subscription with the Azure portal:
Locate and delete any disk artifacts in a classic account
Classic storage accounts may contain classic (unmanaged) disks, virtual machine images, and operating system (OS) images. To migrate the account, you will need to delete these artifacts first.
Important
If you do not delete classic disk artifacts first, the migration may fail.
To learn about migrating unmanaged disks to managed disks, see Migrating unmanaged disks to managed disks.
To delete disk artifacts from the Azure portal, follow these steps:
Navigate to the Azure portal.
In the Search bar at the top, search for Disks (classic), OS Images (classic), or VM Images (classic) to display classic disk artifacts.
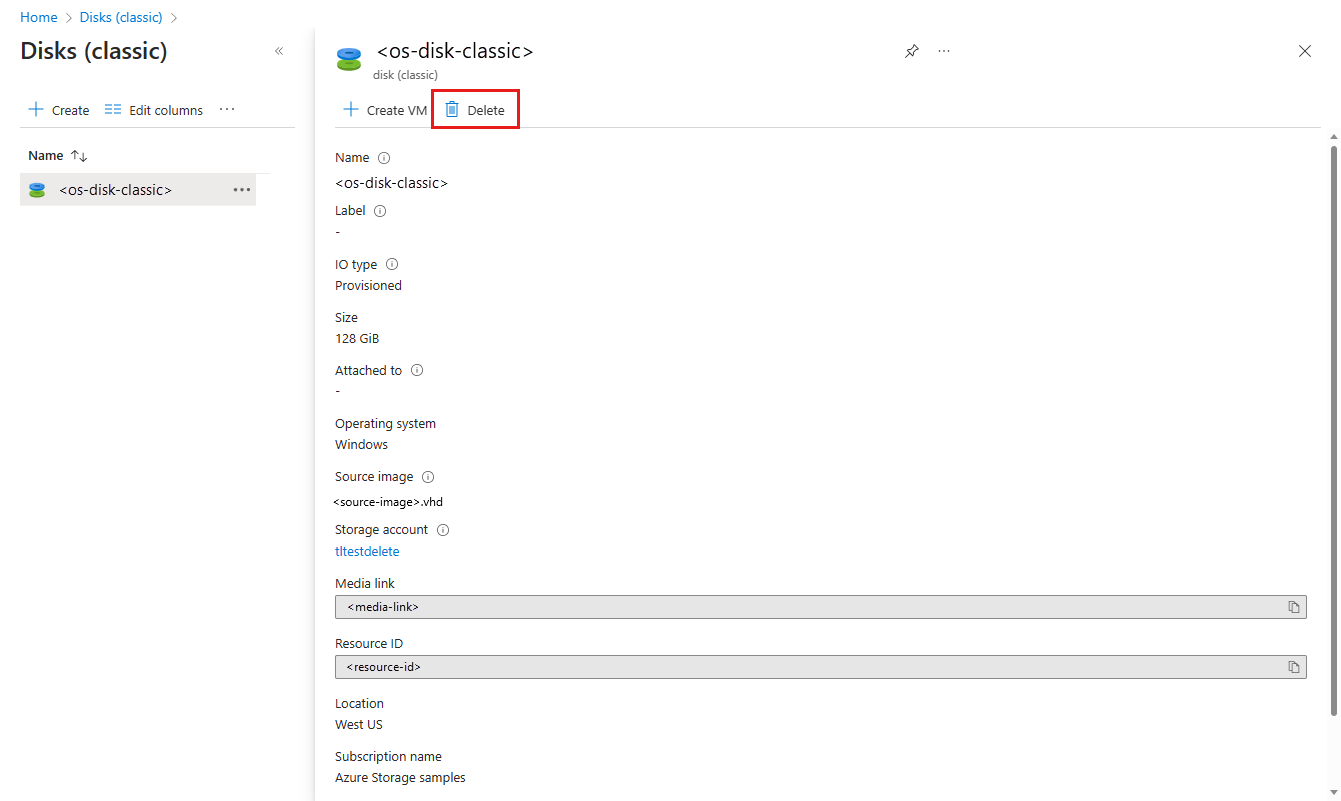
Locate the classic disk artifact to delete, and select it to view its properties.
Select the Delete button to delete the disk artifact.
For more information about errors that may occur when deleting disk artifacts and how to address them, see Troubleshoot errors when you delete Azure classic storage accounts, containers, or VHDs.
Migrate a classic storage account
The process of migrating a classic storage account involves four steps:
Validate. During the Validation phase, Azure checks the storage account to ensure that it can be migrated.
Prepare. In the Prepare phase, Azure creates a new general-purpose v1 storage account and alerts you to any problems that may have occurred. The new account is created in a new resource group in the same region as your classic account.
At this point, your classic storage account still exists. If there are any problems reported, you can correct them or abort the process.
Check manually. It's a good idea to make a manual check of the new storage account to make sure that the output is as you expect.
Commit or abort. If you're satisfied that the migration has been successful, then you can commit the migration. Committing the migration permanently deletes the classic storage account.
If there are any problems with the migration, then you can abort the migration at this point. If you choose to abort, the new resource group and new storage account are deleted. Your classic account remains available. You can address any problems and attempt the migration again.
For more information about the migration process, see Understand storage account migration from the classic deployment model to Azure Resource Manager
Note
Accounts left in a Prepare migration state more 30 days may have their migrations committed on your behalf. If you need more than 30 days to validate your migration to Azure Resource Manager, you can abort the current migration and restart it when you are ready.
Important
After migrating your classic resources to Azure Resource Manager within your subscription, ensure that all Classic Admin role assignments are converted to the Owner role in Azure RBAC. Without an assigned Owner, your subscription may become orphaned. For detailed guidance, refer to Azure classic subscription administrators.
You can migrate a classic storage account to the Azure Resource Manager deployment model with the Azure portal or PowerShell.
To migrate a classic storage account to the Azure Resource Manager deployment model with the Azure portal:
Navigate to your classic storage account in the Azure portal.
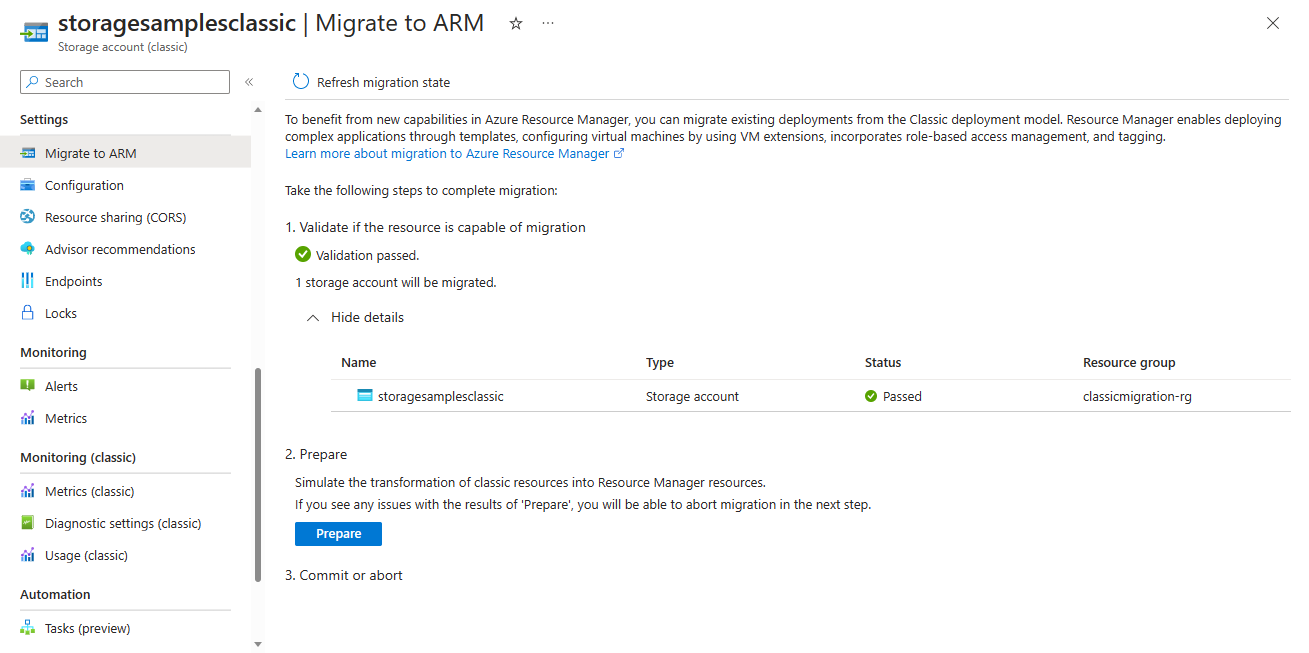
In the Settings section, select Migrate to ARM.
Select Validate to determine migration feasibility.
After a successful validation, select Prepare button to simulate the migration.
If the Prepare step completes successfully, you'll see a link to the new resource group. Select that link to navigate to the new resource group. The migrated storage account appears under the Resources tab in the Overview page for the new resource group.
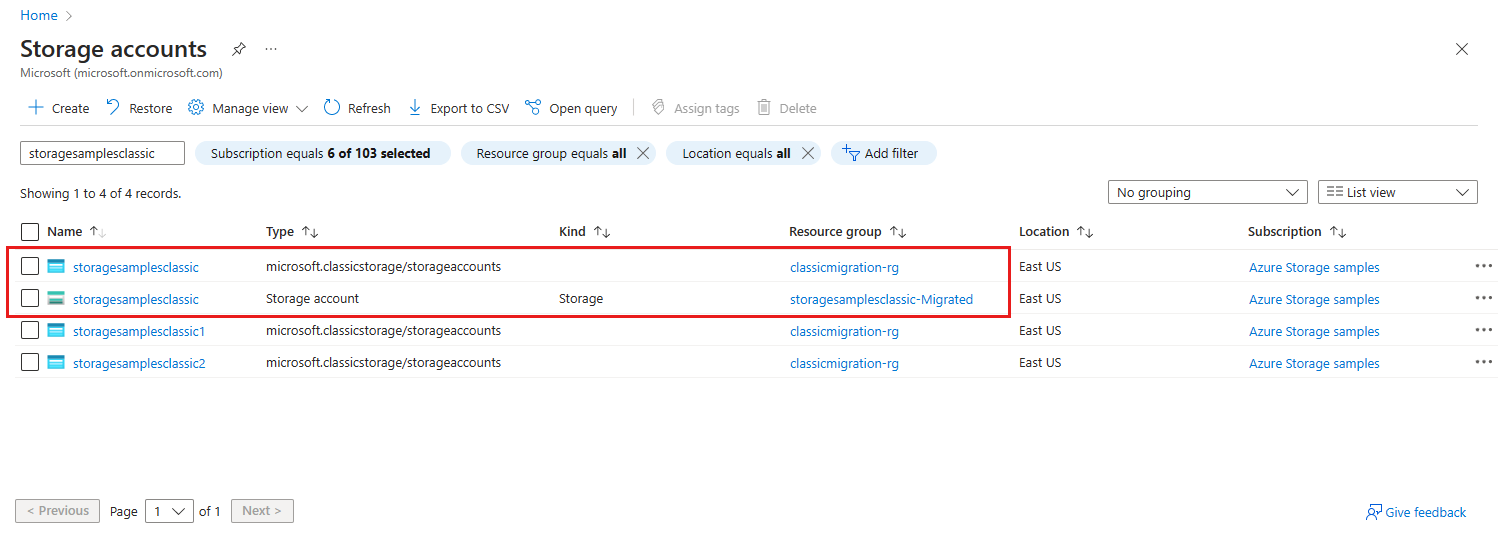
At this point, you can compare the configuration and data in the classic storage account to the newly migrated storage account. You'll see both in the list of storage accounts in the portal. Both the classic account and the migrated account have the same name.
If you're not satisfied with the results of the migration, select Abort to delete the new storage account and resource group. You can then address any problems and try again.
When you're ready to commit, type yes to confirm, then select Commit to complete the migration.
Important
There may be a delay of a few minutes after validation is complete before the Prepare button is enabled.
Update your applications to use Azure Resource Manager APIs
After you migrate your classic storage account to Azure Resource Manager, you must update your applications and scripts to use Azure Resource Manager APIs. The Azure Storage resource provider is the implementation of Azure Resource Manager for Azure Storage.
Azure Storage provides SDKs for convenience in calling the Azure Storage resource provider APIs:
- Management client library for .NET
- Management client library for Java
- Management client library for JavaScript
- Management client library for Python
You can also use the latest versions of Azure PowerShell and Azure CLI to manage your migrated storage accounts:
To learn more about resource providers in Azure Resource Manager, see Resource providers and resource types.


