Map an existing custom domain to Azure Spring Apps
Note
The Basic, Standard, and Enterprise plans will be deprecated starting from mid-March, 2025, with a 3 year retirement period. We recommend transitioning to Azure Container Apps. For more information, see the Azure Spring Apps retirement announcement.
The Standard consumption and dedicated plan will be deprecated starting September 30, 2024, with a complete shutdown after six months. We recommend transitioning to Azure Container Apps. For more information, see Migrate Azure Spring Apps Standard consumption and dedicated plan to Azure Container Apps.
This article applies to: ✅ Java ✅ C#
This article applies to: ✅ Standard ✅ Enterprise
Domain Name Service (DNS) is a technique for storing network node names throughout a network. This article maps a domain, such as www.contoso.com, using a CNAME record. It secures the custom domain with a certificate and shows how to enforce Transport Layer Security (TLS), also known as Secure Sockets Layer (SSL).
Certificates encrypt web traffic. These TLS/SSL certificates can be stored in Azure Key Vault.
Prerequisites
- An Azure subscription. If you don't have a subscription, create a free account before you begin.
- (Optional) Azure CLI version 2.45.0 or higher. Use the following command to install the Azure Spring Apps extension:
az extension add --name spring - An application deployed to Azure Spring Apps (see Quickstart: Launch an existing application in Azure Spring Apps using the Azure portal, or use an existing app). If your application is deployed using the Basic plan, be sure to upgrade to the Standard plan.
- A domain name with access to the DNS registry for a domain provider, such as GoDaddy.
- A private certificate (that is, your self-signed certificate) from a third-party provider. The certificate must match the domain.
- A deployed instance of Azure Key Vault. For more information, see About Azure Key Vault.
Key Vault private link considerations
The IP addresses for Azure Spring Apps management aren't yet part of the Azure Trusted Microsoft services. Therefore, to enable Azure Spring Apps to load certificates from a Key Vault protected with private endpoint connections, you must add the following IP addresses to Azure Key Vault firewall:
20.99.204.11120.201.9.9720.74.97.552.235.25.3520.194.10.020.59.204.46104.214.186.8652.153.221.22252.160.137.3920.39.142.5620.199.190.22220.79.64.620.211.128.9652.149.104.14420.197.121.20940.119.175.7720.108.108.22102.133.143.3852.226.244.15020.84.171.16920.93.48.10820.75.4.4620.78.29.21320.106.86.3420.193.151.132
Import certificate
Prepare your certificate file in PFX (optional)
Azure Key Vault supports importing private certificate in PEM and PFX format. If the PEM file you obtained from your certificate provider doesn't work in the Save certificate in Key Vault section, follow the steps here to generate a PFX for Azure Key Vault.
Merge intermediate certificates
If your certificate authority gives you multiple certificates in the certificate chain, you need to merge the certificates in order.
To do this task, open each certificate you received in a text editor.
Create a file for the merged certificate, called mergedcertificate.crt. In a text editor, copy the content of each certificate into this file. The order of your certificates should follow the order in the certificate chain, beginning with your certificate and ending with the root certificate. It looks like the following example:
-----BEGIN CERTIFICATE-----
<your entire Base64 encoded SSL certificate>
-----END CERTIFICATE-----

-----BEGIN CERTIFICATE-----
<The entire Base64 encoded intermediate certificate 1>
-----END CERTIFICATE-----

-----BEGIN CERTIFICATE-----
<The entire Base64 encoded intermediate certificate 2>
-----END CERTIFICATE-----

-----BEGIN CERTIFICATE-----
<The entire Base64 encoded root certificate>
-----END CERTIFICATE-----
Export certificate to PFX
Export your merged TLS/SSL certificate with the private key that your certificate request was generated with.
If you generated your certificate request using OpenSSL, then you have created a private key file. To export your certificate to PFX, run the following command. Replace the placeholders <private-key-file> and <merged-certificate-file> with the paths to your private key and your merged certificate file.
openssl pkcs12 -export -out myserver.pfx -inkey <private-key-file> -in <merged-certificate-file>
When prompted, define an export password. Use this password when uploading your TLS/SSL certificate to Azure Key Vault later.
If you used IIS or Certreq.exe to generate your certificate request, install the certificate to your local machine, and then export the certificate to PFX.
Save certificate in Key Vault
The procedure to import a certificate requires the PEM or PFX encoded file to be on disk and you must have the private key.
Use the following steps to upload your certificate to key vault:
Go to your key vault instance.
In the navigation pane, select Certificates.
On the upper menu, select Generate/import.
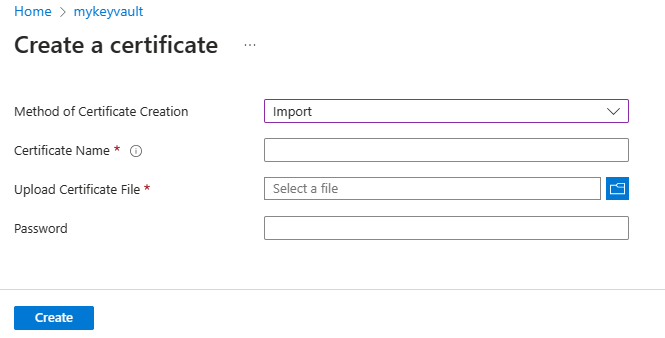
On the Create a certificate page, select Import for Method of Certificate Creation, and then provide a value for Certificate Name.
Under Upload Certificate File, navigate to certificate location and select it.
Under Password, if you're uploading a password protected certificate file, provide that password here. Otherwise, leave it blank. Once the certificate file is successfully imported, key vault removes that password.
Select Create.
Grant Azure Spring Apps access to your key vault
You need to grant Azure Spring Apps access to your key vault before you import the certificate.
Use the following steps to grant access using the Azure portal:
Go to your key vault instance.
In the navigation pane, select Access policies.
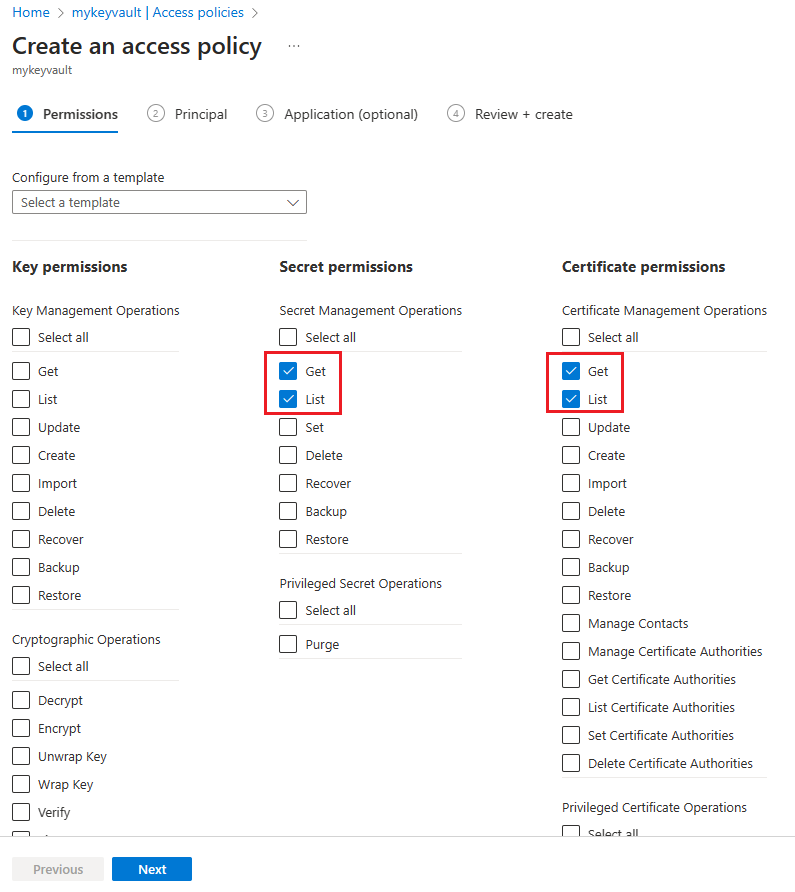
On the upper menu, select Create.
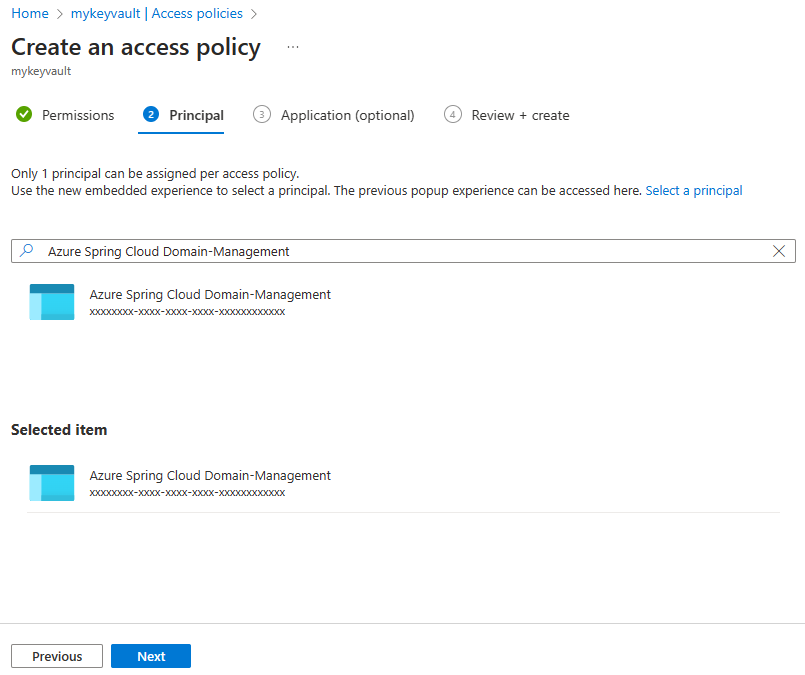
Fill in the info, and select Add button, then Create access police.
Secret permission Certificate permission Select principal Get, List Get, List Azure Spring Apps Domain-Management Note
If you don't find the "Azure Spring Apps Domain-Management", search for "Azure Spring Cloud Domain-Management".
Import certificate to Azure Spring Apps
Use the following steps to import a certificate:
Go to your Azure Spring Apps instance.
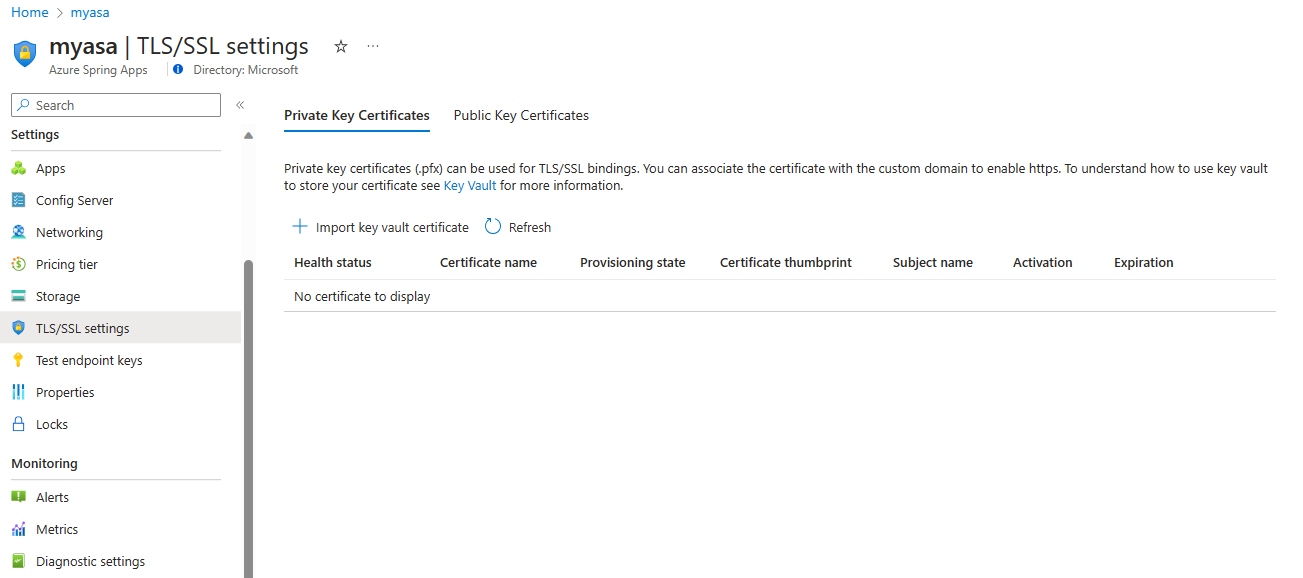
From the navigation pane, select TLS/SSL settings.
Select Import key vault certificate.
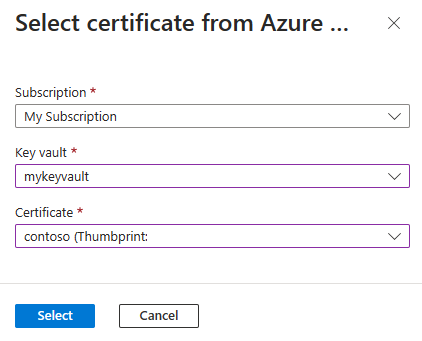
On the Select certificate from Azure page, select the Subscription, Key Vault, and Certificate from the drop-down options, and then choose Select.
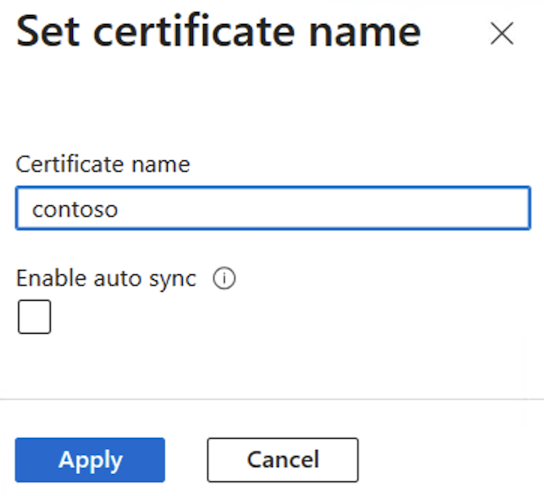
On the opened Set certificate name page, enter your certificate name, select Enable auto sync if needed, and then select Apply. For more information, see the Auto sync certificate section.
When you have successfully imported your certificate, it displays in the list of Private Key Certificates.

Important
To secure a custom domain with this certificate, be sure to bind the certificate to the specific domain. For more information, see the Add SSL binding section.
Auto sync certificate
A certificate stored in Azure Key Vault sometimes gets renewed before it expires. Similarly, your organization's security policies for certificate management might require your DevOps team to replace certificates with new ones regularly. After you enable auto sync for a certificate, Azure Spring Apps starts to sync your key vault for a new version regularly - usually every 24 hours. If a new version is available, Azure Spring Apps imports it, and then reloads it for various components using the certificate without causing any downtime. The following list shows the affected components and relevant scenarios:
- App
- Custom domain
- VMware Spring Cloud Gateway
- Custom domain
- API portal for VMware Tanzu
- Custom domain
- VMware Tanzu Application Accelerator
- Connecting to a Git repository with a self-signed certificate.
- Application Configuration Service for Tanzu
- Connecting to a Git repository with a self-signed certificate.
When Azure Spring Apps imports or reloads a certificate, an activity log is generated. To see the activity logs, navigate to your Azure Spring Apps instance in the Azure portal and select Activity log in the navigation pane.
Note
The certificate auto sync feature works with private certificates and public certificates imported from Azure Key Vault. This feature is unavailable for content certificates, which the customer uploads.
You can enable or disable the certificate auto sync feature when you import a certificate from your key vault to Azure Spring Apps. For more information, see the Import a certificate to Azure Spring Apps section.
You can also enable or disable this feature for a certificate that has already been imported to Azure Spring Apps.
Use the following steps to enable or disable auto sync for an imported certificate:
Add Custom Domain
You can use a CNAME record to map a custom DNS name to Azure Spring Apps.
Note
The A record isn't supported.
Create the CNAME record
Go to your DNS provider and add a CNAME record to map your domain to <service-name>.azuremicroservices.io. Here, <service-name> is the name of your Azure Spring Apps instance. We support wildcard domain and sub domain.
After you add the CNAME, the DNS records page resembles the following example:
Map your custom domain to Azure Spring Apps app
If you don't have an application in Azure Spring Apps, follow the instructions in Quickstart: Deploy your first application to Azure Spring Apps.
Use the following steps to bind a custom domain with the app:
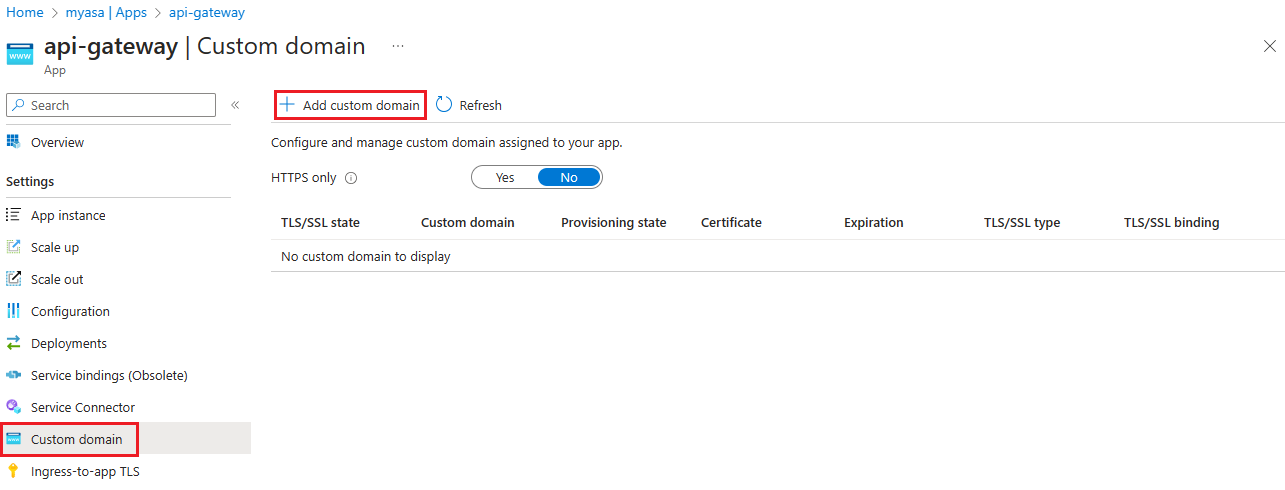
Go to the application page.
Select Custom Domain.
Select Add Custom Domain.
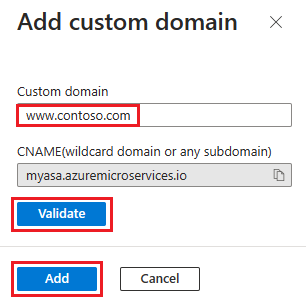
Type the fully qualified domain name for which you added a CNAME record, such as
www.contoso.com. Make sure that Hostname record type is set to CNAME -<service-name>.azuremicroservices.io.Select Validate to enable the Add button.
Select Add.
One app can have multiple domains, but one domain can only map to one app. When you successfully mapped your custom domain to the app, it displays on the custom domain table.
Note
A Not Secure label for your custom domain means that it's not yet bound to an SSL certificate. Any HTTPS request from a browser to your custom domain receives an error or warning.
Add SSL binding
Use the following steps to update a custom domain of the app:
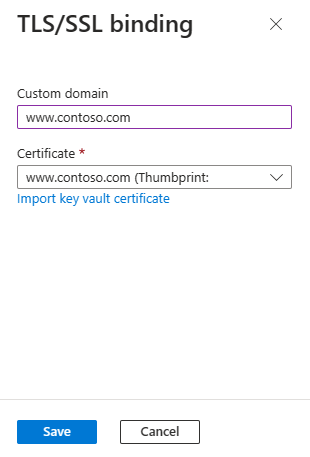
In the custom domain table, select Add ssl binding as shown in the previous figure.
Select your Certificate or import it.
Select Save.
After you successfully add SSL binding, the domain state is secure: Healthy.
Enforce HTTPS
By default, anyone can still access your app using HTTP, but you can redirect all HTTP requests to the HTTPS port.
In your app page, in the navigation, select Custom Domain. Then, set HTTPS Only to Yes.

When the operation is complete, navigate to any of the HTTPS URLs that point to your app. Note that HTTP URLs don't work.
