Set up disaster recovery to Azure for on-premises physical servers
The Azure Site Recovery service contributes to your disaster recovery strategy by managing and orchestrating replication, failover, and failback of on-premises machines, and Azure virtual machines (VMs).
This tutorial shows how to set up disaster recovery of on-premises physical Windows and Linux servers to Azure. In this tutorial, you learn how to:
- Create a Recovery Services vault for Site Recovery
- Create a replication policy
- Enable replication for a server
Prerequisites
To complete this tutorial:
- Make sure you understand the architecture and components for this scenario.
- Review the support requirements for all components.
- Make sure that the servers you want to replicate comply with Azure VM requirements.
- Prepare Azure. You need an Azure subscription, an Azure virtual network, and a storage account.
- Prepare an account for automatic installation of the Mobility service on each server you want to replicate.
Before you begin, note that:
- After failover to Azure, physical servers can't be failed back to on-premises physical machines. You can only fail back to VMware VMs.
- This tutorial sets up physical server disaster recovery to Azure with the simplest settings. If you want to learn about other options, read through our How To guides:
- Set up the replication source, including the Site Recovery configuration server.
- Set up the replication target.
- Configure a replication policy, and enable replication.
Set up an Azure account
Get a Microsoft Azure account.
- You can start with a free trial.
- Learn about Site Recovery pricing, and get pricing details.
- Find out which regions are supported for Site Recovery.
Verify Azure account permissions
Make sure your Azure account has permissions for replication of VMs to Azure.
- Review the permissions you need to replicate machines to Azure.
- Verify and modify Azure role-based access control (Azure RBAC) permissions.
Set up an Azure network
Set up an Azure network.
- Azure VMs are placed in this network when they're created after failover.
- The network should be in the same region as the Recovery Services vault
Set up an Azure storage account
Set up an Azure storage account.
- Site Recovery replicates on-premises machines to Azure storage. Azure VMs are created from the storage after failover occurs.
- The storage account must be in the same region as the Recovery Services vault.
Prepare an account for Mobility service installation
The Mobility service must be installed on each server you want to replicate. Site Recovery installs this service automatically when you enable replication for the server. To install automatically, you need to use the root/admin account that Site Recovery will utilize to access the server.
- You can use a domain or local account for Windows VMs
- For Windows VMs, if you're not using a domain account, disable Remote User Access control on the local machine. To do this, in the register under HKEY_LOCAL_MACHINE\SOFTWARE\Microsoft\Windows\CurrentVersion\Policies\System, add the DWORD entry LocalAccountTokenFilterPolicy, with a value of 1.
- To add the registry entry to disable the setting from a CLI, type:
REG ADD HKEY_LOCAL_MACHINE\SOFTWARE\Microsoft\Windows\CurrentVersion\Policies\System /v LocalAccountTokenFilterPolicy /t REG_DWORD /d 1. - For Linux, the account should be root on the source Linux server.
Create a vault
Sign in to the Azure portal.
In the Marketplace search for Backup and Site Recovery
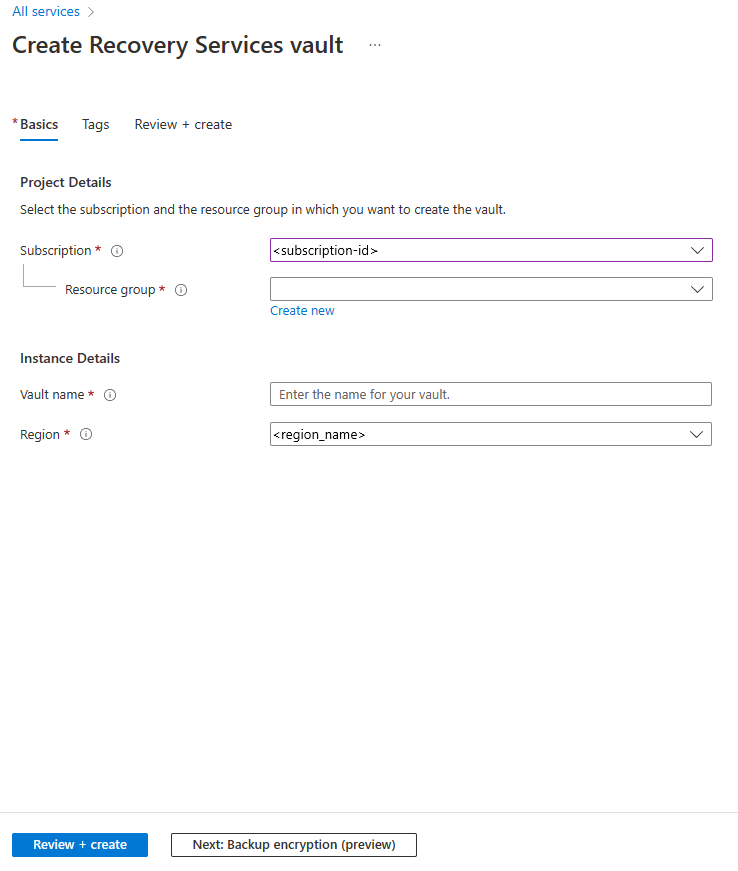
In the Create Recovery Services vault page, do the following:
- Under Subscription, select the appropriate subscription name.
- Create a resource group, or select an existing one.
- Under Vault name, specify a friendly name to identify the vault.
- Under Region, specify an Azure region.
- Select Review + create to finish.
To quickly access the vault from the dashboard, click Pin to dashboard > Create.
The new vault will appear on the Dashboard > All resources, and on the main Recovery Services vaults page.
Prepare infrastructure
it's important to prepare the infrastructure before you set up disaster recovery of physical VMware machines to Azure.
Deployment planning
- In the Azure portal, go to Recovery Services vaults and select the vault.
- On the vault home page, select Enable Site Recovery.
- Navigate to the bottom of the page, and select Prepare infrastructure under the VMware machines to Azure section. This opens the Prepare infrastructure pane.
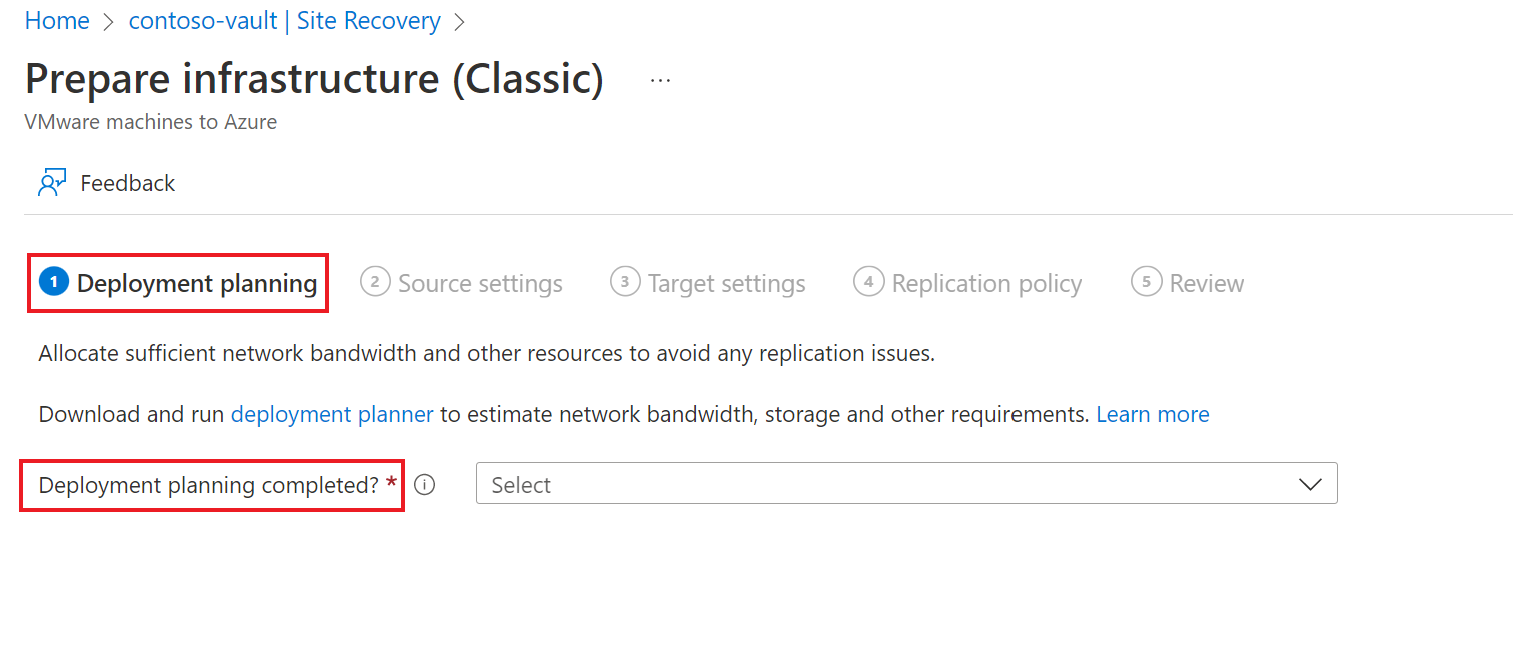
In the Prepare infrastructure pane, under Deployment planning tab do the following:
Tip
If you're planning a large deployment, download the Deployment Planner for Hyper-V from the link on the page.
- For this tutorial, we don't need the Deployment Planner. In Deployment planning completed?, select I will do it later.
- Select Next.
Source settings
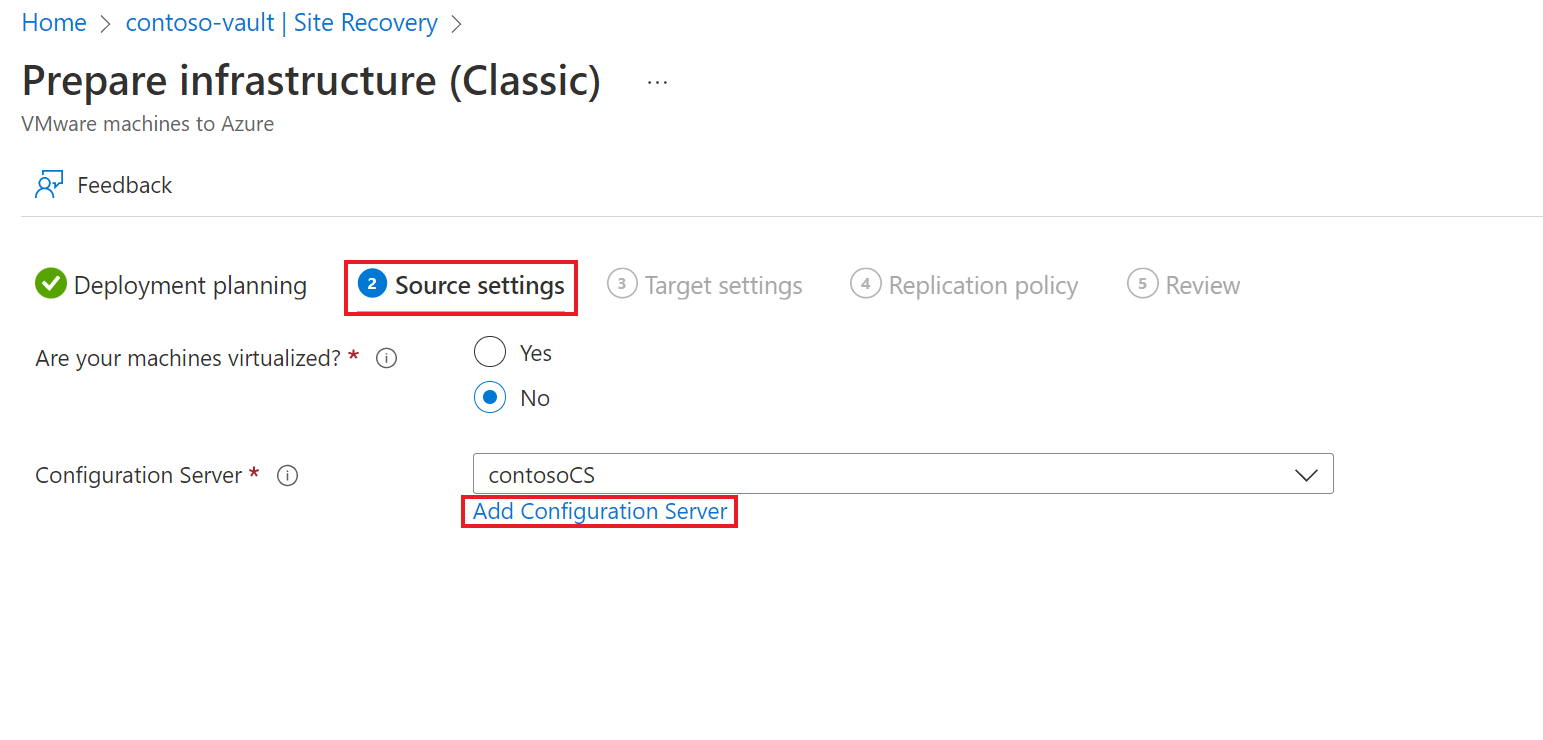
On the Source settings tab, do the following:
- Select if your machines are virtual or physical in the Are your machines virtualized? option. For this tutorial, select No.
- Under Configuration Server, specify the server you want to use. If you don't have a configuration server ready, you can use the Add Configuration Server option.
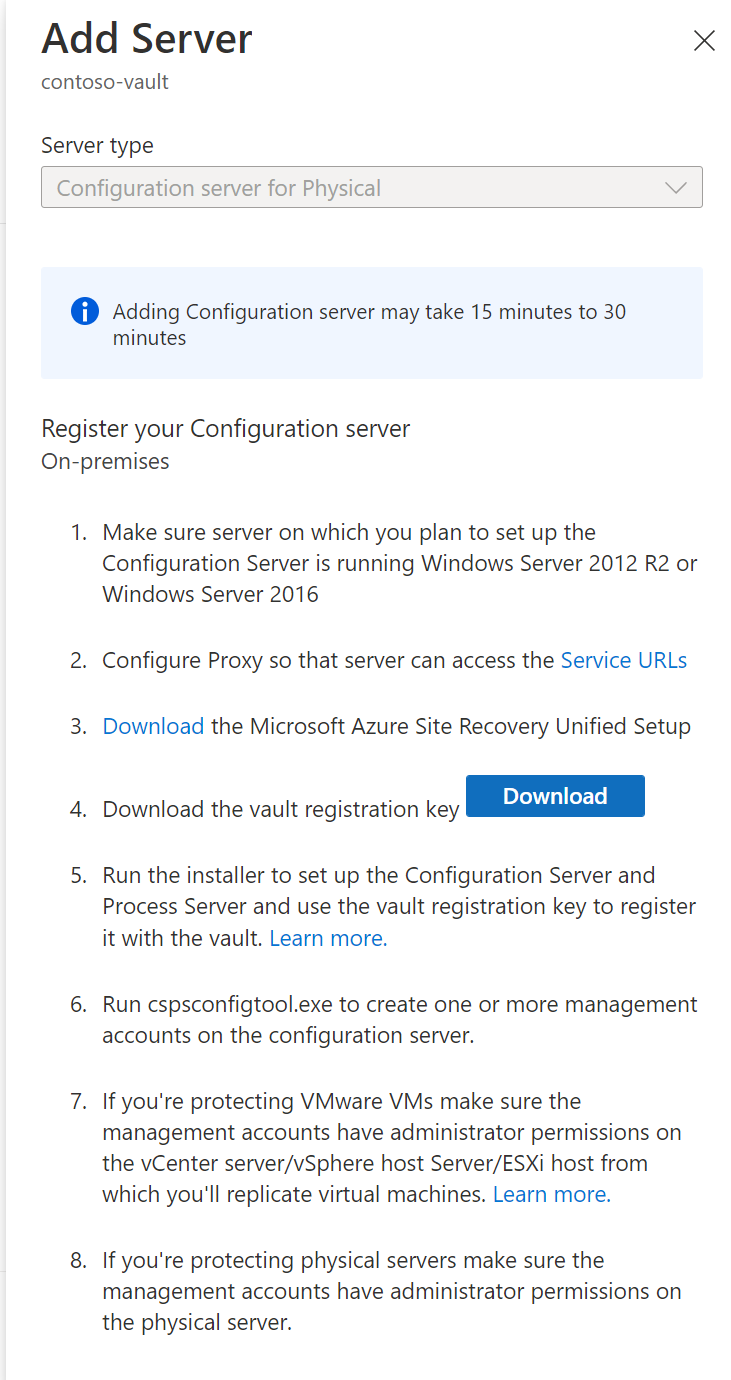
- On the Add Server pane, do the following:
- If you’re enabling protection for virtual machines, then download the Configuration server virtual machine template. Learn more.
- If you’re enabling protection for physical machines, then download the Site Recovery Unified Setup installation file. You will also need to download the vault registration key. You need it when you run Unified Setup. The key is valid for five days after you generate it. Learn more.
- Select Next.
Register the configuration server in the vault
Do the following before you start:
Verify time accuracy
On the configuration server machine, make sure that the system clock is synchronized with a Time Server. It should match. If it's 15 minutes in front or behind, setup might fail.
Verify connectivity
Make sure the machine can access these URLs based on your environment:
| Name | Commercial URL | Government URL | Description |
|---|---|---|---|
| Microsoft Entra ID | login.microsoftonline.com |
login.microsoftonline.us |
Used for access control and identity management. |
| Backup | *.backup.windowsazure.com |
*.backup.windowsazure.us |
Used for replication data transfer and coordination. |
| Replication | *.hypervrecoverymanager.windowsazure.com |
*.hypervrecoverymanager.windowsazure.us |
Used for replication management operations and coordination. |
| Storage | *.blob.core.windows.net |
*.blob.core.usgovcloudapi.net |
Used for access to the storage account that stores replicated data. |
| Telemetry (optional) | dc.services.visualstudio.com |
dc.services.visualstudio.com |
Used for telemetry. |
| Time synchronization | time.windows.com |
time.nist.gov |
Used to check time synchronization between system and global time in all deployments. |
IP address-based firewall rules should allow communication to all of the Azure URLs that are listed above over HTTPS (443) port. To simplify and limit the IP Ranges, it's recommended that URL filtering is done.
- Commercial IPs - Allow the Azure Datacenter IP Ranges, and the HTTPS (443) port. Allow IP address ranges for the Azure region of your subscription to support the Microsoft Entra ID, Backup, Replication, and Storage URLs.
- Government IPs - Allow the Azure Government Datacenter IP Ranges, and the HTTPS (443) port for all USGov Regions (Virginia, Texas, Arizona, and Iowa) to support Microsoft Entra ID, Backup, Replication, and Storage URLs.
Run setup
Run Unified Setup as a Local Administrator, to install the configuration server. The process server and the master target server are also installed by default on the configuration server.
Run the Unified Setup installation file.
In Before You Begin, select Install the configuration server and process server.
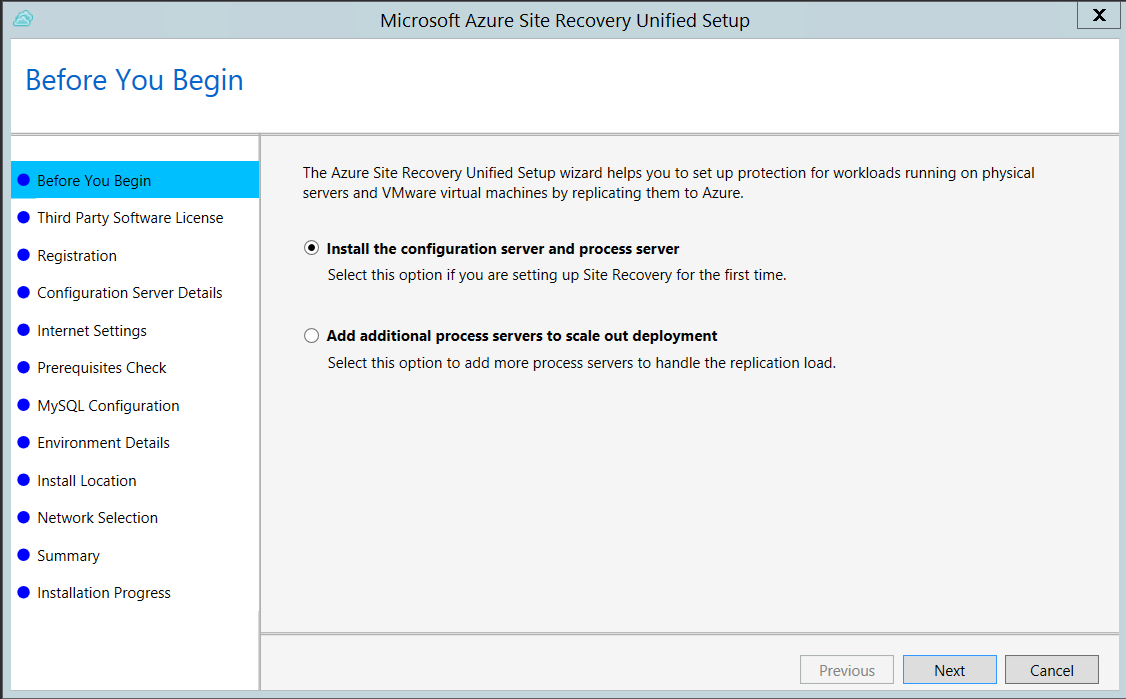
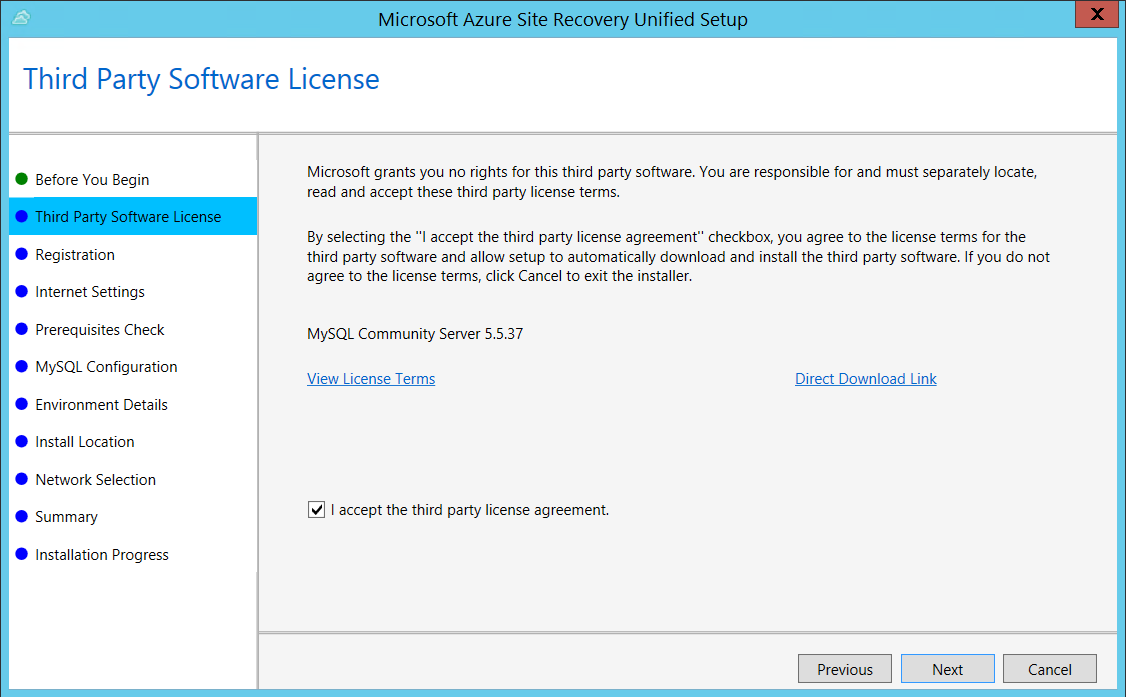
In Third Party Software License, click I Accept to download and install MySQL.
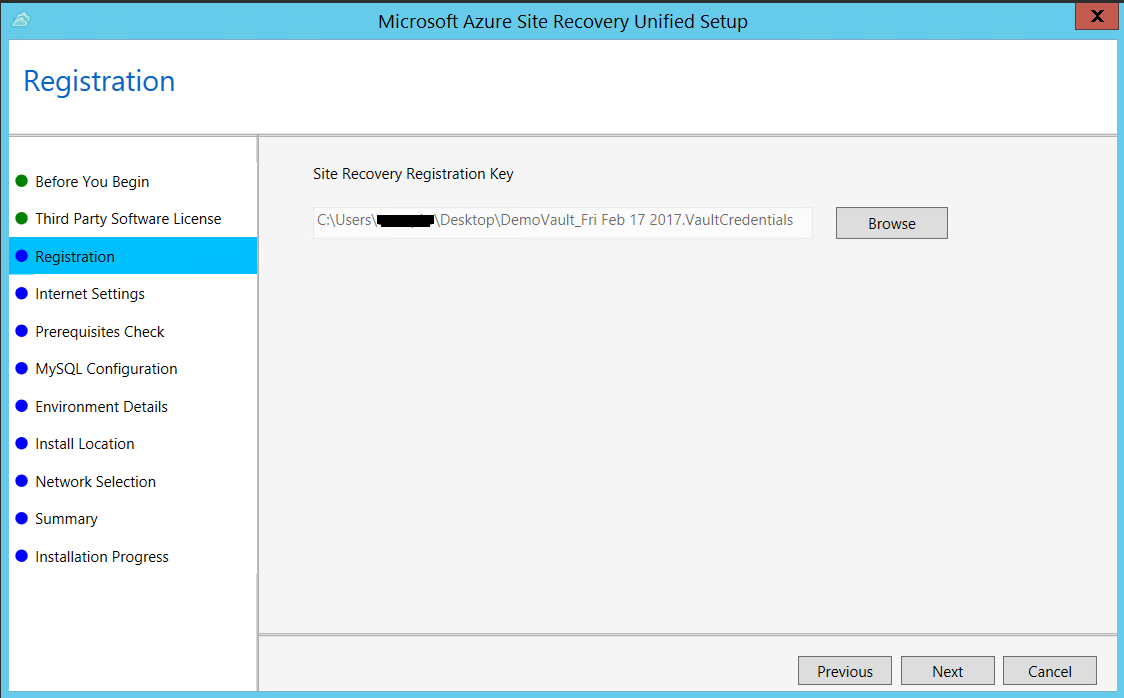
In Registration, select the registration key you downloaded from the vault.
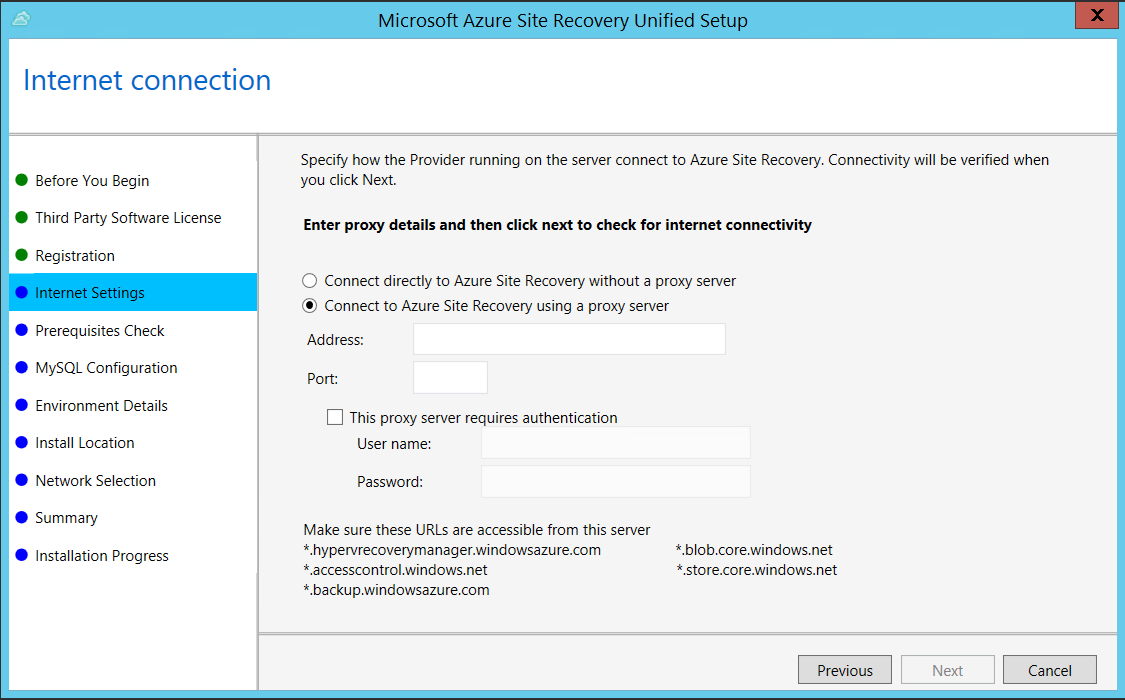
In Internet Settings, specify how the Provider running on the configuration server connects to Azure Site Recovery over the Internet. Make sure you've allowed the required URLs.
- If you want to connect with the proxy that's currently set up on the machine, select Connect to Azure Site Recovery using a proxy server.
- If you want the Provider to connect directly, select Connect directly to Azure Site Recovery without a proxy server.
- If the existing proxy requires authentication, or if you want to use a custom proxy for the Provider connection, select Connect with custom proxy settings, and specify the address, port, and credentials.
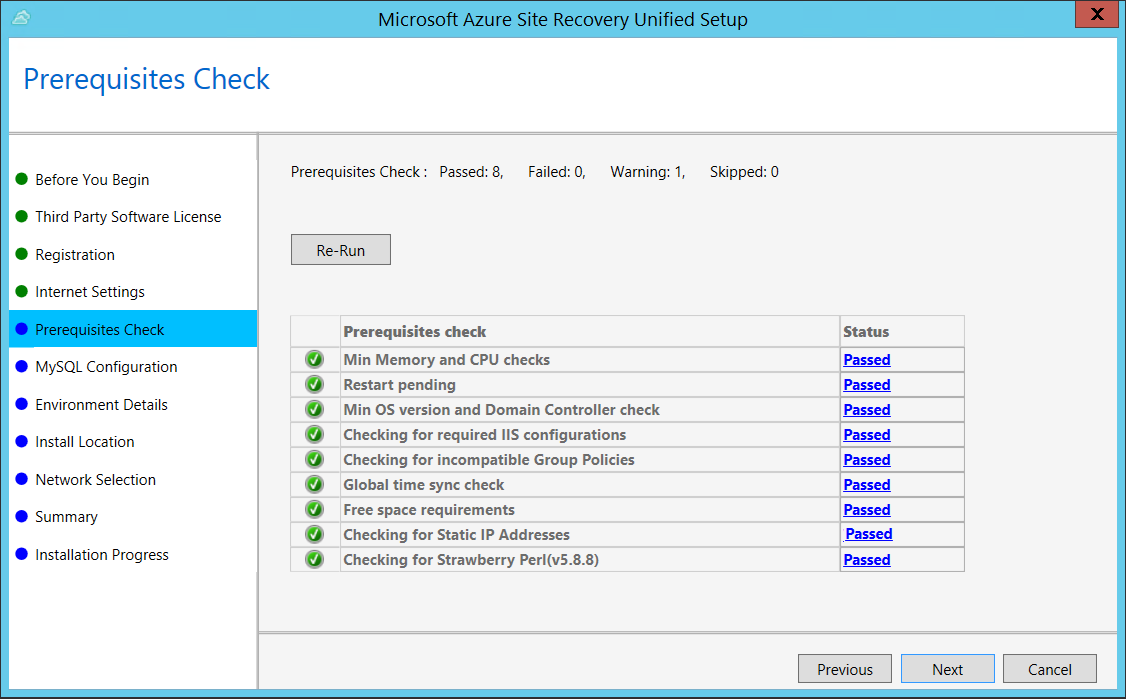
In Prerequisites Check, Setup runs a check to make sure that installation can run. If a warning appears about the Global time sync check, verify that the time on the system clock (Date and Time settings) is the same as the time zone.
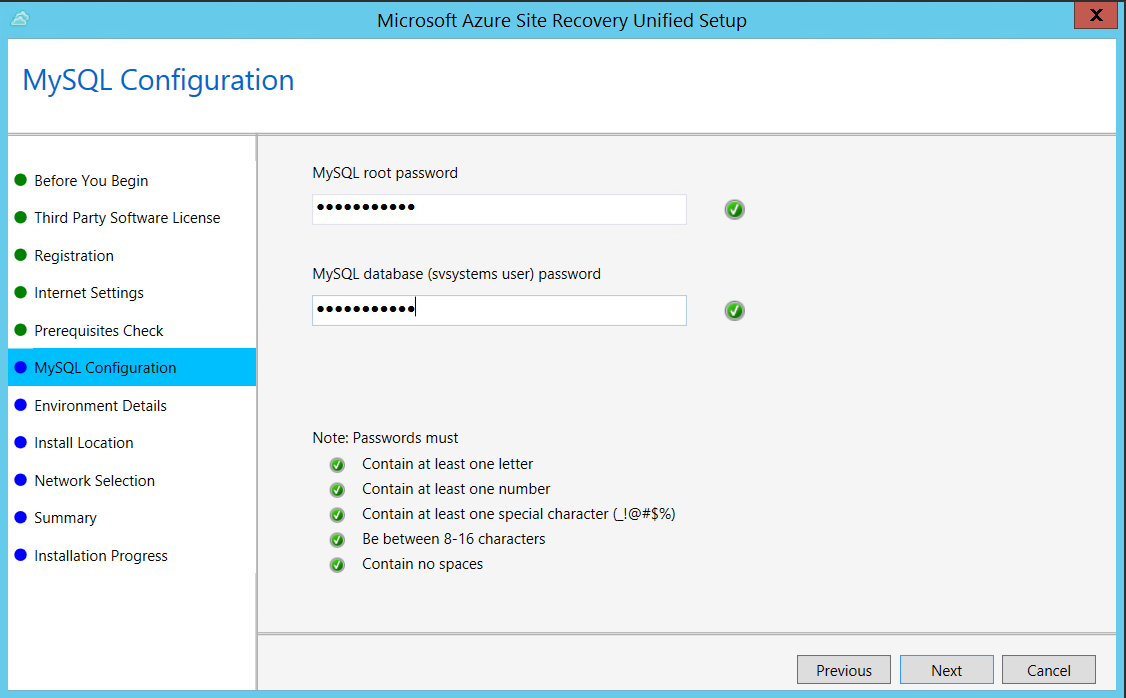
In MySQL Configuration, create credentials for logging on to the MySQL server instance that is installed.
In Environment Details, select No if you're replicating Azure Stack VMs or physical servers.
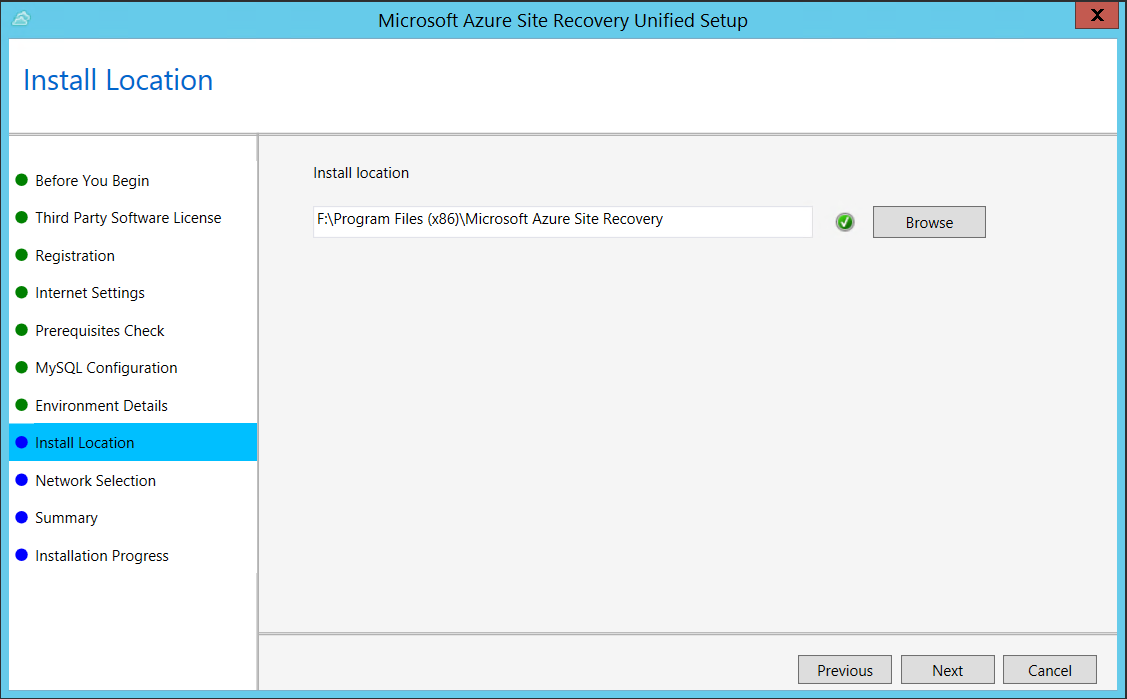
In Install Location, select where you want to install the binaries and store the cache. The drive you select must have at least 5 GB of disk space available, but we recommend a cache drive with at least 600 GB of free space.
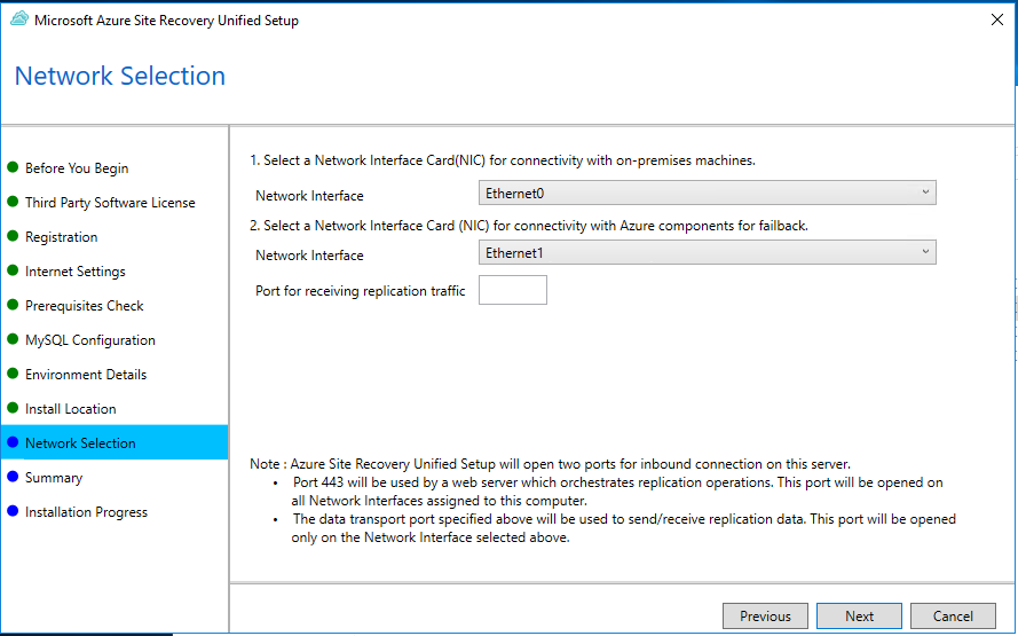
In Network Selection, first select the NIC that the in-built process server uses for discovery and push installation of mobility service on source machines, and then select the NIC that Configuration Server uses for connectivity with Azure. Port 9443 is the default port used for sending and receiving replication traffic, but you can modify this port number to suit your environment's requirements. In addition to the port 9443, we also open port 443, which is used by a web server to orchestrate replication operations. Do not use port 443 for sending or receiving replication traffic.
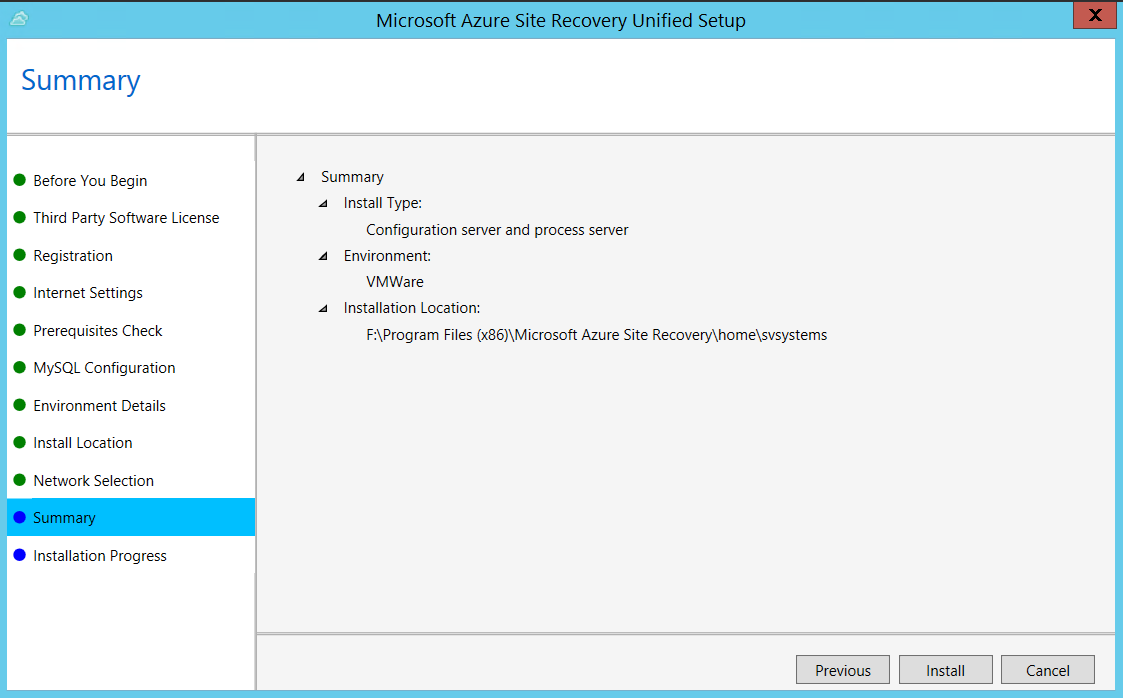
In Summary, review the information and click Install. When installation finishes, a passphrase is generated. You will need this when you enable replication, so copy it and keep it in a secure location.
After registration finishes, the server is displayed on the Settings > Servers blade in the vault.
Target settings
Select and verify target resources.
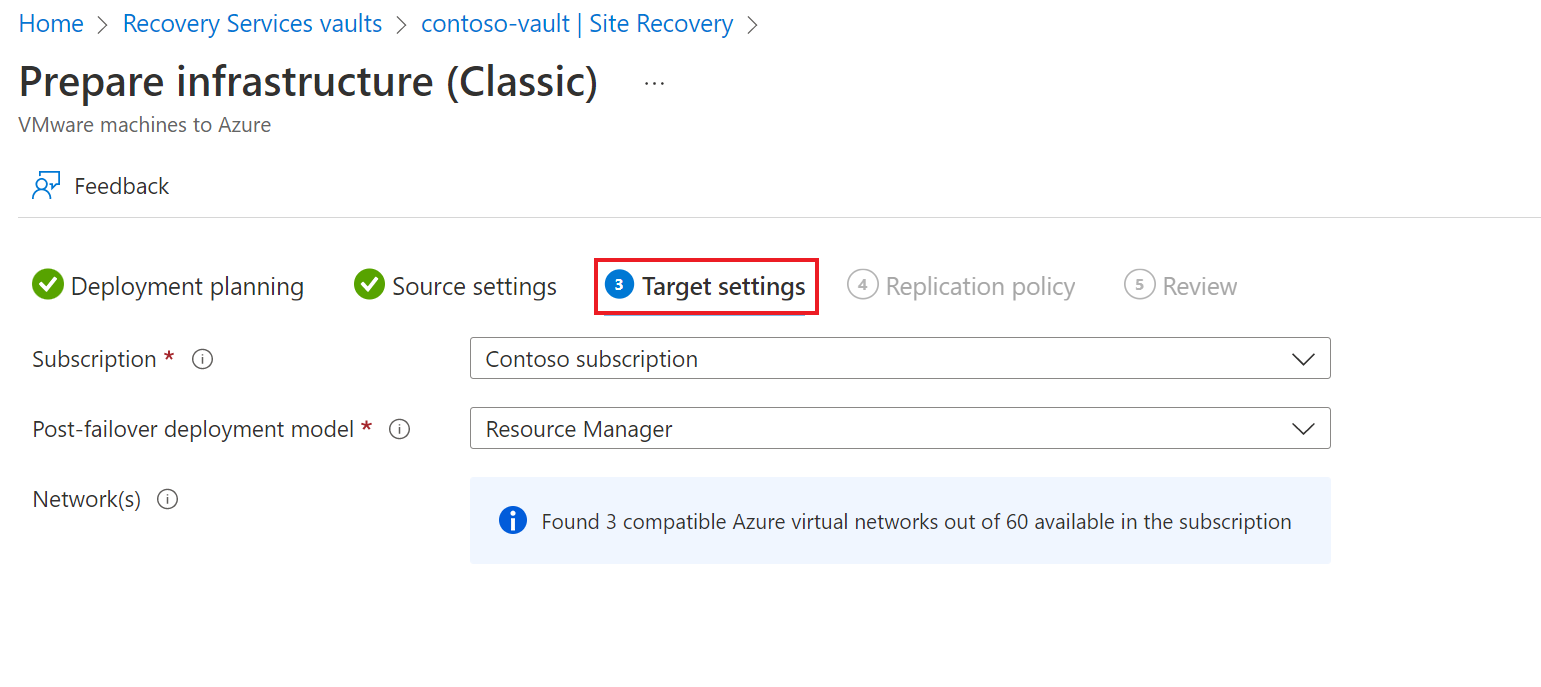
On the Target settings tab, do the following:
Under Subscription, select the Azure subscription you want to use.
Under Post-failover deployment model, specify the target deployment model. Site Recovery checks that you have one or more compatible Azure storage accounts and networks.
![!NOTE] Only Resource Manager deployment model should be selected, as Classic deployment model will be deprecated by 01, March, 2023.
Select Next
Replication policy
Enable replication for each server. Site Recovery will install the Mobility service when replication is enabled. When you enable replication for a server, it can take 15 minutes or longer for changes to take effect, and appear in the portal.
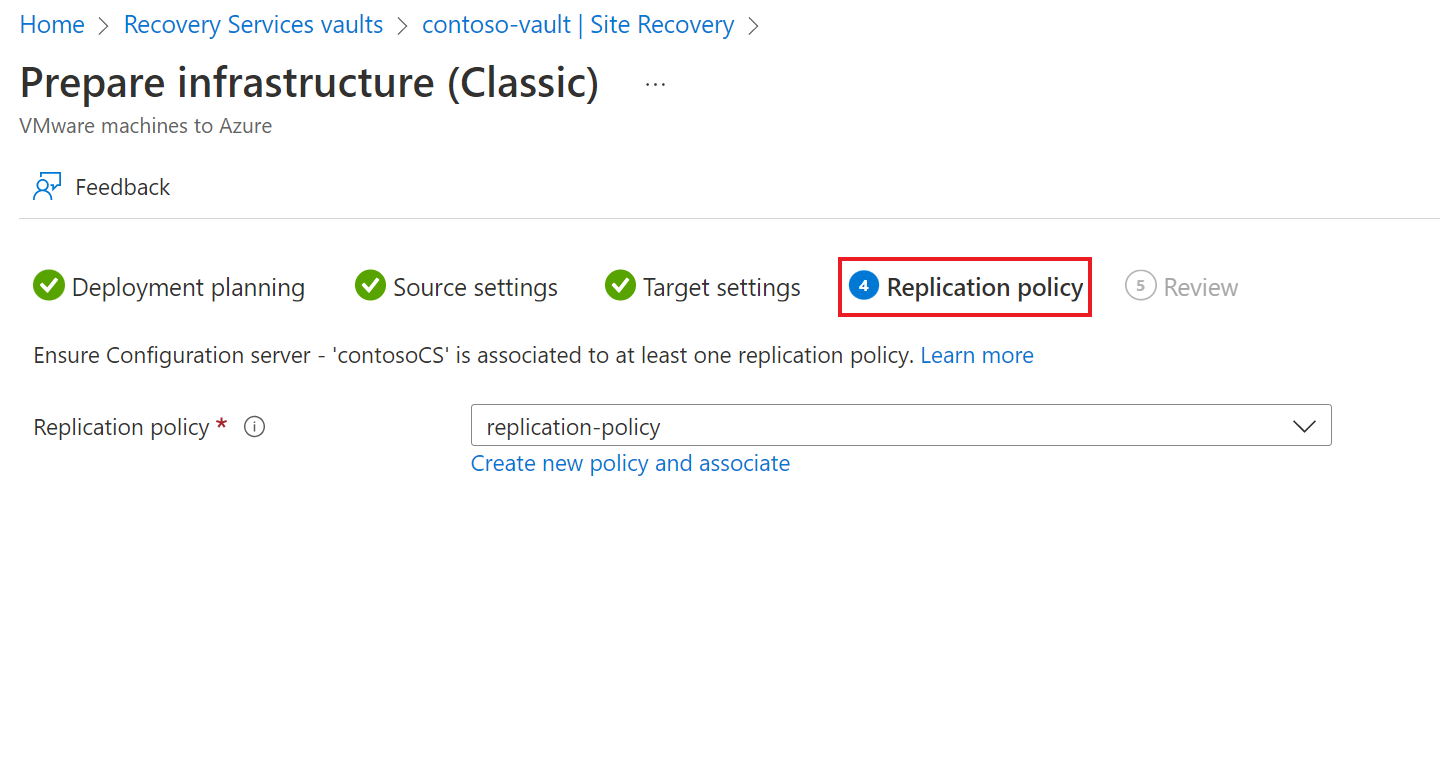
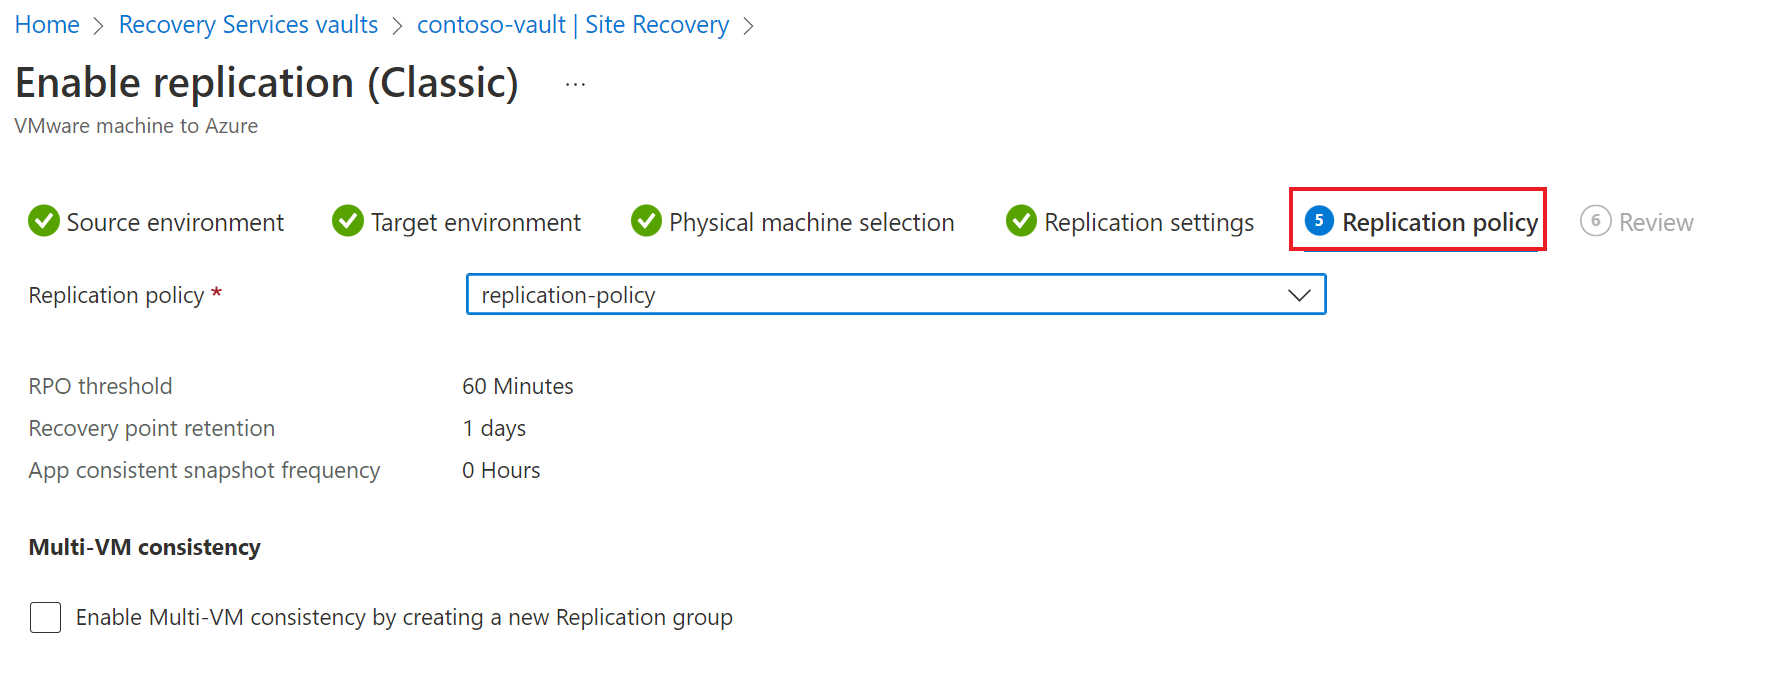
Under Replication policy tab, do the following:
- Under Replication policy, specify the replication policy.
- If you do not have a replication policy, use the Create new policy and associate option to create a new policy.
- In the Create and associate policy page, do the following:
- Name - specify a policy name.
- Source type - select VMware / Physical machines.
- Target type - select the subscription and the resource group in which you want to create the Azure VMs after failover.
- RPO threshold in mins - specify the recovery point objective (RPO) limit. This value specifies how often data recovery points are created. An alert is generated if continuous replication exceeds this limit..
- Retention period (in days) - specify how long (in days) the retention window is for each recovery point. Replicated VMs can be recovered to any point in a window. Up to 15 days retention is supported.
- In App-consistent snapshot frequency, specify how often (in hours) recovery points containing application-consistent snapshots will be created.
- After the policy is created, select OK.
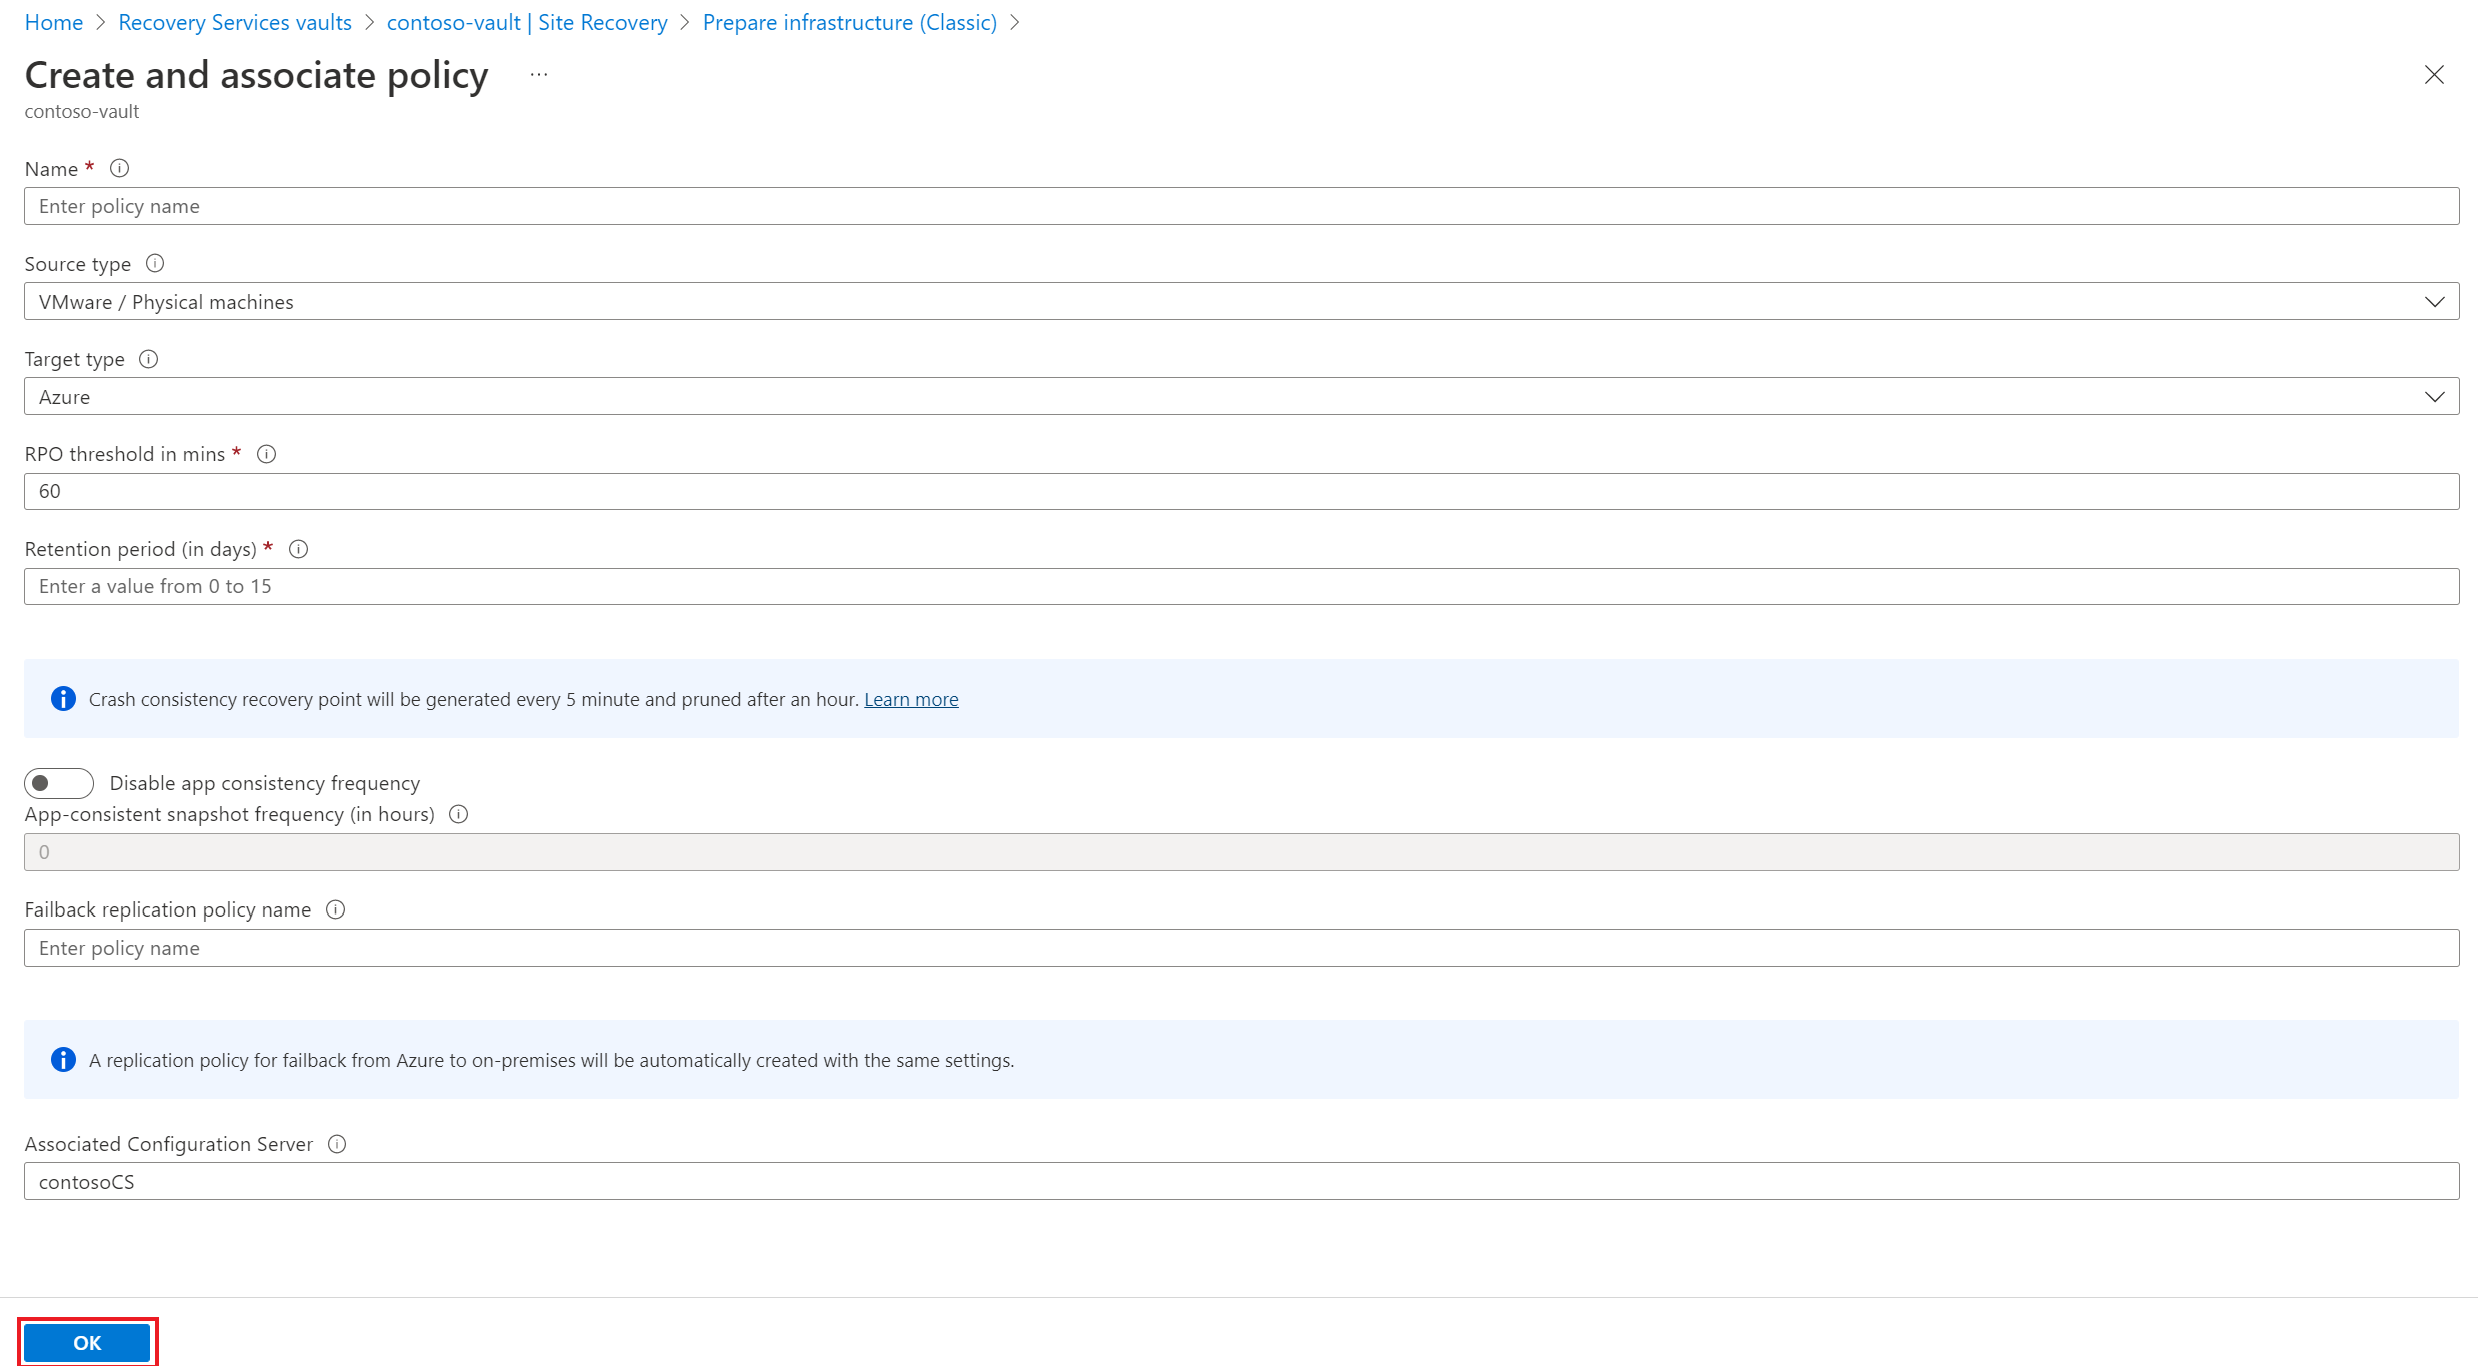
By default, a matching policy is automatically created for failback. For example, if the replication policy is rep-policy then a failback policy rep-policy-failback is created. This policy isn't used until you initiate a failback from Azure.
Enable replication
In the Azure portal, go to Recovery Services vaults and select the vault.
On the vault home page, select Enable Site Recovery.
Navigate to the bottom of the page, and select Enable replication (Classic) under the VMware machines to Azure section.
Under Source environment tab, do the following:
- In Configuration server, specify the configuration server name.
- In Machine type, select Physical machines.
- In Process server, retain the default selection. Optionally, you can use the Add Process Server to add a new server for this step.
- Select Next.

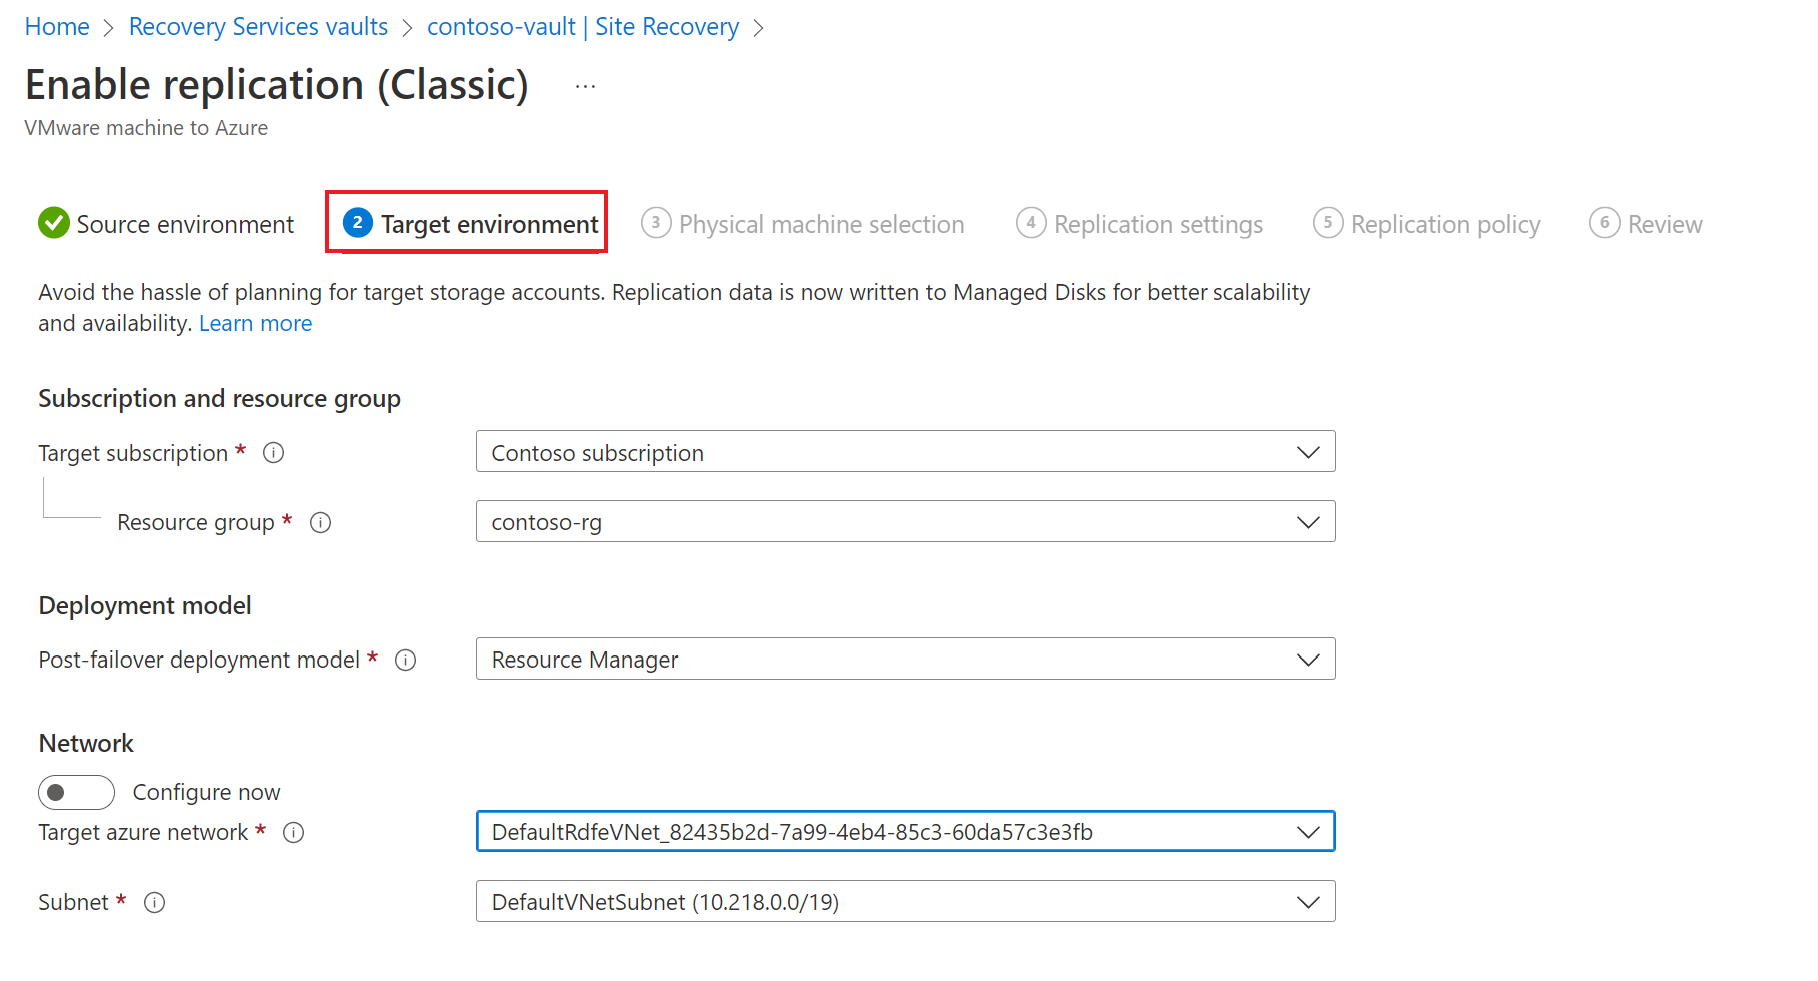
Under Target environment tab, do the following:
- In Target subscription, specify the subscription name.
- In Resource group, specify the resource group name.
- For Post-failover deployment model, specify Resource Manager.
- Under Target azure network, choose the Azure storage account you want to use for replicating data.
- In Subnet, select the Azure network and subnet to which Azure VMs will connect, when they're created after failover.
- Select Next.
Under Physical machine selection tab, do the following:
- Select Add Physical machine.
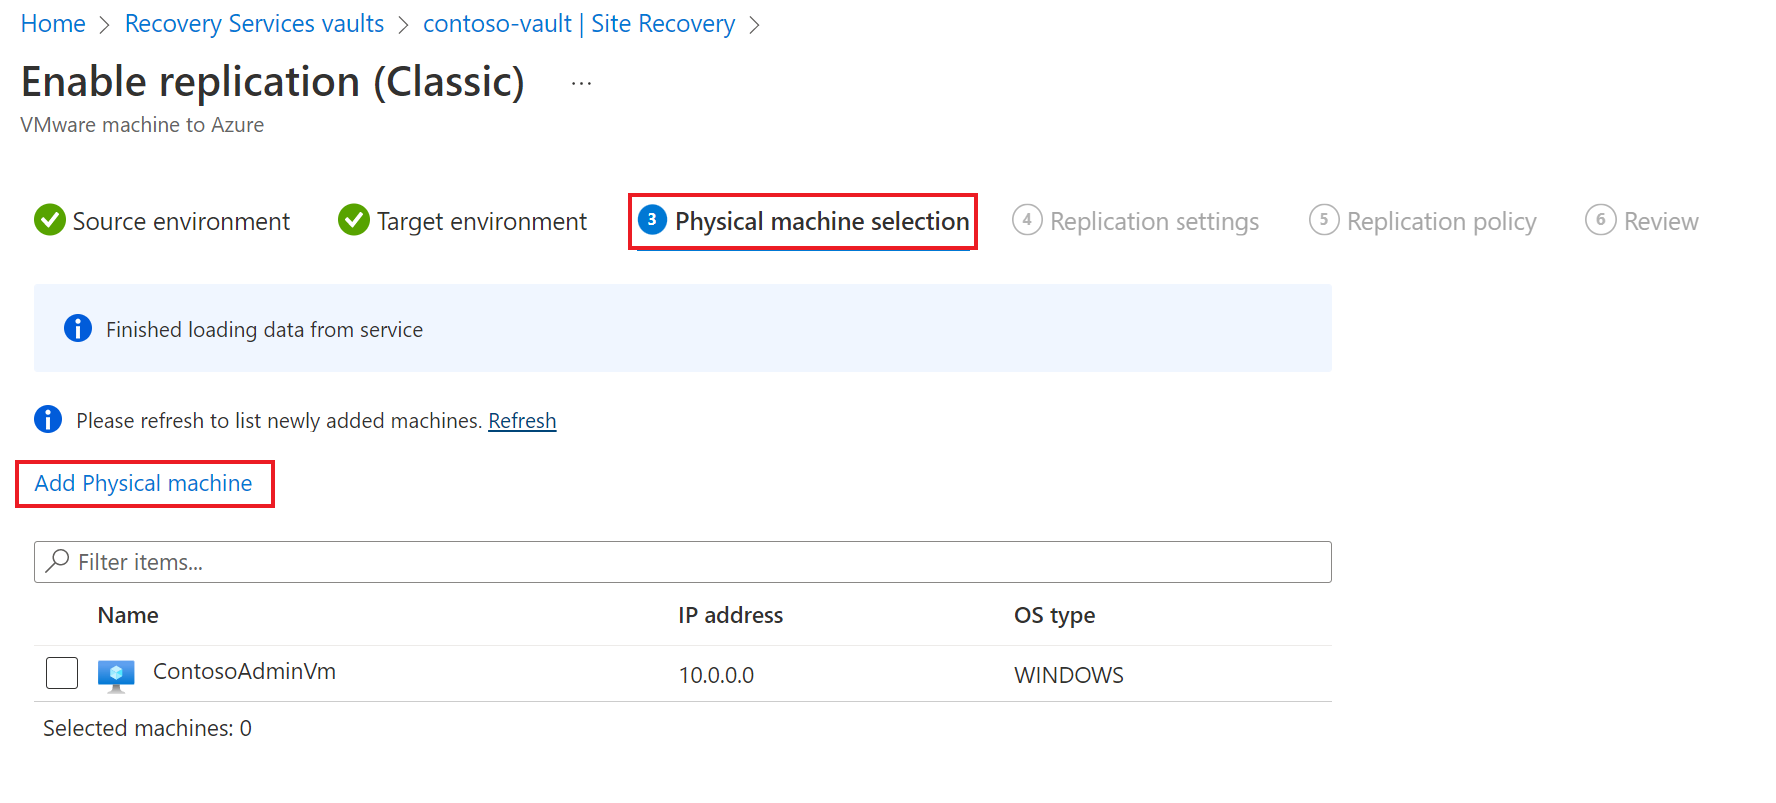
- Specify the name and IP address.
- Select the operating system of the machine you want to replicate.
It takes a few minutes for the servers to be discovered and listed.

- Select Add Physical machine.
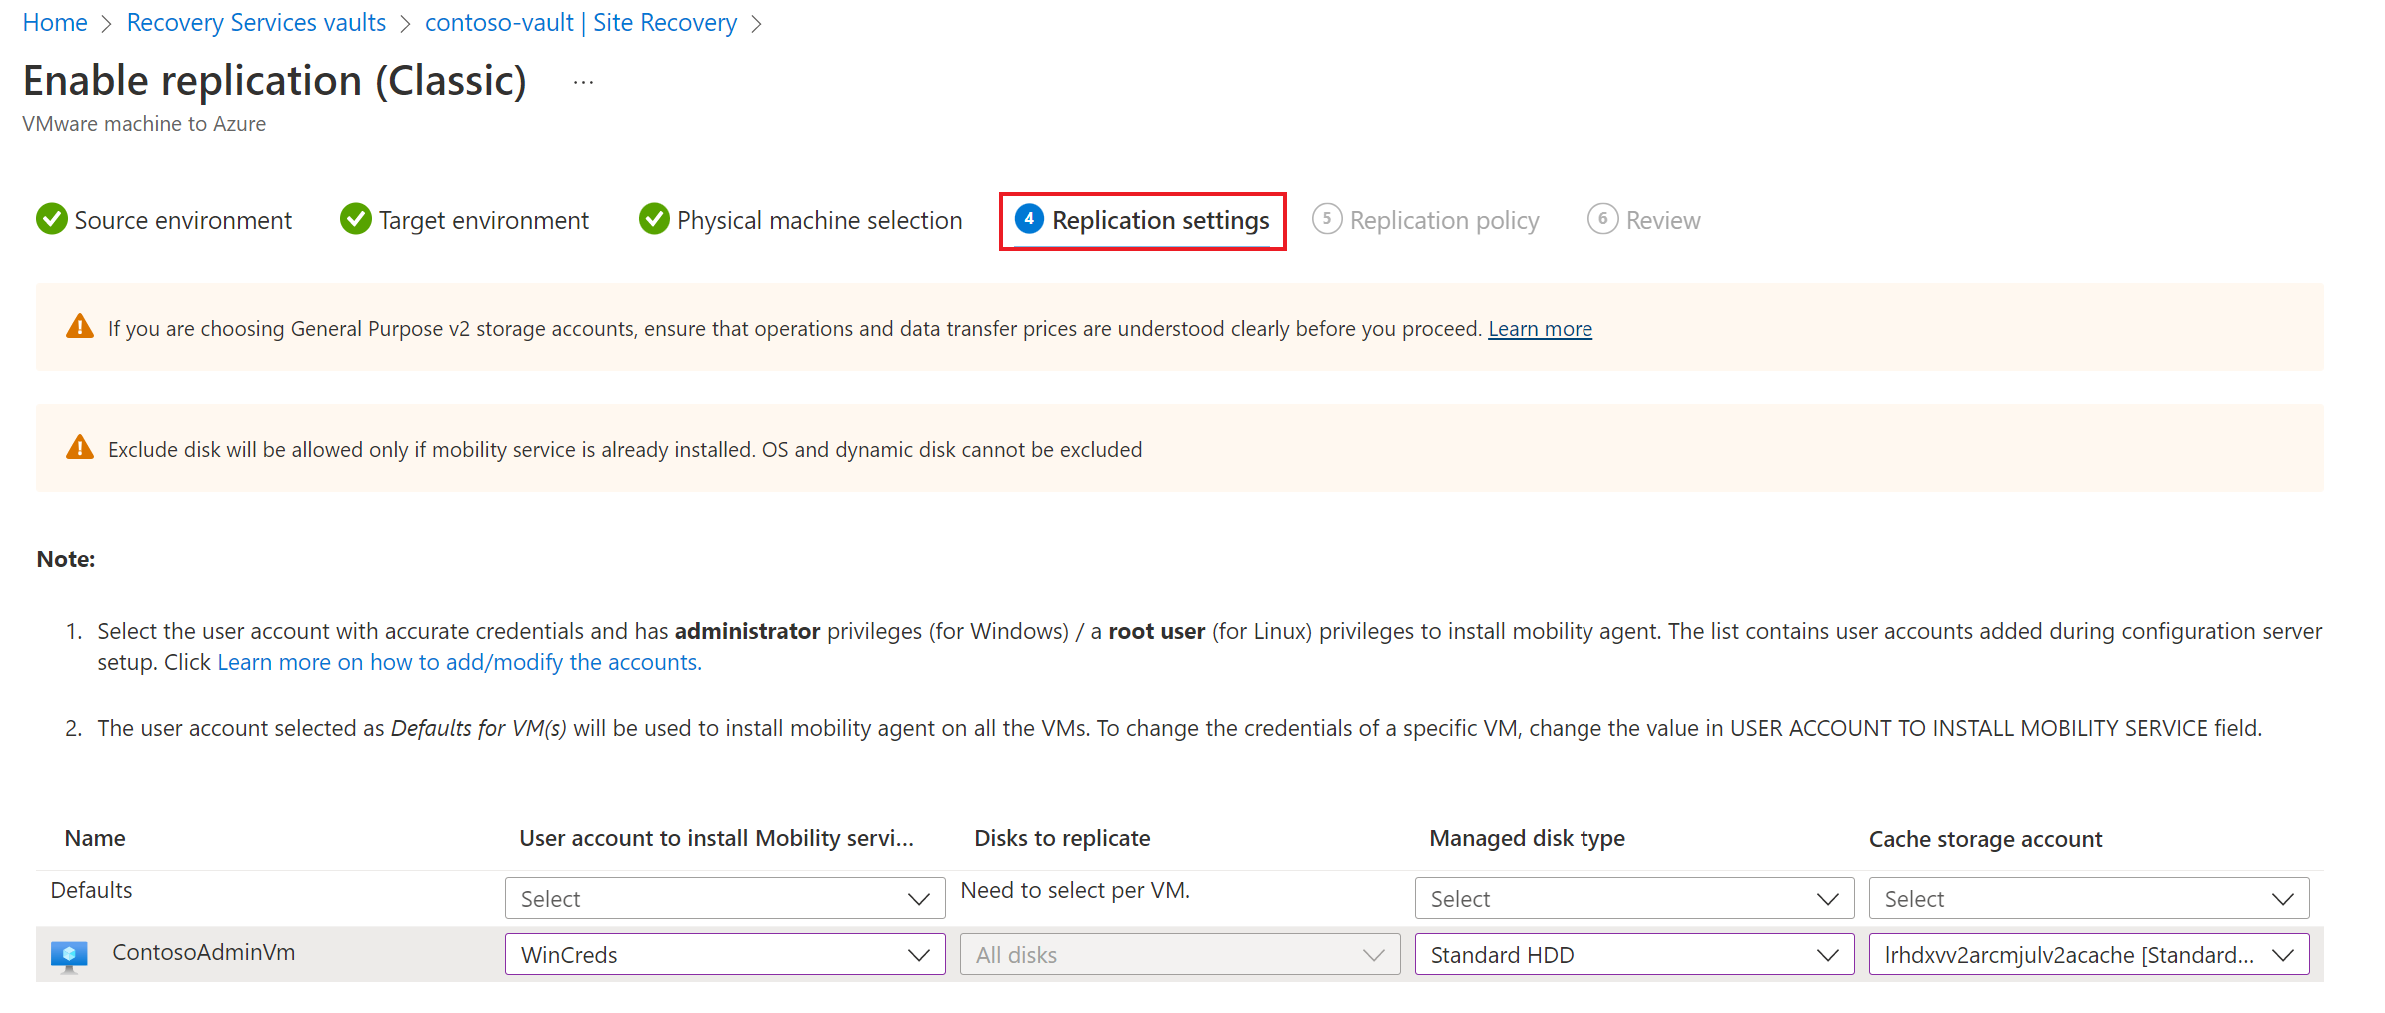
Under Replication settings tab, select and verify the user account details.
Under Replication policy tab, verify that the correct replication policy is selected.
Under Review tab, review your selections and select Enable Replication. You can track progress of the Enable Protection job in Settings > Jobs > Site Recovery Jobs. After the Finalize Protection job runs the machine is ready for failover.
To monitor servers you add, you can check the last discovered time for them in Configuration Servers > Last Contact At. To add machines without waiting for a scheduled discovery time, highlight the configuration server (don’t click it), and click Refresh.
Next steps
Learn more about run a disaster recovery drill.