Ingest historical data into your target platform
In previous articles, you selected a target platform for your historical data. You also selected a tool to transfer your data and stored the historical data in a staging location. You can now start to ingest the data into the target platform.
This article describes how to ingest your historical data into your selected target platform.
Export data from the legacy SIEM
In general, SIEMs can export or dump data to a file in your local file system, so you can use this method to extract the historical data. It’s also important to set up a staging location for your exported files. The tool you use to transfer the data ingestion can copy the files from the staging location to the target platform.
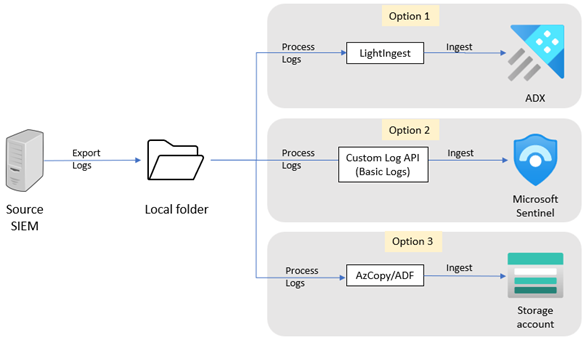
This diagram shows the high-level export and ingestion process.
To export data from your current SIEM, see one of the following sections:
Ingest to Azure Data Explorer
To ingest your historical data into Azure Data Explorer (ADX) (option 1 in the diagram above):
- Install and configure LightIngest on the system where logs are exported, or install LightIngest on another system that has access to the exported logs. LightIngest supports Windows only.
- If you don't have an existing ADX cluster, create a new cluster and copy the connection string. Learn how to set up ADX.
- In ADX, create tables and define a schema for the CSV or JSON format (for QRadar). Learn how to create a table and define a schema with sample data or without sample data.
- Run LightIngest with the folder path that includes the exported logs as the path, and the ADX connection string as the output. When you run LightIngest, ensure that you provide the target ADX table name, that the argument pattern is set to
*.csv, and the format is set to.csv(orjsonfor QRadar).
Ingest data to Microsoft Sentinel Basic Logs
To ingest your historical data into Microsoft Sentinel Basic Logs (option 2 in the diagram above):
If you don't have an existing Log Analytics workspace, create a new workspace and install Microsoft Sentinel.
Create a custom log table to store the data, and provide a data sample. In this step, you can also define a transformation before the data is ingested.
Collect information from the data collection rule and assign permissions to the rule.
Run the Custom Log Ingestion script. The script asks for the following details:
- Path to the log files to ingest
- Microsoft Entra tenant ID
- Application ID
- Application secret
- DCE endpoint (Use the logs ingestion endpoint URI for the DCR)
- DCR immutable ID
- Data stream name from the DCR
The script returns the number of events that have been sent to the workspace.
Ingest to Azure Blob Storage
To ingest your historical data into Azure Blob Storage (option 3 in the diagram above):
- Install and configure AzCopy on the system to which you exported the logs. Alternatively, install AzCopy on another system that has access to the exported logs.
- Create an Azure Blob Storage account and copy the authorized Microsoft Entra ID credentials or Shared Access Signature token.
- Run AzCopy with the folder path that includes the exported logs as the source, and the Azure Blob Storage connection string as the output.
Next steps
In this article, you learned how to ingest your data into the target platform.
