Tutorial: TLS, X.509 client authentication, and attribute-based access control (ABAC) authorization with Azure IoT Operations MQTT broker
This tutorial guides you through setting up the Azure IoT Operations MQTT broker with TLS encryption and X.509 client authentication. It includes step-by-step instructions and scripts for creating certificates for both the broker and clients. The tutorial explains how to configure the MQTT broker with different root certificate authorities (CAs) for the client and broker. It also covers setting up an attribute-based access control (ABAC) authorization policy based on the client certificate chain. Finally, the tutorial uses the Mosquito client to test various scenarios to ensure the setup works correctly.
The tutorial simulates an environment where Azure IoT Operations is installed in a Contoso factory, with devices manufactured by Fabrikam. To make TLS and X.509 authentication work:
- Azure IoT Operations MQTT broker, installed in a Contoso factory, must trust the Fabrikam root CA
- Fabrikam sensors, like thermostats, must trust the Contoso root CA
- Each entity must have its own leaf certificate issued by the correct root CA
Prerequisites
To follow this tutorial, you need:
- A Kubernetes cluster with port forwarding enabled for port 8883.
- Azure IoT Operations deployed without an existing load balancer listener.
- Kubectl access to the cluster to create Kubernetes secrets and config maps.
- Mosquitto client to publish and subscribe to MQTT messages running on the same machine as the Kubernetes cluster for
localhostaccess. To not uselocalhost, see Optional: Use a real hostname or IP address instead oflocalhostsection. - Step CLI to create certificates.
Tip
To meet these requirements, use the quickstart codespace. The quickstart codespace simplifies the setup process by providing these components out of the box.
Additionally, familiarity with public key cryptography and terms like root CA, private key, and intermediate certificates is useful.
Optional: Use a real hostname or IP address instead of localhost
To keep this tutorial simple, we use localhost to access the MQTT broker. This approach ensures that the broker's server certificate has a Subject Alternative Name (SAN) that matches the hostname used to access the broker. Using localhost simplifies the setup since the SAN is already set correctly.
In a real-world scenario, you'd use the hostname or external IP of the broker instead of localhost and connect to it from another device on the network. In this case, you need to determine the correct hostname or IP address and use it as the SAN when creating the server certificate:
- If the hostname or IP address is already known (for example, through a DNS record or static IP), use it as the SAN when creating the server certificate. Then, connect to the broker using that hostname or IP instead of
localhost. - If the hostname or IP address isn't already known, you can use a placeholder service to determine the external IP address:
- Create the LoadBalancer service on a port that's not being used (like 8080):
kubectl create service loadbalancer placeholder-service --tcp=8080:8080 - Retrieve the external IP:
kubectl get svc placeholder-service - If the external IP:
- Shows a value like
192.168.X.X- use that IP as the SAN when creating the server certificate and secret. Then, connect to the broker using that IP instead oflocalhost. - Shows
<pending>- the Kubernetes distribution you use might not support automatically assigning an external IP. To find the external IP, follow the steps in the Kubernetes documentation for your distribution and host environment. You might also need to configure port forwarding or a VPN depending on the network setup.
- Shows a value like
- After determining the external IP, delete the placeholder service:
kubectl delete svc placeholder-service
- Create the LoadBalancer service on a port that's not being used (like 8080):
This method ensures that the server certificate matches the external IP address, allowing secure access to the MQTT broker.
Prepare server-side certificates and full chain
First, create a server-side root CA. This CA is separate from the client-side root CA which is created later. To keep the separation clear, we name everything server side "Contoso". To make later steps easier, we skip the password for encrypting the private key. This practice is only acceptable in a tutorial setting.
step certificate create "Contoso Root CA" \
contoso_root_ca.crt contoso_root_ca.key \
--profile root-ca \
--no-password --insecure
Then, create an intermediate CA signed by this root CA.
step certificate create "Contoso Intermediate CA 1" \
contoso_intermediate_ca.crt contoso_intermediate_ca.key \
--profile intermediate-ca \
--ca ./contoso_root_ca.crt --ca-key ./contoso_root_ca.key \
--no-password --insecure
Lastly, use this intermediate CA to sign a server certificate for MQTT broker's broker frontend. Here, localhost is the Subject Alternative Name (SAN) used for the tutorial.
step certificate create mqtts-endpoint \
mqtts-endpoint.crt mqtts-endpoint.key \
--profile leaf \
--ca ./contoso_intermediate_ca.crt --ca-key ./contoso_intermediate_ca.key \
--bundle \
--san localhost \
--not-after 2400h --no-password --insecure
With the --bundle flag, the server certificate is bundled with the signing intermediate certificate. TLS handshake requires the bundle to verify the full chain.
Prepare client-side certificates and full chain
Similarly, create the root CA for Fabrikam and the intermediate CA.
step certificate create --profile root-ca "Fabrikam Root CA" \
fabrikam_root_ca.crt fabrikam_root_ca.key \
--no-password --insecure
step certificate create "Fabrikam Intermediate CA 1" \
fabrikam_intermediate_ca.crt fabrikam_intermediate_ca.key \
--profile intermediate-ca \
--ca ./fabrikam_root_ca.crt --ca-key ./fabrikam_root_ca.key \
--no-password --insecure
Then, generate client certificates for a thermostat, hygrometer, heater, and lightbulb.
# Create a client certificate for the thermostat
step certificate create thermostat thermostat.crt thermostat.key \
--ca ./fabrikam_intermediate_ca.crt --ca-key ./fabrikam_intermediate_ca.key --bundle \
--not-after 2400h --no-password --insecure

# Create a client certificate for the hygrometer
step certificate create hygrometer hygrometer.crt hygrometer.key \
--ca ./fabrikam_intermediate_ca.crt --ca-key ./fabrikam_intermediate_ca.key --bundle \
--not-after 2400h --no-password --insecure

# Create a client certificate for the heater
step certificate create heater heater.crt heater.key \
--ca ./fabrikam_intermediate_ca.crt --ca-key ./fabrikam_intermediate_ca.key --bundle \
--not-after 2400h --no-password --insecure

# Create a client certificate for the lightbulb
step certificate create lightbulb lightbulb.crt lightbulb.key \
--ca ./fabrikam_intermediate_ca.crt --ca-key ./fabrikam_intermediate_ca.key --bundle \
--not-after 2400h --no-password --insecure
Configure Kubernetes
Import the newly generated server certificate and private key into a Kubernetes secret. This secret is used to configure a TLS listener for MQTT broker later.
kubectl create secret tls broker-server-cert -n azure-iot-operations \
--cert mqtts-endpoint.crt \
--key mqtts-endpoint.key
Also, create a config map to contain the Fabrikam (client-side) root CA. This config map is required for MQTT broker to trust it for X.509 authentication.
kubectl create configmap fabrikam-ca -n azure-iot-operations \
--from-file=client_ca.pem=fabrikam_root_ca.crt
Configure MQTT broker
The next steps configure the MQTT broker with TLS encryption and X.509 client authentication. The tutorial uses the Azure portal to configure the MQTT broker.
Authentication
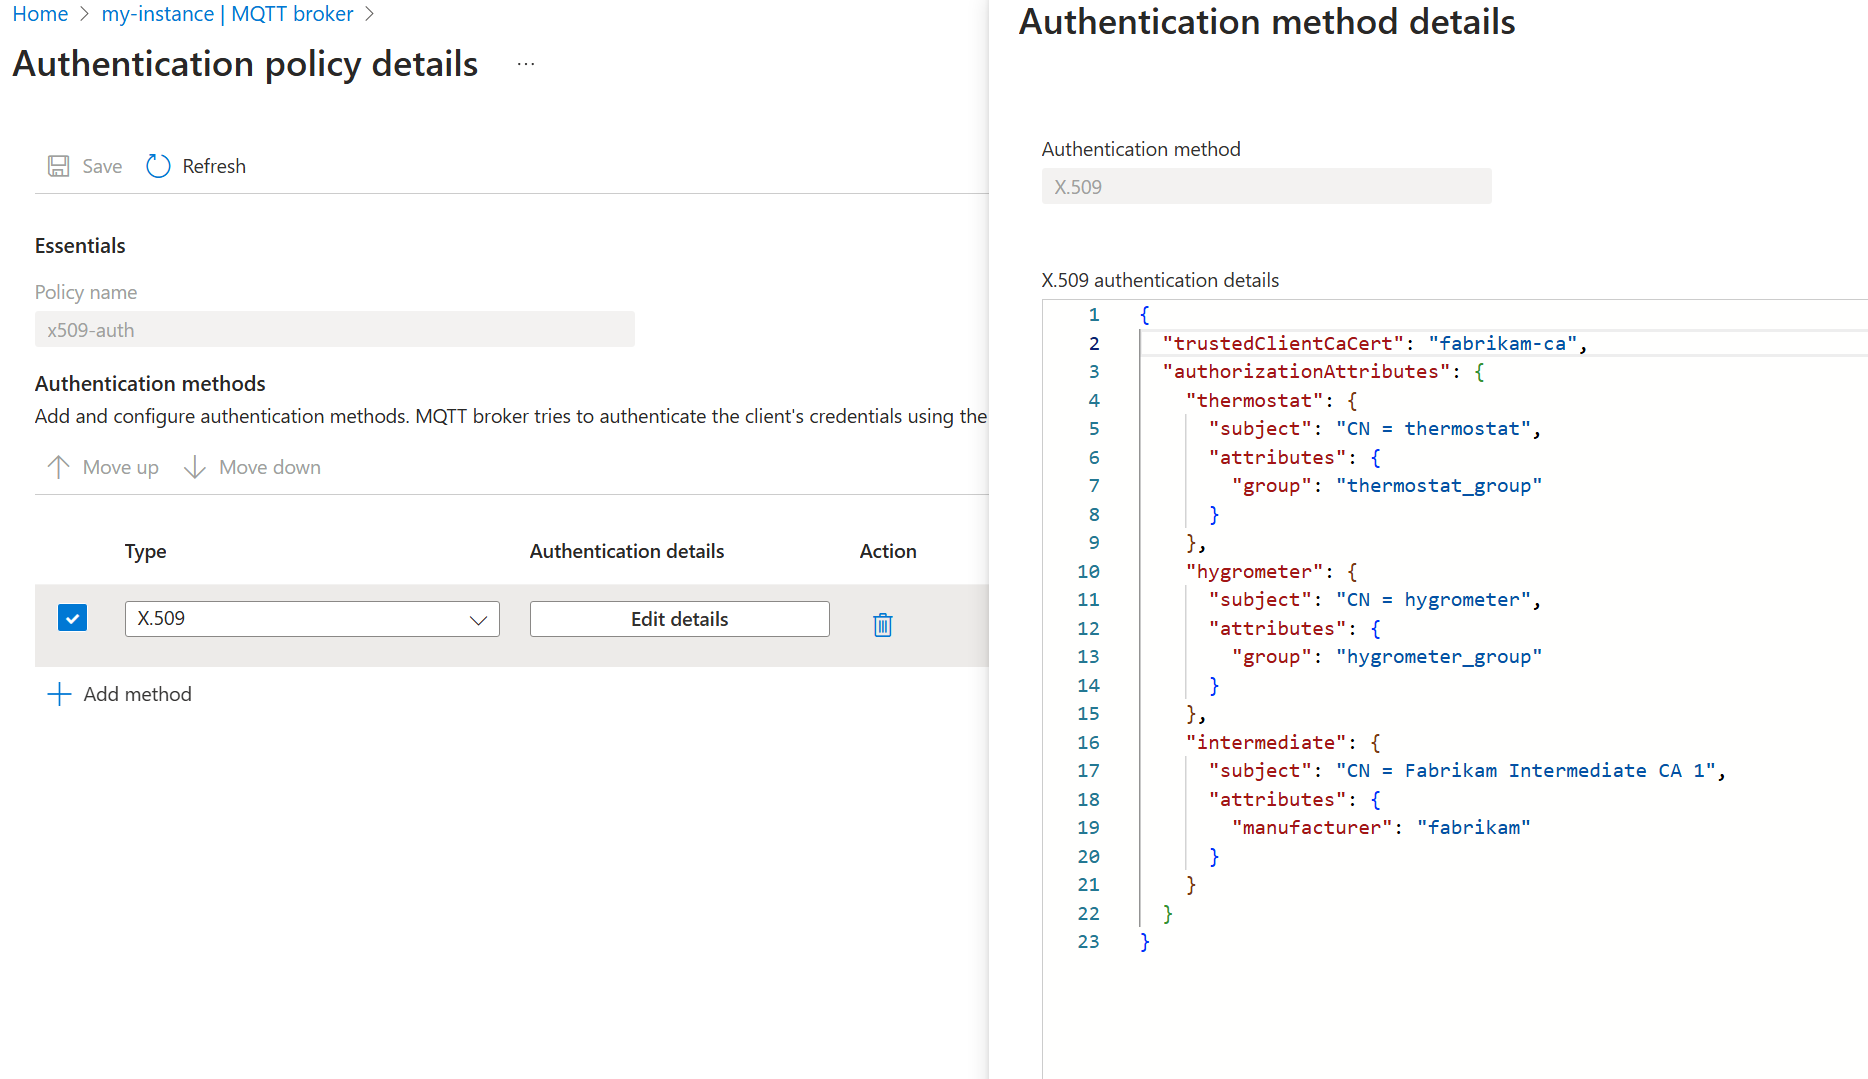
To allow clients to authenticate using X.509 certificates issued by the Fabrikam root CA, create an authentication policy that trusts the Fabrikam root CA certificate and maps the client certificates to authorization attributes for ABAC.
In the Azure portal, navigate to your IoT Operations instance.
Under Components, select MQTT Broker.
Select the Authentication tab.
Select Create authentication policy.
For Policy name, enter
x509-auth.Add a new method by selecting Add method.
Choose the method type X.509 from the dropdown list then select Add details to configure the method.
In the X.509 authentication details pane, specify the Fabrikam trusted CA certificate ConfigMap name
fabrikam-caand the attributes.{ "trustedClientCaCert": "fabrikam-ca", "authorizationAttributes": { "thermostat": { "subject": "CN = thermostat", "attributes": { "group": "thermostat_group" } }, "hygrometer": { "subject": "CN = hygrometer", "attributes": { "group": "hygrometer_group" } }, "intermediate": { "subject": "CN = Fabrikam Intermediate CA 1", "attributes": { "manufacturer": "fabrikam" } } } }Select Apply then Add to save the changes.

Listener
With the authentication policy in place, create a listener that uses the X.509 authentication policy. Also, since X.509 authentication requires TLS, configure the listener to use the Contoso server certificate and private key created earlier.
In the Azure portal, navigate to your IoT Operations instance.
Under Components, select MQTT Broker.
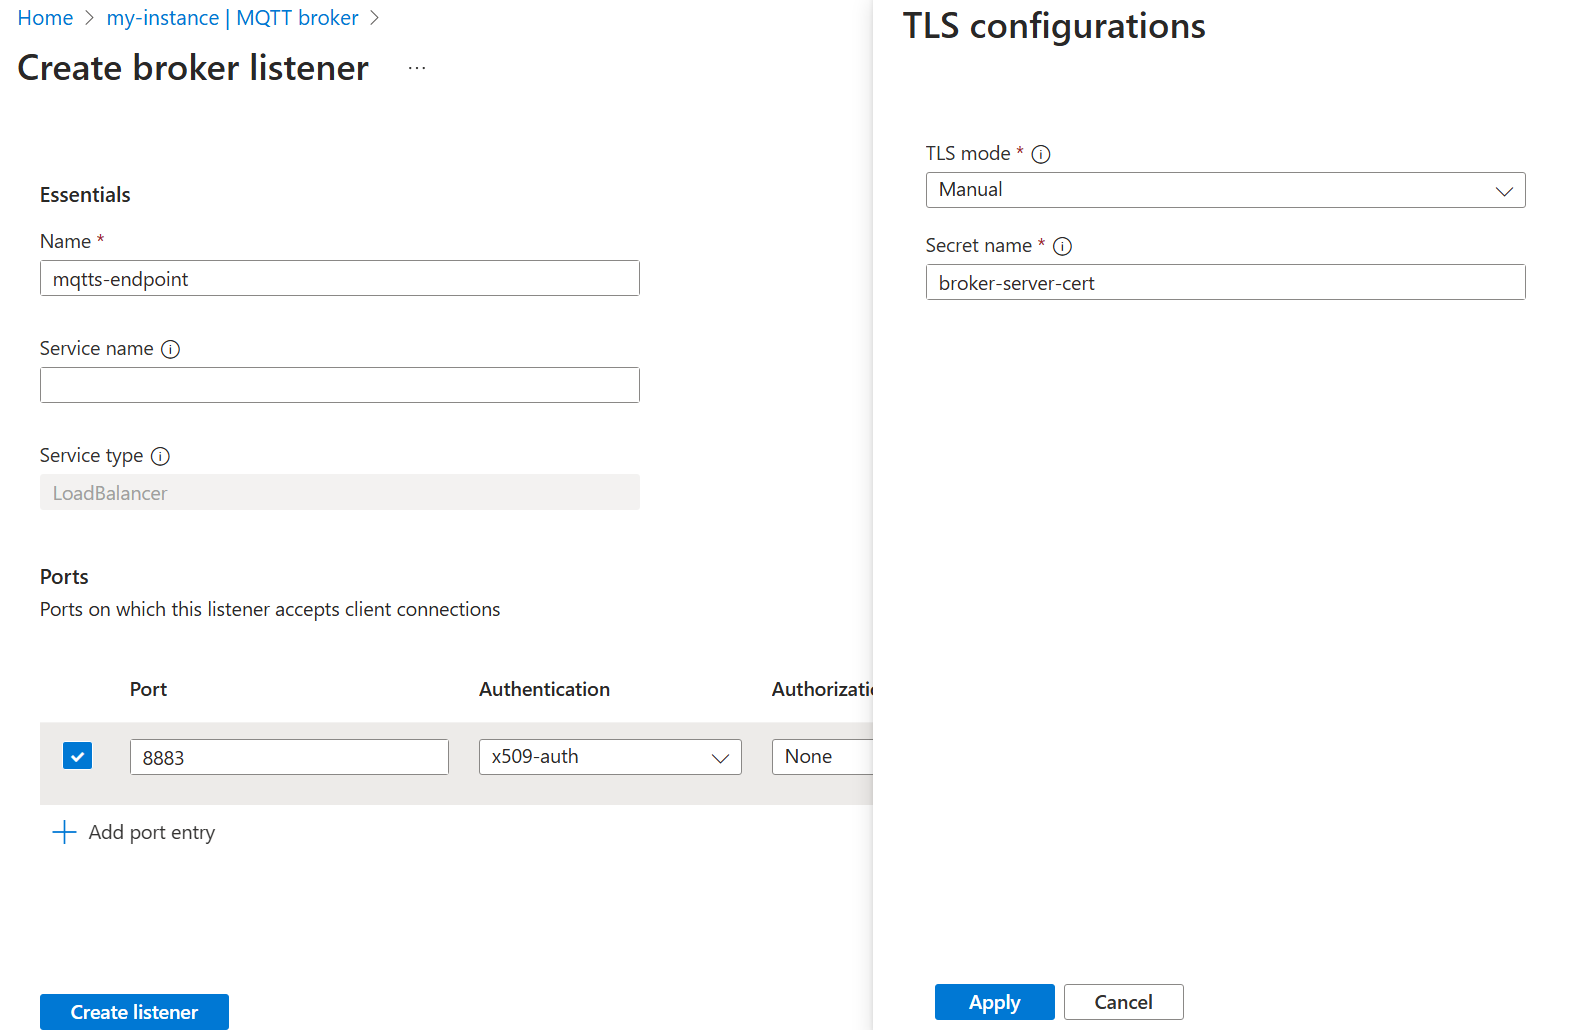
Select MQTT broker listener for LoadBalancer > Create. Enter the following settings:
Setting Description Name Enter mqtts-endpoint.Service name Name of the Kubernetes service. Leave empty to use the listener name mqtts-endpointas service name.Service type LoadBalancer already selected. Under Ports, enter the following settings for the first port:
Setting Description Port Enter 8883 Authentication Choose x509-auth Authorization Choose None Protocol Choose MQTT TLS Select Add In the TLS configuration pane, enter the following settings:
Setting Description TLS Mode Choose Manual Issuer name Enter broker-server-certSelect Apply and Create listener.

After a minute or two, the mqtts-endpoint LoadBalancer service is created.
$ kubectl get service mqtts-endpoint -n azure-iot-operations
NAME             TYPE           CLUSTER-IP     EXTERNAL-IP   PORT(S)          AGE
mqtts-endpoint   LoadBalancer   10.43.28.140   XXX.XX.X.X    8883:30988/TCP   104s
Instead of using the external IP, we use localhost for the tutorial.
Tip
The codespace configuration automatically sets up port forwarding for 8883. To setup other environments, see Use port forwarding.
Use a single Mosquito client to publish messages over TLS
From the same folder as the certificate files: contoso_root_ca.crt, thermostat.crt, and thermostat.key, use Mosquito client to publish a message. The --cafile contoso_root_ca.crt flag is for Mosquito to perform server certificate verification.
mosquitto_pub -t "example/topic" -m "example temperature measurement" -i thermostat \
-q 1 -V mqttv5 -d \
-h localhost \
--key thermostat.key \
--cert thermostat.crt \
--cafile contoso_root_ca.crt
The publish succeeds because Mosquito uses a client certificate that is rooted in fabrikam_root_ca.crt. The MQTT broker trusts this certificate because the x509-auth authentication policy created earlier. Additionally, the MQTT broker currently allows authenticated clients to publish to any topic.
Client thermostat sending CONNECT
Client thermostat received CONNACK (0)
Client thermostat sending PUBLISH (d0, q1, r0, m1, 'example/topic', ... (31 bytes))
Client thermostat received PUBACK (Mid: 1, RC:0)
Client thermostat sending DISCONNECT
Configure authorization to MQTT topics for multiple clients using X.509
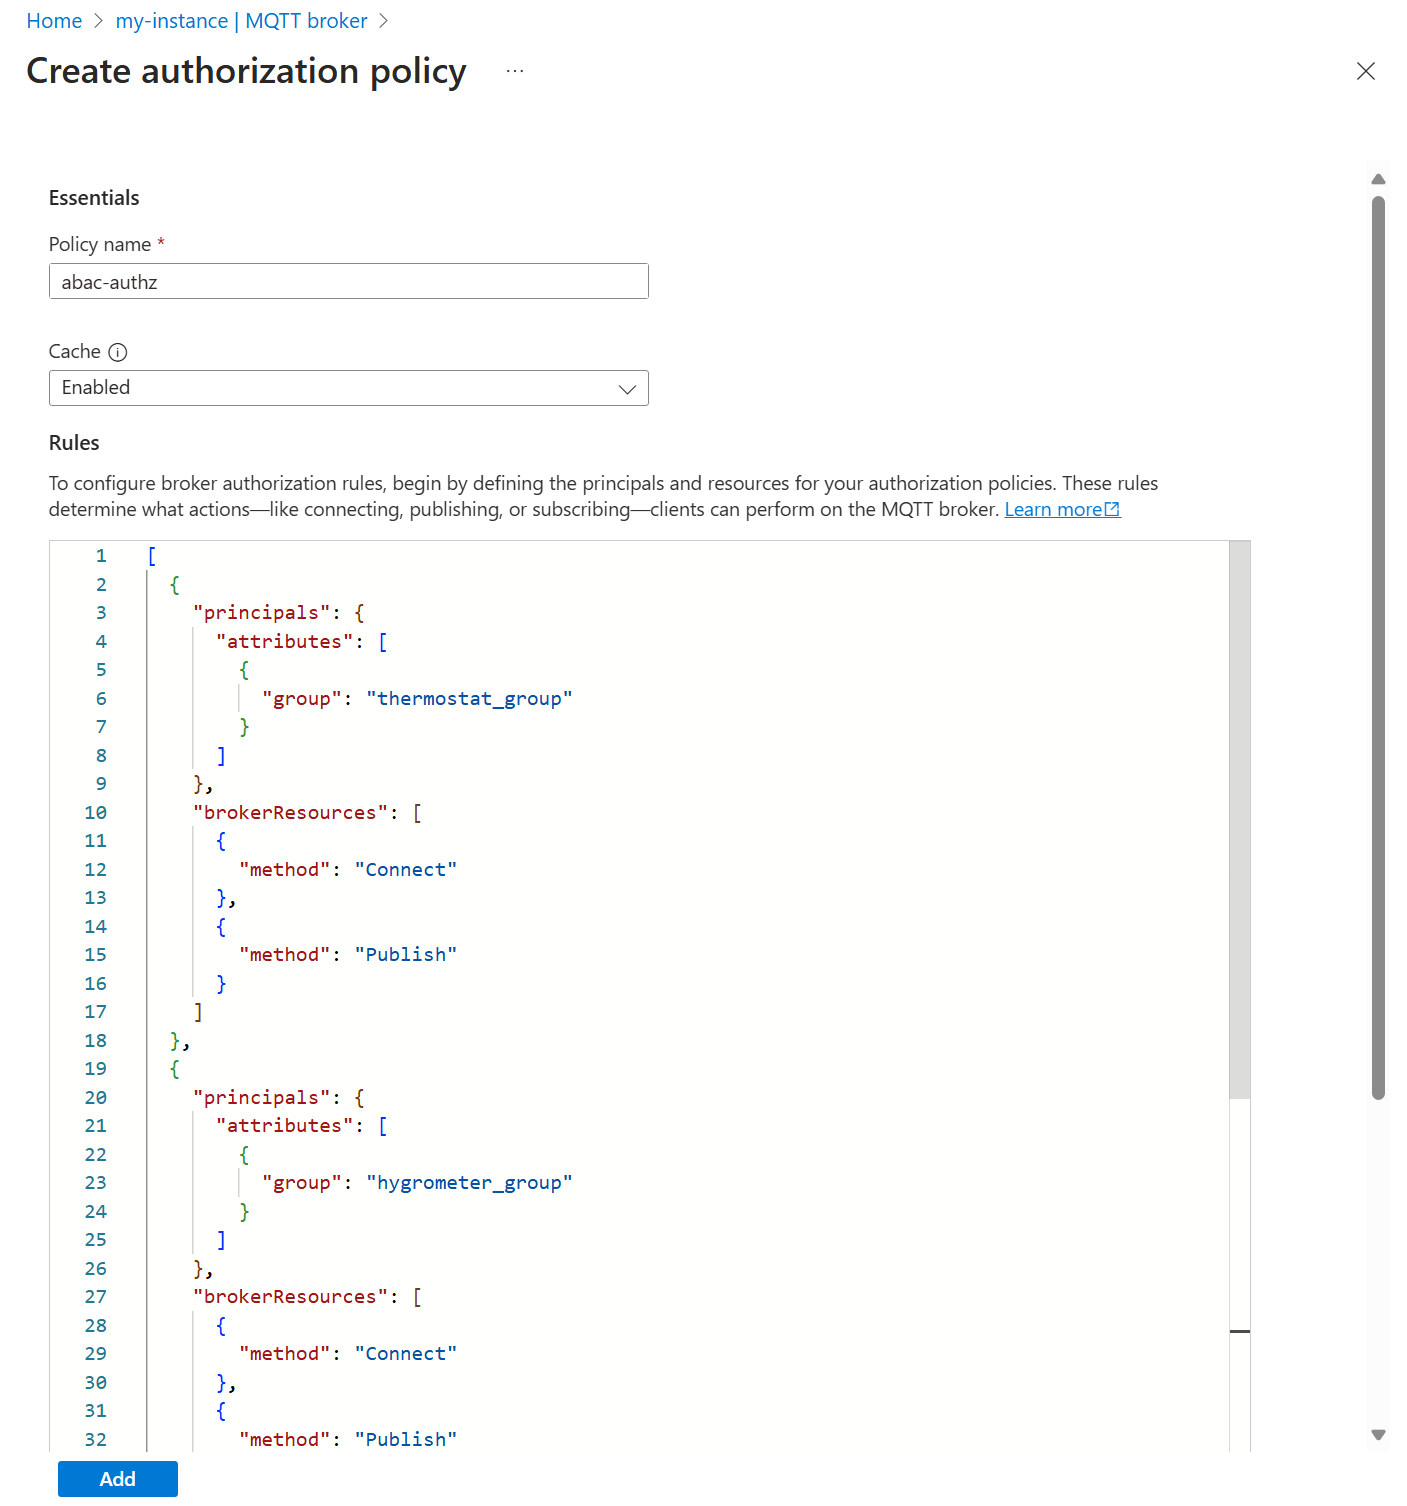
To restrict access to MQTT topics based on the client certificate attributes, create an authorization policy that maps the client certificate attributes to allowed actions on specific topics.
In the Azure portal, navigate to your IoT Operations instance.
Under Components, select MQTT Broker.
Select the Authorization tab.
Select Create authorization policy.
For Policy name, enter
abac-authz.Under Rules, enter the following rules:
[
  {
    "principals": {
      "attributes": [
        {
          "group": "thermostat_group"
        }
      ]
    },
    "brokerResources": [
      {
        "method": "Connect"
      },
      {
        "method": "Publish",
        "topics": [
          "telemetry/temperature"
        ]
      }
    ]
  },
  {
    "principals": {
      "attributes": [
        {
          "group": "hygrometer_group"
        }
      ]
    },
    "brokerResources": [
      {
        "method": "Connect"
      },
      {
        "method": "Publish",
        "topics": [
          "telemetry/humidity"
        ]
      }
    ]
  },
  {
    "principals": {
      "attributes": [
        {
          "manufacturer": "fabrikam"
        }
      ]
    },
    "brokerResources": [
      {
        "method": "Connect"
      },
      {
        "method": "Publish",
        "topics": [
          "health/heartbeat"
        ]
      }
    ]
  },
  {
    "principals": {
      "usernames": [
        "heater"
      ]
    },
    "brokerResources": [
      {
        "method": "Connect"
      },
      {
        "method": "Subscribe",
        "topics": [
          "telemetry/temperature",
          "telemetry/humidity"
        ]
      }
    ]
  }
]
Select Add to save the changes.

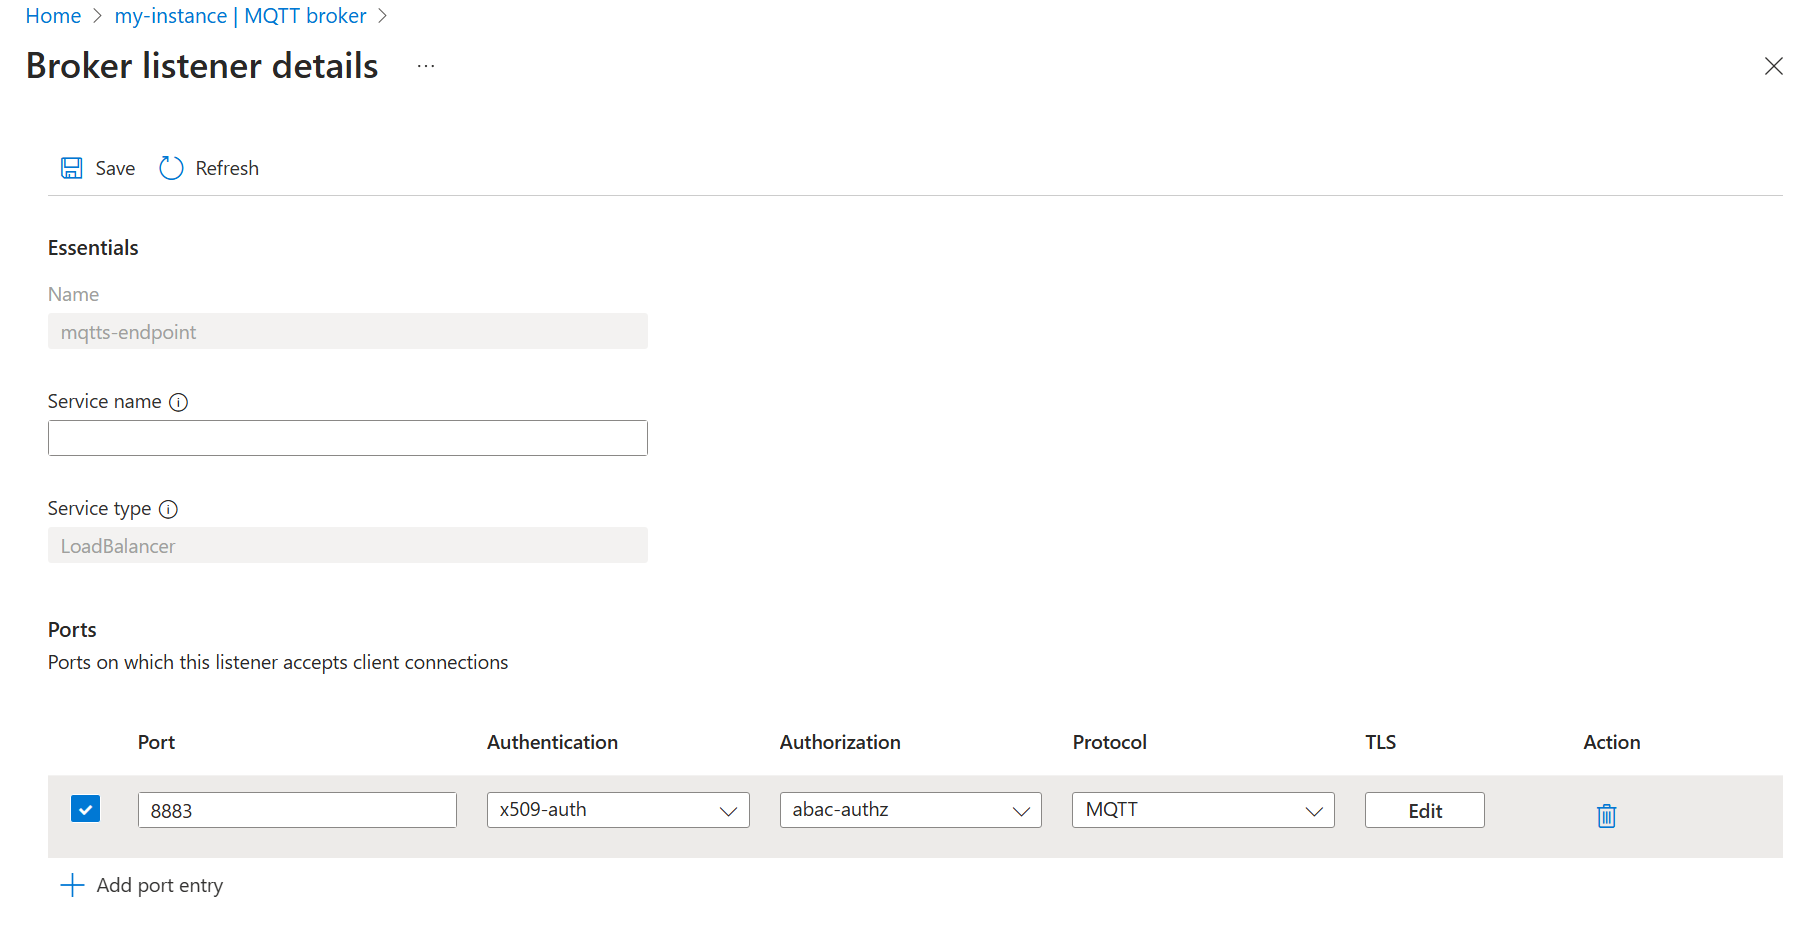
Then, update the MQTT broker listener to use the new authorization policy.
- Select the Listeners tab.
- Select the mqtts-endpoint listener.
- Under Ports > 8883 > Authorization, choose abac-authz.
- Select Save.

Publish messages to a restricted topic
In this section, we test out the newly applied authorization policies.
First, connect with thermostat and try to publish on topic telemetry/humidity:
mosquitto_pub -t "telemetry/humidity" -m "example temperature measurement" -i thermostat \
-q 1 -V mqttv5 -d \
-h localhost \
--key thermostat.key \
--cert thermostat.crt \
--cafile contoso_root_ca.crt
Since thermostat is part of thermostat_group, which isn't allowed to publish to the humidity topic, the publish fails.
Client thermostat sending CONNECT
Client thermostat received CONNACK (0)
Client thermostat sending PUBLISH (d0, q1, r0, m1, 'telemetry/humidity', ... (6 bytes))
Client thermostat received PUBACK (Mid: 1, RC:135)
Warning: Publish 1 failed: Not authorized.
Change to publish to telemetry/temperature, which is allowed and the publish succeeds. Leave the command running.
mosquitto_pub -t "telemetry/temperature" -m "example temperature measurement" -i thermostat \
-q 1 -V mqttv5 -d \
-h localhost \
--repeat 10000 \
--repeat-delay 3 \
--key thermostat.key \
--cert thermostat.crt \
--cafile contoso_root_ca.crt
Subscribe to messages on restricted topics
In a separate terminal session, connect with heater to subscribe to health/heartbeat.
mosquitto_sub -q 1 -t "health/heartbeat" -d -V mqttv5 \
-i heater \
-h localhost \
--key heater.key \
--cert heater.crt \
--cafile contoso_root_ca.crt
Since heater is not authorized to subscribe to the heartbeat topic, the subscription fails. Here, code 135 means not authorized.
Client heater sending CONNECT
Client heater received CONNACK (0)
Client heater sending SUBSCRIBE (Mid: 1, Topic: health/heartbeat, QoS: 1, Options: 0x00)
Client heater received SUBACK
Subscribed (mid: 1): 135
Switch the subscription topic to telemetry/temperature, which thermostat is still sending messages to.
mosquitto_sub -q 1 -t "telemetry/temperature" -d -V mqttv5 \
-i heater \
-h localhost \
--key heater.key \
--cert heater.crt \
--cafile contoso_root_ca.crt
Now heater starts to receive messages because it's authorized with its username.
In another separate terminal session, publish messages to health/heartbeat with lightbulb:
mosquitto_pub -q 1 -t "health/heartbeat" -m "example heartbeat" -d -V mqttv5 \
-i lightbulb \
-h localhost \
--repeat 100 \
--repeat-delay 3 \
--key lightbulb.key \
--cert lightbulb.crt \
--cafile contoso_root_ca.crt
The publish succeeds because lightbulb has an intermediate certificate with CN = Fabrikam Intermediate CA 1, which is mapped to the attribute manufacturer=fabrikam. Clients with that attribute can publish on health/heartbeat. When the client starts sending messages, heater started earlier doesn't receive anything.
Clean up resources
To clean up the resources created in this tutorial, delete the listener and the authentication and authorization policies.
- In the Azure portal, navigate to your IoT Operations instance.
- Under Components, select MQTT Broker.
- Select the Listeners tab.
- Select the checkbox next to mqtts-endpoint listener.
- Select Delete.
- Confirm the deletion.
- Select the Authentication tab.
- Select the checkbox next to x509-auth.
- Select Delete.
- Confirm the deletion.
- Select the Authorization tab.
- Select the checkbox next to abac-authz.
- Select Delete.
- Confirm the deletion.
Also, delete the Kubernetes secret and config map.
kubectl delete secret broker-server-cert -n azure-iot-operations
kubectl delete configmap fabrikam-ca -n azure-iot-operations
Finally, delete the certificates and keys generated earlier.
rm contoso_root_ca.crt contoso_root_ca.key contoso_intermediate_ca.crt contoso_intermediate_ca.key mqtts-endpoint.crt mqtts-endpoint.key
rm fabrikam_root_ca.crt fabrikam_root_ca.key fabrikam_intermediate_ca.crt fabrikam_intermediate_ca.key thermostat.crt thermostat.key hygrometer.crt hygrometer.key heater.crt heater.key lightbulb.crt lightbulb.key