Quickstart: Deploy the MedTech service using the Azure portal
Important
As of 2/26/2025 the MedTech service will no longer be available in the following regions: UK West, UAE North, South Africa North, Qatar Central.
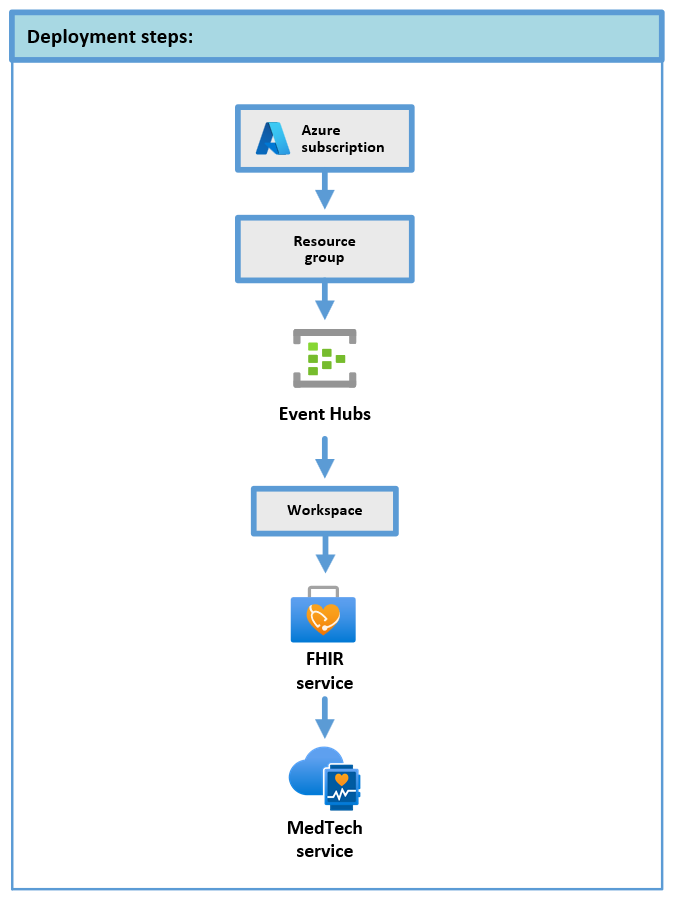
The MedTech service deployment using the Azure portal is divided into the following three sections:
As a prerequisite, you need an Azure subscription and have been granted the proper permissions to deploy Azure resource groups and resources. You can follow all the steps, or skip some if you have an existing environment. Also, you can combine all the steps and complete them in Azure PowerShell, Azure CLI, and REST API scripts.
Tip
See the MedTech service article, Choose a deployment method for the MedTech service, for a description of the different deployment methods that can help to simply and automate the deployment of the MedTech service.
Deploy prerequisite resources
The first step is to deploy the MedTech service prerequisite resources:
- Azure resource group
- Azure Event Hubs namespace and event hub
- Azure Health Data services workspace
- Azure Health Data Services FHIR® service
Once the prerequisite resources are available, deploy:
- Azure Health Data Services MedTech service
Deploy a resource group
Deploy a resource group to contain the prerequisite resources and the MedTech service.
Deploy an Event Hubs namespace and event hub
Deploy an Event Hubs namespace into the resource group. Event Hubs namespaces are logical containers for event hubs. Once the namespace is deployed, you can deploy an event hub, which the MedTech service reads from. For information about deploying Event Hubs namespaces and event hubs, see Create an event hub using Azure portal.
Deploy a workspace
Deploy a workspace into the resource group. After you create a workspace using the Azure portal, a FHIR service and MedTech service can be deployed from the workspace.
Deploy a FHIR service
Deploy a FHIR service into your resource group using your workspace. The MedTech service persists transformed device data into the FHIR service.
Configure and deploy the MedTech service
If you have successfully deployed the prerequisite resources, you're now ready to deploy the MedTech service.
Before you can deploy the MedTech service, you must complete the following steps:
Set up the MedTech service configuration
Start with these three steps to begin configuring the MedTech service:
Start by going to your Azure Health Data services workspace and select the Create MedTech service box.
This step takes you to the Add MedTech service button. Select the button.
This step takes you to the Create MedTech service page. This page has five tabs you need to fill out:
- Basics
- Device mapping
- Destination mapping
- Tags (Optional)
- Review + create
Configure the Basics tab
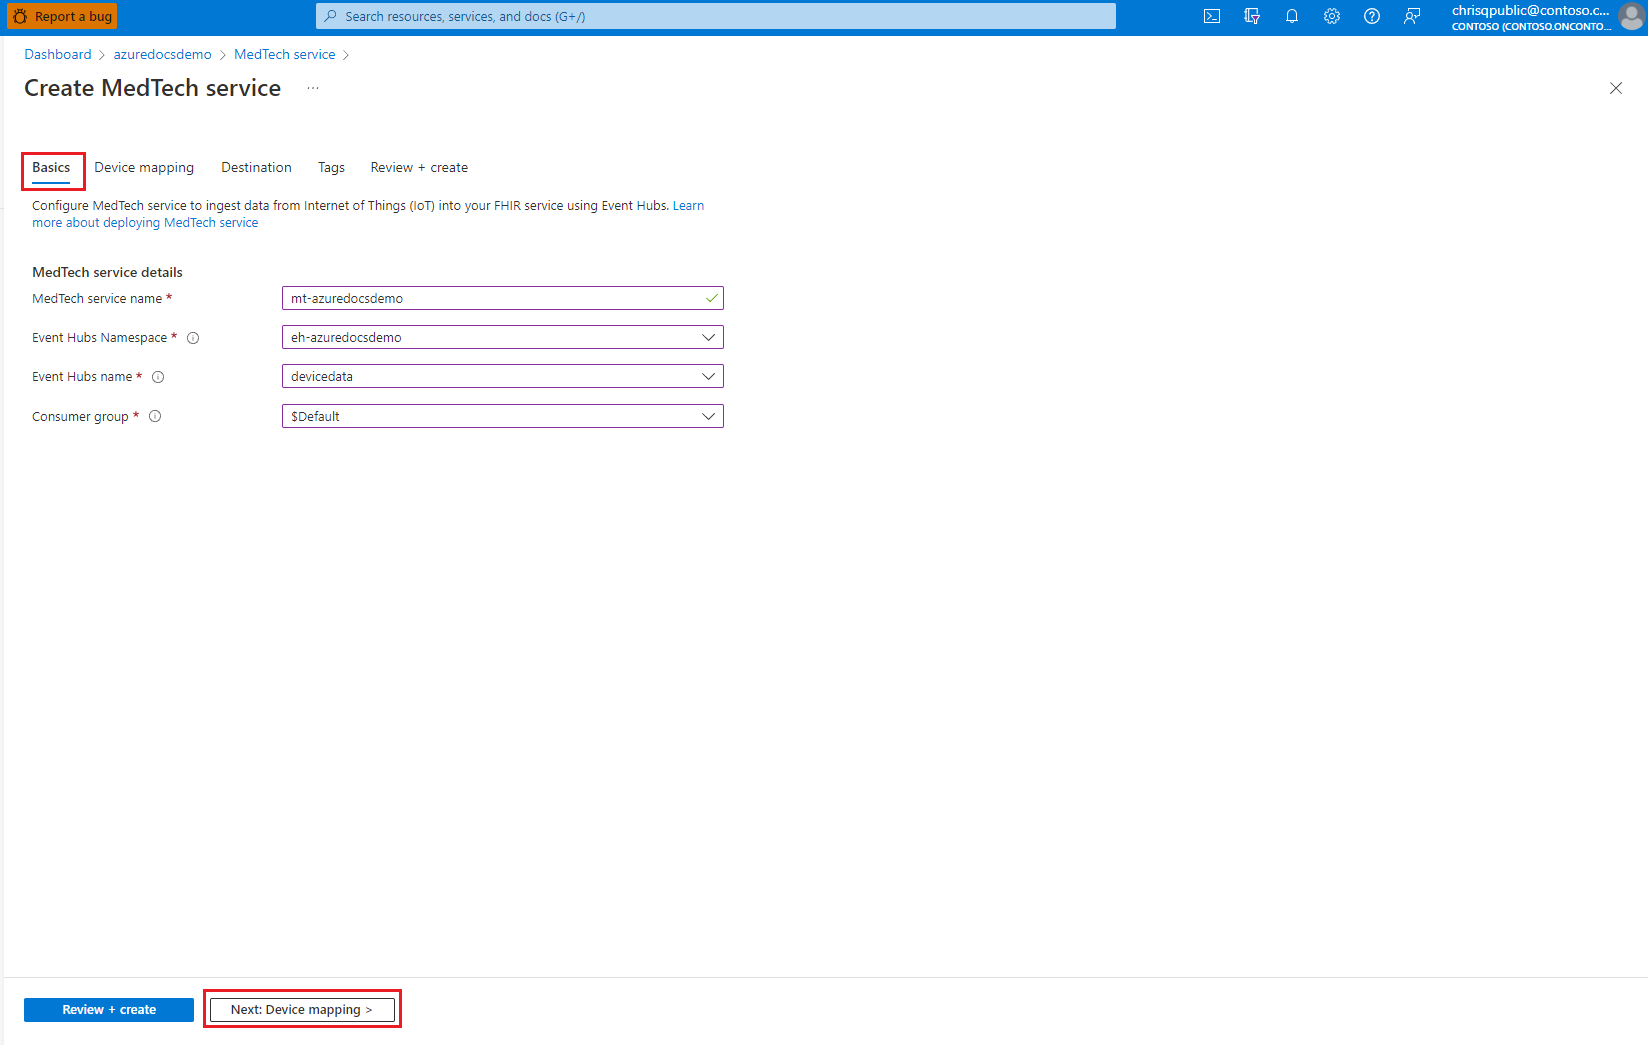
Follow these four steps to fill in the Basics tab configuration:
Enter the MedTech service name.
The MedTech service name is a friendly, unique name for your MedTech service. For this example, we have named the MedTech service mt-azuredocsdemo.
Select the Event Hubs Namespace.
The Event Hubs Namespace is the name of the Event Hubs namespace that you previously deployed. For this example, we're using the name eh-azuredocsdemo.
Select the Events Hubs name.
The Event Hubs name is the name of the event hub that you previously deployed within the Event Hubs Namespace. For this example, we're using the name devicedata.
Select the Consumer group.
By default, a consumer group named $Default is created during the deployment of an event hub. Use this consumer group for your MedTech service deployment.
Important
If you're going to allow access from multiple services to the event hub, it is highly recommended that each service has its own event hub consumer group.
Consumer groups enable multiple consuming applications to have a separate view of the event stream, and to read the stream independently at their own pace and with their own offsets. For more information, see Consumer groups.
Examples:
Two MedTech services accessing the same event hub.
A MedTech service and a storage writer application accessing the same event hub.
The Basics tab should now look something like this after you've filled it out:
Configure the Device mapping tab
For the purposes of this quickstart, accept the default Device mapping and move to the Destination tab. The device mapping is addressed in the Post-deployment section of this quickstart.
Configure the Destination tab
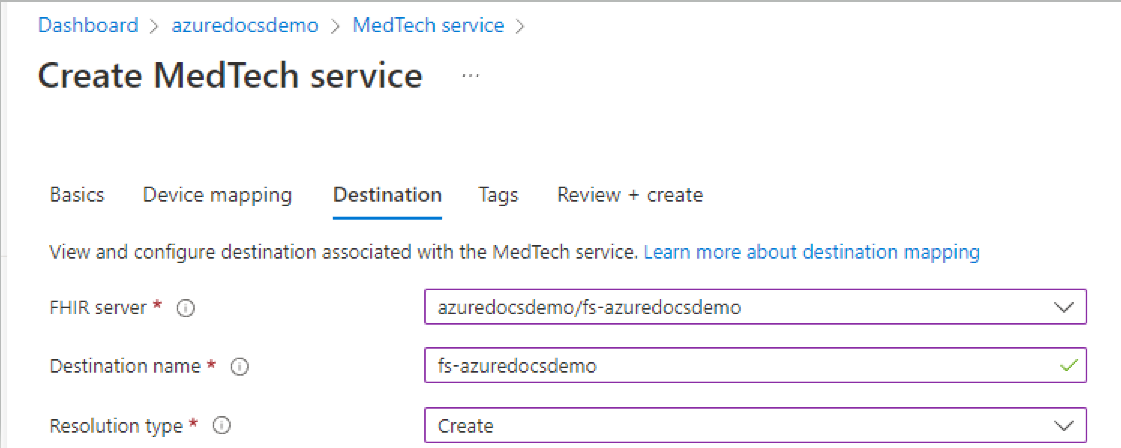
Under the Destination tab, use these values to enter the destination properties for your MedTech service instance:
First, select the name of your FHIR server.
Next, enter the Destination name.
The Destination name is a friendly name for the destination. Enter a unique name for your destination. In this example, the Destination name name is fs-azuredocsdemo.
Next, select the Resolution type.
Resolution type specifies how the MedTech service associates device data with Device resources and Patient resources. The MedTech service reads Device and Patient resources from the FHIR service using device identifiers and patient identifiers. If an encounter identifier is specified and extracted from the device data payload, it's linked to the observation if an encounter exists on the FHIR service with that identifier. If the encounter identifier is successfully normalized, but no FHIR Encounter exists with that encounter identifier, a FhirResourceNotFound exception is thrown.
Device and Patient resources can be resolved by choosing a Resolution type of Create and Lookup:
Create
If Create was selected, and Device or Patient resources are missing when the MedTech service is reading the device data, new resources are created using the identifiers included in the device data.
Lookup
If Lookup was selected, and Device or Patient resources are missing, an error occurs, and the device data isn't processed. A DeviceNotFoundException and/or a PatientNotFoundException error is generated, depending on the type of resource not found.
For the Destination mapping field, accept the default Destination mapping. The FHIR destination mapping is addressed in the Post-deployment section of this quickstart.
The Destination tab should now look something like this after you've filled it out:
Configure the Tags tab (Optional)
Before you complete your configuration in the Review + create tab, you might want to configure tags. You can do this step by selecting the Next: Tags > tab.
Tags are name and value pairs used for categorizing resources and are an optional step. For more information about tags, see Use tags to organize your Azure resources and management hierarchy.
Validate your deployment
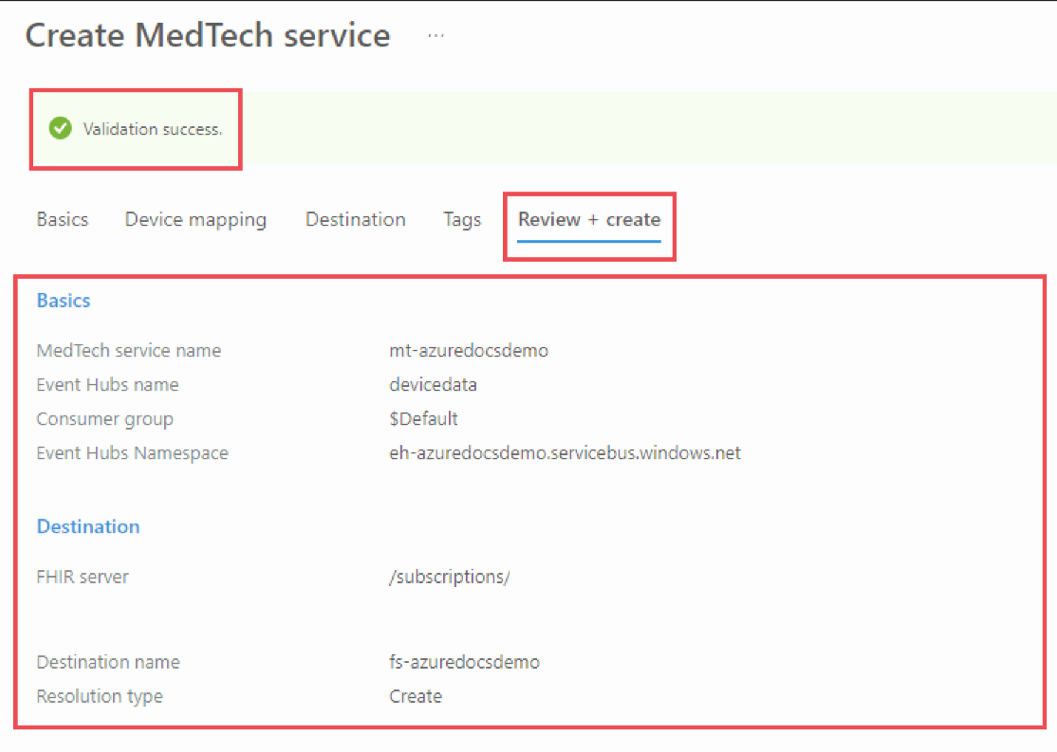
To begin the validation process of your MedTech service deployment, select the Review + create tab. There's a short delay and then you should see a screen that displays a Validation success message.
Your validation screen should look something like this:
If your deployment didn't validate, review the validation failure message(s), and troubleshoot the issue(s). Check all properties under each MedTech service tab that you've configured and then try the validation process again.
Create deployment
Select the Create button to begin the deployment.
The deployment process can take several minutes. The screen displays a message saying that your deployment is in progress.
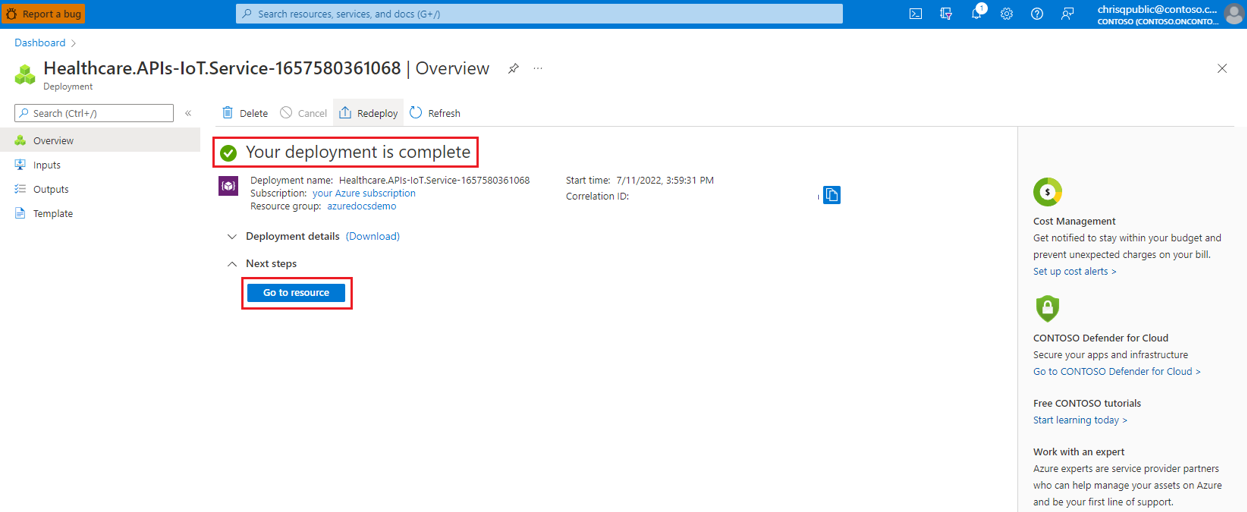
When Azure has finishes deploying, a "Your Deployment is complete" message appears and also displays the following information:
- Deployment name
- Subscription
- Resource group
- Deployment details
Your screen should look something like this:
Post-deployment
Grant resource access to the MedTech service system-managed identity
There are two post-deployment access steps you must perform or the MedTech service can't read data from the event hub, or write data to the FHIR service.
These steps are:
- Grant the MedTech service system-managed identity Azure Event Hubs Data Receiver access to the event hub.
- Grant the MedTech service system-managed identity FHIR Data Writer access to the FHIR service.
These two steps are needed because MedTech service uses Azure role-based access control (Azure RBAC) and a system-assigned managed identity for extra security and access control of your Azure resources.
Provide device and FHIR destination mappings
Valid and conforming device and FHIR destination mappings have to be provided to your MedTech service for it to be fully functional. For an overview and sample device and FHIR destination mappings, see:
Tip
You can use the MedTech service Mapping debugger for assistance creating, updating, and troubleshooting the MedTech service device and FHIR destination mappings. The Mapping debugger enables you to easily view and make inline adjustments in real-time, without ever having to leave the Azure portal. The Mapping debugger can also be used for uploading test device messages to see how they'll look after being processed into normalized messages and transformed into FHIR Observations.
Next steps
Choose a deployment method for the MedTech service
Overview of the MedTech service device data processing stages
Frequently asked questions about the MedTech service
Note
FHIR® is a registered trademark of HL7 and is used with the permission of HL7.
