Quickstart: Use an ARM template to deploy Azure API for FHIR
Important
Azure API for FHIR will be retired on September 30, 2026. Follow the migration strategies to transition to Azure Health Data Services FHIR® service by that date. Due to the retirement of Azure API for FHIR, new deployments won't be allowed beginning April 1, 2025. Azure Health Data Services FHIR service is the evolved version of Azure API for FHIR that enables customers to manage FHIR, DICOM, and MedTech services with integrations into other Azure services.
In this quickstart, you learn how to use an Azure Resource Manager template (ARM template) to deploy Azure API for Fast Healthcare Interoperability Resources (FHIR®). You can deploy Azure API for FHIR through the Azure portal, PowerShell, or CLI.
An Azure Resource Manager template is a JavaScript Object Notation (JSON) file that defines the infrastructure and configuration for your project. The template uses declarative syntax. You describe your intended deployment without writing the sequence of programming commands to create the deployment.
If your environment meets the prerequisites and you're familiar with using ARM templates, select the Deploy to Azure button. The template opens in the Azure portal once you sign in.
Prerequisites
An Azure account with an active subscription. Create one for free.
Review the template
The template used in this quickstart is from Azure Quickstart Templates.
{
  "$schema": "https://schema.management.azure.com/schemas/2019-04-01/deploymentTemplate.json#",
  "contentVersion": "1.0.0.0",
  "metadata": {
    "_generator": {
      "name": "bicep",
      "version": "0.5.6.12127",
      "templateHash": "9588053699595008971"
    }
  },
  "parameters": {
    "serviceName": {
      "type": "string",
      "metadata": {
        "description": "The name of the service."
      }
    },
    "location": {
      "type": "string",
      "allowedValues": [
        "australiaeast",
        "eastus",
        "eastus2",
        "japaneast",
        "northcentralus",
        "northeurope",
        "southcentralus",
        "southeastasia",
        "uksouth",
        "ukwest",
        "westcentralus",
        "westeurope",
        "westus2"
      ],
      "metadata": {
        "description": "Location of Azure API for FHIR"
      }
    }
  },
  "resources": [
    {
      "type": "Microsoft.HealthcareApis/services",
      "apiVersion": "2021-11-01",
      "name": "[parameters('serviceName')]",
      "location": "[parameters('location')]",
      "kind": "fhir-R4",
      "properties": {
        "authenticationConfiguration": {
          "audience": "[format('https://{0}.azurehealthcareapis.com', parameters('serviceName'))]",
          "authority": "[uri(environment().authentication.loginEndpoint, subscription().tenantId)]"
        }
      }
    }
  ]
}
The template defines one Azure resource.
- Microsoft.HealthcareApis/services
Deploy the template
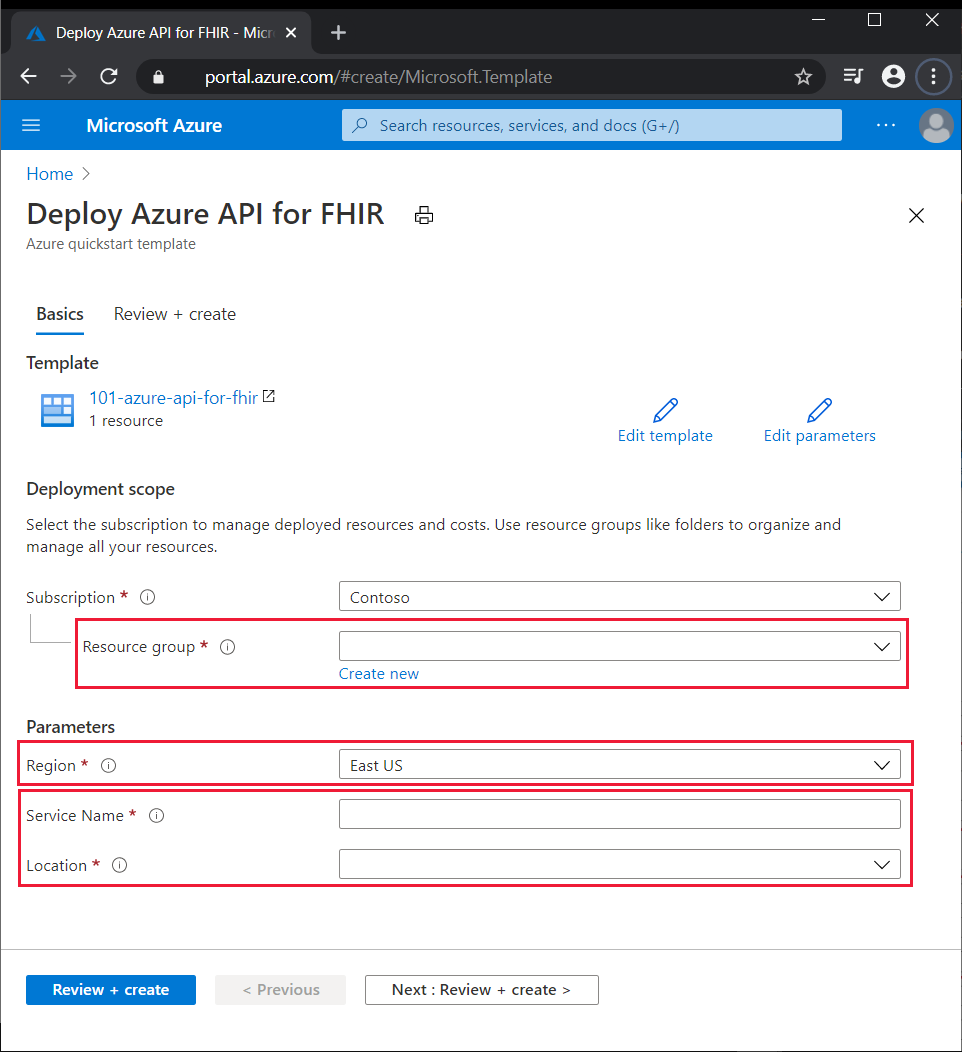
Select the following link to deploy the Azure API for FHIR using the ARM template in the Azure portal:
On the Deploy Azure API for FHIR page:
If you want, change the Subscription from the default to a different subscription.
For Resource group, select Create new, enter a name for the new resource group, and select OK.
If you created a new resource group, select a Region for the resource group.
Enter a new Service Name and choose the Location of the Azure API for FHIR. The location can be the same as or different from the region of the resource group.
Select Review + create.
Read the terms and conditions, and then select Create.
Note
The deployment takes a few minutes to complete. Note the names for the Azure API for FHIR service and the resource group, for use in reviewing deployed resources.
Review deployed resources
Follow these steps to see an overview of your new Azure API for FHIR service:
In the Azure portal, search for and select Azure API for FHIR.
In the FHIR list, select your new service. The Overview page for the new Azure API for FHIR service appears.
To validate that the new FHIR API account is provisioned, select the link next to FHIR metadata endpoint to fetch the FHIR API capability statement. The link has a format of
https://<service-name>.azurehealthcareapis.com/metadata. If the account is provisioned, a JSON file is displayed.
Clean up resources
When no longer needed, delete the resource group. This deletes the resources in the resource group.
In the Azure portal, search for and select Resource groups.
In the resource group list, choose the name of your resource group.
In the Overview page of your resource group, select Delete resource group.
In the confirmation dialog box, type the name of your resource group, and then select Delete.
For a step-by-step tutorial that guides you through the process of creating an ARM template, see the tutorial to create and deploy your first ARM template
Next steps
In this quickstart guide, you've deployed the Azure API for FHIR into your subscription. For information about how to register applications and the Azure API for FHIR configuration settings, see the following.
Note
FHIR® is a registered trademark of HL7 and is used with the permission of HL7.

