Assign custom domain names to Event Grid namespace's MQTT and HTTP host names
The Event Grid namespace is automatically assigned an HTTP hostname at the time of creation. If MQTT is enabled on the namespace, the MQTT hostname is also assigned to the namespace. Your clients use these host names to communicate with the Event Grid namespace.
You can assign your custom domain names to your Event Grid namespace’s MQTT and HTTP host names, along with the default host names. Custom domain configurations not only help you to meet your security and compliance requirements, but also eliminates the need to modify your clients that are already linked to your domain.
Prerequisites
To use custom domains for namespaces, you need to have the following prerequisites:
- Custom domain that you own and can modify its Domain Name System (DNS) records. To modify DNS records, you need access to the DNS registry for your domain provider, such as GoDaddy.
- Secure Sockets Layer (SSL) certificate for your custom domain from a public or private CA.
- Azure Key Vault account to host the SSL certificate for your custom domain.
High-level steps
To use custom domains for namespaces, follow these steps:
- Add DNS entries to point your custom domain to the Event Grid namespace endpoint.
- Enable managed identity on your Event Grid namespace.
- Create an Azure Key Vault account that hosts the server certificate for your custom domain.
- Add role assignment in Azure Key Vault for the namespace’s managed identity.
- Associate your Event Grid namespace with the custom domain, specifying your custom domain name, certificate name, and key vault instance reference.
- The Event Grid namespace generates a TXT record that you use to prove ownership of the custom domain.
- Prove your domain ownership by creating a TXT record based on the value that Event Grid generated in the previous step.
- Event Grid validates the TXT records of the custom domain before activating the custom domain for your clients’ usage.
- Your clients can connect to the Event Grid namespace through the custom domain.
Limitations
- Custom domain configuration is unique per region across MQTT and HTTP host names.
- Custom domain configuration can't be identical for the MQTT and HTTP host names under the same namespace.
- Custom domain configuration can't clash with any MQTT or HTTP hostname for any namespace in the same region.
Add DNS entries
Create DNS records in your domain to point to the hostname of your Event Grid namespace that you want to associate your domain with. To learn more, see Configuring a custom domain name for an Azure cloud service.
Your HTTP hostname for your namespace is in the following format: <namespace name>.centraluseuap-1.eventgrid.azure.net
Your MQTT hostname for your namespace is in the following format: <namespace name>.centraluseuap-1.ts.eventgrid.azure.net
Enable managed identity on your Event Grid namespace
The namespace uses the managed identity to access your Azure Key Vault instance to get the server certificate for your custom domain. Use the following command to enable system- assigned managed identity on your Event Grid namespace:
az eventgrid namespace update --resource-group <resource group name> --name <namespace name> --identity "{type:systemassigned}"
For information configuring system and user-assigned identities using the Azure portal, see Enable managed identity for an Event Grid namespace.
Create an Azure Key Vault account and upload your server certificate
Use the following command to create an Azure Key Vault account:
az keyvault create --name "<your-unique-keyvault-name>" --resource-group "<resource group name>" --location "centraluseuap"Use the following command to import a certificate to the Azure Key Vault
az keyvault certificate import --vault-name "<your-key-vault-name>" -n "<cert name>" -f "<path to your certificate pem file> "Note
Your certificate must include the domain name in the Subject Alternative name for DNS. For more information, see Tutorial: Import a certificate in Azure Key Vault.
Add role assignment in Azure Key Vault for the namespace’s managed identity
You need to provide access to the namespace to access your Azure Key Vault account using the following steps:
Get Event Grid namespace system managed identity principal ID using the following command
$principalId=(az eventgrid namespace show --resource-group <resource group name> --name <namespace name> --query identity.principalId -o tsv)Get your Azure Key vault resource ID.
$keyVaultResourceId=(az keyvault show --resource-group <resource group name> --name <your key vault name> --query id -o tsv)Add role assignment in Key Vault for the namespace’s managed identity.
az role assignment create --role "Key Vault Certificate User" --assignee $principalId --scope $keyVaultResourceIdFor more information about Key Vault access and the portal experience, see Provide access to Key Vault keys, certificates, and secrets with an Azure role-based access control.
Associate your Event Grid namespace with the custom domain
In this step, you associate your unverified custom domain with the namespace, but you can't use it until you prove your ownership of the custom domain in the next step.
Use Azure portal
Use the following steps to add your custom domains:
Navigate to your Event Grid namespace in the Azure portal
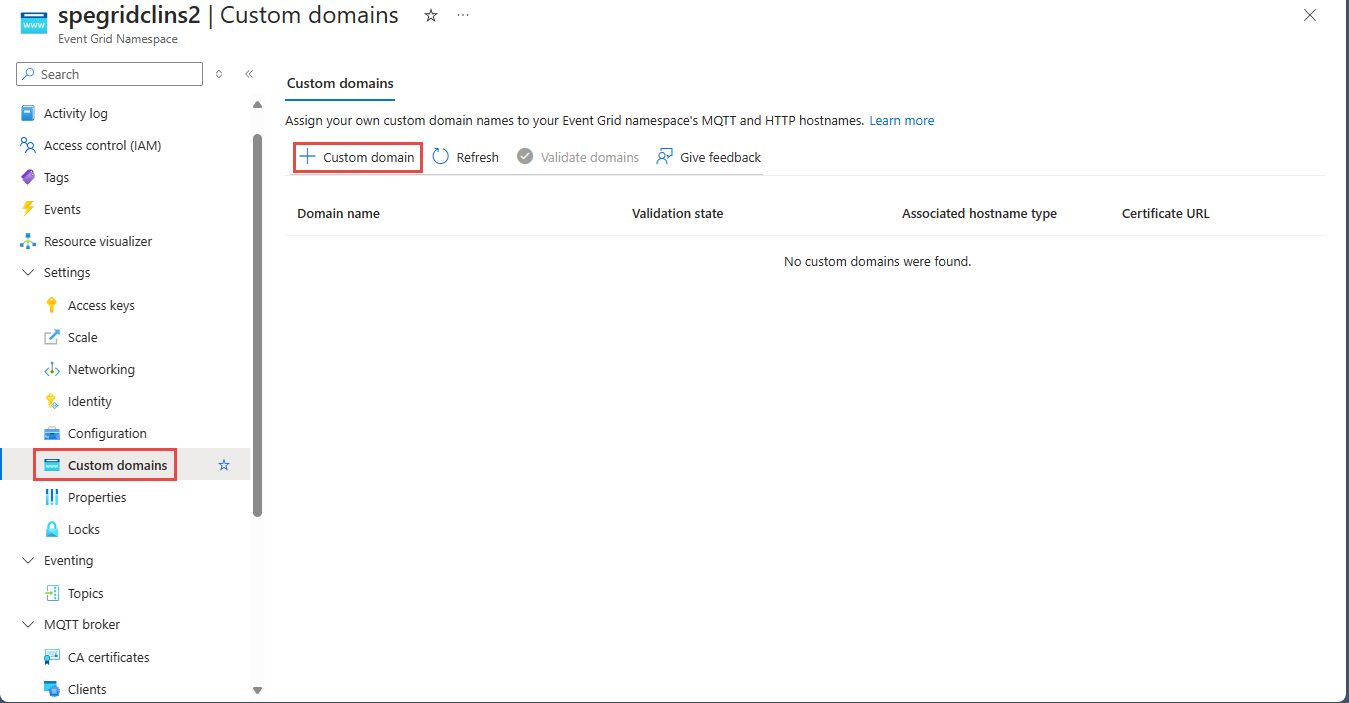
On the Event Grid Namespace page, select Custom domains on the left navigation menu.
On the Custom domains page, select + Custom domain.
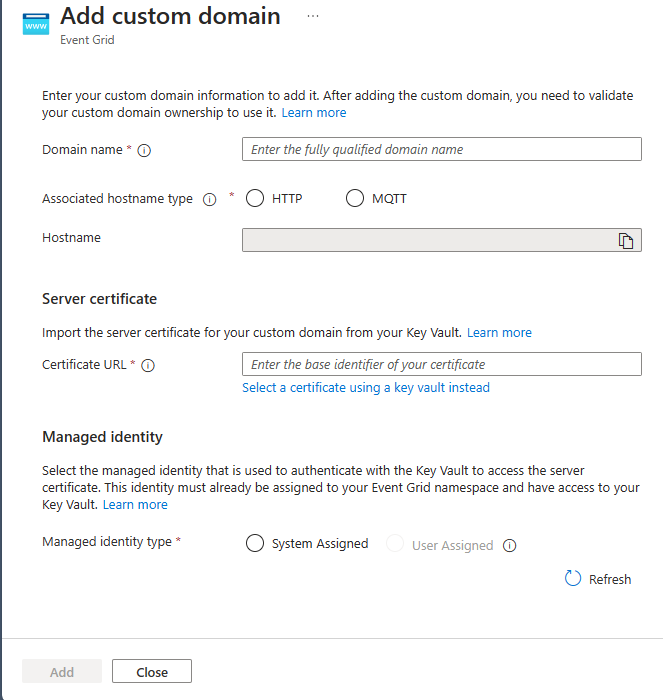
On the Add custom domain page, specify values for the following properties:
Domain name: the fully qualified domain name to be assigned to one of your Event Grid namespace host names.
Associated hostname type: the default hostname type that is to be associated with your custom domain name.
Certificate URL: the Certificate Identifier of the server certificate in your Azure Key Vault. Include only the base identifier of the certificate by excluding the last segment of the Certificate Identifier. You can choose Select a certificate using a key vault instead to select the certificate and the key vault from your subscriptions.
Managed identity: the managed identity used to authenticate with the Key Vault to access the server certificate that was created.
Select Add
Save the TXT records as you need to use these values to prove your custom domain ownership.
Azure CLI example
Use the following command to update your namespace with the custom domain configuration. The following object includes two different customDomains configurations: the configuration under topicSpacesConfiguration is assigned to your MQTT endpoint, and the configuration under topicsConfiguration is assigned to your HTTP endpoint.
Note
Each custom domain configuration has to be unique within the same region.
az resource create --resource-type Microsoft.EventGrid/namespaces --id /subscriptions/<Subscription ID>/resourceGroups/<Resource Group>/providers/Microsoft.EventGrid/namespaces/<Namespace Name> --is-full-object --properties @./resources/NS.json
NS.json
{
    "properties": {
        "topicsConfiguration": {
            "hostname": "HOSTNAME",
            "customDomains": [
                {
                    "fullyQualifiedDomainName": "www.HTTPDOMAINNAME.com",
                    "identity": {
                        "type": "SystemAssigned"
                    },
                    "certificateInfo": {
                        "keyVaultArmId": " /subscriptions/SUBSCRIPTIONID/resourceGroups/RESOURCEGROUPNAME/providers/Microsoft.KeyVault/vaults/KEYVAULTNAME",
                        "certificateName": "CERTIFICATENAME"
                    }
                }
            ]
        },
        "topicSpacesConfiguration": {
            "state": " Enabled",
            "routeTopicResourceId": " /subscriptions/SUBSCRIPTIONID/resourceGroups/RESOURCEGROUPNAME/providers/Microsoft.EventGrid/namespaces/NAMESPACENAME/topics/TOPICNAME",
            "hostname": "NAMESPACENAME.westus2-1.ts.eventgrid.azure.net",
            "routingIdentityInfo": {
                "type": "None"
            },
            "customDomains": [
                {
                    "fullyQualifiedDomainName": " www.MQTTDOMAINNAME.com ",
                    "identity": {
                        "type": "SystemAssigned"
                    },
                    "certificateInfo": {
                        "keyVaultArmId": "/subscriptions/SUBSCRIPTIONNAME/resourceGroups/RESOURCEGROUPNAME/providers/Microsoft.KeyVault/vaults/KEYVAULTNAME",
                        "certificateName": "CERTIFICATENAME"
                    }
                }
            ]
        }
    }
}
Replace the following placeholders with appropriate values, save it to a file named NS.json, and run the CLI command.
| Place holder | Description |
|---|---|
HOSTNAME |
You can get the host name from the Overview page of your Event Grid namespace in the Azure portal. |
NAMESPACENAME |
Name of the Event Grid namespace. |
TOPICNAME |
Name of the topic in the namespace. |
HTTPDOMAINNAME |
Name of the HTTP domain. |
MQTTDOMAINNAME |
Name of the MQTT domain. |
SUBSCRIPTIONID |
Azure subscription ID. |
RESOURCEGROUPNAME |
Name of the Azure resource group. |
KEYVAULTNAME |
Name of the key vault. |
CERTIFICATENAME |
Name of the certificate. |
The identity type (type) can be either SystemAssigned or UserAssigned. If UserAssigned is selected, specify the user assigned identity using the userAssignedIdentity property.
The response to this operation includes the DNS information in the form of the following properties: expectedTxtRecordName and expectedTxtRecordValue. Save this information as you need to use these values to prove your custom domain ownership. Here's a sample response:
{
    "properties": {
        "topicsConfiguration": {
            "hostname": "HOSTNAME",
            "customDomains": [
                {
                    "fullyQualifiedDomainName": "www.HTTPDOMAINNAME.com",
                    "validationState": "Pending",
                    "identity": {
                        "type": "SystemAssigned"
                    },
                    "certificateInfo": {
                        "keyVaultArmId": " /subscriptions/SUBSCRIPTIONID/resourceGroups/RESOURCEGROUPNAME/providers/Microsoft.KeyVault/vaults/KEYVAULTNAME",
                        "certificateName": "CERTIFICATENAME"
                    },
                    "expectedTxtRecordName": "_eg. www.contoso-http.com",
                    "expectedTxtRecordValue": "<random string>"
                }
            ]
        },
        "topicSpacesConfiguration": {
            "state": " Enabled",
            "routeTopicResourceId": " /subscriptions/SUBSCRIPTIONID/resourceGroups/RESOURCEGROUPNAME/providers/Microsoft.EventGrid/namespaces/MSNS/topics/TOPICNAME",
            "hostname": "HOSTNAME",
            "routingIdentityInfo": {
                "type": "None"
            },
            "customDomains": [
                {
                    "fullyQualifiedDomainName": " www.MQTTDOMAINNAME.com ",
                    "validationState": "Pending",
                    "identity": {
                        "type": "SystemAssigned"
                    },
                    "certificateInfo": {
                        "keyVaultArmId": "/subscriptions/SUBSCRIPTIONID/resourceGroups/RESOURCEGROUPNAME/providers/Microsoft.KeyVault/vaults/KEYVAULTNAME",
                        "certificateName": "CERTIFICATENAME"
                    },
                    "expectedTxtRecordName": "_eg. www.contoso-mqtt.com",
                    "expectedTxtRecordValue": "<random string>"
                }
            ]
        }
    }
}
Prove your custom domain ownership
To prove your domain ownership, follow these steps:
Add the DNS information.
Go back to your domain registrar and create a new TXT record for your domain based on your copied DNS information from the previous step. Creating this TXT for your domain verifies ownership of your domain name. Set the time to live (TTL) to 3,600 seconds (60 minutes), and then save the record.
Verify your custom domain name.
To use Azure portal, follow these steps to validate your custom domains:
- On the Custom domains page, select Validate domains.
- On the Validate domains page, select Validate.
Use the following command to update your namespace with an identical custom domain configuration. This command triggers the validation of the custom domain ownership. The DNS records must propagate before you can verify the domain and the propagation time of your DNS settings depends on your domain registrar.
In the response to your command, verify that the
validationStateisApproved.az resource create --resource-type Microsoft.EventGrid/namespaces --id /subscriptions/<Subscription ID>/resourceGroups/<Resource Group>/providers/Microsoft.EventGrid/namespaces/<Namespace Name> --is-full-object --properties @./resources/NS.jsonNS.json:
{
    "properties": {
        "topicsConfiguration": {
            "hostname": "HOSTNAME",
            "customDomains": [
                {
                    "fullyQualifiedDomainName": "www.HTTPDOMAINNAME.com",
                    "identity": {
                        "type": "SystemAssigned"
                    },
                    "certificateInfo": {
                        "keyVaultArmId": " /subscriptions/AZURESUBSCRIPTIONID/resourceGroups/RESOURCEGROUPNAME/providers/Microsoft.KeyVault/vaults/KEYVAULTNAME",
                        "certificateName": "CERTIFICATENAME"
                    }
                }
            ]
        },
        "topicSpacesConfiguration": {
            "state": " Enabled",
            "routeTopicResourceId": " /subscriptions/AZURESUBSCRIPTIONID/resourceGroups/RESOURCEGROUPNAME/providers/Microsoft.EventGrid/namespaces/NAMESPACENAME/topics/TOPICNAME",
            "hostname": "HOSTNAME",
            "routingIdentityInfo": {
                "type": "None"
            },
            "customDomains": [
                {
                    "fullyQualifiedDomainName": "www.MQTTDOMAINNAME.com ",
                    "identity": {
                        "type": "SystemAssigned"
                    },
                    "certificateInfo": {
                        "keyVaultArmId": "/subscriptions/AZURESUBSCRIPTIONID/resourceGroups/RESOURCEGROUPNAME/providers/Microsoft.KeyVault/vaults/KEYVAULTNAME",
                        "certificateName": "CERTIFICATENAME"
                    }
                }
            ]
        }
    }
}

