Use Azure SQL Database with Azure DevOps Server
Azure DevOps Server 2022 | Azure DevOps Server 2020 | Azure DevOps Server 2019
Use the steps in this article to configure Azure DevOps Server with Azure SQL Database. This topology has a few additional steps compared with using an on-premises SQL server.
Requirements
- Azure SQL Database can only be used with Azure DevOps Server 2019 and later versions.
- You must install the Azure DevOps Server on Azure VM.
- The VM must have system-managed identity enabled, which is used to authenticate to the Azure SQL database.
- The VM must be joined to a domain but not a workgroup.
- Azure SQL databases must be single databases. Managed instances and elastic pools are supported in Azure DevOps Server 2022 and newer.
All General Purpose and Premium SKUs are supported. Standard SKUs S3 and higher also are supported. Basic SKUs and Standard SKUs S2 and below aren't supported. Azure DevOps Server configurations that use Azure SQL Database don't support older SQL Server Reporting Services with SQL Server Analysis Services reporting features. Instead, you can use the Azure DevOps Analytics.
Upgrading to Azure DevOps Server is supported only from Team Foundation Server 2015 and newer when you use Azure SQL Database. Azure SQL Database doesn't support encrypted stored procedures.
Set up Azure SQL Database
Configure a managed identity on your virtual machines. We only support system-managed identities at this time.
You can run configuration by using all standard mechanisms, including the:
To set up a new Azure DevOps Server instance, create two Azure SQL databases:
AzureDevOps_Configuration
AzureDevOps_DefaultCollection
Note
You can skip this step if you use existing databases to either:
- Upgrade a new version of Azure DevOps Server.
- Migrate an up-to-date instance of Azure DevOps Server to Azure SQL Database.
Configure Azure Active Directory authentication for your Azure SQL Database server. Make yourself the Active Directory administrator on the server. You need administrator permissions on the database to complete the remaining configuration steps. You can change this permission later.
Enable your managed identity, or identities if you use multiple servers, to sign in to your Azure SQL database and give it the appropriate permissions. Connect to the database server by using SQL Server Management Studio. Connect by using an Azure Active Directory user with Active Directory authentication. You can't manipulate Azure Active Directory users if you sign in to Azure SQL Database under SQL authentication.
a. Run the following T-SQL command on the
maindatabase:CREATE USER [VMName] FROM EXTERNAL PROVIDER ALTER ROLE [dbmanager] ADD MEMBER [VMName]Replace VMName with the name of the virtual machine whose managed identity you add to the database.
b. Run the following T-SQL command on the configuration and all collection databases:
CREATE USER [VMName] FROM EXTERNAL PROVIDER
ALTER ROLE [db_owner] ADD MEMBER [VMName]
ALTER USER [VMName] WITH DEFAULT_SCHEMA=dbo
Configure Azure DevOps Server
Return to the Azure DevOps Server configuration wizard. If you set up a new instance, select This is a new Azure DevOps Server deployment. If you upgrade or migrate and have existing data in your databases, select I have existing databases to use for this Azure DevOps Server deployment.
When you get to the Database page in the configuration wizard, specify the Azure SQL Database server instance. Typically, the server instance is in the form of SQLInstanceName.database.windows.net.
You now have an Azure DevOps Server instance that runs on Azure SQL Database.
Connect to an Azure SQL database from on-premises SSMS
Do the following steps to connect to an Azure SQL databased from your on-premises SSMS:
Export via SQL server Management Studio using SSMS from the VM running in the same VNET as a private endpoint from SQL to blob storage/ file share.

You can make use SQL Server Management Studio Export data-tier application wizard to export the Azure SQL database to a .bacpac file. You can store the .bacpac file in Azure blob storage or file share.
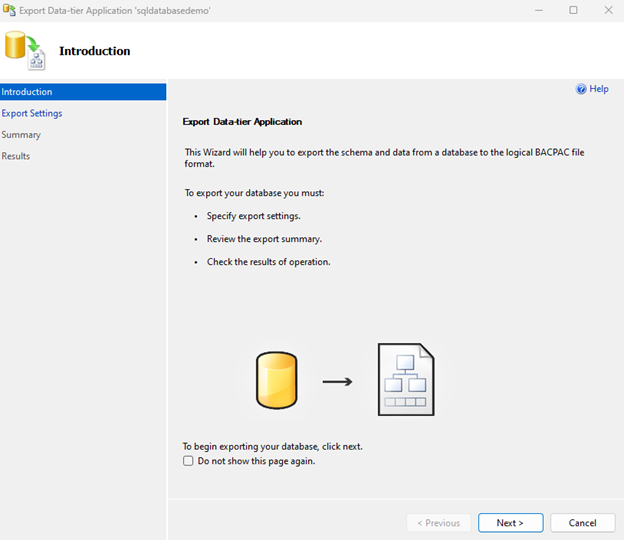
Right-select the SQL Database on logical SQL Server from SSMS > Tasks > Export data-tier application wizard.
Select Next.

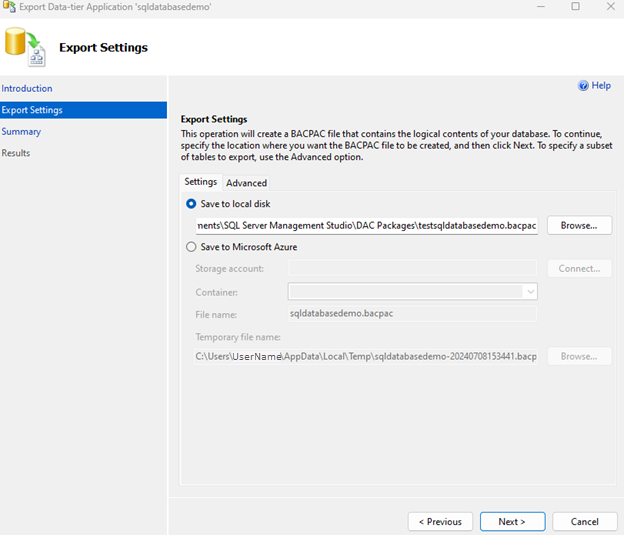
Select the location to store the BACPAC file.
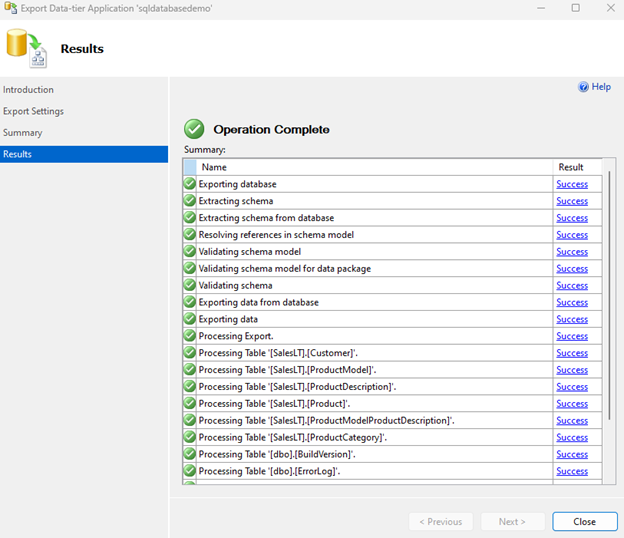
Select Close.
The DAC packages are located here: C:\Users\{sample-user-name}\OneDrive - Microsoft\Documents\SQL Server Management Studio\DAC Packages.
Connect Azure SQL Database from Azure DevOps Server 2022
Connecting Azure SQL Database from Azure DevOps Server 2022 (on-premises) involves configuring access, ensuring connectivity, and using appropriate credentials. Do the following steps to connect Azure SQL Database from Azure DevOps Server 2022.
Prerequisites
| Category | Requirements |
|---|---|
| Firewall rules | Azure SQL Database firewall rules allow inbound connections from the IP address or subnet where Azure DevOps Server is hosted. To do so, go to: Azure portal > Azure SQL Database > Settings > Firewalls and virtual networks > add a new rule to allow access from your Azure DevOps Server’s public IP address or subnet. |
| Tools | - Azure SQL Database provisioned and accessible from Azure. Record of the server name, database name, and authentication method. - Azure DevOps Server 2022 running in your on-premises environment. - SSMS installed on the same machine where Azure DevOps Server is installed. |
Connect to Azure SQL Database
Get Azure SQL Database connection details:
- Server name:
<your-server-name>.database.windows.net - Database name:
<your-database-name> - Authentication method: SQL Server Authentication (username/password) or Microsoft Entra ID authentication.
- Server name:
Connect Using SQL Server Management Studio (SSMS): a. Open SQL Server Management Studio on the machine where Azure DevOps Server is installed. b. Connect to Azure SQL Database: c. Launch SSMS. d. In the Connect to Server window:
- Enter the Server Name:
<your-server-name>.database.windows.net - Choose Authentication: SQL Server Authentication.
- Enter your User Name and Password.
- Select Connect. Once connected, the Azure SQL Database is listed under the Object Explorer in SSMS.
- Enter the Server Name:
Test connectivity: Execute a query or command in SSMS to verify connectivity:
SELECT @@VERSION;This query returns the SQL Server version of your Azure SQL Database, confirming that the connection is successful.
Use connection in Azure DevOps Server: Once you verify the connectivity from SSMS, you can use this connection within Azure DevOps Server for various tasks such as:
- Automated deployments: Set up release pipelines in Azure DevOps Server to deploy database changes.
- Data migration: Use SQL scripts or data tools integrated with Azure DevOps Server.
- Continuous integration: Integrate database changes into your CI/CD pipelines.
Tip
- Be secure: Consider using Microsoft Entra ID for more secure access.
- Manage credentials: Store credentials securely and avoid hardcoding them in scripts or configurations.
- Monitor: Monitor database connections and usage to ensure security and performance.
Connect Azure SQL Database from Azure DevOps Server 2022 running on-premises, enabling streamlined database management and integration with your development and deployment processes. Adjust configurations and security measures based on your organization's policies and requirements.
Use your Azure SQL Database connection in Azure DevOps Server 2022
Prepare Azure DevOps Server:
a. Ensure you have Azure DevOps Server 2022 installed and configured on your on-premises environment.</
b. Access to the Azure DevOps Server with appropriate permissions to create and manage pipelines.Set up Azure DevOps project and repository (if not already done):
a. Create a new or use an existing Azure DevOps project.
b. Set up a Git or TFVC repository to store your pipeline definitions and scripts.Create a pipeline:
a. Go to your Azure DevOps project.
b. Select Pipelines > Pipelines > New pipeline.
c. Select the appropriate pipeline template based on your requirements. For Azure SQL Database, you might start with an Empty job or choose a template that suits your deployment needs (for example, Azure Pipeline).
d. Edit the pipeline YAML file or use the classic editor to define your pipeline stages and tasks.Add tasks to deploy to Azure SQL Database:
Task: SQL Server Database Deployment: Use the
SqlAzureDacpacDeploymenttask to deploy changes to your Azure SQL Database. Example YAML snippet:steps: - task: SqlAzureDacpacDeployment@1 inputs: azureSubscription: 'YourServiceConnectionName' # Use your Azure SQL Database service connection serverName: '<your-server-name>.database.windows.net' databaseName: '<your-database-name>' deployType: 'DacpacTask' authenticationType: 'server' sqlUsername: '$(sqlUsername)' sqlPassword: '$(sqlPassword)'Replace
<your-server-name>,<your-database-name>,$(sqlUsername), and$(sqlPassword)with appropriate values or variables.Task: Azure SQL Query: Use the
AzureSqlQuerytask to run SQL queries against your Azure SQL Database. Example YAML snippet:steps: - task: AzureSqlQuery@1 inputs: azureSubscription: 'YourServiceConnectionName' # Use your Azure SQL Database service connection serverName: '<your-server-name>.database.windows.net' databaseName: '<your-database-name>' sqlUsername: '$(sqlUsername)' sqlPassword: '$(sqlPassword)' sqlQuery: 'SELECT * FROM TableName'
Securely manage credentials: Use Azure DevOps variables or Azure Key Vault integration to manage sensitive information like SQL Server credentials (
sqlUsernameandsqlPassword).Trigger and run pipeline:
- Save and commit your pipeline changes.
- Trigger the pipeline manually or set up triggers (for example, on code commit, schedule) as per your deployment strategy.
Monitor pipeline execution:
- Monitor pipeline runs in Azure DevOps to ensure deployments to Azure SQL Database are successful.
- Review logs and outputs to troubleshoot any issues during deployment.
Tip
- Integrate with Release Pipelines: Integrate your build pipeline with release pipelines for more complex deployment scenarios and approvals.
- Make incremental database changes: Use tools like SQL Server Data Tools (SSDT) or migrations to manage incremental changes to your database schema.
- Use version control: Keep your SQL scripts and database changes under version control to track changes and ensure reproducibility.
Adjust configurations and tasks based on your specific deployment needs and organizational requirements.
Create a SQL Server backup
Creating a SQL Server backup for Azure DevOps Server 2022 using the Azure DevOps Server Administration Console involves configuring backup settings and scheduling regular backups. Do the following steps to create a SQL Server backup.
Prerequisites for backup
| Category | Requirements |
|---|---|
| Access | Administrator access to the server where the Azure DevOps Server is installed. |
| Permissions | Permission to configure backups and access SQL Server Management Studio. |
Create backup
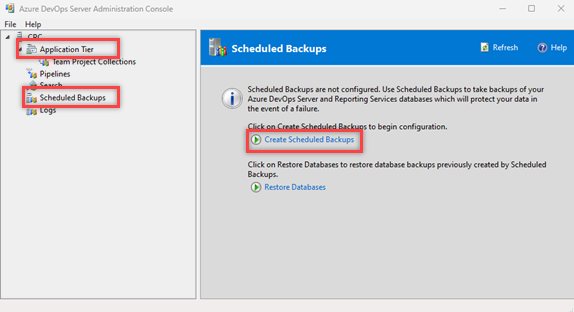
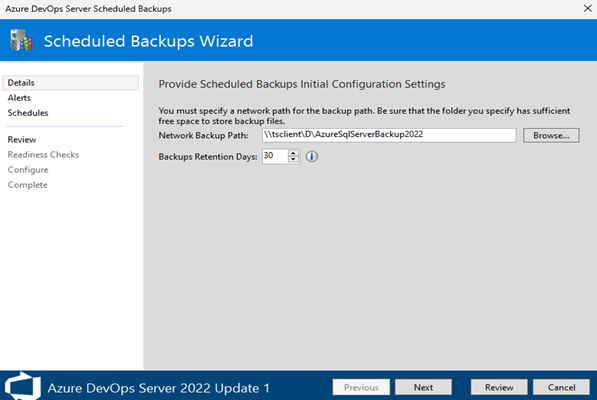
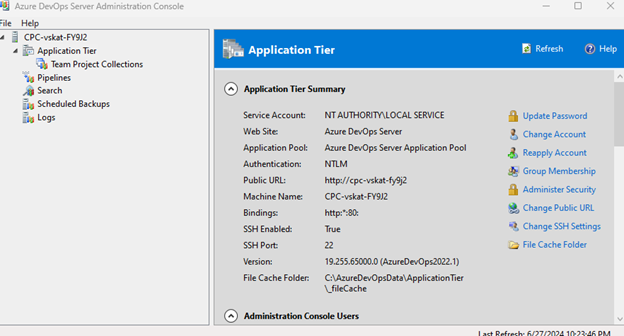
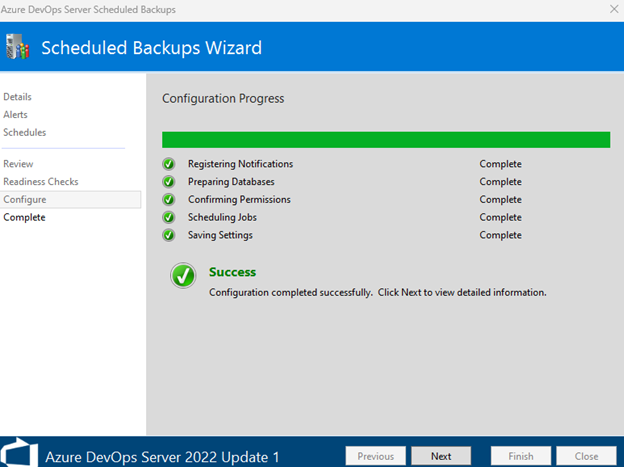
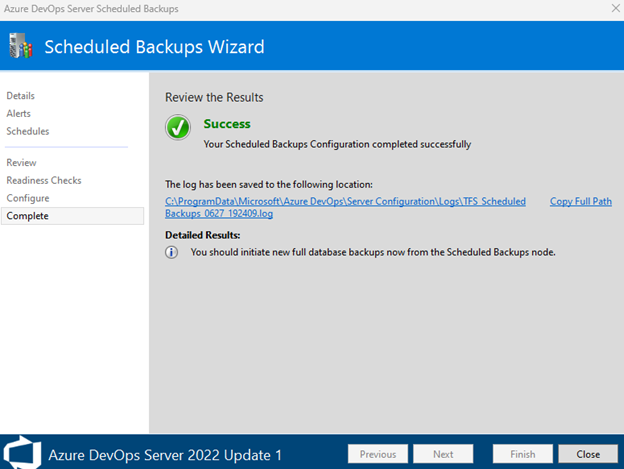
Launch the Azure DevOps Server Administration Console on the server where Azure DevOps Server is installed and select Application Tier > Scheduled Backups > Create Scheduled Backups.
Enter the network backup path, and then select Next.
Select any desired email alerts, and then select Next.

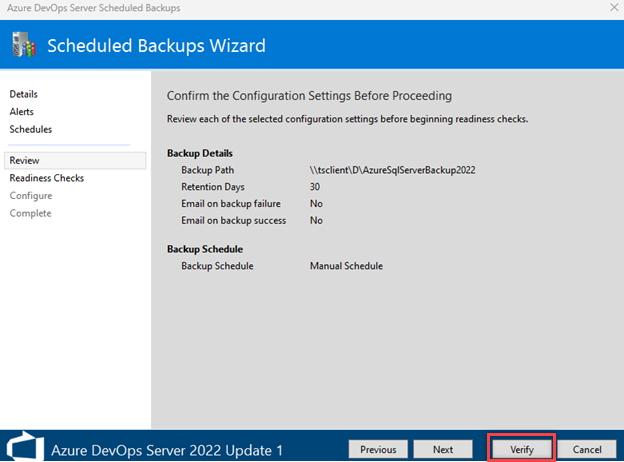
Choose a backup schedule based on your requirements, and then select Next.

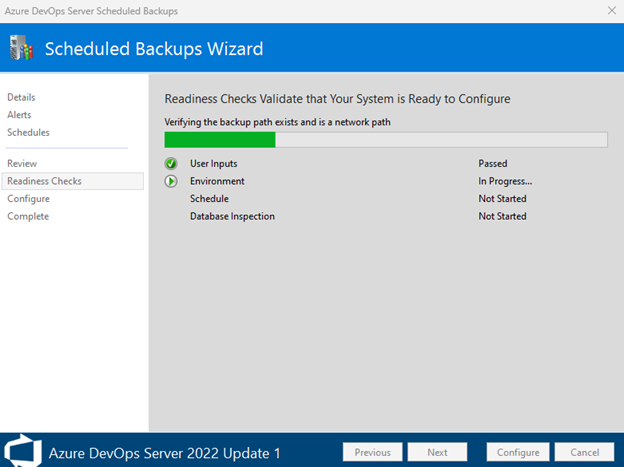
Confirm your configuration settings and select Verify.
The backups wizard verifies that the backup path exists and is a network path.
Troubleshoot errors
In case of a readiness check failure, see the following information for help with troubleshooting.
Error: Service Account Access
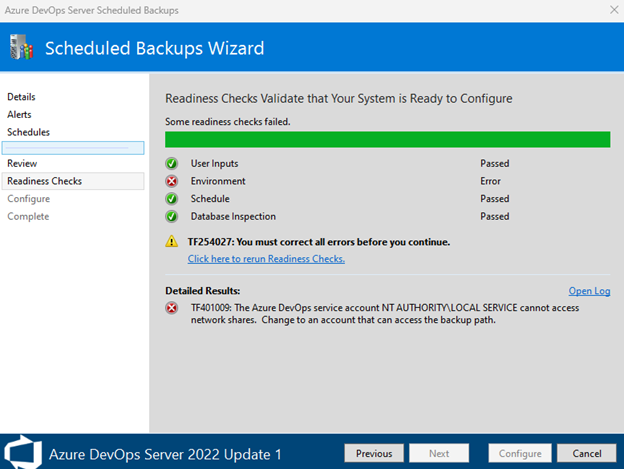
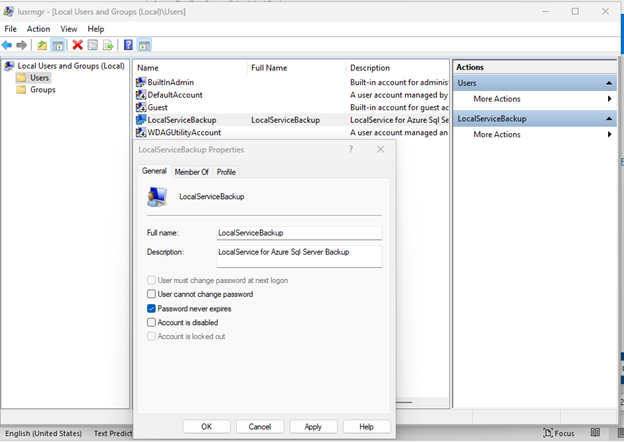
Error message: TF401009: The Azure DevOps service account NT AUTHORITY\LOCAL SERVICE cannot access network shares. Change to an account that can access the backup path. This error occurs when the service account is NT AUTHORITY\LOCAL SERVICE.
Solution:
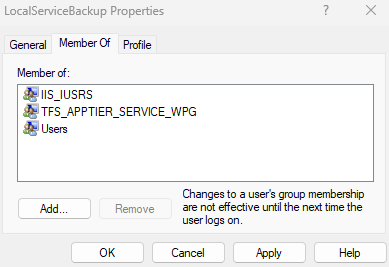
- Create a local user with the necessary access permissions.
- In the Azure DevOps Server Administration Console, go to the Application Tier screen and select Change Account.
- Change the service account to the newly created local user account.
- Redo the backup process to successfully create the backup and rerun the readiness cecks.
Successful backup configuration:
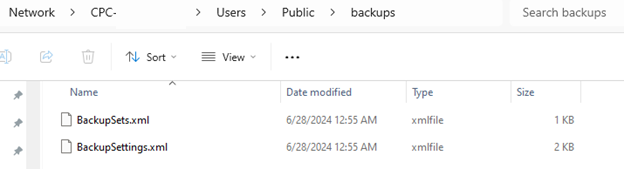
Scheduled backup logs:
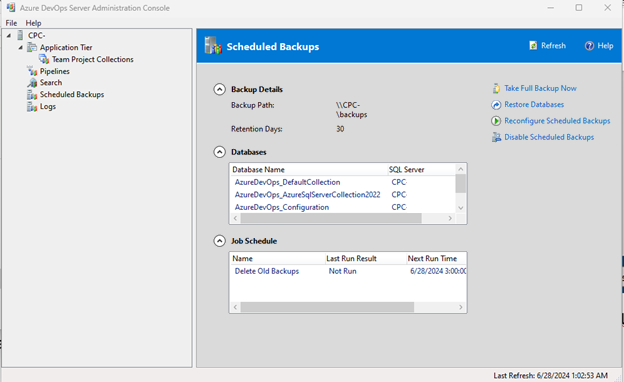
Administration Console scheduled backups:
Error: Log File
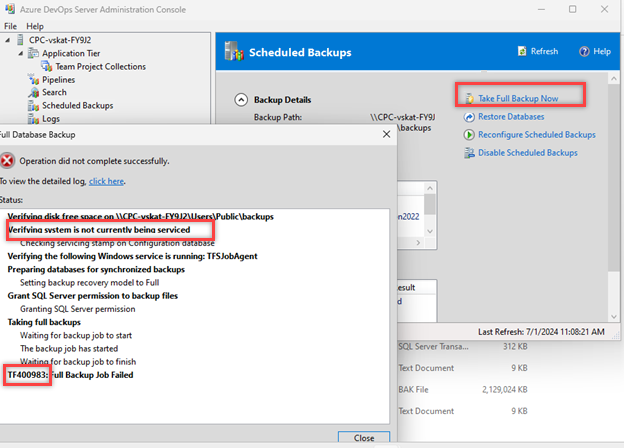
Example log file location: C:\ProgramData\Microsoft\Azure DevOps\Server Configuration\Logs\TFS_Scheduled Backups_0627_192409.log
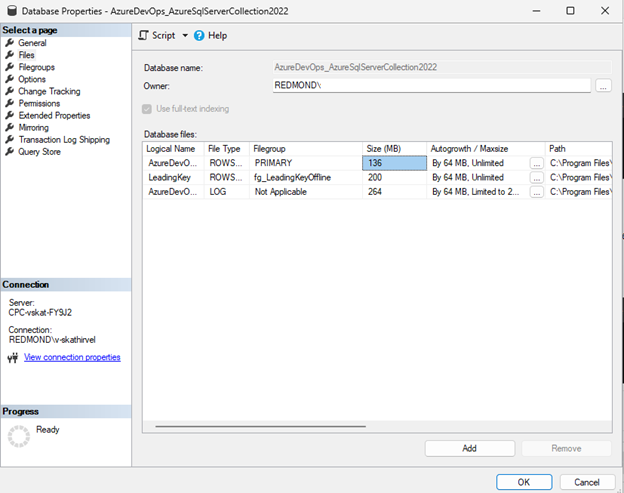
Example log file error message: [7/1/2024 7:28:37 AM] [Error]``Exception Message: The backup of the file or filegroup "LeadingKey" is not permitted because it is not online. Container state: "Offline" (7). Restore status: 0. BACKUP can be performed by using the FILEGROUP or FILE clauses to restrict the selection to include only online data.``BACKUP DATABASE is terminating abnormally. (type SqlException)
Solution:
Ensure all filegroups are online before performing the backup.
LeadingKeyOffline example:
Test the backup process using SQL queries to identify and resolve any issues with specific filegroups.