Authenticating Azure-hosted apps to Azure resources with the Azure SDK for Python
When you host an app in Azure using services like Azure App Service, Azure Virtual Machines, or Azure Container Instances, the recommended approach to authenticate an app to Azure resources is with managed identity.
A managed identity provides an identity for your app such that it can connect to other Azure resources without the need to use a secret key or other application secret. Internally, Azure knows the identity of your app and what resources it's allowed to connect to. Azure uses this information to automatically obtain Microsoft Entra tokens for the app to allow it to connect to other Azure resources, all without you having to manage any application secrets.
Note
Apps running on Azure Kubernetes Service (AKS) can use a workload identity to authenticate with Azure resources. In AKS, a workload identity represents a trust relationship between a managed identity and a Kubernetes service account. If an application deployed to AKS is configured with a Kubernetes service account in such a relationship, DefaultAzureCredential authenticates the app to Azure by using the managed identity. Authentication by using a workload identity is discussed in Use Microsoft Entra Workload ID with Azure Kubernetes Service. For steps on how to configure workload identity, see Deploy and configure workload identity on an Azure Kubernetes Service (AKS) cluster.
Managed identity types
There are two types of managed identities:
- System-assigned managed identities - This type of managed identity is provided by and tied directly to an Azure resource. When you enable managed identity on an Azure resource, you get a system-assigned managed identity for that resource. A system-assigned managed identity is tied to the lifecycle of the Azure resource it's associated with. When the resource is deleted, Azure automatically deletes the identity for you. Since all you have to do is enable managed identity for the Azure resource hosting your code, this approach is the easiest type of managed identity to use.
- User-assigned managed identities - You can also create a managed identity as a standalone Azure resource. This approach is most frequently used when your solution has multiple workloads that run on multiple Azure resources that all need to share the same identity and same permissions. For example, if your solution had components that run on multiple App Service and virtual machine instances that all need access to the same set of Azure resources, then a user-assigned managed identity used across those resources makes sense.
This article covers the steps to enable and use a system-assigned managed identity for an app. If you need to use a user-assigned managed identity, see the article Manage user-assigned managed identities to see how to create a user-assigned managed identity.
1 - Enable managed identity in the Azure resource hosting the app
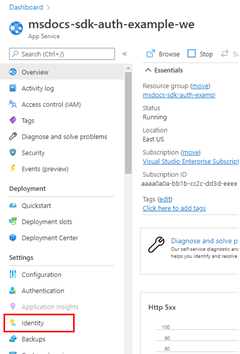
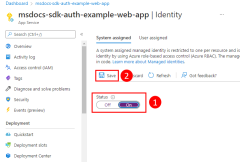
The first step is to enable managed identity on Azure resource hosting your app. For example, if you're hosting a Django application using Azure App Service, you need to enable managed identity for the App Service web app that is hosting your app. If you're using a virtual machine to host your app, you would enable your VM to use managed identity.
You can enable managed identity to be used for an Azure resource using either the Azure portal or the Azure CLI.
Azure CLI commands can be run in the Azure Cloud Shell or on a workstation with the Azure CLI installed.
The Azure CLI commands used to enable managed identity for an Azure resource are of the form az <command-group> identity --resource-group <resource-group-name> --name <resource-name>. Specific commands for popular Azure services are shown below.
az webapp identity assign --resource-group <resource-group-name> -name <web-app-name>
The output will look like the following.
{
  "principalId": "aaaaaaaa-bbbb-cccc-1111-222222222222",
  "tenantId": "aaaabbbb-0000-cccc-1111-dddd2222eeee",
  "type": "SystemAssigned",
  "userAssignedIdentities": null
}
The principalId value is the unique ID of the managed identity. Keep a copy of this output as you'll need these values in the next step.
2 - Assign roles to the managed identity
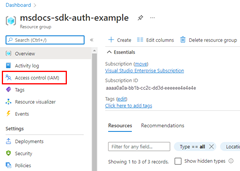
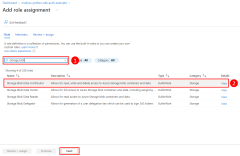
Next, you need to determine what roles (permissions) your app needs and assign the managed identity to those roles in Azure. A managed identity can be assigned roles at a resource, resource group, or subscription scope. This example shows how to assign roles at the resource group scope since most applications group all their Azure resources into a single resource group.
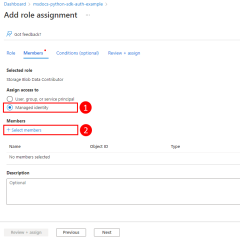
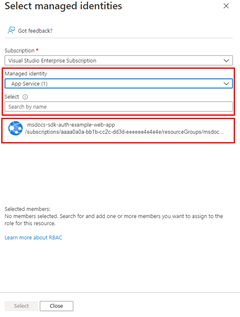
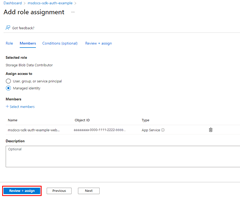
A managed identity is assigned a role in Azure using the az role assignment create command. For the assignee, use the principalId you copied in step 1.
az role assignment create --assignee <managedIdentityprincipalId> \
    --scope /subscriptions/<subscriptionId>/resourceGroups/<resourceGroupName> \
    --role "<roleName>"
To get the role names that a service principal can be assigned to, use the az role definition list command.
az role definition list \
    --query "sort_by([].{roleName:roleName, description:description}, &roleName)" \
    --output table
For example, to allow the managed identity with the ID of aaaaaaaa-bbbb-cccc-1111-222222222222 read, write, and delete access to Azure Storage blob containers and data in all storage accounts in the msdocs-python-sdk-auth-example resource group in the subscription with ID aaaa0a0a-bb1b-cc2c-dd3d-eeeeee4e4e4e, you would assign the application service principal to the Storage Blob Data Contributor role using the following command.
az role assignment create --assignee aaaaaaaa-bbbb-cccc-1111-222222222222 \
    --scope /subscriptions/aaaa0a0a-bb1b-cc2c-dd3d-eeeeee4e4e4e/resourceGroups/msdocs-python-sdk-auth-example \
    --role "Storage Blob Data Contributor"
For information on assigning permissions at the resource or subscription level using the Azure CLI, see the article Assign Azure roles using the Azure CLI.
3 - Implement DefaultAzureCredential in your application
When your code is running in Azure and managed identity has been enabled on the Azure resource hosting your app, the DefaultAzureCredential determines the credentials to use in the following order:
- Check the environment for a service principal as defined by the environment variables
AZURE_CLIENT_ID,AZURE_TENANT_ID, and eitherAZURE_CLIENT_SECRETorAZURE_CLIENT_CERTIFICATE_PATHand (optionally)AZURE_CLIENT_CERTIFICATE_PASSWORD. - Check keyword parameters for a user-assigned managed identity. You can pass in a user-assigned managed identity by specifying its client ID in the
managed_identity_client_idparameter. - Check the
AZURE_CLIENT_IDenvironment variable for the client ID of a user-assigned managed identity. - Use the system-assigned managed identity for the Azure resource if it's enabled.
You can exclude managed identities from the credential by setting the exclude_managed_identity_credential keyword parameter True.
In this article, we're using the system-assigned managed identity for an Azure App Service web app, so we don't need to configure a managed identity in the environment or pass it in as a parameter. The following steps show you how to use DefaultAzureCredential.
First, add the azure.identity package to your application.
pip install azure-identity
Next, for any Python code that creates an Azure SDK client object in your app, you'll want to:
- Import the
DefaultAzureCredentialclass from theazure.identitymodule. - Create a
DefaultAzureCredentialobject. - Pass the
DefaultAzureCredentialobject to the Azure SDK client object constructor.
An example of these steps is shown in the following code segment.
from azure.identity import DefaultAzureCredential
from azure.storage.blob import BlobServiceClient

# Acquire a credential object
token_credential = DefaultAzureCredential()

blob_service_client = BlobServiceClient(
        account_url="https://<my_account_name>.blob.core.windows.net",
        credential=token_credential)
As discussed in the Azure SDK for Python authentication overview article, DefaultAzureCredential supports multiple authentication methods and determines the authentication method being used at runtime. The benefit of this approach is that your app can use different authentication methods in different environments without implementing environment-specific code. When the preceding code is run on your workstation during local development, DefaultAzureCredential will use either an application service principal, as determined by environment settings, or developer tool credentials to authenticate with other Azure resources. Thus, the same code can be used to authenticate your app to Azure resources during both local development and when deployed to Azure.

