Map container images from code to cloud
When a vulnerability is identified in a container image stored in a container registry or running in a Kubernetes cluster, it can be difficult for a security practitioner to trace back to the CI/CD pipeline that first built the container image and identify a developer remediation owner. With DevOps security capabilities in Microsoft Defender Cloud Security Posture Management (CSPM), you can map your cloud-native applications from code to cloud to easily kick off developer remediation workflows and reduce the time to remediation of vulnerabilities in your container images.
Prerequisites
An Azure account with Defender for Cloud onboarded. If you don't already have an Azure account, create one for free.
For Azure DevOps:
Microsoft Security DevOps (MSDO) Extension must be installed on the Azure DevOps organization.
Ensure that the Microsoft Defender for DevOps Extension is shared and installed in all connected Azure DevOps organizations. For newly onboarded connectors, this will be done automatically. This extension automatically injects tasks into all Azure Pipelines to collect data for container mapping.
Must use YAML Pipelines as Classic Pipelines are no longer supported.
For GitHub:
Microsoft Security DevOps (MSDO) Action must be configured in your GitHub workflows.
The GitHub Workflow must have "id-token: write" permissions for federation with Defender for Cloud. For an example, see this YAML.
Defender CSPM enabled.
The container images must be built using Docker and the Docker client must be able to access the Docker server during the build.
Map your container image from Azure DevOps pipelines to the container registry
After building a container image in an Azure DevOps CI/CD pipeline and pushing it to a registry, see the mapping by using the Cloud Security Explorer:
Sign in to the Azure portal.
Go to Microsoft Defender for Cloud > Cloud Security Explorer. It can take a maximum of 4 hours for the container image mapping to appear in the Cloud Security Explorer.
To see basic mapping, select Container Images > + > Pushed by code repositories.
(Optional) Select + by Container Images to add other filters to your query, such as Has vulnerabilities to filter only container images with CVEs.
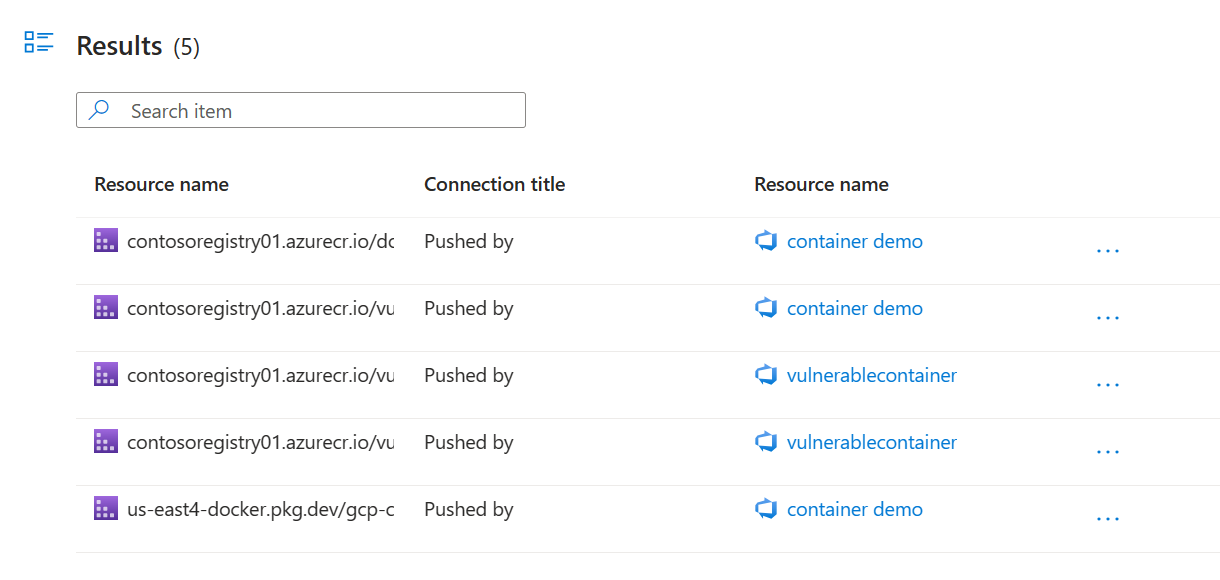
After running your query, you'll see the mapping between container registry and Azure DevOps pipeline. Select ... next to the edge to see more details on where the Azure DevOps pipeline was run.
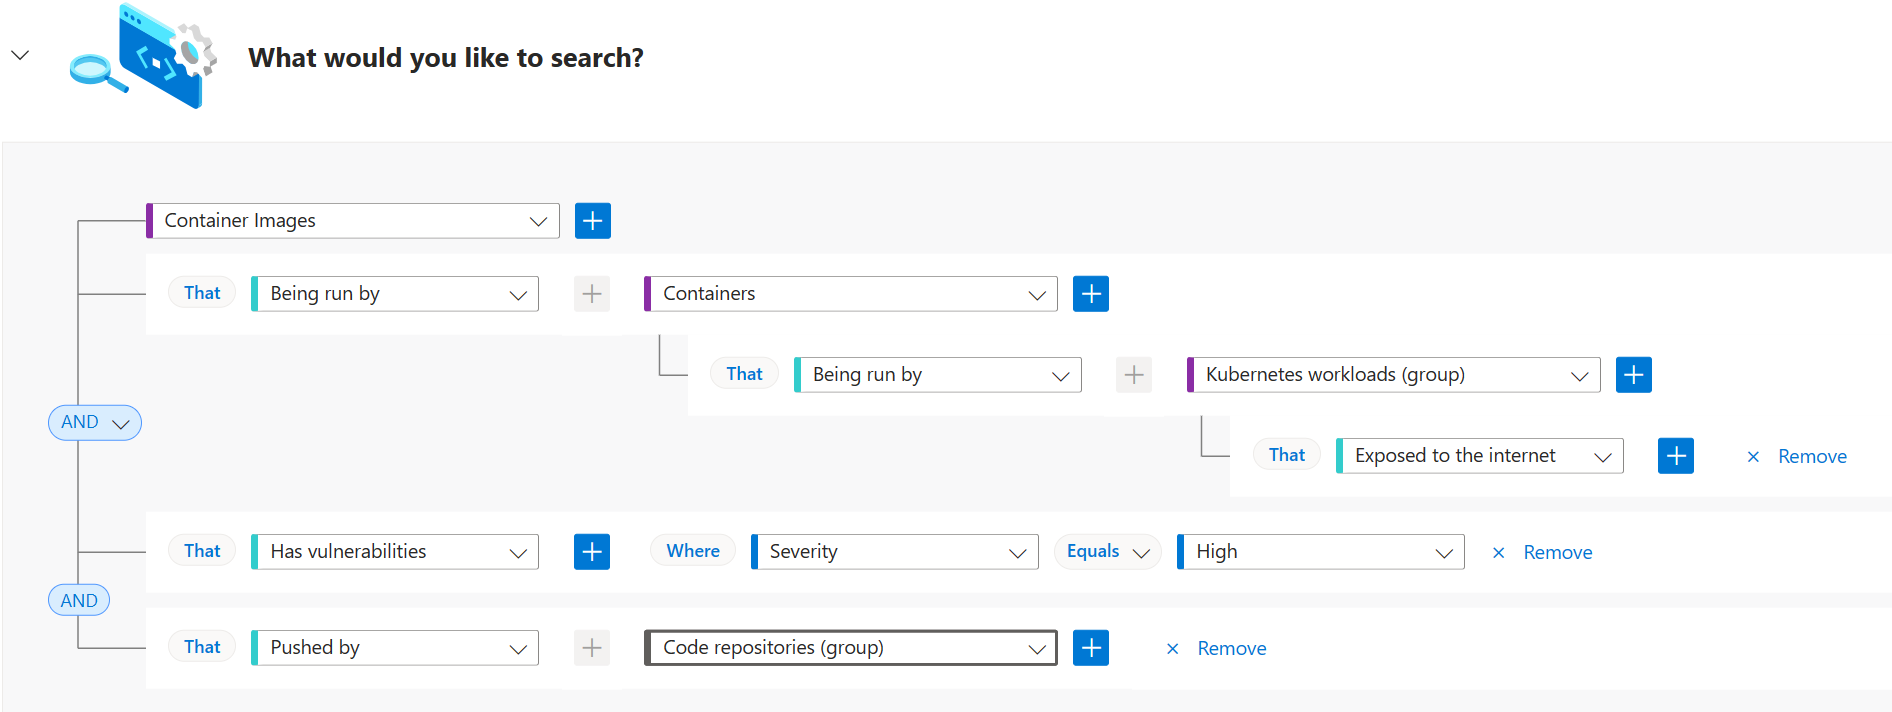
The following is an example of an advanced query that utilizes container image mapping. Starting with a Kubernetes workload that is exposed to the internet, you can trace all container images with high severity CVEs back to the Azure DevOps pipeline where the container image was built, empowering a security practitioner to kick off a developer remediation workflow.
Note
If your Azure DevOps organization had the Azure DevOps connector created prior to November 15, 2023, please navigate to Organization settings > Extensions > Shared and install the container image mapping decorator. If you do not see the extension shared with your organization, fill out the following form.
Map your container image from GitHub workflows to the container registry
Ensure you onboarded a GitHub connector to Defender for Cloud.
Run the following MSDO workflow:
name: Build and Map Container Image

on: [push, workflow_dispatch]

jobs:
  build:
    runs-on: ubuntu-latest
    # Set Permissions
    permissions:
      contents: read
      id-token: write
    steps:
      - uses: actions/checkout@v3
      - uses: actions/setup-python@v4
        with:
          python-version: '3.8'
    # Set Authentication to Container Registry of Choice.
    # The example below is for Azure Container Registry. Amazon Elastic Container Registry and Google Artifact Registry are also supported.
   - name: Azure Container Registry Login
        uses: Azure/docker-login@v1
        with:
        login-server: <containerRegistryLoginServer>
        username: ${{ secrets.ACR_USERNAME }}
        password: ${{ secrets.ACR_PASSWORD }}
    # Build and Push Image
    - name: Build and Push the Docker image
        uses: docker/build-push-action@v2
        with:
          push: true
          tags: ${{ secrets.IMAGE_TAG }}
          file: Dockerfile
     # Run Mapping Tool in MSDO
    - name: Run Microsoft Security DevOps Analysis
      uses: microsoft/security-devops-action@latest
      id: msdo
After building a container image in a GitHub workflow and pushing it to a registry, see the mapping by using the Cloud Security Explorer:
Sign in to the Azure portal.
Go to Microsoft Defender for Cloud > Cloud Security Explorer. It can take a maximum of 4 hours for the container image mapping to appear in the Cloud Security Explorer.
To see basic mapping, select Container Images > + > Pushed by code repositories.
(Optional) Select + by Container Images to add other filters to your query, such as Has vulnerabilities to filter only container images with CVEs.
After running your query, you'll see the mapping between container registry and GitHub workflow. Select ... next to the edge to see more details on where the GitHub workflow was run.
The following is an example of an advanced query that utilizes container image mapping. Starting with a Kubernetes workload that is exposed to the internet, you can trace all container images with high severity CVEs back to the GitHub repository where the container image was built, empowering a security practitioner to kick off a developer remediation workflow.
Next steps
- Learn more about DevOps security in Defender for Cloud.


