Tutorial: Use the data copy service to copy data into Azure Data Box
This tutorial describes how to ingest data by using the data copy service without an intermediate host. The data copy service runs locally on Azure Data Box, connects to your network-attached storage (NAS) device via the Server Message Block (SMB) protocol, and copies data to Data Box.
Use the data copy service:
- In NAS environments where intermediate hosts might not be available.
- With small files that take weeks for ingestion and upload of data. The data copy service significantly improves the ingestion and upload time for small files.
Note
Copy service compatibility with non-Windows NAS devices is not officially supported.
In this tutorial, you learn how to:
- Copy data to Data Box
Prerequisites
Before you begin this tutorial:
- Complete the Set up Azure Data Box tutorial.
- Ensure that your Data Box device is delivered, and the order status in the portal is Delivered.
- Ensure that you have the credentials of the NAS device containing your source data.
- Ensure that you're connected to a high-speed network. We strongly recommend that you have at least one 10-Gigabit Ethernet (GbE) connection. You can use a 1-GbE data link if a 10-GbE connection isn't available, but copy speed is affected.
Copy data to Data Box
After you're connected to the NAS device, the next step is to copy your data.
Important
To avoid the possibility of data corruption or loss, ensure that you follow the recommended bast-practices:
- Before initiating data copy operations, ensure that the data size conforms to the size limits described in the Azure storage and Data Box limits article.
- Ensure that data isn't uploaded to Data Box by other applications outside Data Box. Simultaneous data copy operations might result in upload-job failures and data corruption.
- Ensure that source data isn't being modified while being read by the data copy service. Modifying data during copy operations might cause failures or data corruption.
- Ensure that you maintain a copy of the source data until the Data Box transfer process is complete and your data is accessible within Azure Storage.
To copy data by using the data copy service, you need to create a job:
In your Data Box device's local web UI, select Manage > Copy data.
On the Copy data page, select Create.
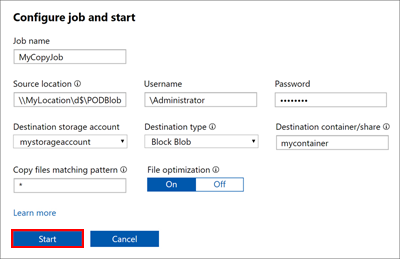
In the Configure job and start dialog box, fill out the following fields:
Field Value Job name A unique name fewer than 230 characters for the job. These characters aren't allowed in the job name: <, >, |, ?, *, \, :, /, and \. Source location Provide the SMB path to the data source in the format: \\<ServerIPAddress>\<ShareName>or\\<ServerName>\<ShareName>.Username Username in \\<DomainName><UserName>format to access the data source. Local administrators require explicit security permissions. Right-click the folder, select Properties, and then select Security to add the local administrator within the Security tab.Password Password to access the data source. Destination storage account Select the target storage account to upload data to from the list. Destination type Select the target storage type from the list: Block Blob, Page Blob, Azure Files, or Block Blob (Archive). Destination container/share Enter the name of the container or share that you want to upload data to in your destination storage account. The name can be a share name or a container name. For example, use myshareormycontainer. You can also enter the name in the formatsharename\directory_nameorcontainername\virtual_directory_name.Copy files matching pattern You can enter the file-name matching pattern in the following two ways: - Use wildcard expressions: Only
*and?are supported in wildcard expressions. For example, the expression*.vhdmatches all the files that have the.vhdextension. Similarly,*.dl?matches all the files with either the extension.dlor that start with.dl, such as.dll. Likewise,*foomatches all files whose names end withfoo.
You can directly enter the wildcard expression in the field. By default, the value you enter in the field is treated as a wildcard expression. - Use regular expressions: POSIX-based regular expressions are supported. For example, the regular expression
.*\.vhdmatches all the files that have the.vhdextension. For regular expressions, provide the<pattern>directly asregex(<pattern>). For more information about regular expressions, go to Regular expression language - a quick reference.
File optimization When this feature is enabled, files smaller than 1 MB are packed during ingestion. This packing speeds up the data copy for small files. It also saves a significant amount of time when the number of files far exceeds the number of directories.
If you use file optimization:- After you run prepare to ship, you can download a bill of materials (BOM) file, which lists the original file names, to help you ensure that all the correct files are copied.
- Don't delete the packed files, whose file names begin with
ADB_PACK_. If you delete a packed file, the original file isn't uploaded during future data copies. - Don't copy the same files that you copy with the Copy Service via other protocols such as SMB, NFS, or REST API. Using different protocols can result in conflicts and failure during data uploads.
- File optimization isn't supported for Azure Files. To see which timestamps, file attributes, and access control lists (ACLs) are copied for a nonoptimized data copy job, refer to the transferred metadata article.
- Use wildcard expressions: Only
Select Start. The inputs are validated, and if the validation succeeds, then the job starts. It might take a few minutes for the job to start.
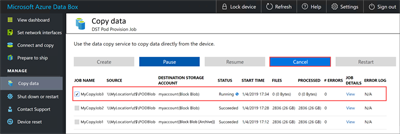
A job with the specified settings is created. You can pause, resume, cancel, or restart a job. Select the check box next to the job name, and then select the appropriate button.
You can pause a job if it's affecting the NAS device's resources during peak hours:
You can resume the job during off-peak hours:
You can cancel a job at any time:
When you cancel a job, a confirmation is required:
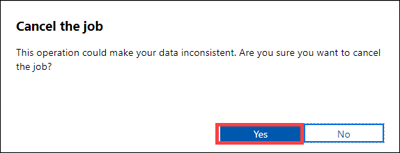
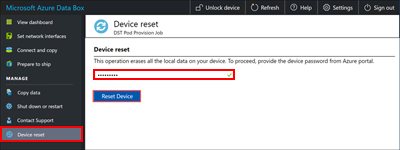
Canceling a copy job doesn't delete any data already copied to the device during a job. To delete data already copied to your Data Box device, reset the device.
Note
If you cancel or pause a job, large files might be only partially copied. These partially copied files are uploaded in the same state to Azure. When you cancel or pause a job, make sure that your files have been properly copied. To validate the files, look at the SMB shares or download the BOM file.
You can restart a failed job that arises from a transient error, such as a network glitch. However, a job can't be restarted after it reaches a terminal status, such as Succeeded or Completed with errors. Errors resulting from file-naming or file-size issues are logged, but the job can't be restarted after it completes.
If you experience a failure and can't restart the job, download the error logs and locate the underlying failure. After correcting the issue, create a new job to copy the files. Alternatively, you can also copy the files over SMB.
The current release doesn't support job deletion.
You can create unlimited jobs, but you can run only a maximum of 10 jobs in parallel at any one time.
If File optimization is on, small files are packed at ingest and unpacked during upload to improve copy performance. These packed files are named using a GUID. Don't delete packed files.
The following data is presented on the Copy data page while the job is in progress:
- The Status column displays the status of the copy job. Valid statuses include:
- Running
- Failed
- Succeeded
- Pausing
- Paused
- Canceling
- Canceled
- Completed with errors
- The Files column displays the number and total size of the files being copied.
- The Processed column displays the number and the total size of the files that are processed.
- The Job details column provides a link to view job details.
- The # Errors column displays the number of errors encountered during the copy process. To download the error logs for troubleshooting, select the link within the corresponding Error log column.
- The Status column displays the status of the copy job. Valid statuses include:
Wait for the copy job to finish. Because some errors are logged only on the Connect and copy page, ensure that the copy job is complete and reports no errors before advancing to the next step.
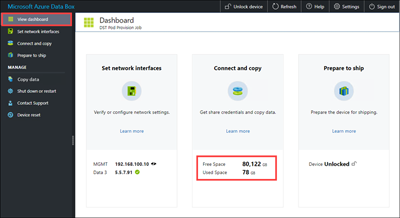
To ensure data integrity, a checksum is computed inline as the data is copied. After the copy is complete, select View dashboard to verify the used space and free space on your device.
After the copy job is finished, you can select Prepare to ship.
Note
Prepare to ship can't run while copy jobs are in progress.
Next steps
Advance to the next tutorial to learn how to ship your Data Box device back to Microsoft.

