Connect a bot to email
APPLIES TO: SDK v4
You can configure your bot to communicate with users via Microsoft 365 email. When you configure your bot to access an email account, it receives a message when a new email arrives. The bot can then use email to respond. For example, in response to a user's email message, the bot could send an email reply with the message, "Hi! Thanks for your order! We will begin processing it immediately."
The Email channel currently works with Office 365 only. Other email services aren't currently supported.
Warning
- For security reasons, Exchange Online will disable basic authentication on October 1st, 2022. The Email channel now supports the new Exchange Online modern authentication model. Bots that use the basic authentication model will experience failures after the October 2022 change; or earlier if your tenant administrator disables basic authentication before that date. For more information, see Basic Authentication and Exchange Online - September 2021 Update.
- It's a violation of the Bot Framework Code of Conduct to create "spambots", including bots that send unwanted or unsolicited bulk email.
Prerequisites
- If you don't have an Azure subscription, create a free account before you begin.
- A dedicated Office 365 email account for the bot.
- Permission to grant the bot
Mail.ReadWriteandMail.Sendaccess. For more information, see Understanding Microsoft Entra ID application consent experiences.
Note
You shouldn't use your own personal email accounts for bots, as every message sent to that email account will be forwarded to the bot. This can result in the bot inappropriately sending a response to a sender. For this reason, bots should only use dedicated M365 email accounts.
Configure email to use modern authentication
Open the Azure portal.
Open the Azure Bot resource blade for your bot.
In the left pane, select Channels.
Select Email to open the Configure Email blade.

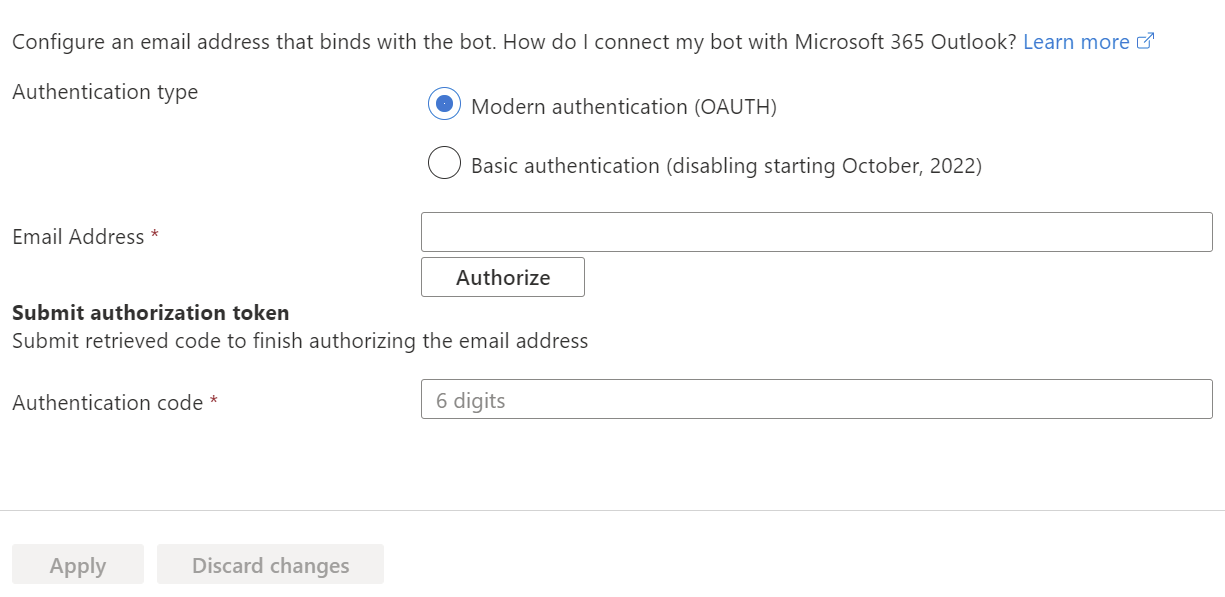
Set Authentication type to Modern authentication (OAUTH).
In Email Address, enter the dedicated Office 365 email account for the bot.
Select Authorize.
When prompted, sign in to the email account and grant read/write and send permissions to the bot.
On success, a page opens with a validation code. Copy the validation code.

In Authentication code, enter the validation code you just copied.
Select Apply to complete email configuration.
Configure email to use basic authentication
Note
- Federated authentication using any vendor that replaces Microsoft Entra ID isn't supported.
- For security reasons, usage of basic authentication in Exchange Online is being disabled on October 1st, 2022. You should migrate all of your bots to use modern authentication before the deadline.
- If you use Microsoft Exchange Server, make sure you've enabled Autodiscover first, before configuring email to use basic authentication.
- If you're using an Office 365 account with MFA enabled on it, make sure you disable MFA for the specified account first; then you can configure the account for the email channel. Otherwise, the connection will fail.
Open the Azure portal.
Open the Azure Bot resource blade for your bot.
In the left pane, select Channels (preview) to open the Channels blade.
Select Email to open the Configure Email blade.

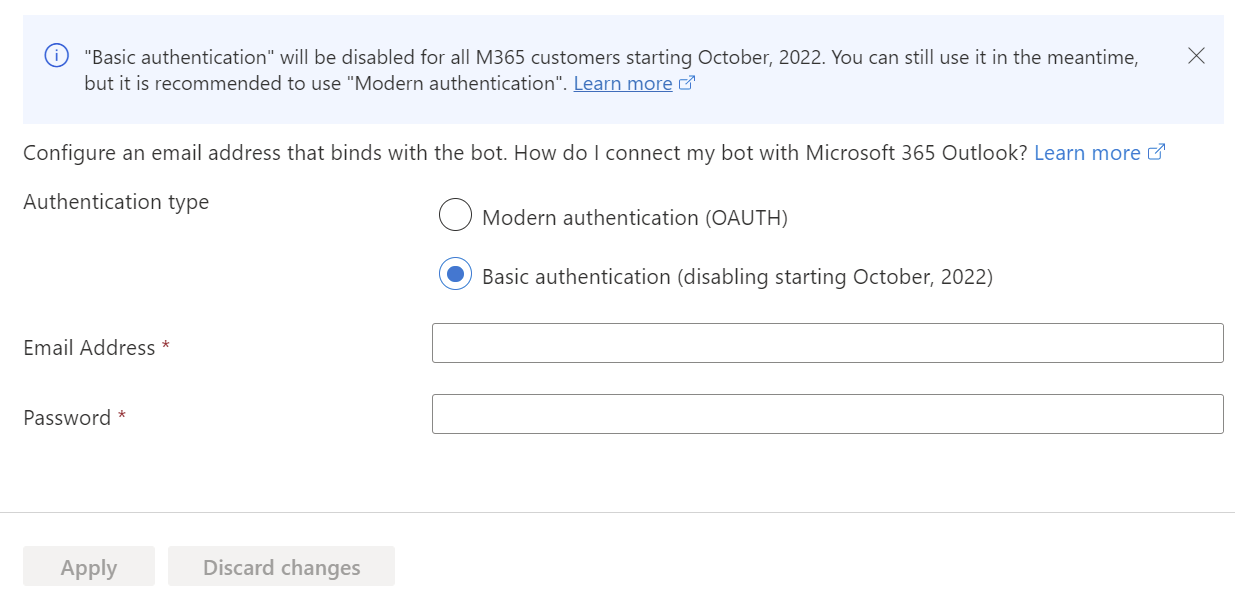
- Set Authentication type to Basic authentication (disabling staring October, 2022).
- In Email Address, enter the dedicated Office 365 email account for the bot.
- In Password, enter the password for the email account.
- Select Apply to complete email configuration.
Customize emails
The Email channel supports sending custom values to create more advanced, customized emails by using the activity channelData property.
The snippet below shows an example of the channelData for an incoming custom email message, from the bot to the user.
{
    "type": "ActivityTypes.Message",
    "locale": "en-Us",
    "channelID": "email",
    "fromName": { "id": "mybot@mydomain.com", "name": "My bot"},
    "recipientName": { "id": "joe@otherdomain.com", "name": "Joe Doe"},
    "conversation": { "id": "123123123123", "topic": "awesome chat" },
    "channelData":
    {
        "htmlBody": "<html><body style = \"font-family: Calibri; font-size: 11pt;\" >This is more than awesome.</body></html>",
        "importance": "high",
        "ccRecipients": "Yasemin@adatum.com;Temel@adventure-works.com",
    }
}
For more information about the activity channelData property, see Create a custom Email message.
Troubleshoot
For errors that can occur while processing consent to an application, see Understanding Microsoft Entra ID application consent experiences and Unexpected error when performing consent to an application.
If your bot doesn't return a 200 OK HTTP status code within 15 seconds in response to an incoming email message, the email channel will try to resend the message, and your bot may receive the same email message activity a few times. For more information, see the HTTP details section in How bots work and the troubleshooting timeout errors article.
Additional resources
- Connect a bot to channels
- Implement channel-specific functionality with the Bot Framework SDK for .NET
- Read the channels reference article for more information about which features are supported on each channel