Back up a SharePoint farm on Azure Stack using Microsoft Azure Backup Server
This article describes how to back up and restore SharePoint data using Microsoft Azure Backup Server (MABS).
Microsoft Azure Backup Server (MABS) enables you to back up a SharePoint farm (on Azure Stack) to Microsoft Azure, which gives an experience similar to back up of other data sources. Azure Backup provides flexibility in the backup schedule to create daily, weekly, monthly, or yearly backup points, and gives you retention policy options for various backup points. It also provides the capability to store local disk copies for quick recovery-time objectives (RTO) and to store copies to Azure for economical, long-term retention.
SharePoint supported scenarios
You need to confirm the supported scenarios before you back up a SharePoint farm to Azure from the support matrix.
Supported scenarios
Azure Backup for MABS supports the following scenarios:
| Workload | Version | SharePoint deployment | Protection and recovery |
|---|---|---|---|
| SharePoint | SharePoint 2019, SharePoint 2016 with latest SPs | SharePoint deployed as an Azure Stack virtual machine -------------- SQL Always On |
Protect SharePoint Farm recovery options: Recovery farm, database, and file or list item from disk recovery points. Farm and database recovery from Azure recovery points. |
Unsupported scenarios
MABS that protects a SharePoint farm doesn't protect search indexes or application service databases. You'll need to configure the protection of these databases separately.
MABS doesn't provide backup of SharePoint SQL Server databases that are hosted on scale-out file server (SOFS) shares.
Limitations
You can't protect SharePoint databases as a SQL Server data source. You can recover individual databases from a farm backup.
Protecting application store items isn't supported with SharePoint 2013.
MABS doesn't support protecting remote FILESTREAM. The FILESTREAM should be part of the database.
Prerequisites
Before you continue, ensure that you've met all the prerequisites for using Microsoft Azure Backup to protect workloads. The tasks in prerequisites also include: create a backup vault, download vault credentials, install Azure Backup Agent, and register the Azure Backup Server with the vault.
Additional prerequisites
By default when you protect SharePoint, all content databases (and the SharePoint_Config and SharePoint_AdminContent* databases) are protected.
To add customizations (such as search indexes, templates or application service databases, or the user profile service), you need to configure these for protection separately. Ensure that you enable protection for all folders that include these types of features or customization files.
MABS runs as Local System, and to back up SQL Server databases, it needs sysadmin privileges on that account for the SQL server. On the SQL Server that you want to back up, set
NT AUTHORITY\SYSTEMto sysadmin.For every 10 million items in the farm, there must be at least 2 GB of space on the volume where the MABS folder is located. This space is required for catalog generation.
To enable you to use MABS to perform a specific recovery of items (site collections, sites, lists, document libraries, folders, individual documents, and list items), catalog generation creates a list of the URLs contained within each content database. You can view the list of URLs in the recoverable item pane in the Recovery task area of the MABS Administrator Console.
In the SharePoint farm, if you have SQL Server databases that are configured with SQL Server aliases, install the SQL Server client components on the front-end Web server that MABS will protect.
Configure backup
To back up the SharePoint farm, configure protection for SharePoint by using ConfigureSharePoint.exe, and then create a protection group in MABS.
Follow these steps:
Run ConfigureSharePoint.exe - This tool configures the SharePoint VSS Writer service (WSS) and provides the protection agent with credentials for the SharePoint farm. After you've deployed the protection agent, the ConfigureSharePoint.exe file can be found in the
<MABS Installation Path\>\binfolder on the front-end Web server.If you have multiple WFE servers, you only need to install it on one of them.
Run as follows:
On the WFE server, on a command prompt, go to
\<MABS installation location\>\\bin\\and runConfigureSharePoint \[\-EnableSharePointProtection\] \[\-EnableSPSearchProtection\] \[\-ResolveAllSQLAliases\] \[\-SetTempPath <path>\], where:EnableSharePointProtection enables protection of the SharePoint farm, enables the VSS writer, and registers the identity of the DCOM application WssCmdletsWrapper to run as a user whose credentials are entered with this option. This account should be a farm admin and also local admin on the front-end Web Server.
EnableSPSearchProtection enables the protection of WSS 3.0 SP Search by using the registry key SharePointSearchEnumerationEnabled under HKLM\Software\Microsoft\ Microsoft Data Protection Manager\Agent\2.0\ on the front-end Web Server, and registers the identity of the DCOM application WssCmdletsWrapper to run as a user whose credentials are entered with this option. This account should be a farm admin and also local admin on the front-end Web Server.
ResolveAllSQLAliases displays all the aliases reported by the SharePoint VSS writer and resolves them to the corresponding SQL server. It also displays their resolved instance names. If the servers are mirrored, it will also display the mirrored server. It reports all the aliases that aren't being resolved to a SQL Server.
SetTempPath sets the environment variable TEMP and TMP to the specified path. Item level recovery fails if a large site collection, site, list, or item is being recovered and there's insufficient space in the farm admin Temporary folder. This option allows you to change the folder path of the temporary files to a volume that has sufficient space to store the site collection or site being recovered.
Enter the farm administrator credentials. This account should be a member of the local Administrator group on the WFE server. If the farm administrator isn't a local admin, grant the following permissions on the WFE server:
Grant the WSS_Admin_WPG group full control to the MABS folder (
%Program Files%\Data Protection Manager\DPM\).Grant the WSS_Admin_WPG group read access to the MABS Registry key (
HKEY_LOCAL_MACHINE\SOFTWARE\Microsoft\Microsoft Data Protection Manager).
After running ConfigureSharePoint.exe, you'll need to rerun it if there's a change in the SharePoint farm administrator credentials.
To create a protection group, select Protection > Actions > Create Protection Group to open the Create New Protection Group wizard in the MABS console.
In Select Protection Group Type, select Servers.
In Select Group Members, expand the server that holds the WFE role.
If there are more than one WFE servers, select the one on which you installed ConfigureSharePoint.exe.
When you expand the computer running SharePoint, MABS queries VSS to see what data MABS can protect. If the SharePoint database is remote, MABS connects to it. If SharePoint data sources don't appear, check that the VSS writer is running on the computer that's running SharePoint and on any remote instance of SQL Server. Then, ensure that the MABS agent is installed both on the computer running SharePoint and on the remote instance of SQL Server. Also, ensure that SharePoint databases aren't being protected elsewhere as SQL Server databases.
In Select data protection method, specify how you want to handle short and long-term backup. Short-term backup is always to disk first, with the option of backing up from the disk to the Azure cloud with Azure Backup (for short or long-term).
In Select short-term goals, specify how you want to back up to short-term storage on disk. In Retention range you specify how long you want to keep the data on disk. In Synchronization frequency, you specify how often you want to run an incremental backup to disk. If you don't want to set a backup interval, you can check just before a recovery point so that MABS will run an express full backup just before each recovery point is scheduled.
On the Review disk allocation page, review the storage pool disk space allocated for the protection group.
Total Data size is the size of the data you want to back up, and Disk space to be provisioned on MABS is the space that MABS recommends for the protection group. MABS chooses the ideal backup volume, based on the settings. However, you can edit the backup volume choices in the Disk allocation details. For the workloads, select the preferred storage in the dropdown menu. Your edits change the values for Total Storage and Free Storage in the Available Disk Storage pane. Underprovisioned space is the amount of storage MABS suggests you add to the volume, to continue with backups smoothly in the future.
In Choose replica creation method, select how you want to handle the initial full data replication. If you select to replicate over the network, we recommended you choose an off-peak time. For large amounts of data or less than optimal network conditions, consider replicating the data offline using removable media.
In Choose consistency check options, select how you want to automate consistency checks. You can enable a check to run only when replica data becomes inconsistent, or according to a schedule. If you don't want to configure automatic consistency checking, you can run a manual check at any time by right-clicking the protection group in the Protection area of the MABS console, and selecting Perform Consistency Check.
If you've selected to back up to the cloud with Azure Backup, on the Specify online protection data page make sure the workloads you want to back up to Azure are selected.
In Specify online backup schedule, specify how often incremental backups to Azure should occur. You can schedule backups to run every day/week/month/year and the time/date at which they should run. Backups can occur up to twice a day. Each time a backup runs, a data recovery point is created in Azure from the copy of the backed-up data stored on the MABS disk.
In Specify online retention policy, you can specify how the recovery points created from the daily/weekly/monthly/yearly backups are retained in Azure.
In Choose online replication, specify how the initial full replication of data will occur. You can replicate over the network, or do an offline backup (offline seeding). Offline backup uses the Azure Import feature. Read more.
On the Summary page, review your settings. After you select Create Group, initial replication of the data occurs. When it finishes, the protection group status will show as OK on the Status page. Backup then takes place in line with the protection group settings.
Monitor operations
After the protection group is created, the initial replication occurs and MABS starts backing up and synchronizing the SharePoint data. MABS monitors the initial synchronization and subsequent backups. You can monitor the SharePoint data in a couple of ways:
Using default MABS monitoring, you can set up notifications for proactive monitoring by publishing alerts and configuring notifications. You can send notifications by e-mail for critical, warning, or informational alerts, and for the status of instantiated recoveries.
If you use Operations Manager, you can centrally publish alerts.
Set up monitoring notifications
In the MABS Administrator Console, select Monitoring > Action > Options.
Select SMTP Server, type the server name, port, and email address from which notifications will be sent. The address must be valid.
In Authenticated SMTP server, type a user name and password. The user name and password must be the domain account name of the person whose "From" address is described in the previous step. Otherwise, the notification delivery fails.
To test the SMTP server settings, select Send Test E-mail, type the e-mail address where you want MABS to send the test message, and then select OK. Select Options > Notifications and select the types of alerts about which recipients want to be notified. In Recipients type the e-mail address for each recipient to whom you want MABS to send copies of the notifications.
Publish Operations Manager alerts
In the MABS Administrator Console, select Monitoring > Action > Options > Alert Publishing > Publish Active Alerts
After you enable Alert Publishing, all existing MABS alerts that might require a user action are published to the MABS Alerts event log. The Operations Manager agent that's installed on the MABS server then publishes these alerts to the Operations Manager and continues to update the console as new alerts are generated.
Restore a SharePoint item from disk by using MABS
In the following example, the Recovering SharePoint item is accidentally deleted and needs to be recovered.
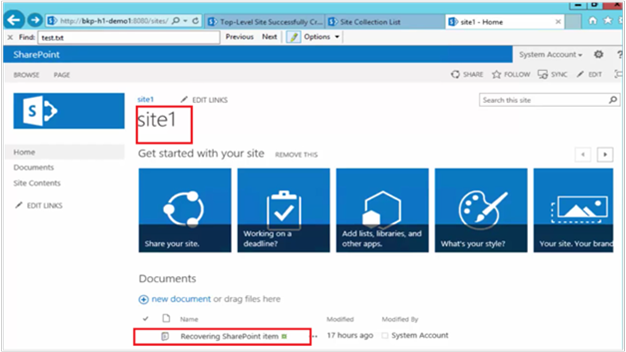
Follow these steps:
Open the MABS Administrator Console.
All SharePoint farms that are protected by MABS are shown in the Protection tab.
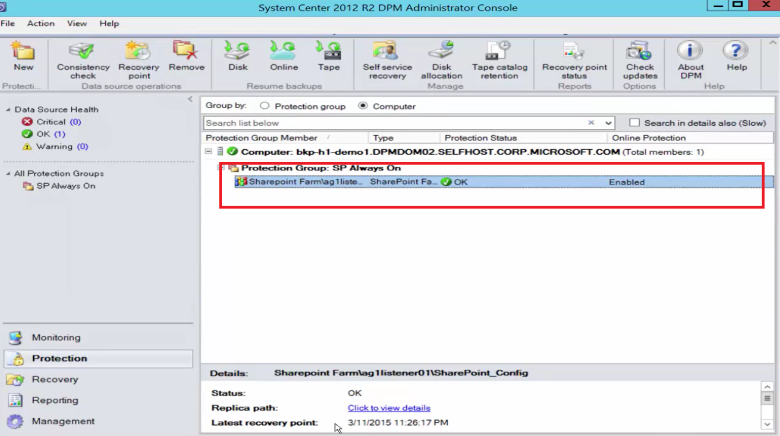
To recover the item, select the Recovery tab.
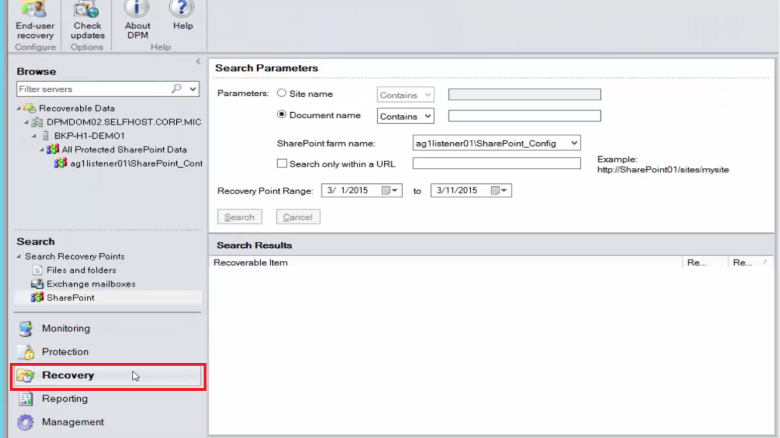
Search SharePoint for Recovering SharePoint item by using a wildcard-based search within a recovery point range.
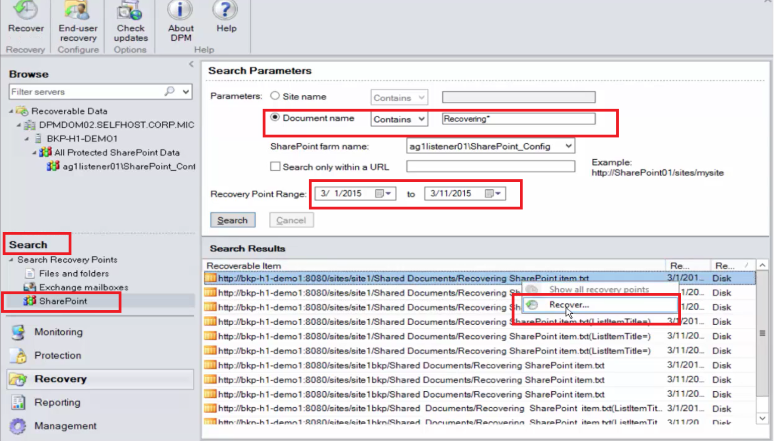
Select the appropriate recovery point from the search results, right-click the item, and then select Recover.
You can also browse through various recovery points and select a database or item to recover.
Select Date > Recovery time, and then select the correct Database > SharePoint farm > Recovery point > Item.
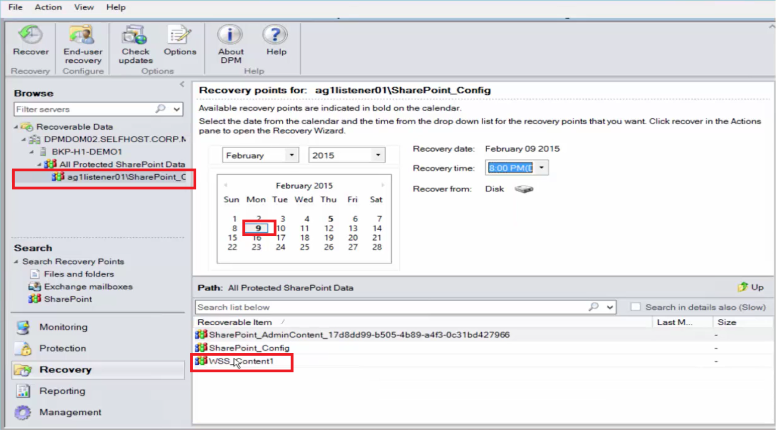
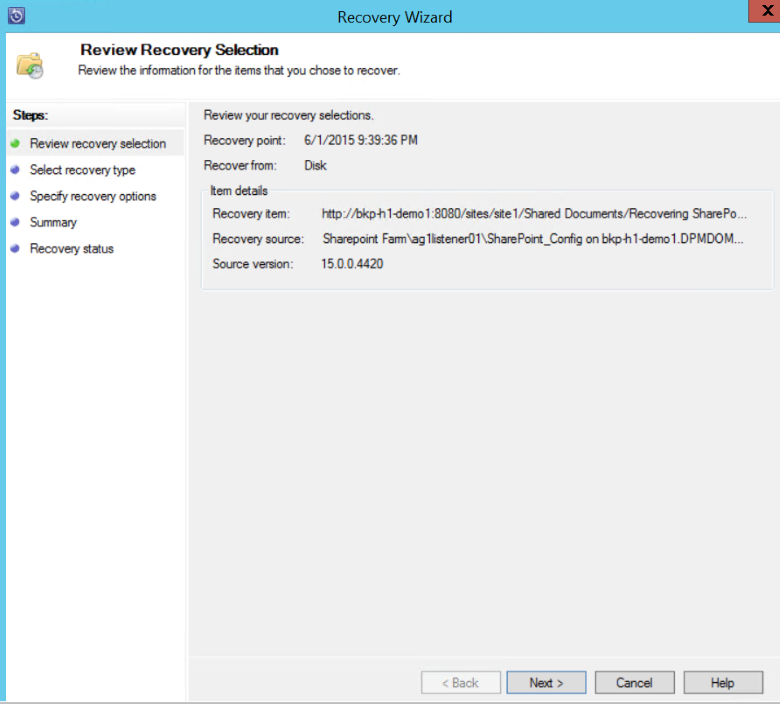
Right-click the item, select Recover to open the Recovery Wizard, and then select Next.
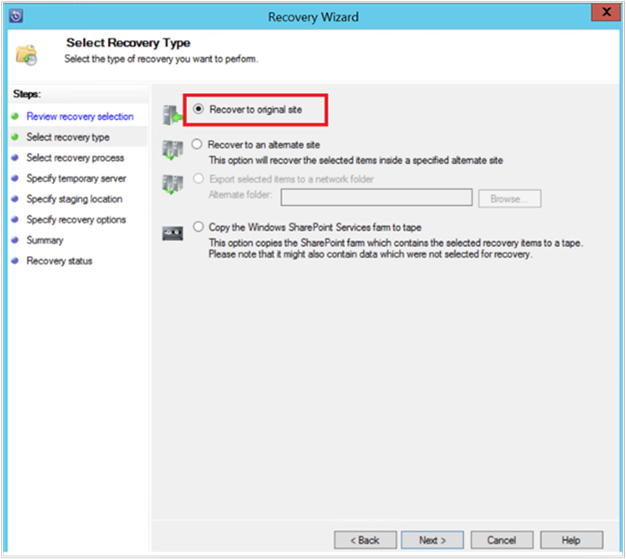
Select the type of recovery that you want to perform, and then select Next.
Note
The selection of Recover to original in the example recovers the item to the original SharePoint site.
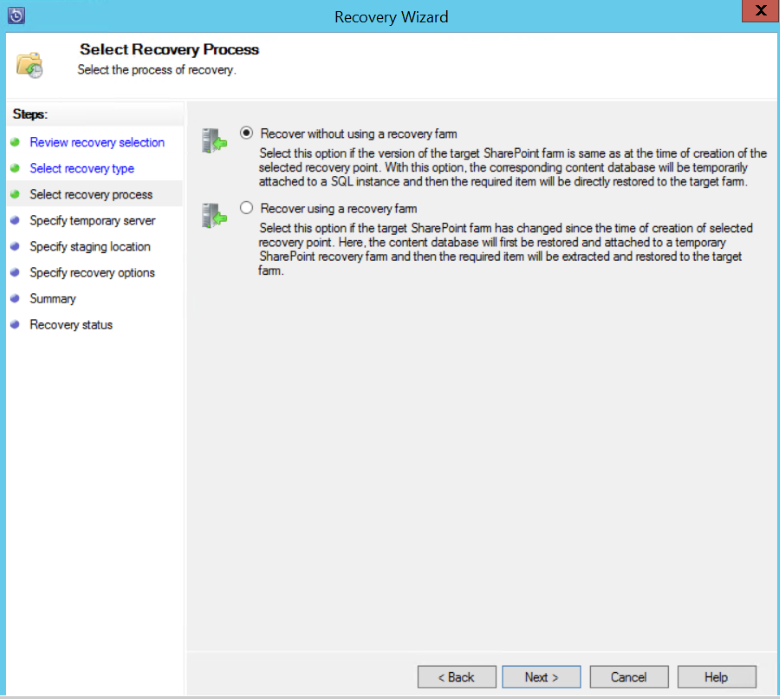
Select the Recovery Process that you want to use.
Select Recover without using a recovery farm if the SharePoint farm hasn't changed and is the same as the recovery point that's being restored.
Select Recover using a recovery farm if the SharePoint farm has changed since the recovery point was created.
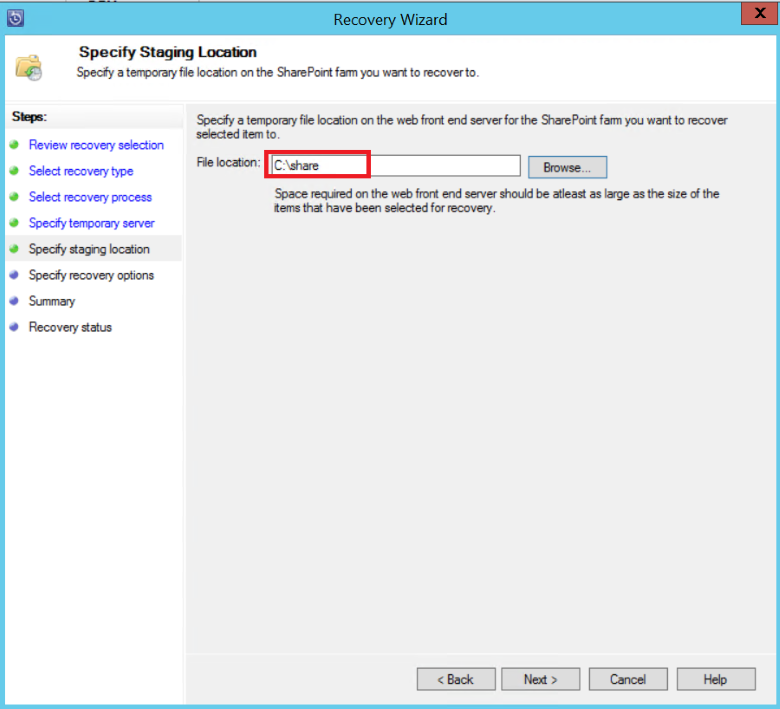
Provide a staging SQL Server instance location to recover the database temporarily, and provide a staging file share on MABS and the server that's running SharePoint to recover the item.
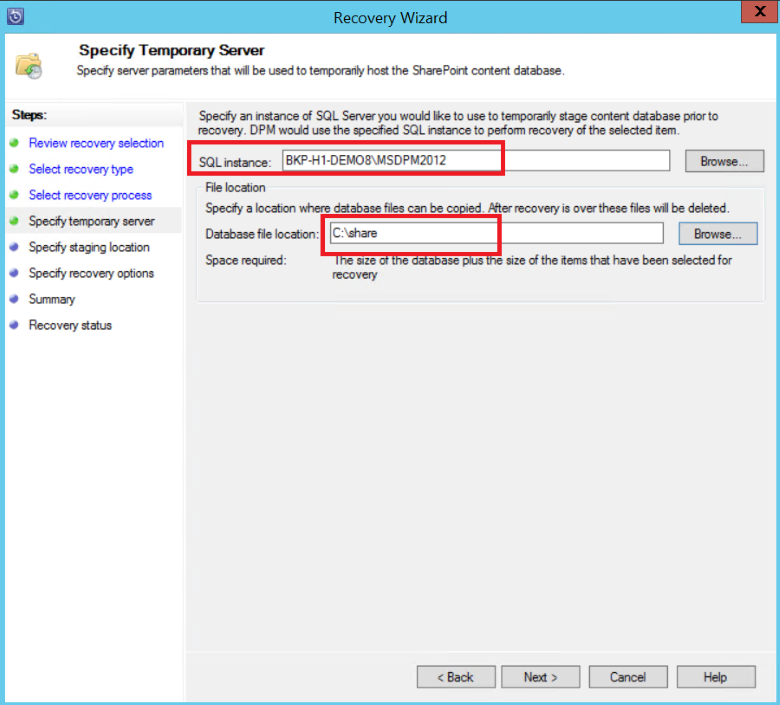
MABS attaches the content database that's hosting the SharePoint item to the temporary SQL Server instance. From the content database, it recovers the item and puts it on the staging file location on MABS. The recovered item that's on the staging location now needs to be exported to the staging location on the SharePoint farm.
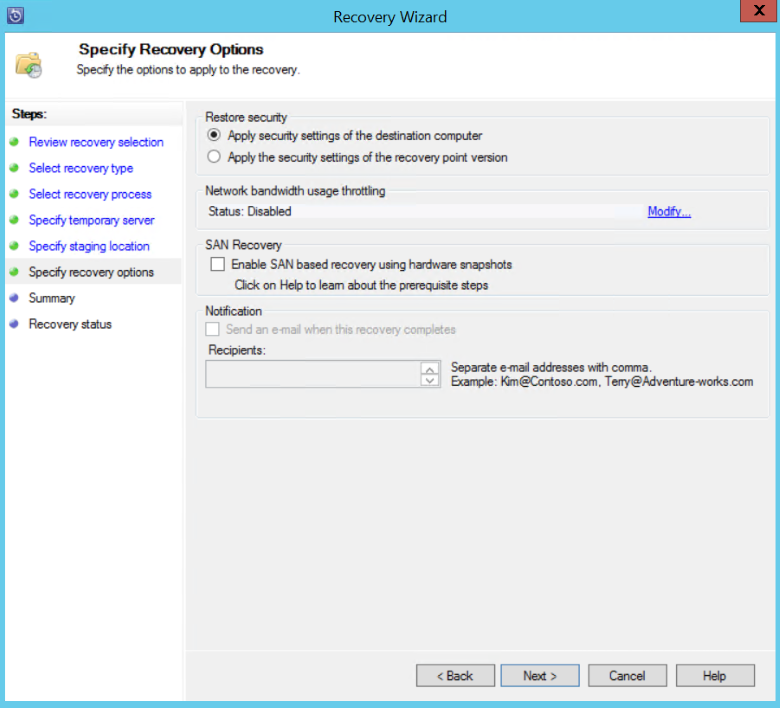
Select Specify recovery options, and apply security settings to the SharePoint farm or apply the security settings of the recovery point. Select Next.
Note
You can choose to throttle the network bandwidth usage. This minimizes impact to the production server during production hours.
Review the summary information, and then select Recover to begin recovery of the file.
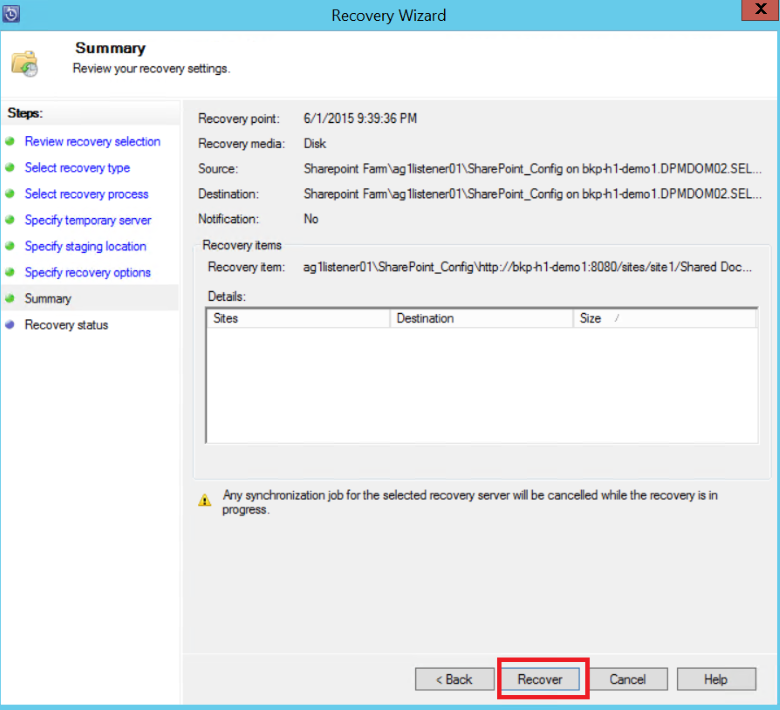
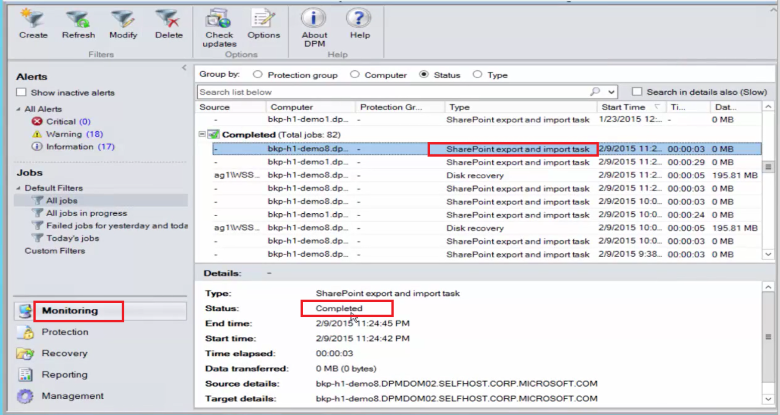
Now select the Monitoring tab in the MABS Administrator Console to view the Status of the recovery.
Note
The file is now restored. You can refresh the SharePoint site to check the restored file.
Restore a SharePoint database from Azure by using MABS
To recover a SharePoint content database, follow these steps:
Browse through various recovery points (as shown previously), and select the recovery point that you want to restore.
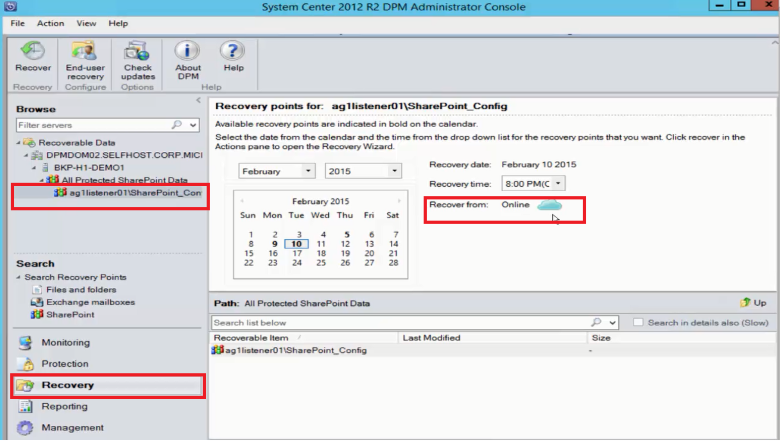
Double-click the SharePoint recovery point to show the available SharePoint catalog information.
Note
Because the SharePoint farm is protected for long-term retention in Azure, no catalog information (metadata) is available on the MABS server. As a result, whenever a point-in-time SharePoint content database needs to be recovered, you need to catalog the SharePoint farm again.
Select Re-catalog.
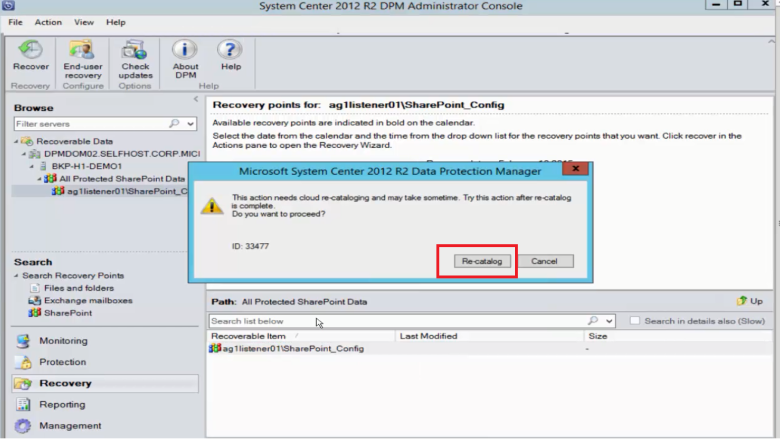
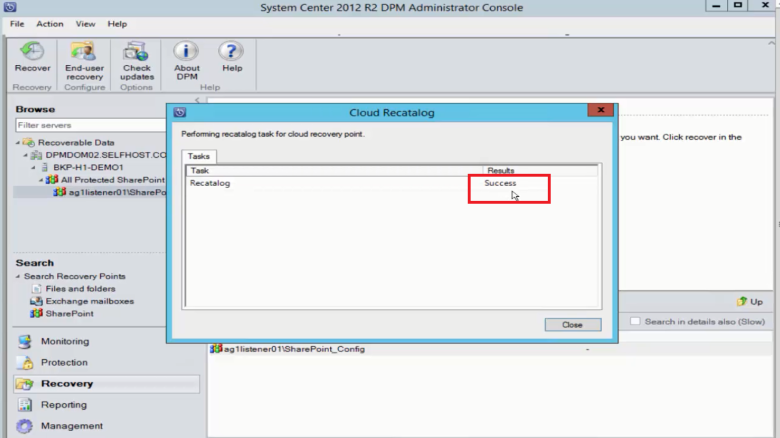
The Cloud Recatalog status window opens.
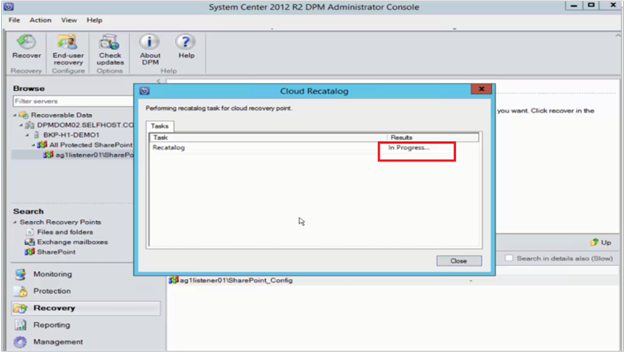
After cataloging is finished, the status changes to Success. Select Close.
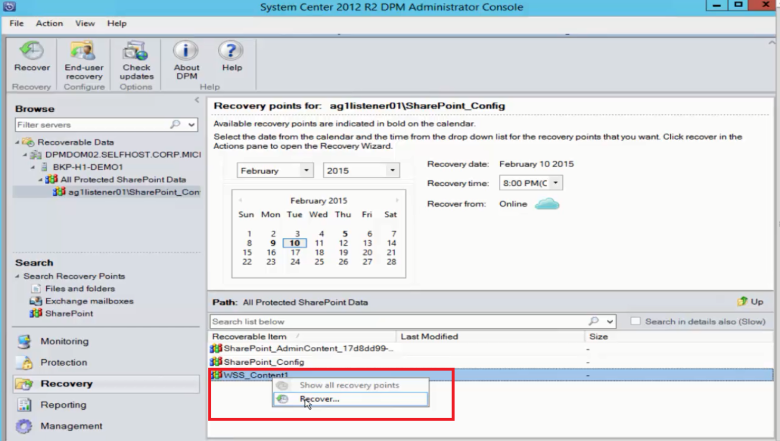
Select the SharePoint object shown in the MABS Recovery tab to get the content database structure. Right-click the item, and then select Recover.
At this point, follow the recovery steps earlier in this article to recover a SharePoint content database from disk.
Switch the Front-End Web Server
If you have more than one front-end web server, and want to switch the server that MABS uses to protect the farm, follow the instructions:
The following procedure uses the example of a server farm with two front-end Web servers, Server1 and Server2. MABS uses Server1 to protect the farm. Change the front-end Web server that MABS uses to Server2 so that you can remove Server1 from the farm.
Note
If the front-end Web server that MABS uses to protect the farm is unavailable, use the following procedure to change the front-end Web server by starting at step 4.
Change the front-end Web server that MABS uses to protect the farm
Stop the SharePoint VSS Writer service on
Server1by running the following command at a command prompt:stsadm -o unregisterwsswriterOn
Server1, open the Registry Editor and navigate to the following key:HKLM\System\CCS\Services\VSS\VssAccessControl
Check all values listed in the VssAccessControl subkey. If any entry has a value data of 0 and another VSS writer is running under the associated account credentials, change the value data to 1.
Install a protection agent on
Server2.Warning
You can only switch Web front-end servers if both the servers are on the same domain.
On
Server2, at a command prompt, change the directory to_MABS installation location_\bin\and run ConfigureSharepoint. For more information about ConfigureSharePoint, see Configure backup.Select the protection group that the server farm belongs to, and then select Modify protection group.
On the Modify Group Wizard, on the Select Group Members page, expand
Server* and select the server farm, and then complete the wizard.A consistency check will start.
If you performed step 6, you can now remove the volume from the protection group.
Next steps
- See the Backup files and application article.
- See the Backup SQL Server on Azure Stack article.