Create and configure a Recovery Services vault
This article describes how to create and configure an Azure Backup Recovery Services vault that stores backups and recovery points. You can use Cross Region Restore to restore in a secondary region. To create a Recovery Services vault using REST API, see this article.
Create a Recovery Services vault
A Recovery Services vault is a management entity that stores recovery points that are created over time, and it provides an interface to perform backup-related operations. These operations include taking on-demand backups, performing restores, and creating backup policies.
To create a Recovery Services vault:
Sign in to the Azure portal.
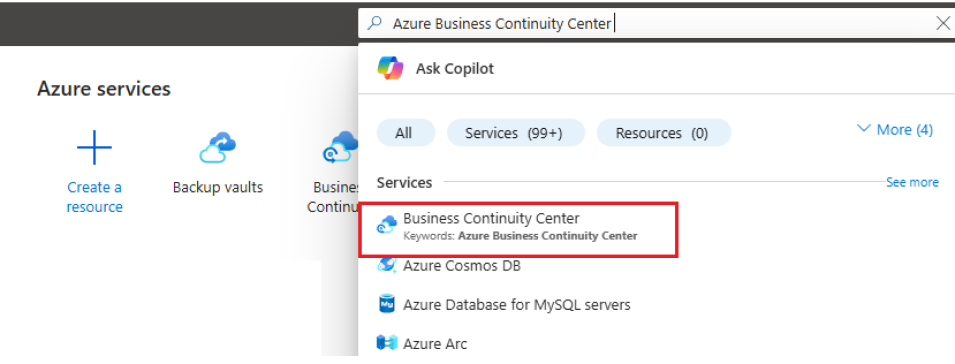
Search for Business Continuity Center, and then go to the Business Continuity Center dashboard.
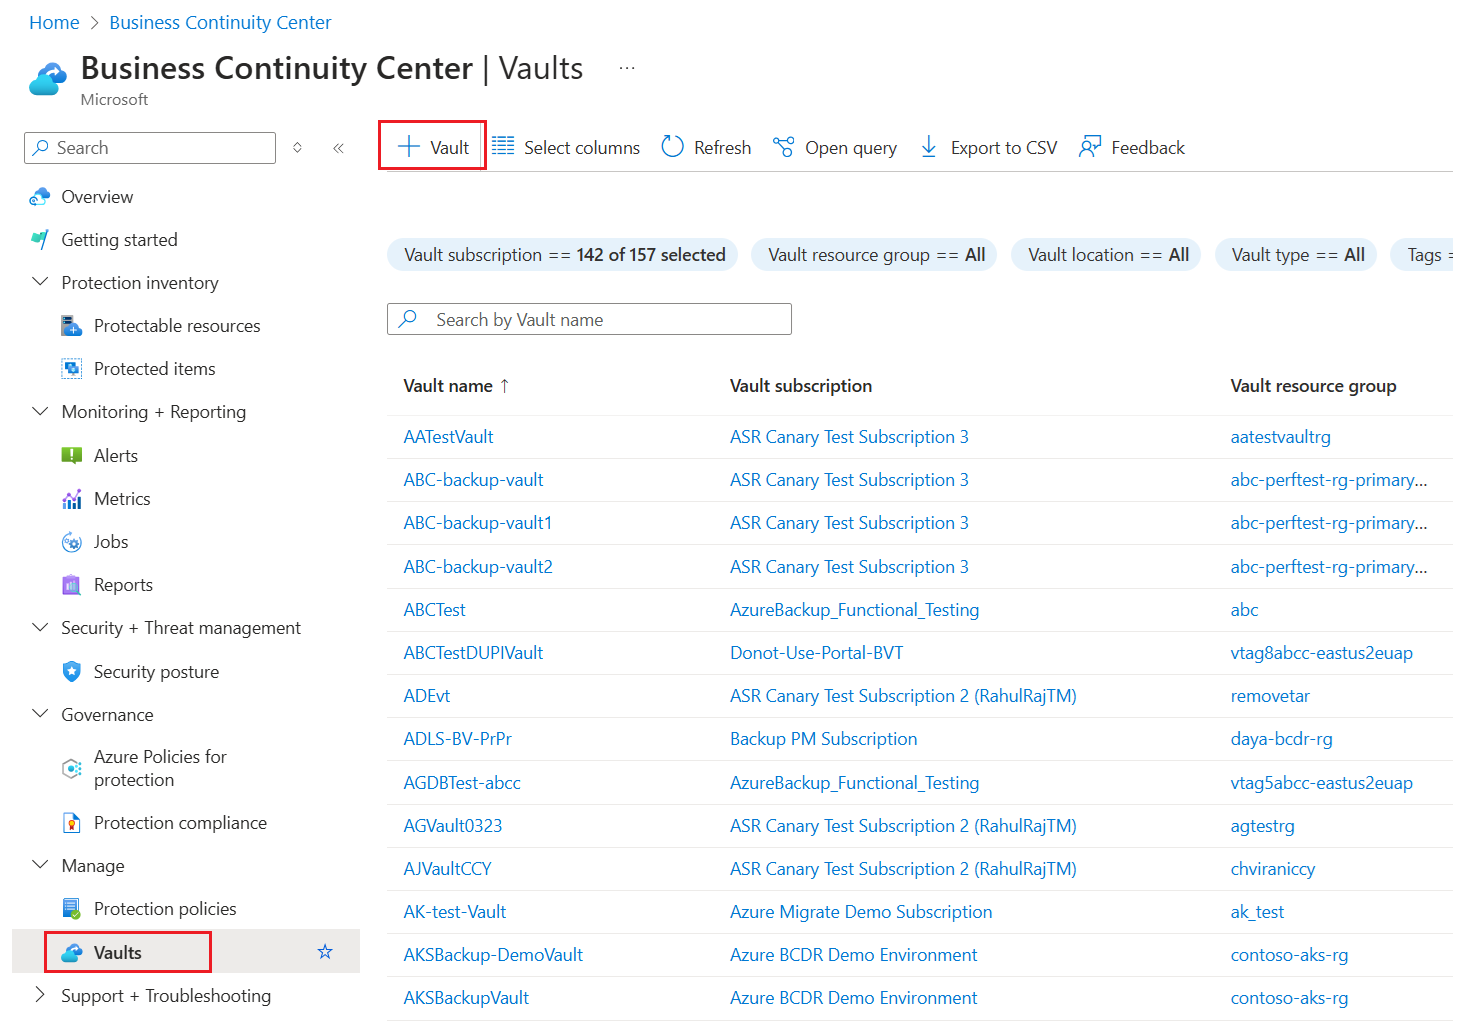
On the Vault pane, select +Vault.
Select Recovery Services vault > Continue.
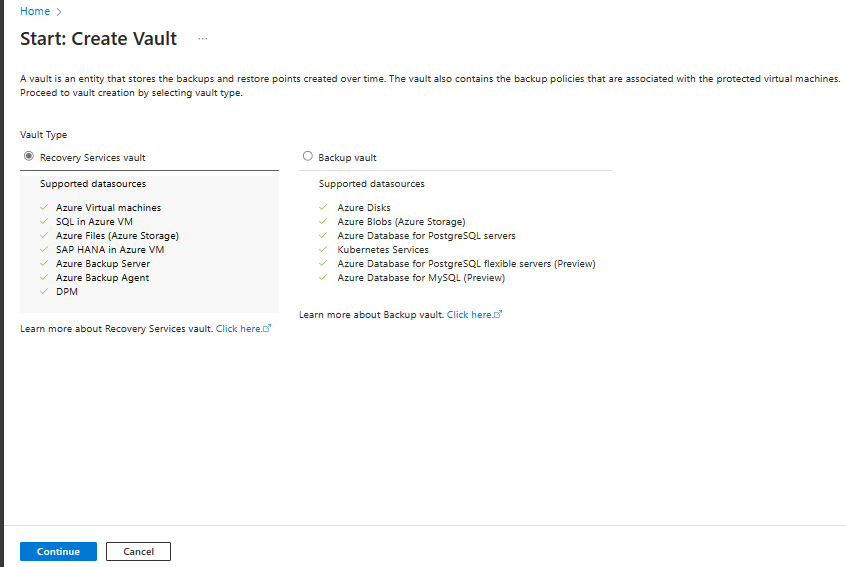
On the Recovery Services vault pane, enter the following values:
Subscription: Select the subscription to use. If you're a member of only one subscription, you'll see that name. If you're not sure which subscription to use, use the default subscription. There are multiple choices only if your work or school account is associated with more than one Azure subscription.
Resource group: Use an existing resource group or create a new one. To view a list of available resource groups in your subscription, select Use existing, and then select a resource in the dropdown list. To create a new resource group, select Create new, and then enter the name. For more information about resource groups, see Azure Resource Manager overview.
Vault name: Enter a friendly name to identify the vault. The name must be unique to the Azure subscription. Specify a name that has at least 2 but not more than 50 characters. The name must start with a letter and consist only of letters, numbers, and hyphens.
Region: Select the geographic region for the vault. For you to create a vault to help protect any data source, the vault must be in the same region as the data source.
Important
If you're not sure of the location of your data source, close the window. Go to the list of your resources in the portal. If you have data sources in multiple regions, create a Recovery Services vault for each region. Create the vault in the first location before you create a vault in another location. There's no need to specify storage accounts to store the backup data. The Recovery Services vault and Azure Backup handle that automatically.
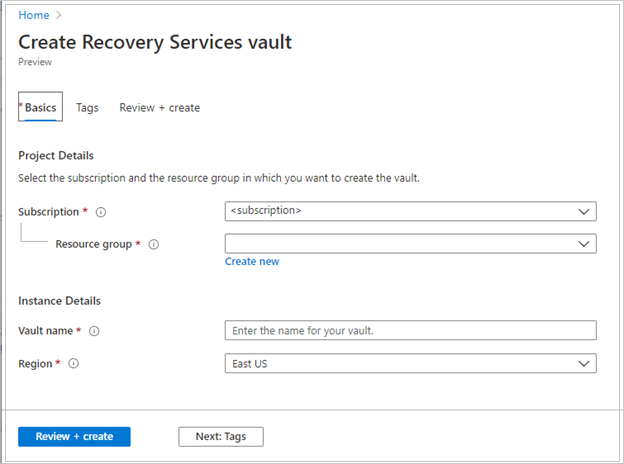
After providing the values, select Review + create.
To finish creating the Recovery Services vault, select Create.
It can take a while to create the Recovery Services vault. Monitor the status notifications in the Notifications area at the upper right. After the vault is created, it appears in the list of Recovery Services vaults. If the vault doesn't appear, select Refresh.

Note
Azure Backup now supports immutable vaults that help you ensure that recovery points once created can't be deleted before their expiry as per the backup policy. You can make the immutability irreversible for maximum protection to your backup data from various threats, including ransomware attacks and malicious actors. Learn more.
Set storage redundancy
Azure Backup automatically handles storage for the vault. You need to specify how that storage is replicated.
Note
Be sure to change the storage replication type for a Recovery Services vault before you configure a backup in the vault. After you configure a backup, the option to modify is disabled.
If you haven't yet configured the backup, complete the following steps to review and modify the settings. If you've already configured the backup and must change the storage replication type, review these workarounds.
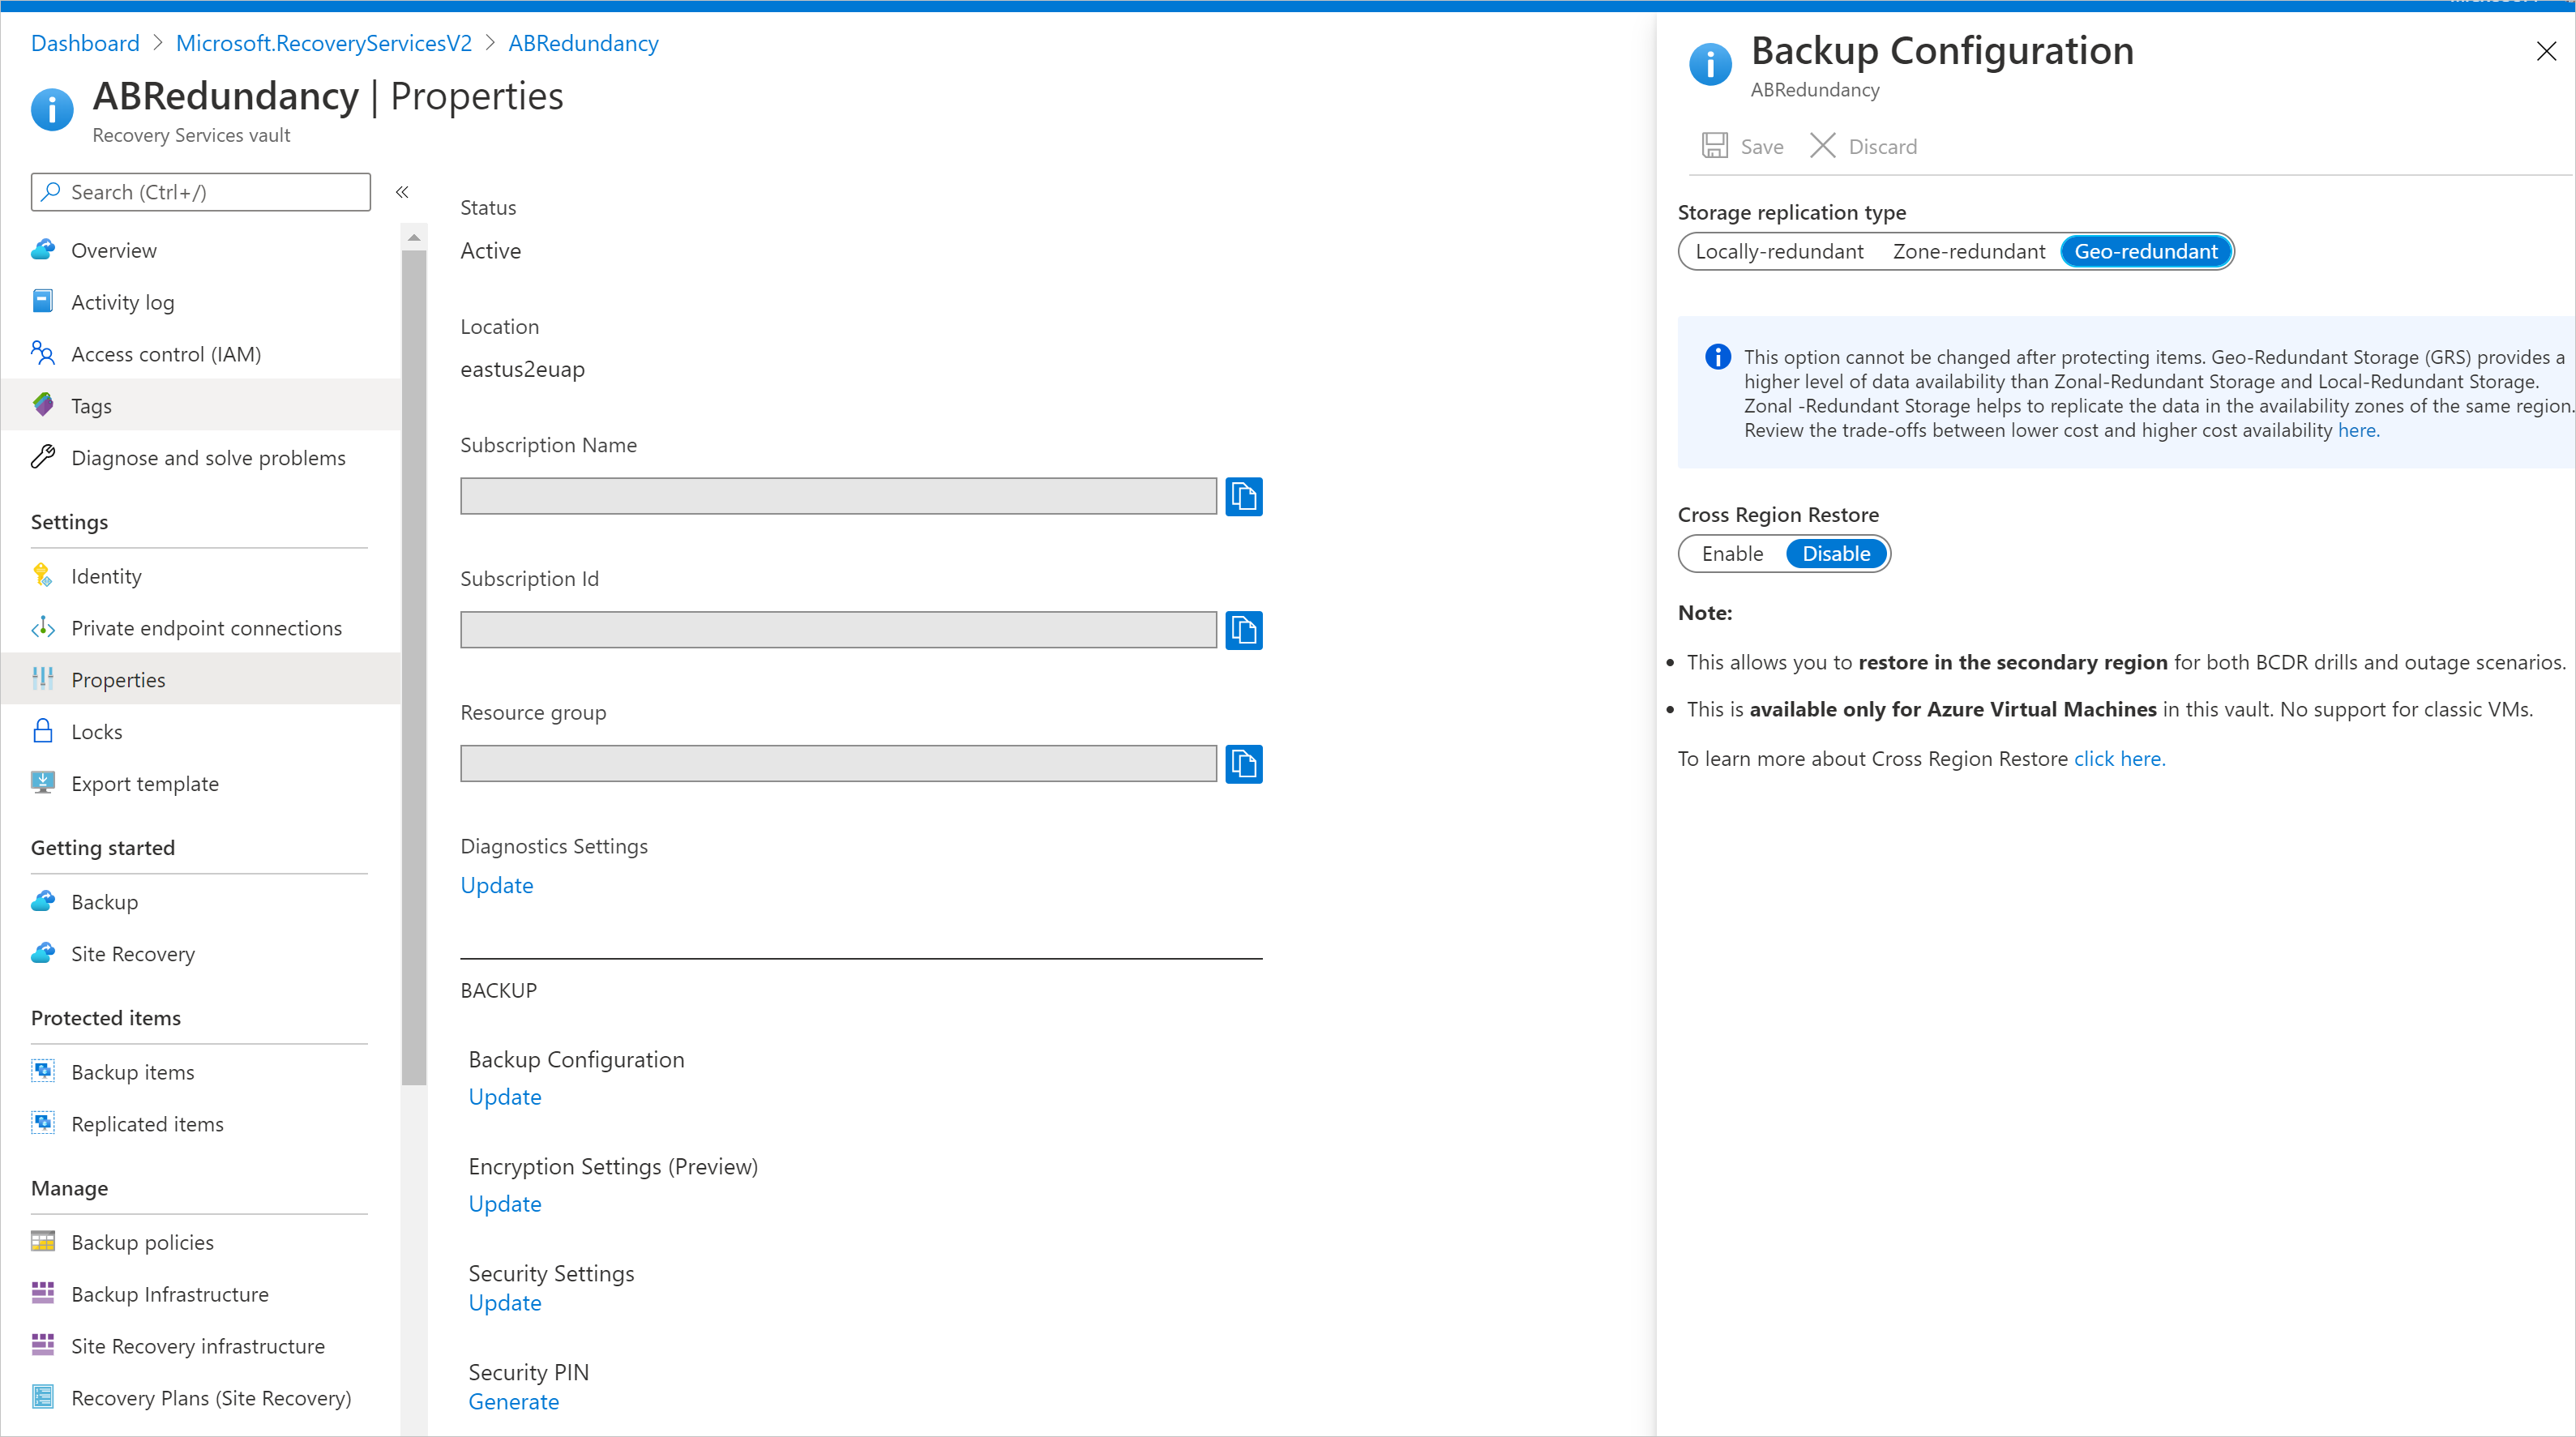
From the Recovery Services vaults pane, select the new vault. In the Settings section, select Properties.
In Properties, under Backup Configuration, select Update.
For Storage replication type, select Geo-redundant, Locally-redundant, or Zone-redundant. Then select Save.
Here are our recommendations for choosing a storage replication type:
If you're using Azure as a primary backup storage endpoint, continue to use the default geo-redundant storage (GRS).
If you don't use Azure as a primary backup storage endpoint, choose locally redundant storage (LRS) to reduce storage costs.
If you need data availability without downtime in a region, guaranteeing data residency, choose zone-redundant storage (ZRS).
Note
The storage replication settings for the vault aren't relevant for Azure file share backup, because the current solution is snapshot based and no data is transferred to the vault. Snapshots are stored in the same storage account as the backed-up file share.
Set Cross Region Restore
The Cross Region Restore option allows you to restore data in a secondary, Azure paired region. You can use Cross Region Restore to conduct drills when there's an audit or compliance requirement. You can also use it to restore the data if there's a disaster in the primary region.
Before you begin, consider the following information:
- Cross Region Restore is supported only for a Recovery Services vault that uses the GRS replication type.
- Virtual machines (VMs) created through Azure Resource Manager and encrypted Azure VMs are supported. VMs created through the classic deployment model aren't supported. You can restore the VM or its disk.
- SQL Server or SAP HANA databases hosted on Azure VMs are supported. You can restore databases or their files.
- MARS Agent is supported for vaults without private endpoint (preview).
- Review the support matrix for a list of supported managed types and regions.
- Using Cross Region Restore will incur additional charges. Once you enable Cross Region restore, it might take up to 48 hours for the backup items to be available in secondary regions. Learn more about pricing.
- Cross Region Restore currently can't be reverted to GRS or LRS after the protection starts for the first time.
- Currently, secondary region RPO is 36 hours. This is because the RPO in the primary region is 24 hours and can take up to 12 hours to replicate the backup data from the primary to the secondary region.
- Review the permissions required to use Cross Region Restore.
A vault created with GRS redundancy includes the option to configure the Cross Region Restore feature. Every GRS vault has a banner that links to the documentation.
Note
Cross-region restore is also supported for machines running on Ultra disks. Learn more about Ultra disk backup supportability.

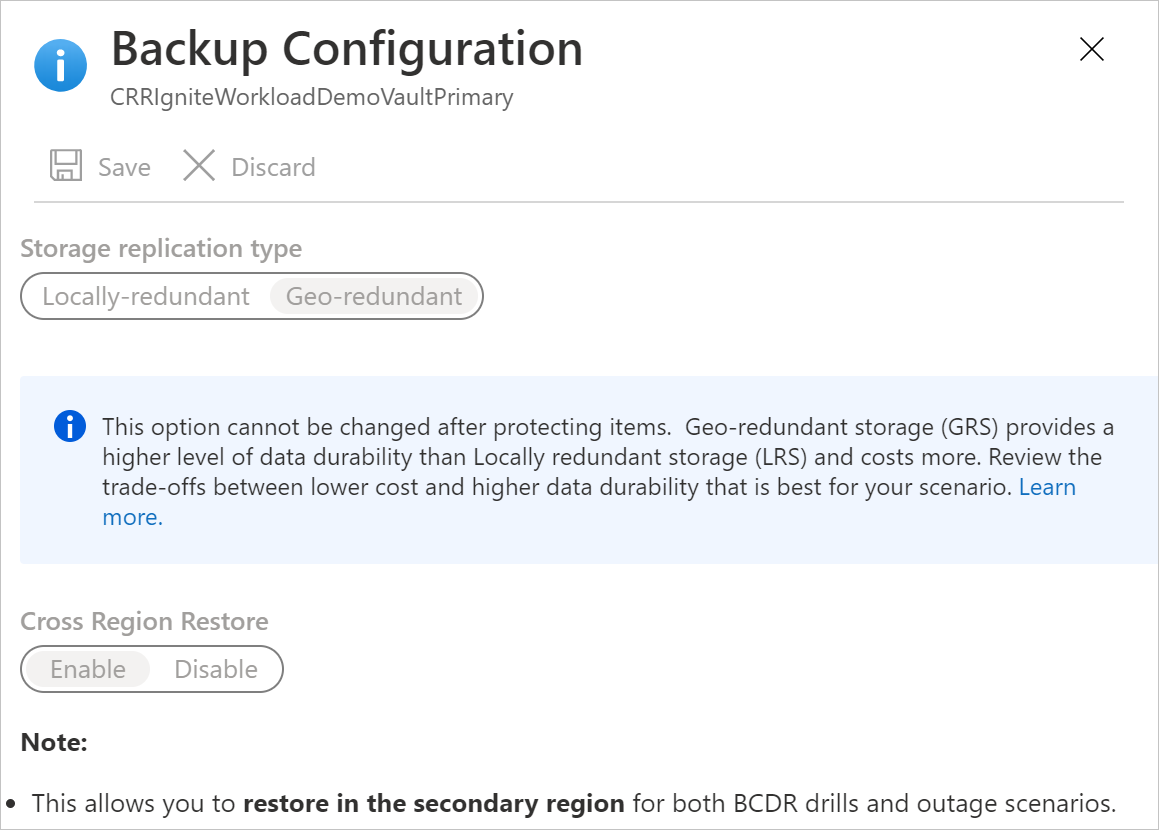
To configure Cross Region Restore for the vault:
From the portal, go to your Recovery Services vault, and then select Properties (under Settings).
Under Backup Configuration, select Update.
Under Cross Region Restore, select Enable.
Note
If you have access to restricted paired regions and still can't view Cross Region Restore settings on the Backup Configuration pane, re-register the Recovery Services resource provider. To re-register the provider, go to your subscription in the Azure portal, go to Resource provider on the left pane, and then select Microsoft.RecoveryServices > Re-register.
For more information about backup and restore with Cross Region Restore, see these articles:
- Cross Region Restore for Azure VMs
- Cross Region Restore for SQL Server databases
- Cross Region Restore for SAP HANA databases
- Cross Region Restore for MARS (Preview)
Set encryption settings
By default, the data in the Recovery Services vault is encrypted through platform-managed keys. You don't need to take any explicit actions to enable this encryption. It applies to all workloads that are backed up to your Recovery Services vault.
You can choose to bring your own key (a customer-managed key) to encrypt the backup data in this vault. If you want to encrypt backup data by using your own key, you must specify the encryption key before any item is added to this vault. After you enable encryption with your key, it can't be reversed.
To configure your vault to encrypt with customer-managed keys:
- Enable managed identity for your Recovery Services vault.
- Assign permissions to the vault to access the encryption key in Azure Key Vault.
- Enable soft delete and purge protection in Azure Key Vault.
- Assign the encryption key to the Recovery Services vault.
You can find instructions for each of these steps in this article.
Modify default settings
We highly recommend that you review the default settings for storage replication type and security before you configure backups in the vault.
By default, Soft delete is set to Enabled on newly created vaults to help protect backup data from accidental or malicious deletions. To review and modify the settings, follow these steps.
Before you decide to move from GRS to LRS, review the trade-offs between lower cost and higher data durability that fit your scenario. If you must move from GRS to LRS after you configure backup, you have the following two choices. Your choice will depend on your business requirements to retain the backup data.
Don't need to preserve previous backed-up data
To help protect workloads in a new LRS vault, you need to delete the current protection and data in the GRS vault and reconfigure backups.
Warning
The following operation is destructive and can't be undone. All backup data and backup items associated with the protected server will be permanently deleted. Proceed with caution.
To stop and delete current protection on the GRS vault:
Follow these steps to disable soft delete in the GRS vault's properties.
Stop protection and delete backups from the existing GRS vault. On the vault dashboard menu, select Backup Items. If you need to move items that are listed here to the LRS vault, you must remove them and their backup data. See Delete protected items in the cloud and Delete protected items on-premises.
If you're planning to move Azure file shares, SQL Server instances, or SAP HANA servers, you'll also need to unregister them. On the vault dashboard menu, select Backup Infrastructure. For steps beyond that, see Unregister a storage account associated with Azure file shares, Unregister a SQL Server instance, or Unregister an SAP HANA instance.
After you remove Azure file shares, SQL Server instances, or SAP HANA servers from the GRS vault, continue to configure the backups for your workload in the new LRS vault.
Must preserve previous backed-up data
If you need to keep the current protected data in the GRS vault and continue the protection in a new LRS vault, there are limited options for some of the workloads:
For Microsoft Azure Recovery Services (MARS), you can stop protection with retained data and register the agent in the new LRS vault. Be aware that:
- The Azure Backup service will continue to retain all the existing recovery points of the GRS vault.
- You'll need to pay to keep the recovery points in the GRS vault.
- You'll be able to restore the backed-up data only for unexpired recovery points in the GRS vault.
- You'll need to create an initial replica of the data on the LRS vault.
For an Azure VM, you can stop protection with retained data for the VM in the GRS vault, move the VM to another resource group, and then help protect the VM in the LRS vault. For information about moving a VM to another resource group, see the guidance and limitations.
You can add a VM to only one vault at a time. However, the VM in the new resource group can be added to the LRS vault because it's considered a different VM. Be aware that:
- The Azure Backup service will retain the recovery points that have been backed up on the GRS vault.
- You'll need to pay to keep the recovery points in the GRS vault. See Azure Backup pricing for details.
- You'll be able to restore the VM, if needed, from the GRS vault.
- The first backup on the LRS vault of the VM in the new resource will be an initial replica.
