Tutorial: Build a Blazor Server chat app
This tutorial shows you how to build and modify a Blazor Server app. You learn how to:
- Build a simple chat room with the Blazor Server app template.
- Work with Razor components.
- Use event handling and data binding in Razor components.
- Quick-deploy to Azure App Service in Visual Studio.
- Migrate from local SignalR to Azure SignalR Service.
Important
Raw connection strings appear in this article for demonstration purposes only.
A connection string includes the authorization information required for your application to access Azure Web PubSub service. The access key inside the connection string is similar to a root password for your service. In production environments, always protect your access keys. Use Azure Key Vault to manage and rotate your keys securely and secure your connection string using Microsoft Entra ID and authorize access with Microsoft Entra ID.
Avoid distributing access keys to other users, hard-coding them, or saving them anywhere in plain text that is accessible to others. Rotate your keys if you believe they may have been compromised.
Ready to start?
Prerequisites
- Install .NET Core 3.0 SDK (Version >= 3.0.100)
- Install Visual Studio 2019 (Version >= 16.3)
Build a local chat room in Blazor Server app
Beginning in Visual Studio 2019 version 16.2.0, Azure SignalR Service is built into the web application publish process to make managing the dependencies between the web app and SignalR service much more convenient. You can work without any code changes at the same time:
- in a local SignalR instance, in a local development environment.
- in Azure SignalR Service for Azure App Service.
Create a Blazor chat app:
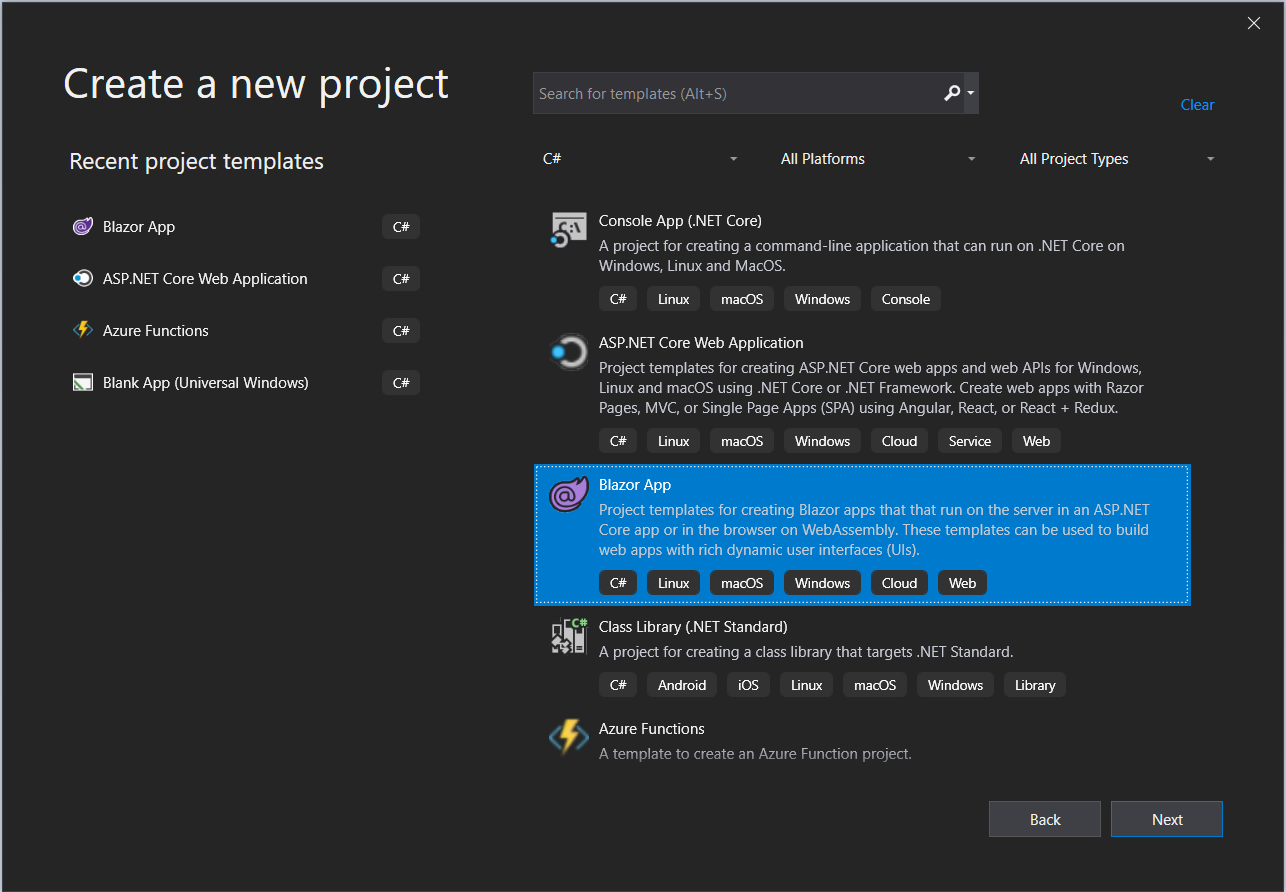
In Visual Studio, choose Create a new project.
Select Blazor App.
Name the application and choose a folder.
Select the Blazor Server App template.
Note
Make sure that you've already installed .NET Core SDK 3.0+ to enable Visual Studio to correctly recognize the target framework.
You also can create a project by running the
dotnet newcommand in the .NET CLI:dotnet new blazorserver -o BlazorChat
Add a new C# file called
BlazorChatSampleHub.csand create a new classBlazorChatSampleHubderiving from theHubclass for the chat app. For more information on creating hubs, see Create and Use Hubs.using System; using System.Threading.Tasks; using Microsoft.AspNetCore.SignalR; namespace BlazorChat { public class BlazorChatSampleHub : Hub { public const string HubUrl = "/chat"; public async Task Broadcast(string username, string message) { await Clients.All.SendAsync("Broadcast", username, message); } public override Task OnConnectedAsync() { Console.WriteLine($"{Context.ConnectionId} connected"); return base.OnConnectedAsync(); } public override async Task OnDisconnectedAsync(Exception e) { Console.WriteLine($"Disconnected {e?.Message} {Context.ConnectionId}"); await base.OnDisconnectedAsync(e); } } }Add an endpoint for the hub in the
Startup.Configure()method.app.UseEndpoints(endpoints => { endpoints.MapBlazorHub(); endpoints.MapFallbackToPage("/_Host"); endpoints.MapHub<BlazorChatSampleHub>(BlazorChatSampleHub.HubUrl); });Install the
Microsoft.AspNetCore.SignalR.Clientpackage to use the SignalR client.dotnet add package Microsoft.AspNetCore.SignalR.Client --version 3.1.7To implement the SignalR client, create a new Razor component called
ChatRoom.razorunder thePagesfolder. Use the ChatRoom.razor file or perform the following steps:Add the
@pagedirective and the using statements. Use the@injectdirective to inject theNavigationManagerservice.@page "/chatroom" @inject NavigationManager navigationManager @using Microsoft.AspNetCore.SignalR.Client;In the
@codesection, add the following members to the new SignalR client to send and receive messages.@code { // flag to indicate chat status private bool _isChatting = false; // name of the user who will be chatting private string _username; // on-screen message private string _message; // new message input private string _newMessage; // list of messages in chat private List<Message> _messages = new List<Message>(); private string _hubUrl; private HubConnection _hubConnection; public async Task Chat() { // check username is valid if (string.IsNullOrWhiteSpace(_username)) { _message = "Please enter a name"; return; }; try { // Start chatting and force refresh UI. _isChatting = true; await Task.Delay(1); // remove old messages if any _messages.Clear(); // Create the chat client string baseUrl = navigationManager.BaseUri; _hubUrl = baseUrl.TrimEnd('/') + BlazorChatSampleHub.HubUrl; _hubConnection = new HubConnectionBuilder() .WithUrl(_hubUrl) .Build(); _hubConnection.On<string, string>("Broadcast", BroadcastMessage); await _hubConnection.StartAsync(); await SendAsync($"[Notice] {_username} joined chat room."); } catch (Exception e) { _message = $"ERROR: Failed to start chat client: {e.Message}"; _isChatting = false; } } private void BroadcastMessage(string name, string message) { bool isMine = name.Equals(_username, StringComparison.OrdinalIgnoreCase); _messages.Add(new Message(name, message, isMine)); // Inform blazor the UI needs updating InvokeAsync(StateHasChanged); } private async Task DisconnectAsync() { if (_isChatting) { await SendAsync($"[Notice] {_username} left chat room."); await _hubConnection.StopAsync(); await _hubConnection.DisposeAsync(); _hubConnection = null; _isChatting = false; } } private async Task SendAsync(string message) { if (_isChatting && !string.IsNullOrWhiteSpace(message)) { await _hubConnection.SendAsync("Broadcast", _username, message); _newMessage = string.Empty; } } private class Message { public Message(string username, string body, bool mine) { Username = username; Body = body; Mine = mine; } public string Username { get; set; } public string Body { get; set; } public bool Mine { get; set; } public bool IsNotice => Body.StartsWith("[Notice]"); public string CSS => Mine ? "sent" : "received"; } }Add the UI markup before the
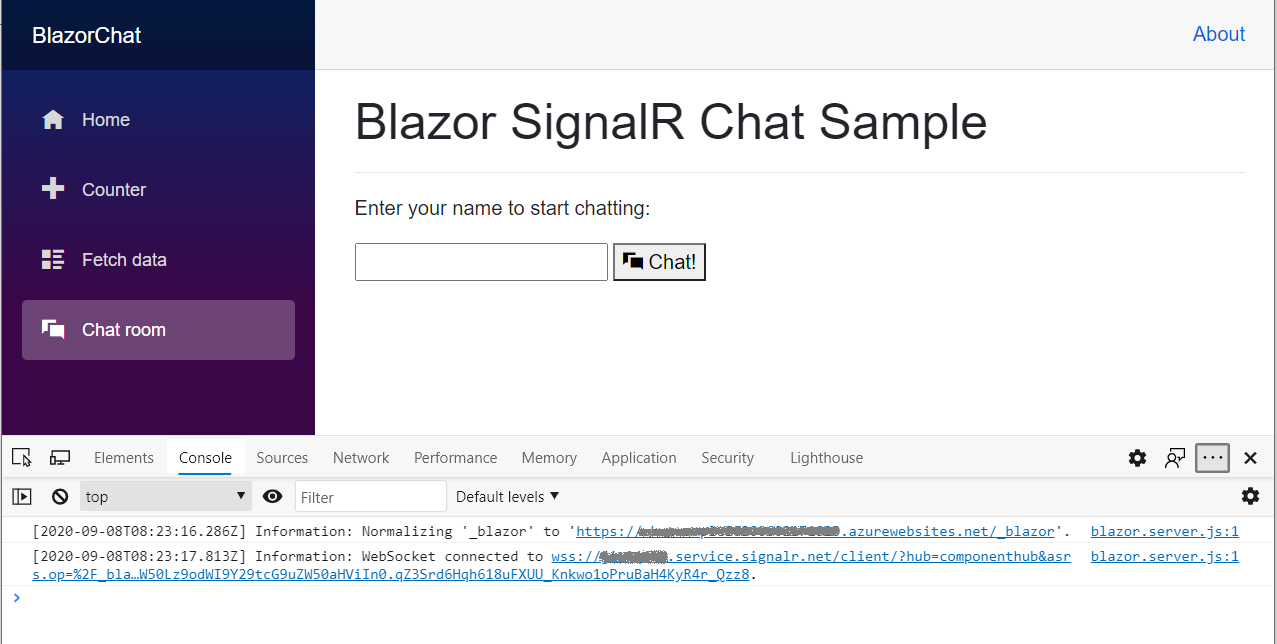
@codesection to interact with the SignalR client.<h1>Blazor SignalR Chat Sample</h1> <hr /> @if (!_isChatting) { <p> Enter your name to start chatting: </p> <input type="text" maxlength="32" @bind="@_username" /> <button type="button" @onclick="@Chat"><span class="oi oi-chat" aria-hidden="true"></span> Chat!</button> // Error messages @if (_message != null) { <div class="invalid-feedback">@_message</div> <small id="emailHelp" class="form-text text-muted">@_message</small> } } else { // banner to show current user <div class="alert alert-secondary mt-4" role="alert"> <span class="oi oi-person mr-2" aria-hidden="true"></span> <span>You are connected as <b>@_username</b></span> <button class="btn btn-sm btn-warning ml-md-auto" @onclick="@DisconnectAsync">Disconnect</button> </div> // display messages <div id="scrollbox"> @foreach (var item in _messages) { @if (item.IsNotice) { <div class="alert alert-info">@item.Body</div> } else { <div class="@item.CSS"> <div class="user">@item.Username</div> <div class="msg">@item.Body</div> </div> } } <hr /> <textarea class="input-lg" placeholder="enter your comment" @bind="@_newMessage"></textarea> <button class="btn btn-default" @onclick="@(() => SendAsync(_newMessage))">Send</button> </div> }
Update the
NavMenu.razorcomponent to insert a newNavLinkcomponent to link to the chat room underNavMenuCssClass.<li class="nav-item px-3"> <NavLink class="nav-link" href="chatroom"> <span class="oi oi-chat" aria-hidden="true"></span> Chat room </NavLink> </li>Add a few CSS classes to the
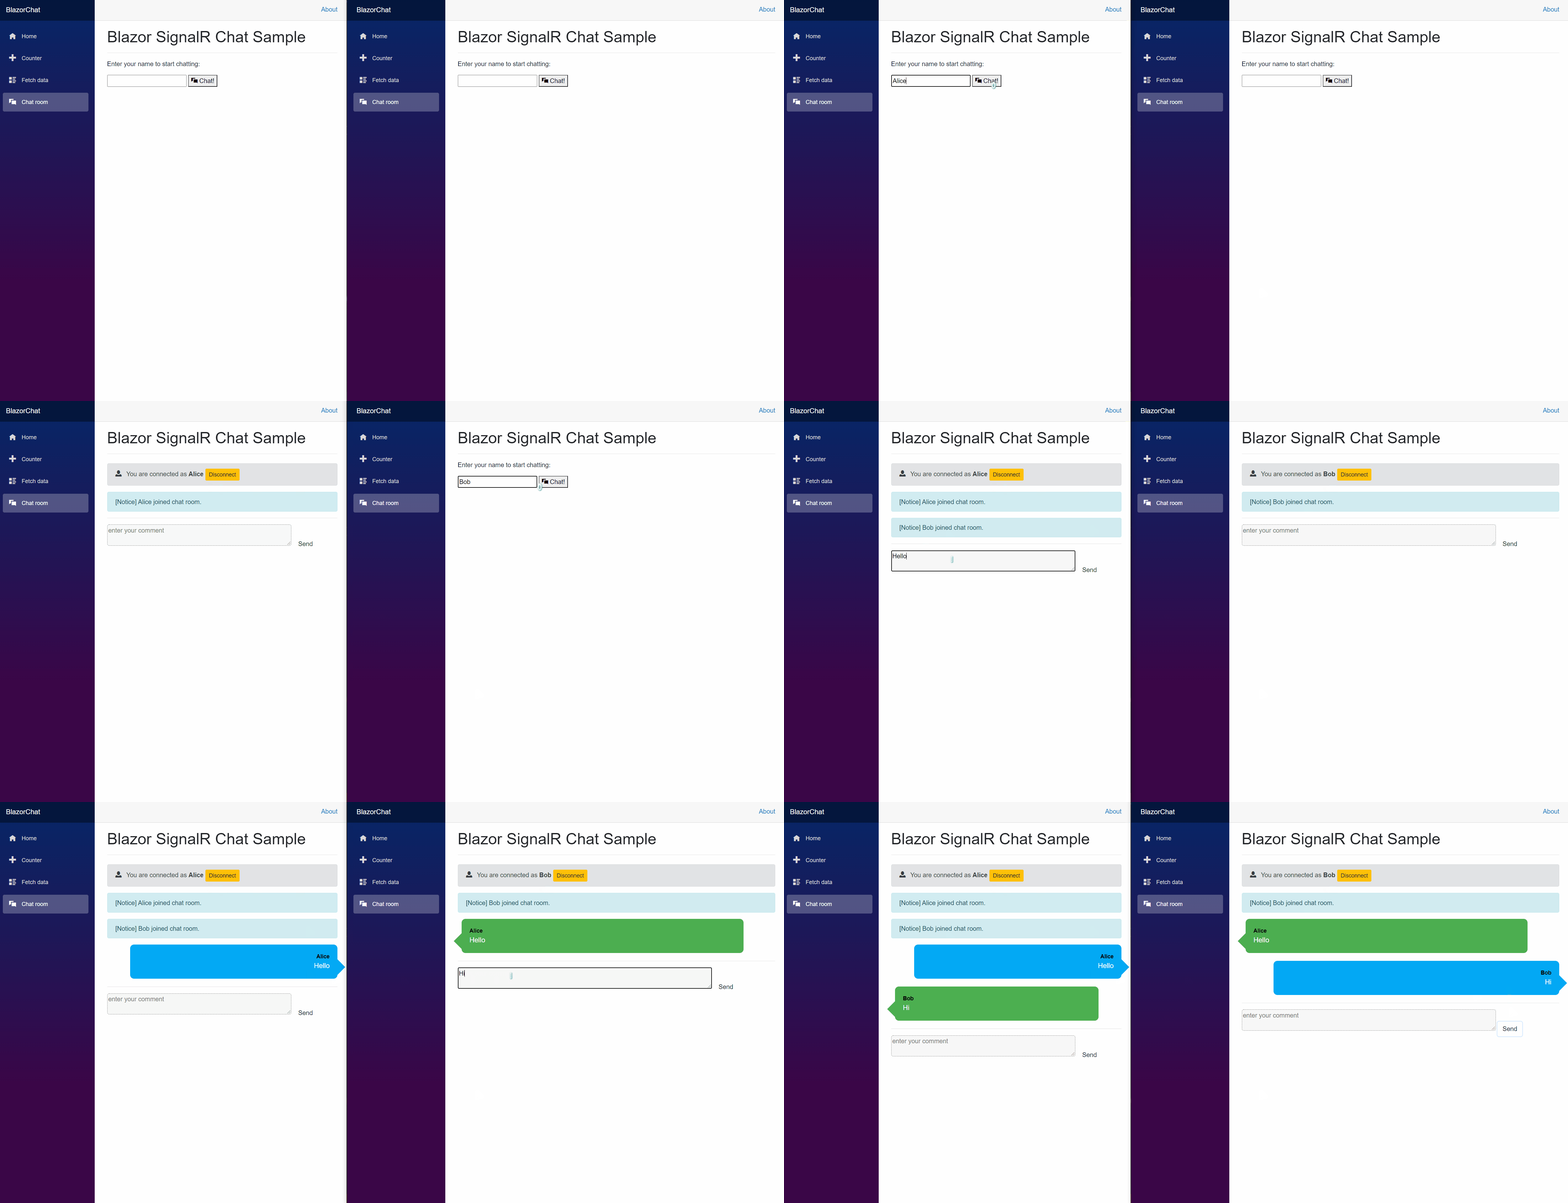
site.cssfile to style the UI elements in the chat page./* improved for chat text box */ textarea { border: 1px dashed #888; border-radius: 5px; width: 80%; overflow: auto; background: #f7f7f7 } /* improved for speech bubbles */ .received, .sent { position: relative; font-family: arial; font-size: 1.1em; border-radius: 10px; padding: 20px; margin-bottom: 20px; } .received:after, .sent:after { content: ''; border: 20px solid transparent; position: absolute; margin-top: -30px; } .sent { background: #03a9f4; color: #fff; margin-left: 10%; top: 50%; text-align: right; } .received { background: #4CAF50; color: #fff; margin-left: 10px; margin-right: 10%; } .sent:after { border-left-color: #03a9f4; border-right: 0; right: -20px; } .received:after { border-right-color: #4CAF50; border-left: 0; left: -20px; } /* div within bubble for name */ .user { font-size: 0.8em; font-weight: bold; color: #000; } .msg { /*display: inline;*/ }To run the app, press F5. Now, you can initiate the chat:
Publish to Azure
When you deploy the Blazor app to Azure App Service, we recommend that you use Azure SignalR Service. Azure SignalR Service allows for scaling up a Blazor Server app to a large number of concurrent SignalR connections. In addition, the SignalR service's global reach and high-performance datacenters significantly aid in reducing latency due to geography.
Important
In a Blazor Server app, UI states are maintained on the server side, which means a sticky server session is required to preserve state. If there is a single app server, sticky sessions are ensured by design. However, if multiple app servers are in use, the client negotiation and connection may be redirected to different servers, which may lead to an inconsistent UI state management in a Blazor app. Hence, it is recommended to enable sticky server sessions as shown in appsettings.json:
"Azure:SignalR:ServerStickyMode": "Required"
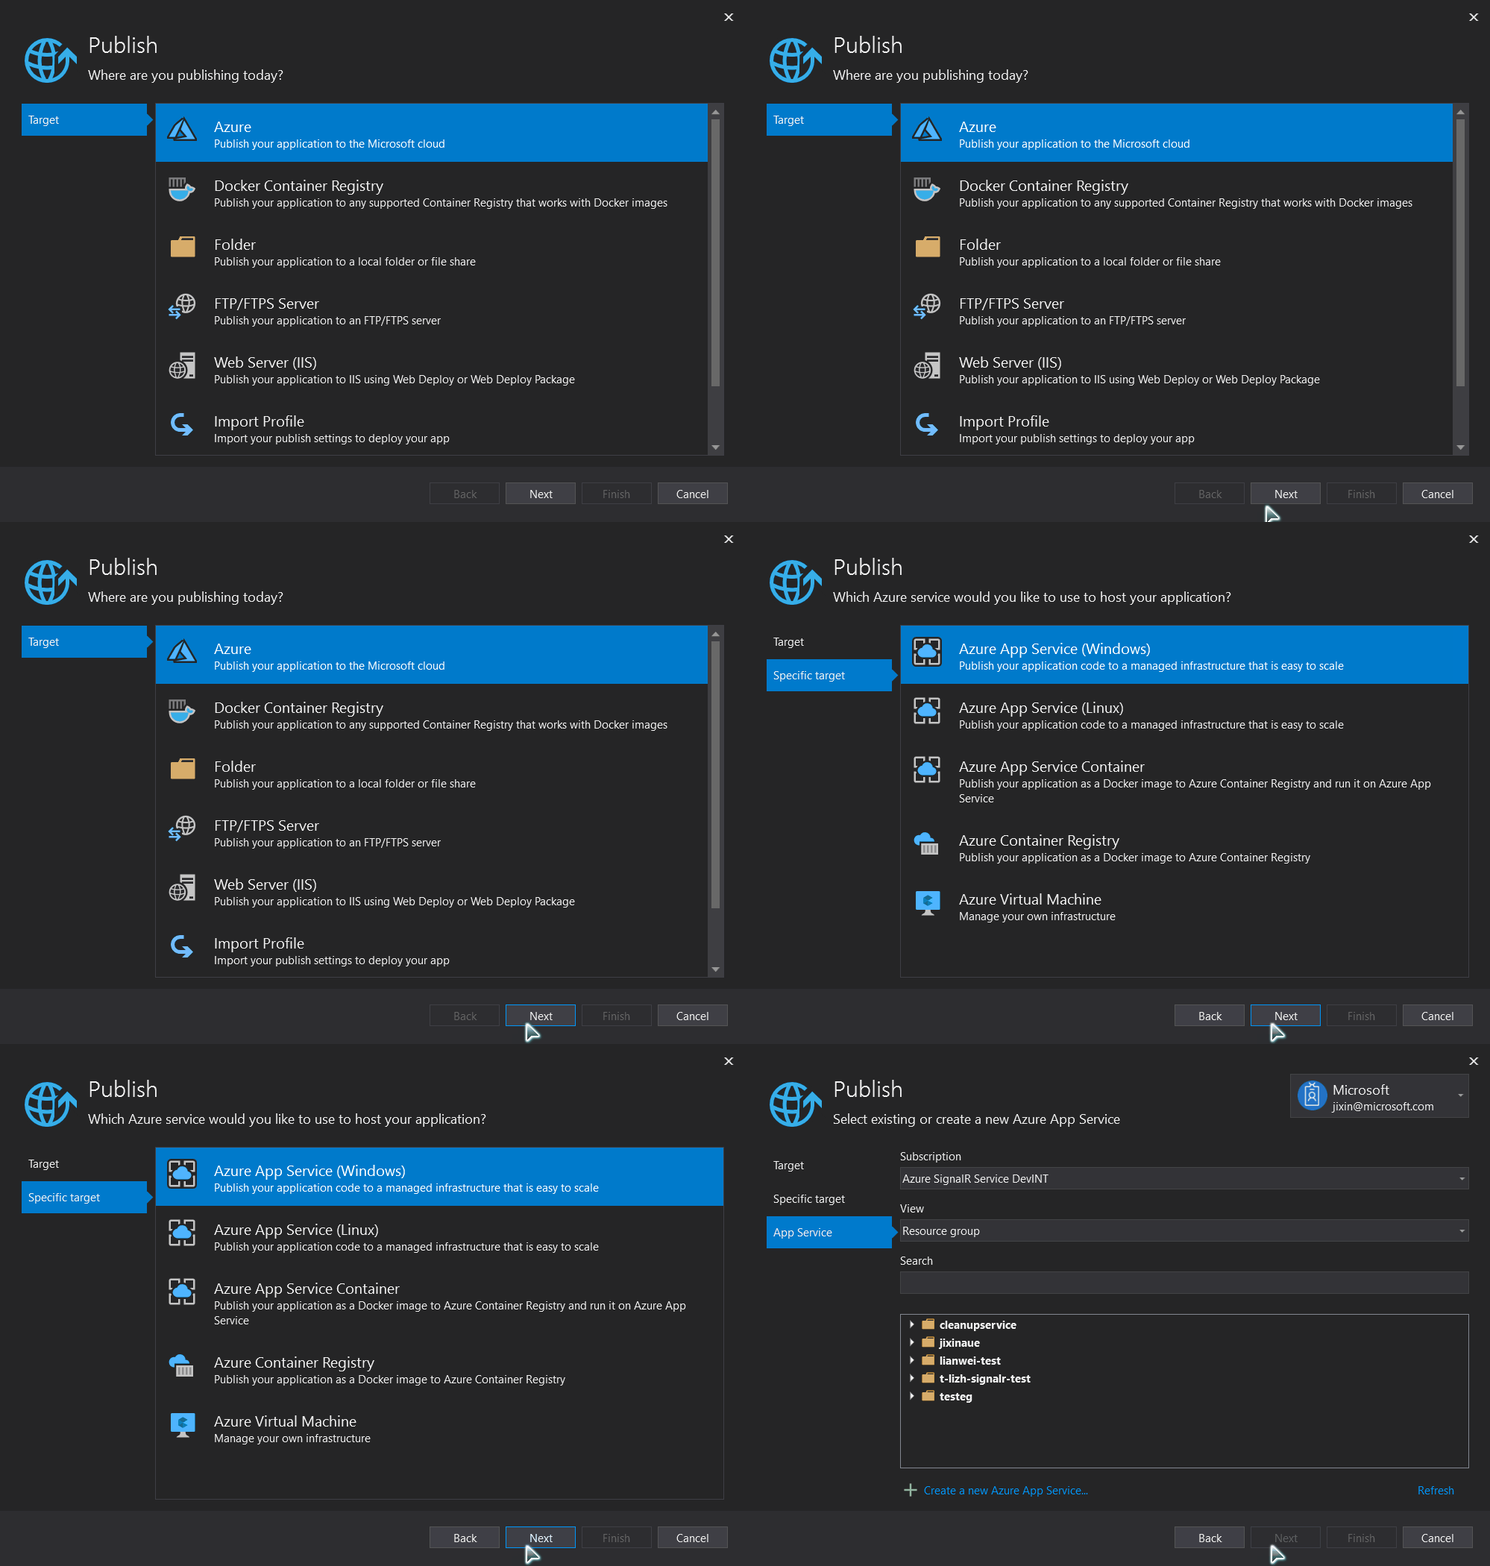
Right-click the project and go to Publish. Use the following settings:
- Target: Azure
- Specific target: All types of Azure App Service are supported.
- App Service: Create or select the App Service instance.
Add the Azure SignalR Service dependency.
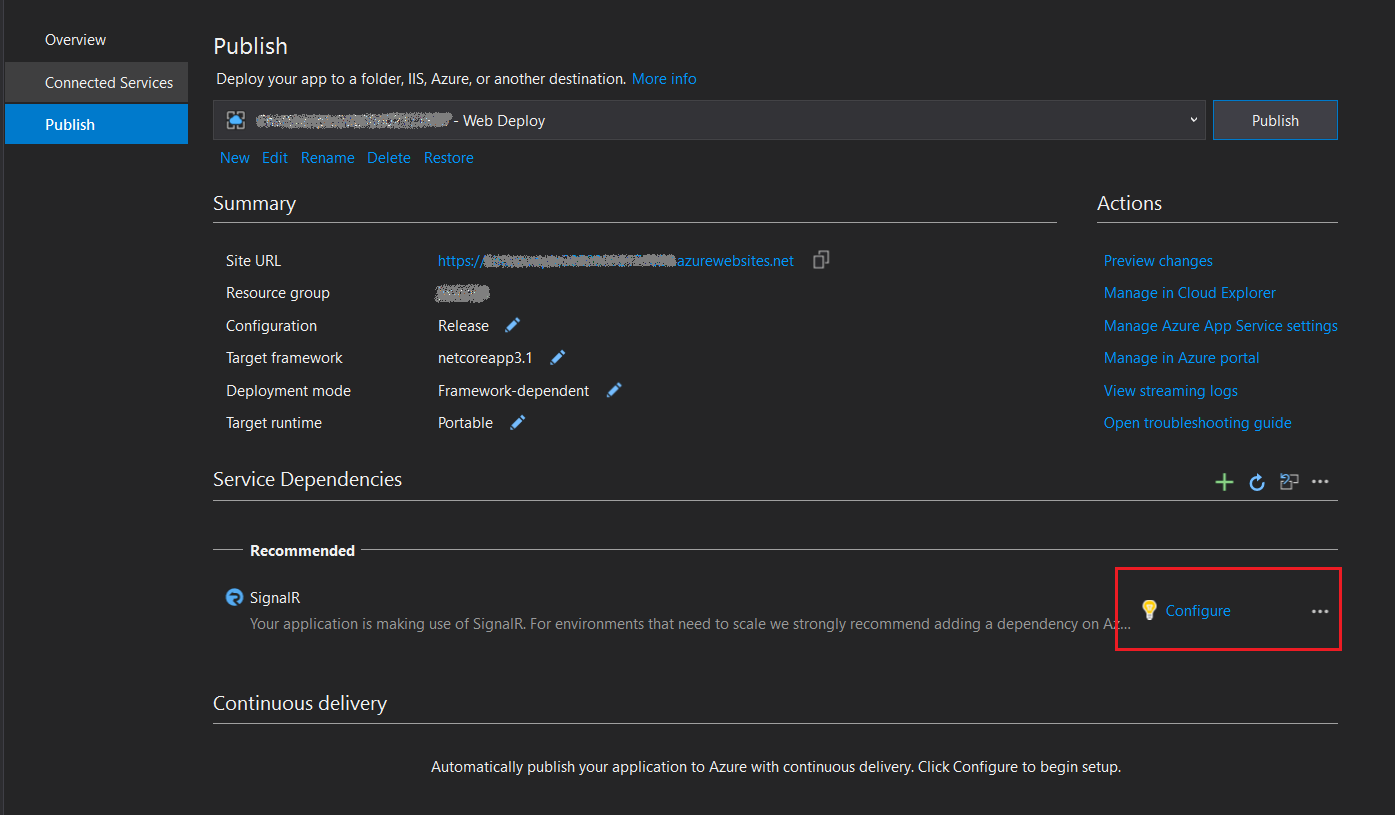
After the creation of the publish profile, you can see a recommendation message to add Azure SignalR service under Service Dependencies. Select Configure to create a new or select an existing Azure SignalR Service in the pane.
The service dependency carries out the following activities to enable your app to automatically switch to Azure SignalR Service when on Azure:
- Update
HostingStartupAssemblyto use Azure SignalR Service. - Add the Azure SignalR Service NuGet package reference.
- Update the profile properties to save the dependency settings.
- Configure the secrets store as per your choice.
- Add the configuration in appsettings.json to make your app target Azure SignalR Service.
- Update
Publish the app.
Now the app is ready to be published. Upon the completion of the publishing process, the app automatically launches in a browser.
Note
The app may require some time to start due to the Azure App Service deployment start latency. You can use the browser debugger tools (usually by pressing F12) to ensure that the traffic has been redirected to Azure SignalR Service.
Enable Azure SignalR Service for local development
Add a reference to the Azure SignalR SDK using the following command.
dotnet add package Microsoft.Azure.SignalRAdd a call to
AddAzureSignalR()inStartup.ConfigureServices()as shown in the following example:public void ConfigureServices(IServiceCollection services) { ... services.AddSignalR().AddAzureSignalR(); ... }Configure the Azure SignalR Service connection string either in appsettings.json or by using the Secret Manager tool.
Note
Step 2 can be replaced with configuring Hosting Startup Assemblies to use the SignalR SDK.
Add the configuration to turn on Azure SignalR Service in appsettings.json.
Raw connection strings appear in this article for demonstration purposes only. In production environments, always protect your access keys. Use Azure Key Vault to manage and rotate your keys securely and secure your connection string using Microsoft Entra ID and authorize access with Microsoft Entra ID.
"Azure": {
  "SignalR": {
    "Enabled": true,
    "ConnectionString": <your-connection-string>
  }
}
Configure the hosting startup assembly to use the Azure SignalR SDK. Edit launchSettings.json and add a configuration like the following example inside
environmentVariables:"environmentVariables": { ..., "ASPNETCORE_HOSTINGSTARTUPASSEMBLIES": "Microsoft.Azure.SignalR" }
Clean up resources
To clean up the resources created in this tutorial, delete the resource group using the Azure portal.
Additional resources
Next steps
In this tutorial, you learned how to:
- Build a simple chat room with the Blazor Server app template.
- Work with Razor components.
- Use event handling and data binding in Razor components.
- Quick-deploy to Azure App Service in Visual Studio.
- Migrate from local SignalR to Azure SignalR Service.
Read more about high availability:
