Deploy Bicep files with Visual Studio Code
You can use Visual Studio Code with the Bicep extension to deploy a Bicep file. You can deploy to any scope. This article shows how to deploy to a resource group.
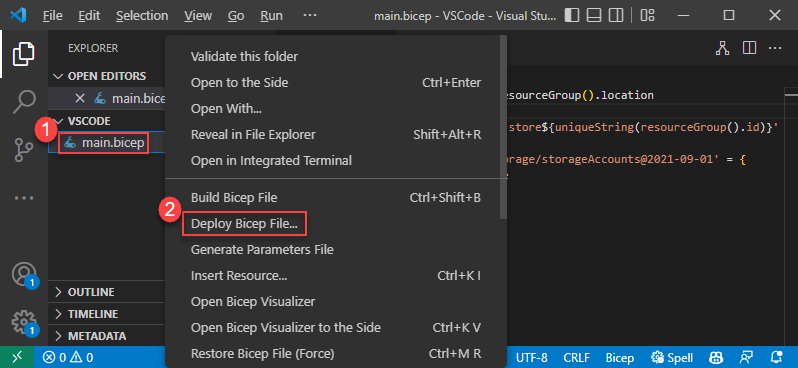
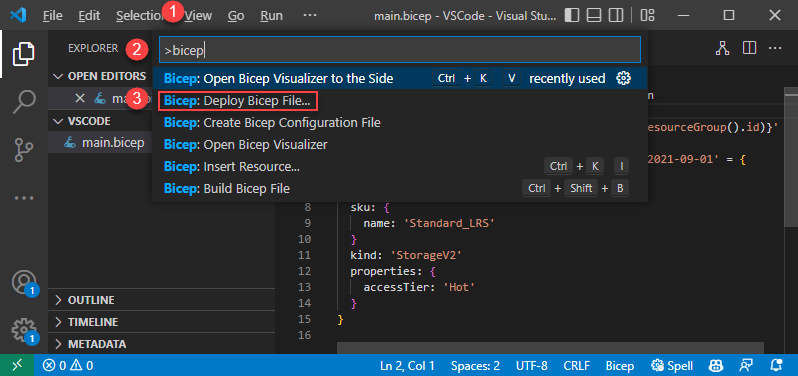
There are three ways you can find the command from an open Bicep file in Visual Studio Code:
Right-click the Bicep file name from the Explorer pane instead of the one under OPEN EDITORS:

Right-click anywhere inside a Bicep file, and then select Deploy Bicep File.
Select Command Palette from the View menu, and then select Bicep: Deploy Bicep File.

After you select the command, follow the wizard to enter the values:
If you're not signed in, follow the instructions provided in the prompt to complete the sign-in process.

Note
The Bicep deploy command in Visual Studio Code uses the new built-in authentication API for managing authentication. It doesn't use cloud profiles from bicepconfig.json. To sign in to a custom cloud, select Manage > Settings > Extension > Microsoft accounts > Microsoft Sovereign Cloud. At this time, multiple signed-in accounts aren't supported.
Select or create a resource group.
Select a parameters file or None to enter values for parameters:

If you choose None, enter the values for parameters:

After you enter the values, you have the option to create a parameters file from values used in this deployment:

If you select Yes, a parameters file named <Bicep-file-name>.parameters.json is created in the same folder.
See Create Bicep files with Visual Studio Code for more information about Visual Studio Code commands and how to use Visual Studio Code to create Bicep files.
Next steps
- For more information about deployment commands, see Deploy Bicep files with the Azure CLI and Azure PowerShell.
- To preview changes before deploying a Bicep file, see Bicep deployment what-if operation.