Create data collection rules (DCRs) in Azure Monitor
There are multiple methods for creating a data collection rule (DCR) in Azure Monitor. In some cases, Azure Monitor will create and manage the DCR according to settings that you configure in the Azure portal. You may not even realize that you're working with a DCR in some of these cases. For other scenarios though, you may need to create your own DCRs or edit existing ones by directly working with their definition in JSON. This article describes the different methods for creating a DCR and recommendations on editing and troubleshooting them.
Note
This article describes how to create and edit the DCR itself. To create and edit data collection rule associations, see Create and manage data collection rule associations.
Permissions
You require the following permissions to create DCRs and DCR associations:
| Built-in role | Scopes | Reason |
|---|---|---|
| Monitoring Contributor |
|
Create or edit DCRs, assign rules to the machine, deploy associations. |
| Virtual Machine Contributor Azure Connected Machine Resource Administrator |
|
Deploy agent extensions on the VM (virtual machine). |
| Any role that includes the action Microsoft.Resources/deployments/* |
|
Deploy Azure Resource Manager templates. |
Important
Create your DCR in the same region as your destination Log Analytics workspace or Azure Monitor workspace. You can associate the DCR to machines or containers from any subscription or resource group in the tenant. To send data across tenants, you must first enable Azure Lighthouse.
Create or edit a DCR using the Azure portal
The Azure portal provides a simplified experience for creating a DCR for particular scenarios. Using this method, you don't need to understand the structure of a DCR, although you may be limited in the configuration you can perform and may need to later edit the DCR definition to implement an advanced feature such as a transformation. The experience will vary for each scenario, so refer to the documentation for the specific scenario you're working with as described in the following table.
| Scenario | Description |
|---|---|
| Enable VM insights | When you enable VM Insights on a VM, the Azure Monitor agent is installed and a DCR is created and associated with the virtual machine. This DCR collects a predefined set of performance counters and shouldn't be modified. See Enable VM Insights. |
| Collect client data from VM | Create a DCR in the Azure portal using a guided interface to select different data sources from the client operating system of a VM. Examples include Windows events, Syslog events, and text logs. The Azure Monitor agent is automatically installed if necessary, and an association is created between the DCR and each VM you select. See Collect data with Azure Monitor Agent. |
| Metrics export | Create a DCR in the Azure portal using a guided interface to select metrics of different resource types to collect. An association is created between the DCR and each resource you select. See Create a data collection rule (DCR) for metrics export. |
| Table creation | When you create a new table in a Log Analytics workspace using the Azure portal, you upload sample data that Azure Monitor uses to create a DCR, including a transformation, that can be used with the Logs Ingestion API. You can't modify this DCR in the Azure portal but can modify it using any of the methods described in this article. See Create a custom table. |
| Kubernetes monitoring | To monitor a Kubernetes cluster, you enable Container Insights for logs and Prometheus for metrics. A DCR for each is created and associated with the containerized version of Azure Monitor agent in the cluster. You may need to modify the Container insights DCR to add a transformation. See Enable monitoring for Kubernetes clusters and Data transformations in Container insights. |
| Workspace transformation DCR | Workspace transformation DCRs provide transformations for data collection scenarios that don't yet use DCRs. You can create this DCR by using the Azure portal to create a transformation for a particular table. See Create workspace transformation DCR. |
DCR definition
Regardless of how it's created, each DCR has a definition that follows a standard JSON schema. To create or edit a DCR using a method other than the Azure portal, you need to work directly with its JSON definition. For some scenarios you must work with the JSON definition because the Azure portal doesn't provide a way to configure the DCR as needed.
You can view the JSON for a DCR in the Azure portal by clicking JSON view in the Overview menu.
Verify that the latest version of the API is selected in the API version dropdown. If not, some of the JSON may not be displayed.
You can also retrieve the JSON for the DCR by calling the DCR REST API. For example, the following PowerShell script retrieves the JSON for a DCR and saves it to a file.
$ResourceId = "<ResourceId>" # Resource ID of the DCR to edit
$FilePath = "<FilePath>" # File to store DCR content
$DCR = Invoke-AzRestMethod -Path ("$ResourceId"+"?api-version=2023-03-11") -Method GET
$DCR.Content | ConvertFrom-Json | ConvertTo-Json -Depth 20 | Out-File -FilePath $FilePath
Note
You can get the details for a DCR using Get-AzDataCollectionRule cmdlet in PowerShell or az monitor data-collection rule show command in Azure CLI, but they don't provide the JSON in the format that you require for editing. Instead, use PowerShell or CLI to call the REST API as shown in the example.
Create or edit a DCR using JSON
In addition to editing an existing DCR, you can create a new one using one of the sample DCRs which provide the JSON for several common scenarios. Use information in Structure of a data collection rule in Azure Monitor to modify the JSON file for your particular environment and requirements.
Once you have the definition of your DCR, you can deploy it to Azure Monitor using the Azure portal, CLI, PowerShell, API, or ARM templates.
Create or edit DCR with CLI
Use the az monitor data-collection rule create command to create a DCR from your JSON file. You can use this same command to update an existing DCR.
az monitor data-collection rule create --location 'eastus' --resource-group 'my-resource-group' --name 'my-dcr' --rule-file 'C:\MyNewDCR.json' --description 'This is my new DCR'
Note
While you may choose to use the PowerShell or CLI commands to create and edit a DCR, the API and ARM methods will provide more detailed error messages if there are compile errors.
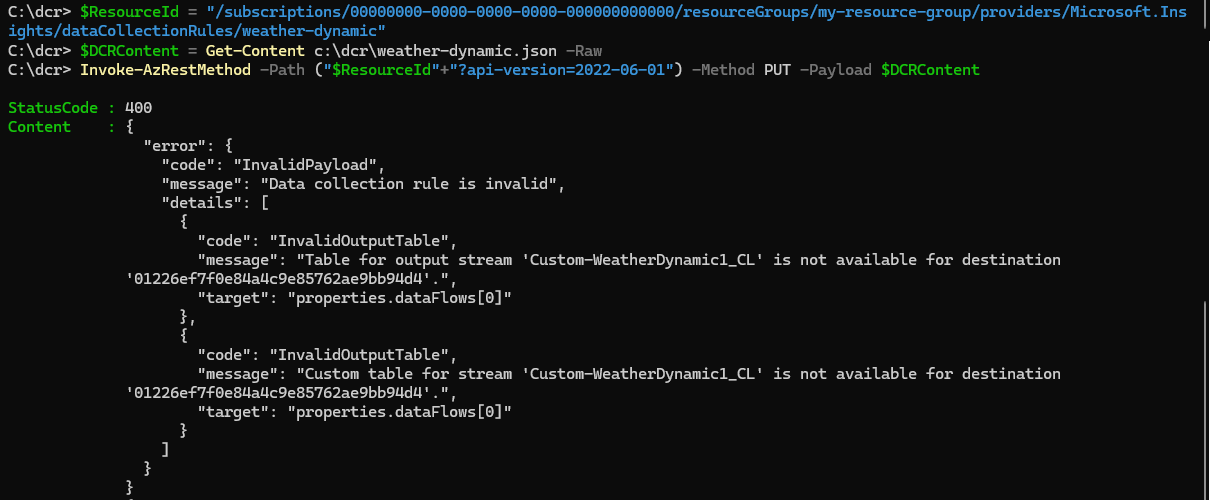
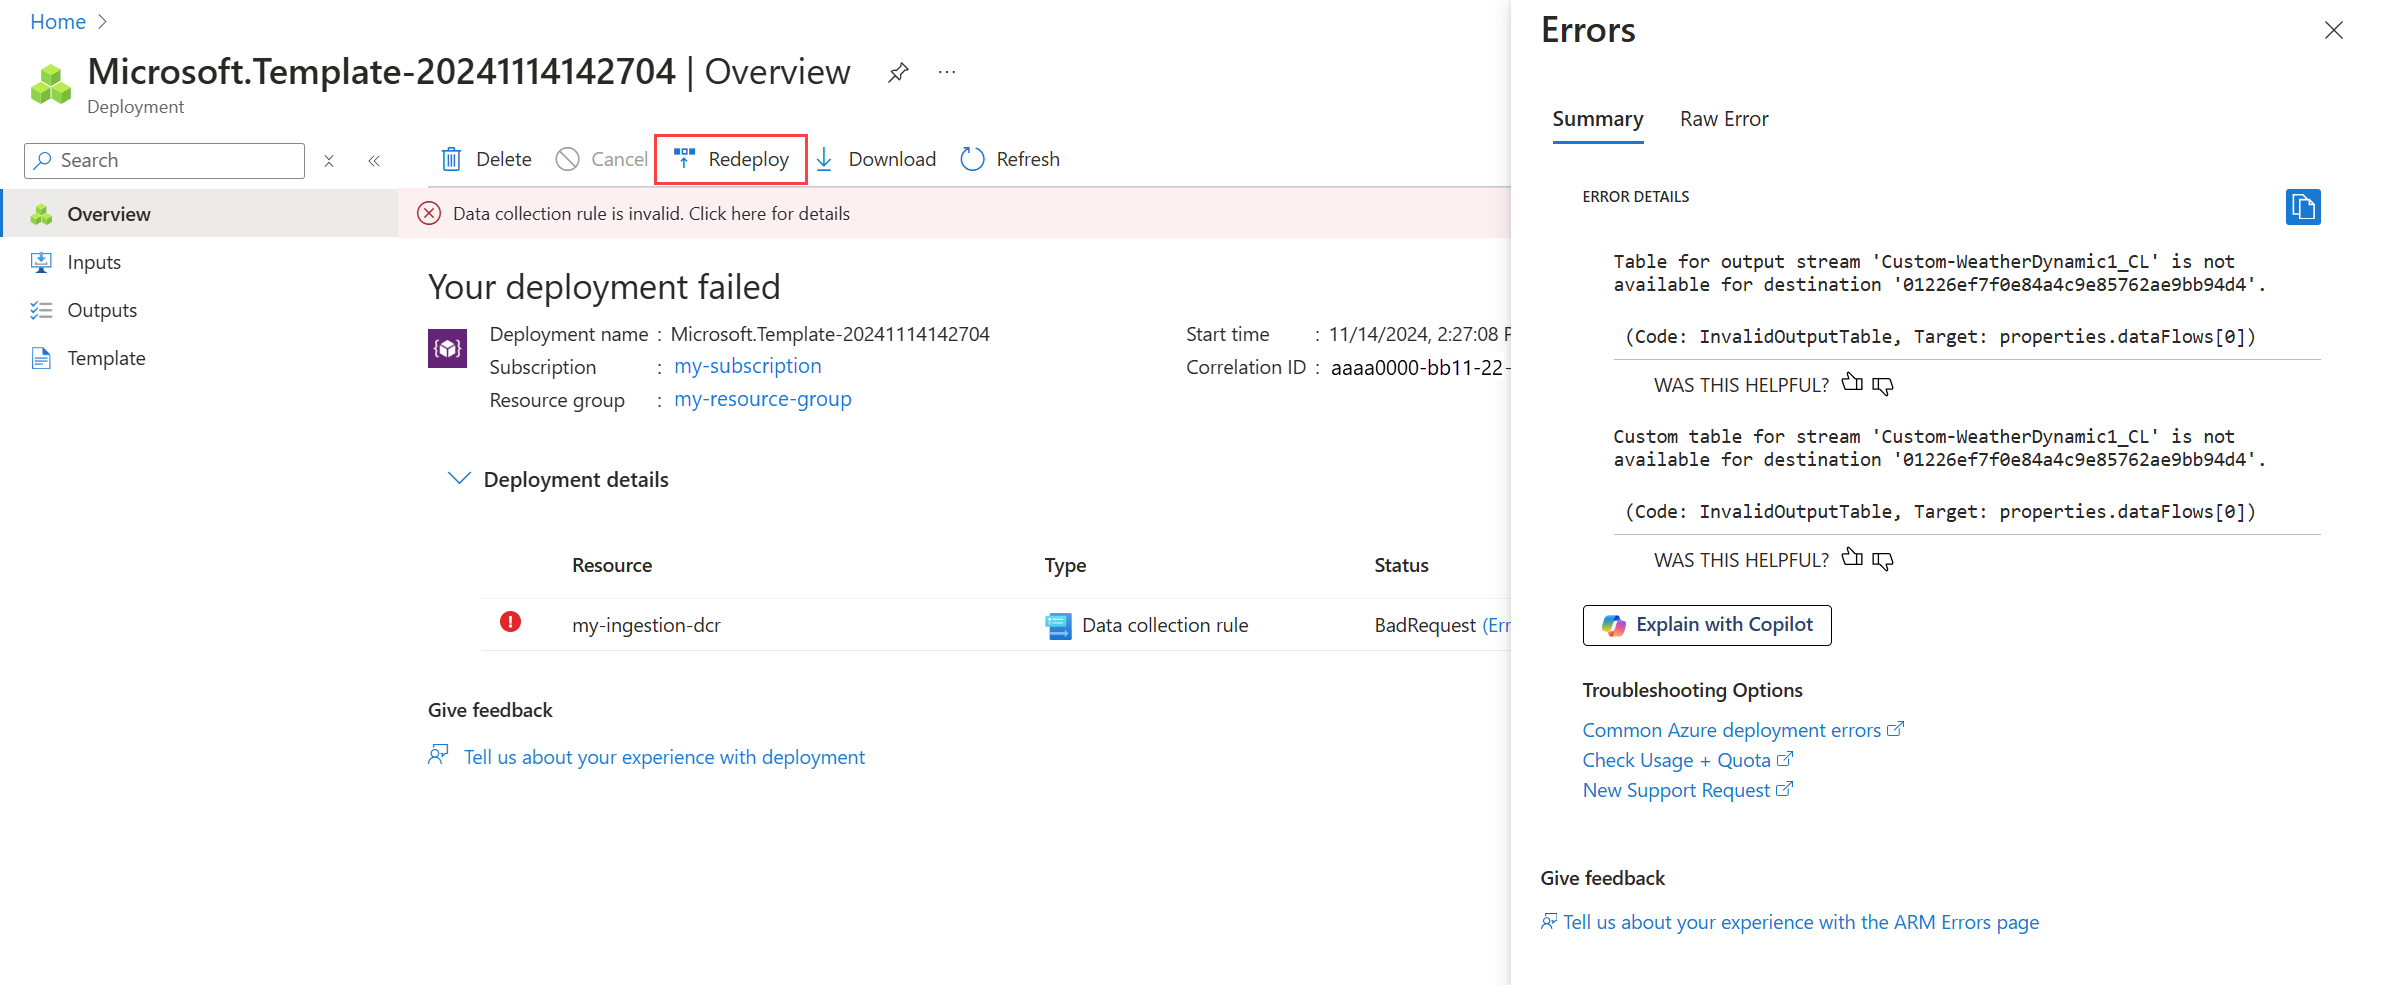
In the following example, the DCR specifies a table name that doesn't exist in the destination Log Analytics workspace. The PowerShell command returns a generic error message, but the API call will return a detailed error message that specifies the exact error.
Strategies to edit and test a DCR
When you create or edit a DCR using its JSON definition, you'll often need to make multiple updates to achieve the functionality you want. You need an efficient method to update the DCR, troubleshoot it if you don't get the results you expect, and then make additional updates. This is especially true if you're adding a transformation to the DCR since you'll need to validate that the query is working as expected. Since you can't edit the JSON directly in the Azure portal, following are some strategies that you can use.
Use local file as source of DCR
If you use a local JSON file as the source of the DCRs that you create and edit, you're assured that you always have access to the latest version of the DCR definition. This is ideal if you want to use version control tools such as GitHub or Azure DevOps to manage your changes. You can also use an editor such as VS Code to make changes to the DCR and then use command line tools to update the DCR in Azure Monitor as described above.
Following is a sample PowerShell script you can use to push changes to a DCR from a source file. This validates that the source file is valid JSON before sending it to Azure Monitor.
param (
    [Parameter(Mandatory = $true)][string]$ResourceId,  # Resource ID of the DCR
    [Parameter(Mandatory = $true)][string]$FilePath  # Path to the DCR JSON file to upload
)

# Read the DCR content from the file
Write-Host "Reading new DCR content from: $FilePath" -ForegroundColor Green
$DCRContent = Get-Content $FilePath -Raw

# Ensure the DCR content is valid JSON
try {
    $ParsedDCRContent = $DCRContent | ConvertFrom-Json
} catch {
    Write-Host "Invalid JSON content in file: $FilePath" -ForegroundColor Red
    exit 1
}

# Create or update the DCR in the specified resource group
Write-Host "Deploying DCR $ResourceId ..." -ForegroundColor Green
Invoke-AzRestMethod -Path ("$ResourceId"+"?api-version=2023-03-11") -Method PUT -Payload $DCRContent
Save DCR content to temporary file
If you don't have the DCR definition in a local file, you can retrieve the definition from Azure Monitor and save it to a temporary file. You can then edit the file using an editor such as VS Code before pushing the updates to Azure Monitor.
Following is a sample PowerShell script you can use to edit an existing DCR in Azure Monitor. The script will retrieve the DCR definition and save it to a temporary file before launching VS Code. Once you indicate to the script that you've saved your changes, the DCR is updated with the new content and the temporary file is deleted.
param ([Parameter(Mandatory=$true)] $ResourceId)

# Get DCR content and save it to a local file
$FilePath = "temp.dcr"
$DCR = Invoke-AzRestMethod -Path ("$ResourceId"+"?api-version=2023-03-11") -Method GET
$DCR.Content | ConvertFrom-Json | ConvertTo-Json -Depth 20 | Out-File $FilePath

# Open DCR in code editor
code $FilePath | Wait-Process

{
	#write DCR content back from the file
	$DCRContent = Get-Content $FilePath -Raw
	Invoke-AzRestMethod -Path ("$ResourceId"+"?api-version=2023-03-11") -Method PUT -Payload $DCRContent
}

#Delete temporary file
Remove-Item $FilePath
Use ARM template to edit a DCR in place
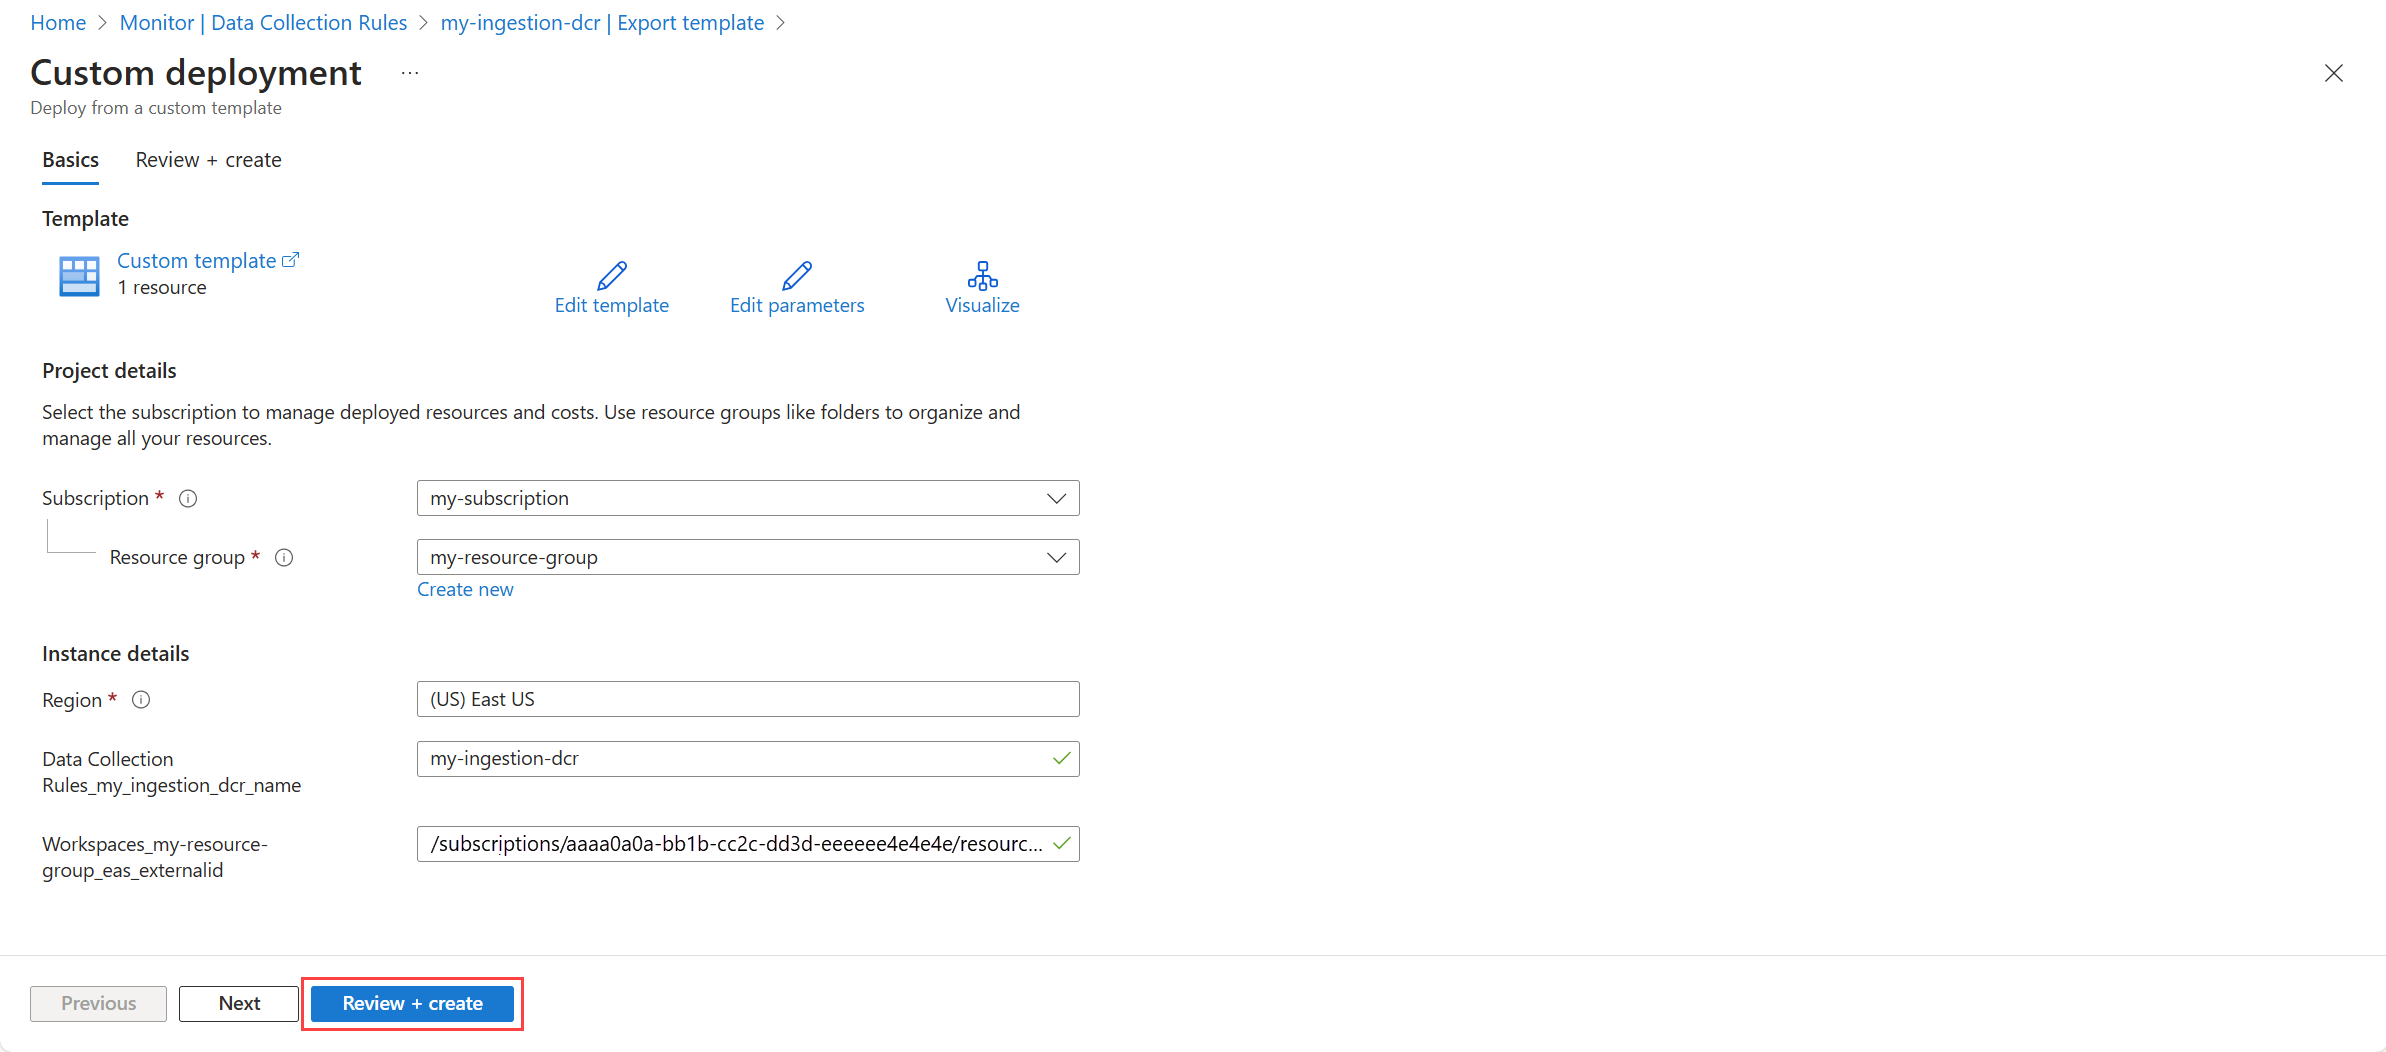
If you want to perform your edits completely in the Azure portal, you can use the Export template feature to retrieve the ARM template for a DCR. You can then modify the definition in JSON and redeploy it in the Azure portal.
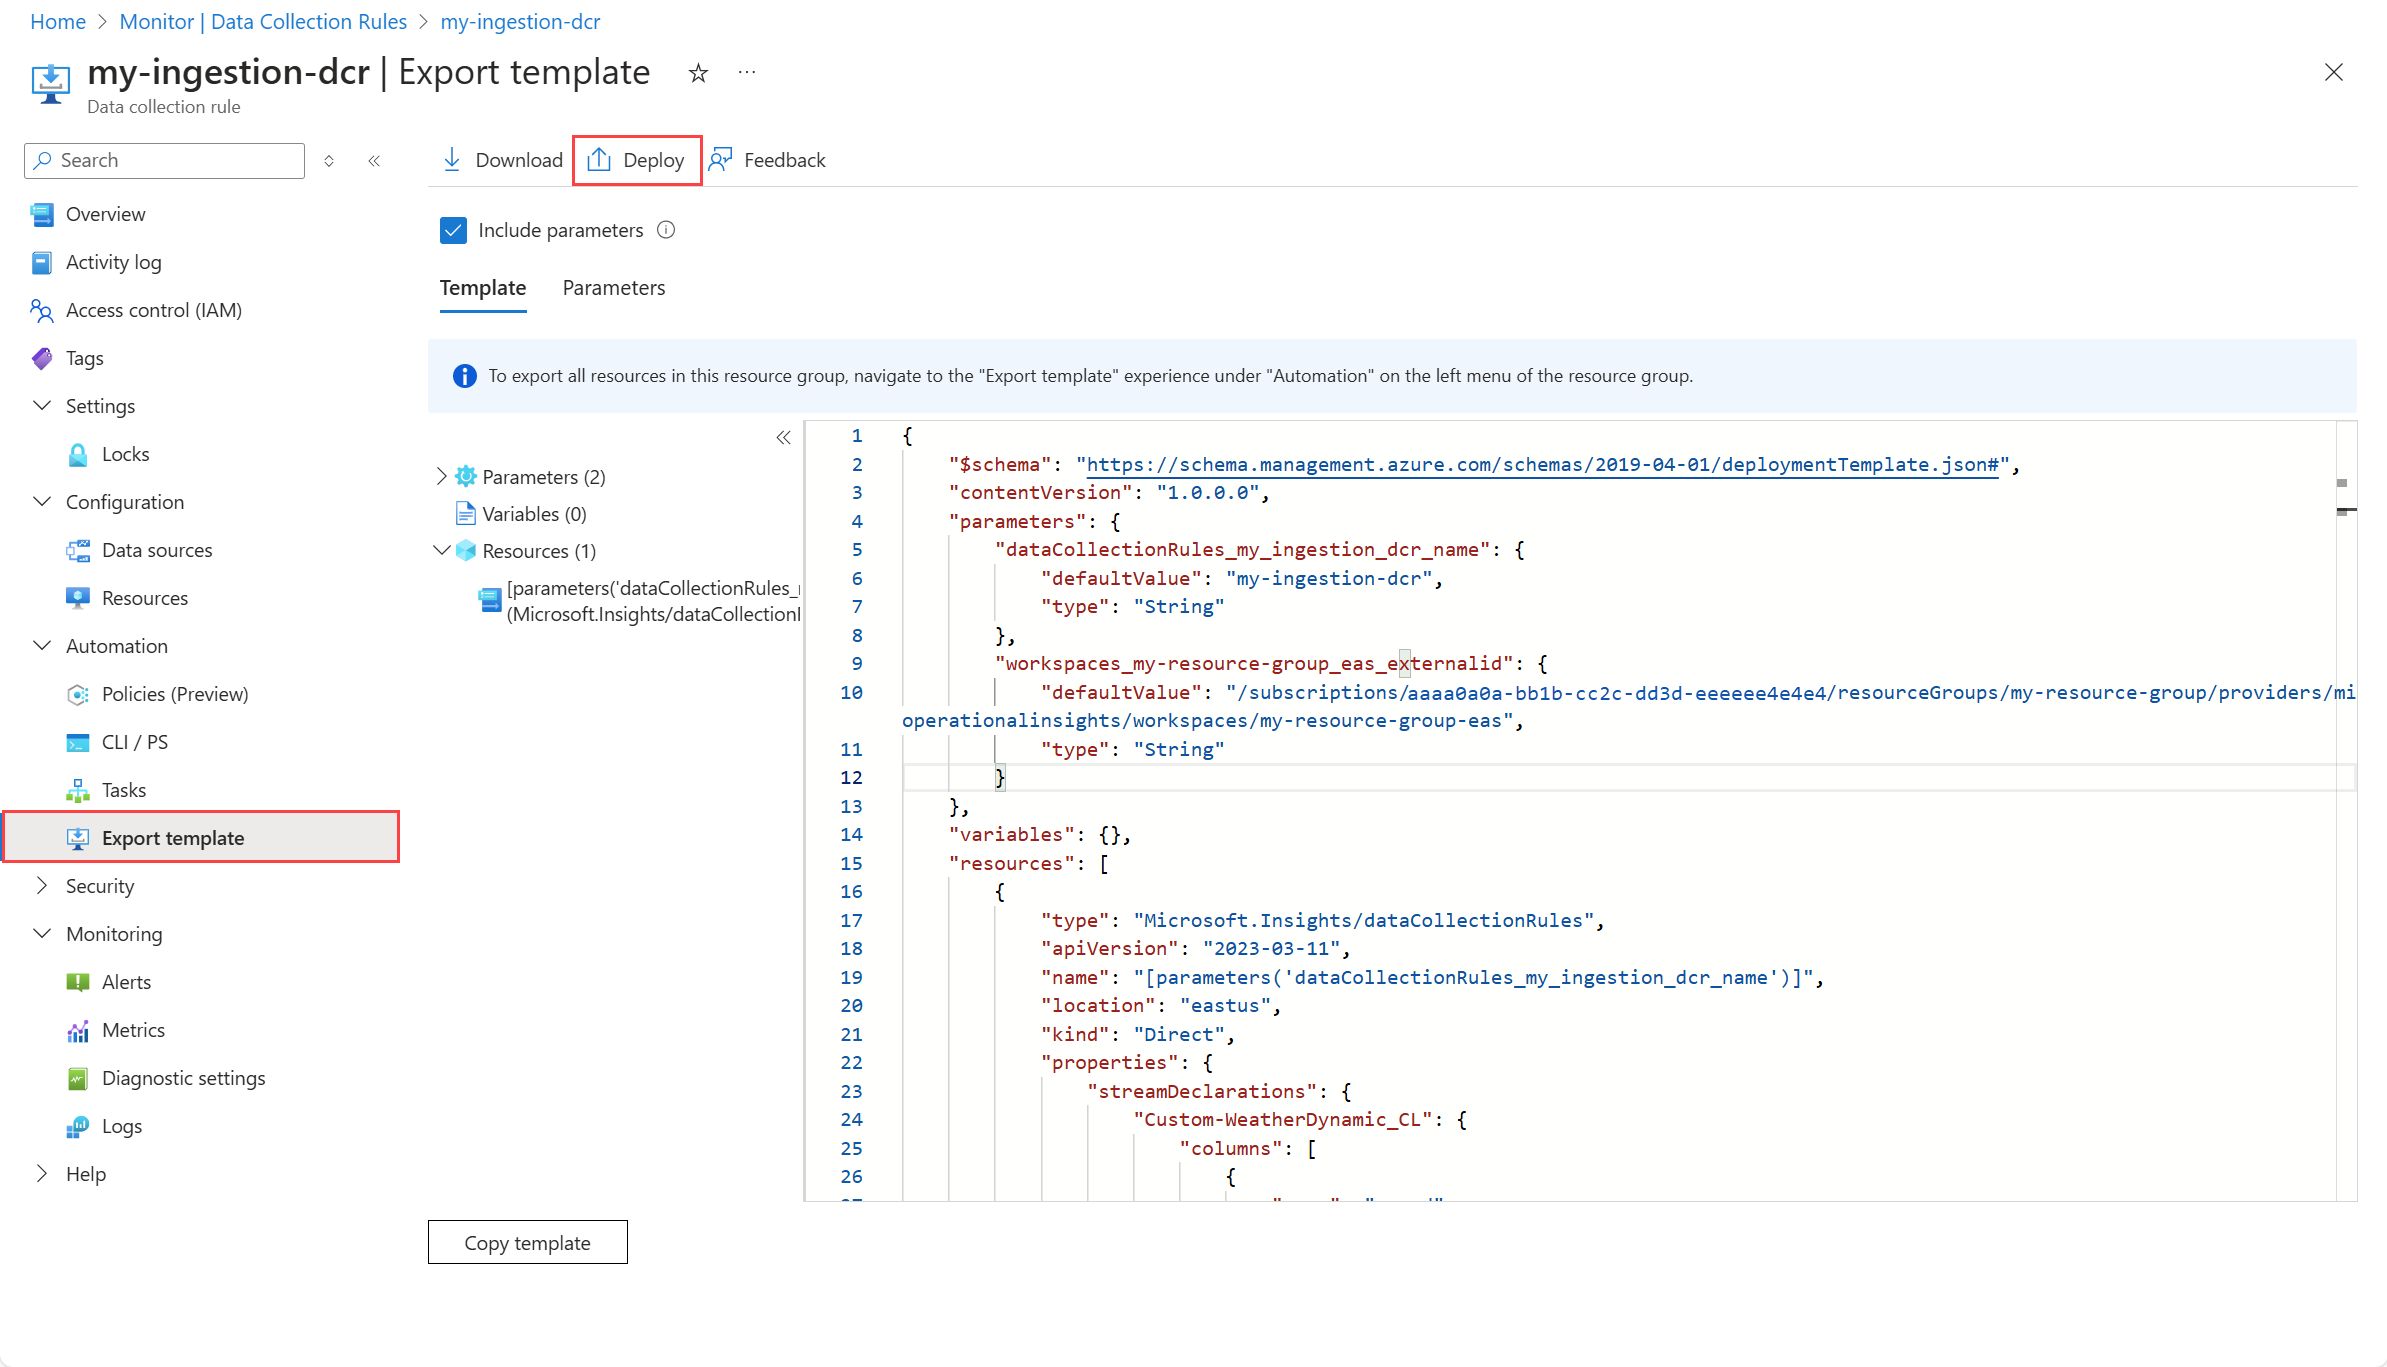
Select the DCR you want to modify in the Azure portal, and select Export template. Then click Deploy to redeploy the same template.
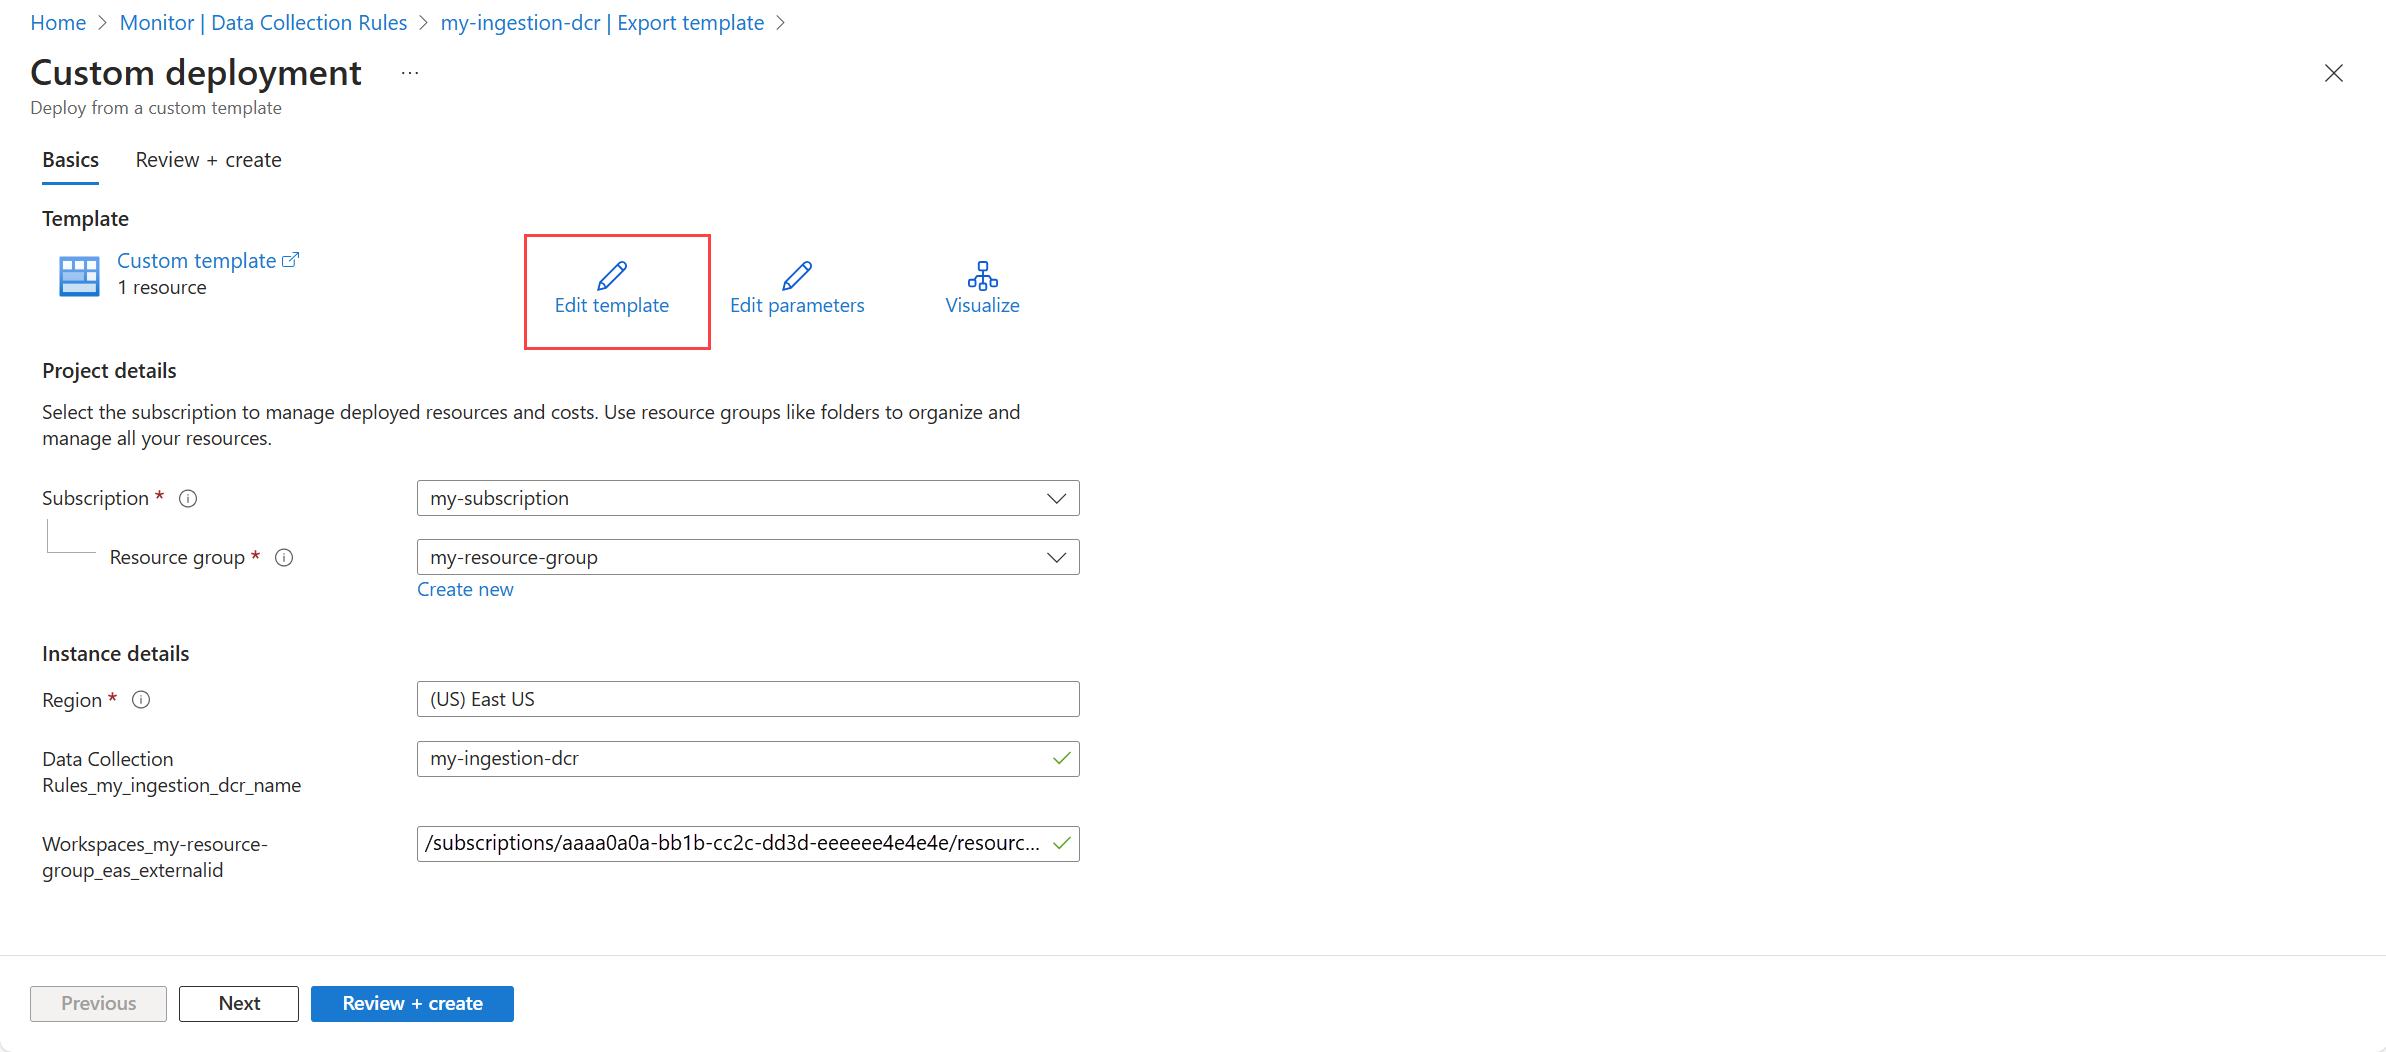
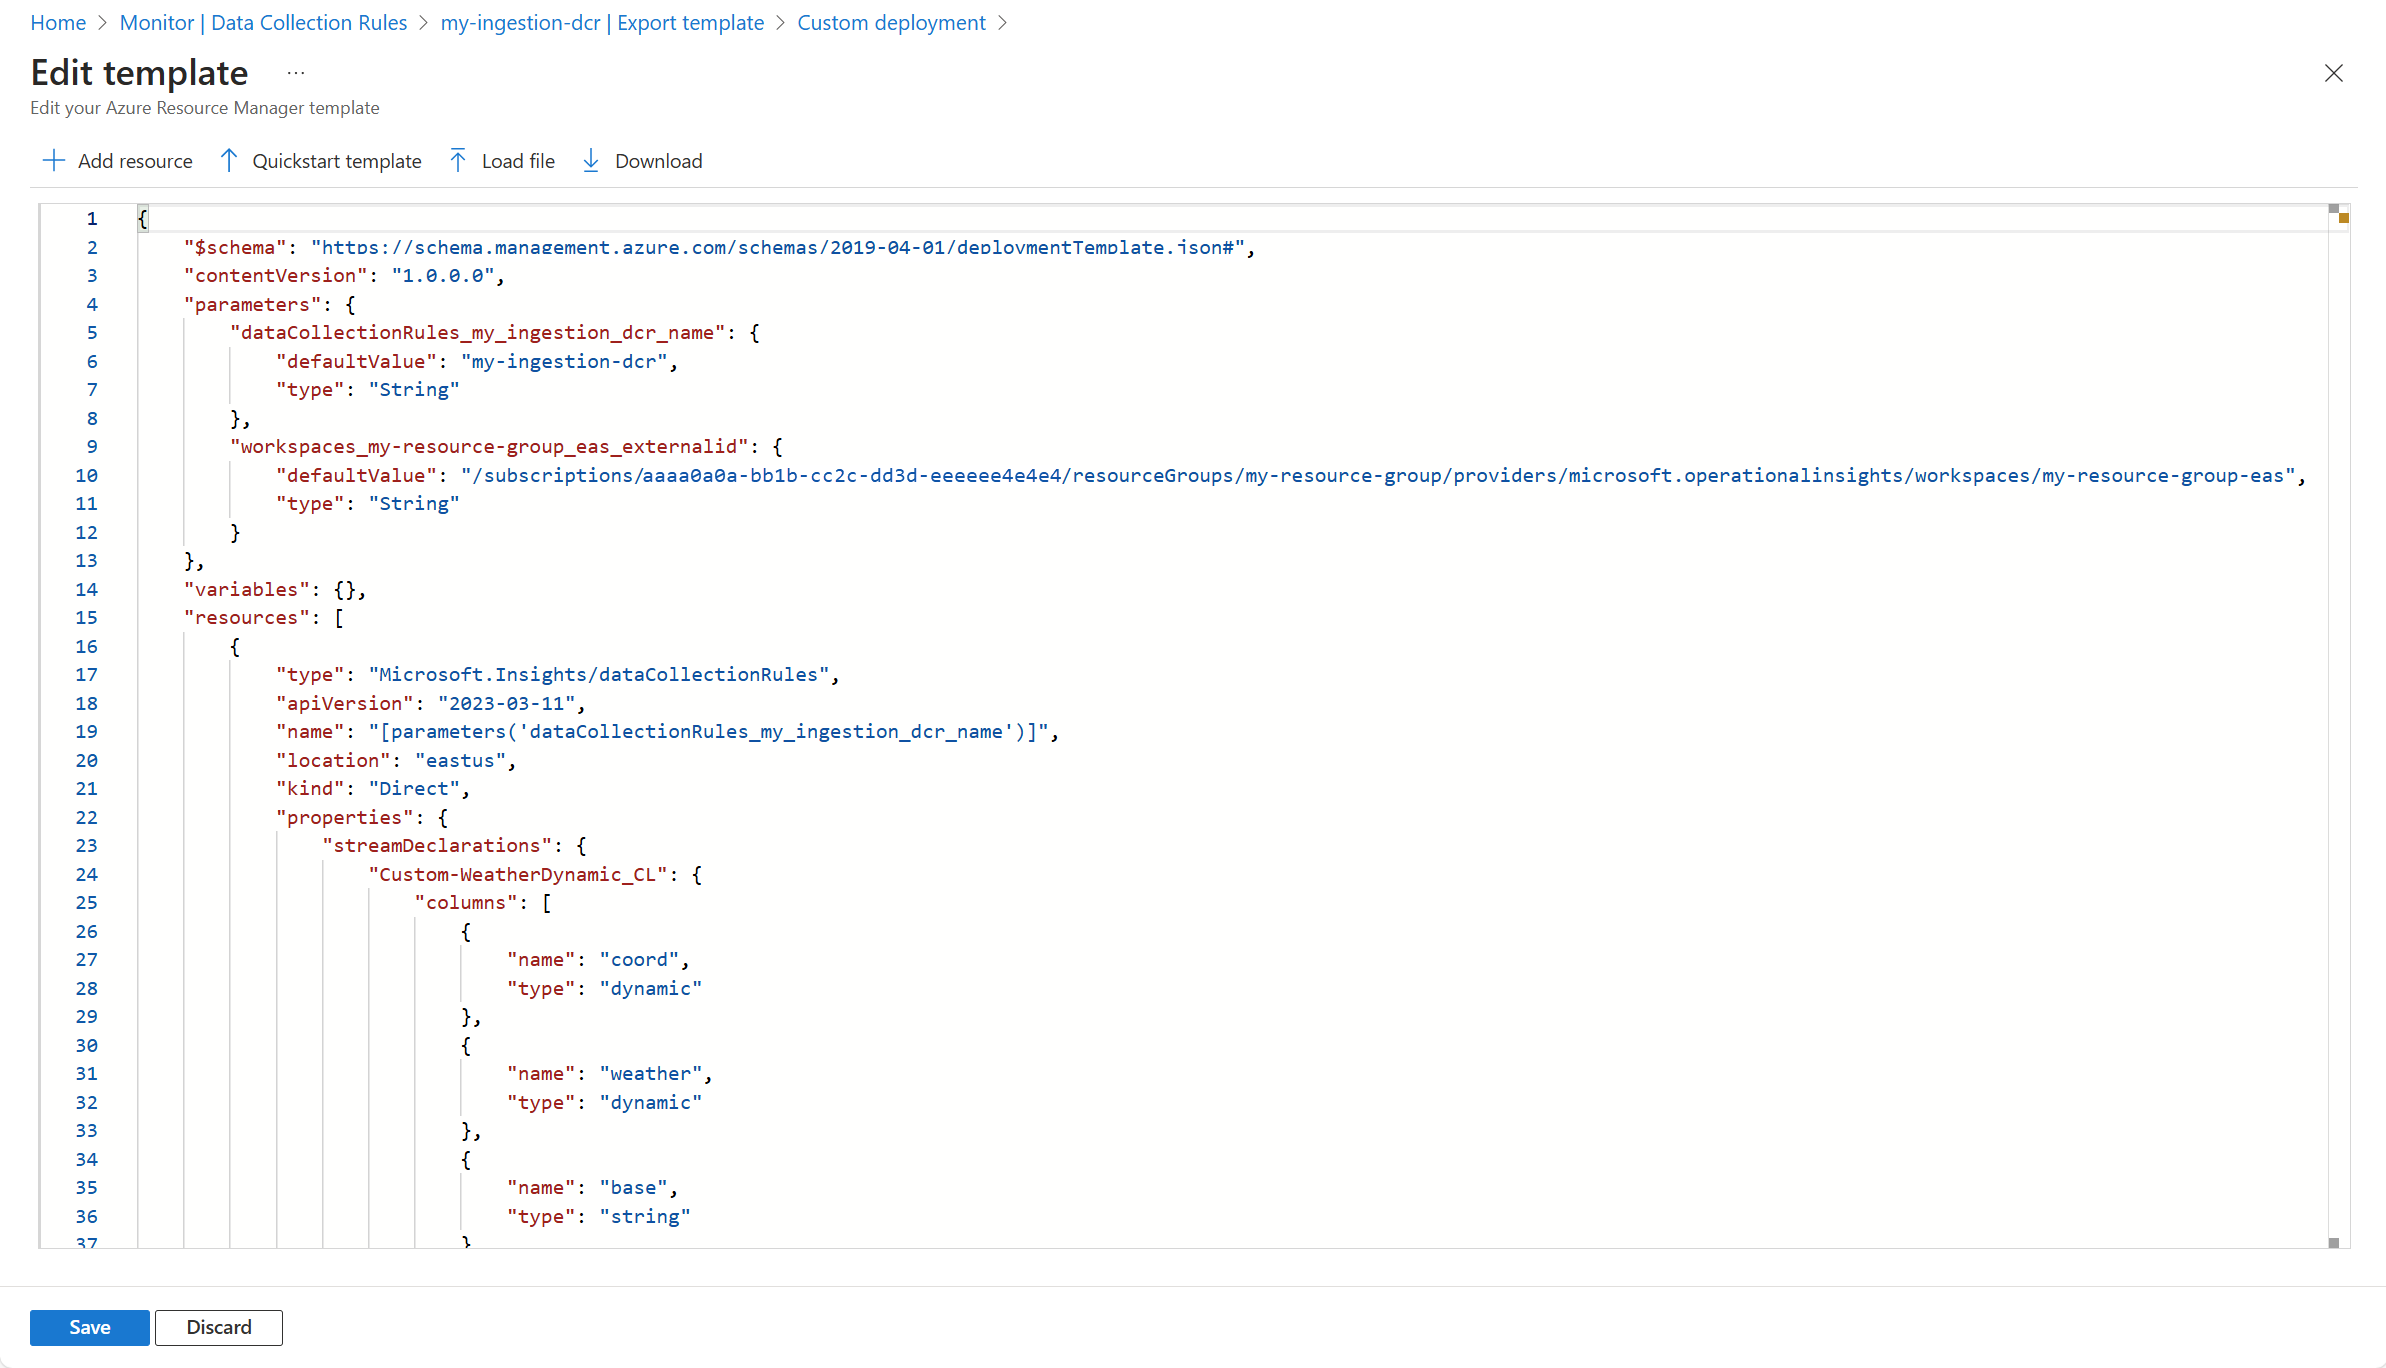
Click Edit template to open up an editable version of the JSON for the DCR. Don't change the parameter values.
Make any required changes to the DCR and then click Save.
If you want to create a new DCR, then change the name parameter. Otherwise, leave the parameters unchanged. Click Review + create to deploy the modified template and Create to create the new DCR.
If the DCR is valid with no errors, the deployment will succeed and the DCR will be updated with the new configuration. Click Go to resource to open the modified DCR.
If the DCR has compile errors, then you'll receive a message that your deployment failed. Click Error details and Operation details to view details of the error. Click Redeploy and then Edit template again to make the necessary changes to the DCR and then save and deploy it again.
Verify and troubleshoot data collection
Once you install the DCR, it may take several minutes for the changes to take effect and data to be collected with the updated DCR. If you don't see any data being collected, it can be difficult to determine the root cause of the issue. Use the DCR monitoring features, which include metrics and logs to help troubleshoots.
DCR metrics are collected automatically for all DCRs, and you can analyze them using metrics explorer like the platform metrics for other Azure resources. Enable DCR error logs to get detailed error information when data processing is not successful.
If you don't see data being collected, follow these basic steps to troubleshoot the issue.
- Check metrics such as
Logs Ingestion Bytes per MinandLogs Rows Received per Minto ensure that the data is reaching Azure Monitor. If not, then check your data source to ensure that it's sending data as expected. - Check
Logs Rows Dropped per Minto see if any rows are being dropped. This may not indicate an error since the rows could be dropped by a transformation. If the rows dropped is the same asLogs Rows Dropped per Minthough, then no data will be ingested in the workspace. Examine theLogs Transformation Errors per Minto see if there are any transformation errors. - Check
Logs Transformation Errors per Minto determine if there are any errors from transformations applied to the incoming data. This could be due to changes in the data structure or the transformation itself. - Check the
DCRLogErrorstable for any ingestion errors that may have been logged. This can provide additional detail in identifying the root cause of the issue.


