Use the CSV in-memory read cache
Applies to: Azure Stack HCI, versions 22H2 and 21H2; Windows Server 2022, Windows Server 2019, Windows Server 2016
Important
Azure Stack HCI is now part of Azure Local. However, older versions of Azure Stack HCI, for example 22H2 will continue to reference Azure Stack HCI and won't reflect the name change. Learn more.
This topic describes how to use system memory to boost the performance of Azure Stack HCI and Windows Server by caching frequent reads. Writes cannot be cached in memory.
Azure Stack HCI and Windows Server are compatible with the Cluster Shared Volume (CSV) in-memory read cache. Using system memory to cache reads can improve performance for applications like Hyper-V, which uses unbuffered I/O to access VHD or VHDX files. (Unbuffered I/Os are any operations that are not cached by the Windows Cache Manager.)
Because the in-memory cache is server-local, it improves data locality. Recent reads are cached in memory on the same host where the virtual machine (VM) is running, reducing how often reads go over the network. This results in lower latency and better storage performance.
Note that the CSV in-memory read cache is different from the storage pool cache.
Planning considerations
The in-memory read cache is most effective for read-intensive workloads, such as Virtual Desktop Infrastructure (VDI). Conversely, if the workload is extremely write-intensive, the cache may introduce more overhead than value and should be disabled.
You can use up to 80% of total physical memory for the CSV in-memory read cache. Be careful to leave enough memory for your VMs!
Note
Certain microbenchmarking tools like DISKSPD and VM Fleet may produce worse results with the CSV in-memory read cache enabled than without it. By default VM Fleet creates one 10 GiB VHDX per VM – approximately 1 TiB total for 100 VMs – and then performs uniformly random reads and writes to them. Unlike real workloads, the reads don't follow any predictable or repetitive pattern, so the in-memory cache is not effective and just incurs overhead.
Configuring the in-memory read cache
The CSV in-memory read cache is available in Azure Stack HCI, Windows Server 2019, and Windows Server 2016 with the same functionality. In Azure Stack HCI and Windows Server 2019, it's on by default with 1 gibibyte (GiB) allocated. In Windows Server 2016, it's off by default.
| OS version | Default CSV cache size |
|---|---|
| Azure Stack HCI | 1 GiB |
| Windows Server 2019 | 1 GiB |
| Windows Server 2016 | 0 (disabled) |
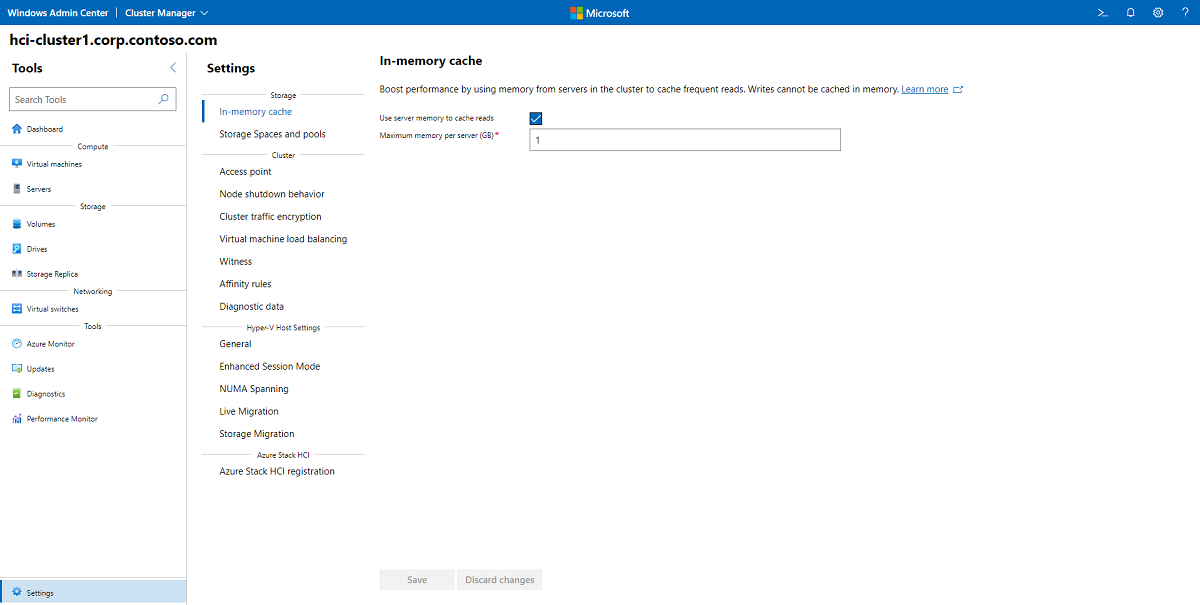
Configure the cache using Windows Admin Center
To configure the cache using Windows Admin Center, do the following:
- In Windows Admin Center, connect to a cluster, and then select Settings from the Tools pane on the left.
- Select In-memory cache under Storage on the Settings pane.
- In the right pane, a checkbox enables or disables the cache, and you can also specify the maximum memory per server to be allocated to the cache.
- When done, select Save.
Configure the cache using PowerShell
To see how much memory is allocated using PowerShell, run the following as administrator:
(Get-Cluster).BlockCacheSize
The value returned is in mebibytes (MiB) per server. For example, 1024 represents 1 GiB.
To change how much memory is allocated, modify this value using PowerShell. For example, to allocate 2 GiB per server, run:
(Get-Cluster).BlockCacheSize = 2048
For changes to take effect immediately, pause and then resume your CSV volumes, or move them between servers. For example, use this PowerShell fragment to move each CSV to another server node and back again:
Get-ClusterSharedVolume | ForEach {
    $Owner = $_.OwnerNode
    $_ | Move-ClusterSharedVolume
    $_ | Move-ClusterSharedVolume -Node $Owner
}
Next steps
For related information, see also:
