Add or remove servers for an Azure Stack HCI cluster
Applies to: Azure Local, version 22H2
Important
Azure Stack HCI is now part of Azure Local. Product documentation renaming is in progress. However, older versions of Azure Stack HCI, for example 22H2 will continue to reference Azure Stack HCI and won't reflect the name change. Learn more.
You can easily add or remove servers from a cluster in Azure Stack HCI. Keep in mind that each new physical server must closely match the rest of the servers in the cluster when it comes to CPU type, memory, number of drives, and the type and size of the drives.
Whenever you add or remove a server, you must also perform cluster validation afterwards to ensure the cluster is functioning normally. This applies to both non-stretched and stretched clusters.
Before you begin
The first step is to acquire new HCI hardware from your original OEM. Always refer to your OEM-provided documentation when adding new server hardware for use in your cluster.
- Place the new physical server in the rack and cable it appropriately.
- Enable physical switch ports and adjust access control lists (ACLs) and VLAN IDs if applicable.
- Configure the correct IP address in the baseboard management controller (BMC) and apply all BIOS settings per OEM instructions.
- Apply the current firmware baseline to all components by using the tools that are provided by your OEM.
- Run OEM validation tests to ensure hardware homogeneity with the existing clustered servers.
- Install the Azure Stack HCI operating system on the new server. For detailed information, see Deploy Azure Stack HCI.
- Join the server to the cluster domain.
Add a server to a cluster
Use Windows Admin Center to join the server to your cluster.
- In Windows Admin Center, select Cluster Manager from the top drop-down arrow.
- Under Cluster connections, select the cluster.
- Under Tools, select Servers.
- Under Servers, select the Inventory tab.
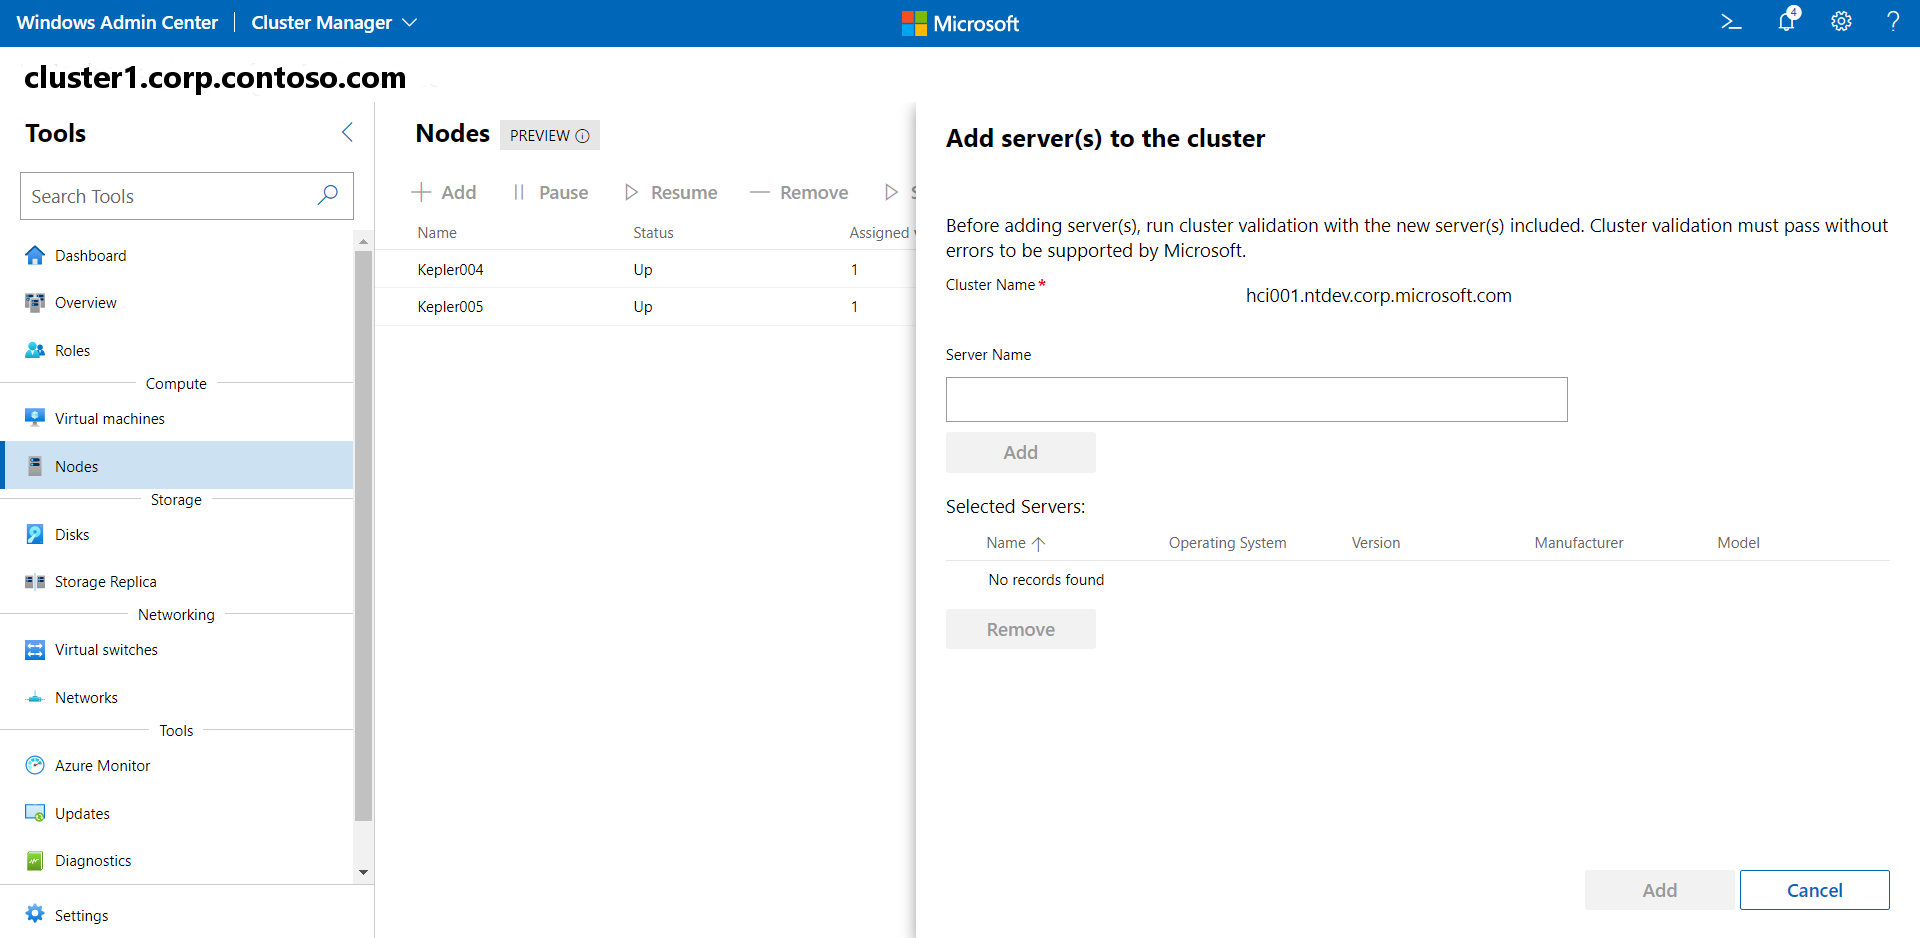
- On the Inventory tab, select Add.
- In Server name, enter the full-qualified domain name of the server you want to add, click Add, then click Add again at the bottom.
- Verify the server has been successfully added to your cluster.
If the node has been added to a single server, see these manual steps to reconfigure Storage Spaces Direct.
Note
If the cluster has Arc-for-server enabled, the new server automatically gets Arc-for-server enabled during the next scheduler run, which runs every hour.
Add a server to an SDN-enabled cluster
If Software Defined Networking (SDN) is already deployed on the cluster to which you're adding a new server, Windows Admin Center doesn't automatically add the new server to the SDN environment. You must use the SDN Express script to add the new server to the SDN infrastructure of the cluster.
Before you run the script, ensure that a virtual switch is created and the server is successfully added to the cluster. Also, ensure that the server is paused so that the workloads cannot move to it.
Download the latest version of the SDN Express PowerShell scripts from the SDN GitHub repository.
Run the following PowerShell cmdlets on the newly added server:
Import-Module SDNExpressModule.PSM1 -verbose
$NCURI = "Insert NC URI"
$creds = Get-Credential
Add-SDNExpressHost -RestName $NCURI -VirtualSwitchName "Insert vSwitch Name" -ComputerName "Insert Name" -HostPASubnetPrefix "Example: 172.23.0.1/24" -Credential $creds
where:
- NCURI is the Network Controller REST API in the following format:
"https://<name of the Network Controller REST API>". For example: "https://mync.contoso.local" - ComputerName is the fully qualified domain name (FQDN) of the server to be added
- HostPASubnetPrefix is the address prefix of the Provider Address (PA) network
- NCURI is the Network Controller REST API in the following format:
Add a server to an Arc VM managed cluster
To add a server to an Arc VM managed cluster, you must enable Arc VM management on the new server after adding it to the cluster.
Follow these steps to add a server to an Azure Arc VM managed cluster:
To add a server to an Arc VM managed cluster, run the following command:
Add-ClusterNode -Cluster Cluster1 -Name $nodeNameTo enable Arc VM management on the newly added server, run the following command:
New-MocPhysicalNode -nodeName $nodeName
Remove a server from a cluster
Keep in mind that when you remove a server, you will also remove any virtual machines (VMs), drives, and workloads associated with the server.
For more information about removing a cluster, see Remove a Cluster.
Uninstall VM extensions
Before you remove a server from a cluster, you must uninstall any VM extensions from your Azure Arc-enabled servers, or else you risk issues installing extensions later if you add the server back again.
You can remove VM extensions by using the Azure portal, using the Azure CLI, or using Azure PowerShell.
Remove a server by using PowerShell
To remove a server from a cluster by using PowerShell:
- Run
Disable-AzureStackHCIArcIntegrationon the server to be removed. - Run
Remove-ClusterNode -Name <ServerName>from a management PC or another server in the cluster.
Remove a server by using Windows Admin Center
The steps for removing a server from your cluster by using Windows Admin Center are similar to those for adding a server to a cluster.
- In Windows Admin Center, select Cluster Manager from the top drop-down arrow.
- Under Cluster connections, select the cluster.
- Under Tools, select Servers.
- Under Servers, select the Inventory tab.
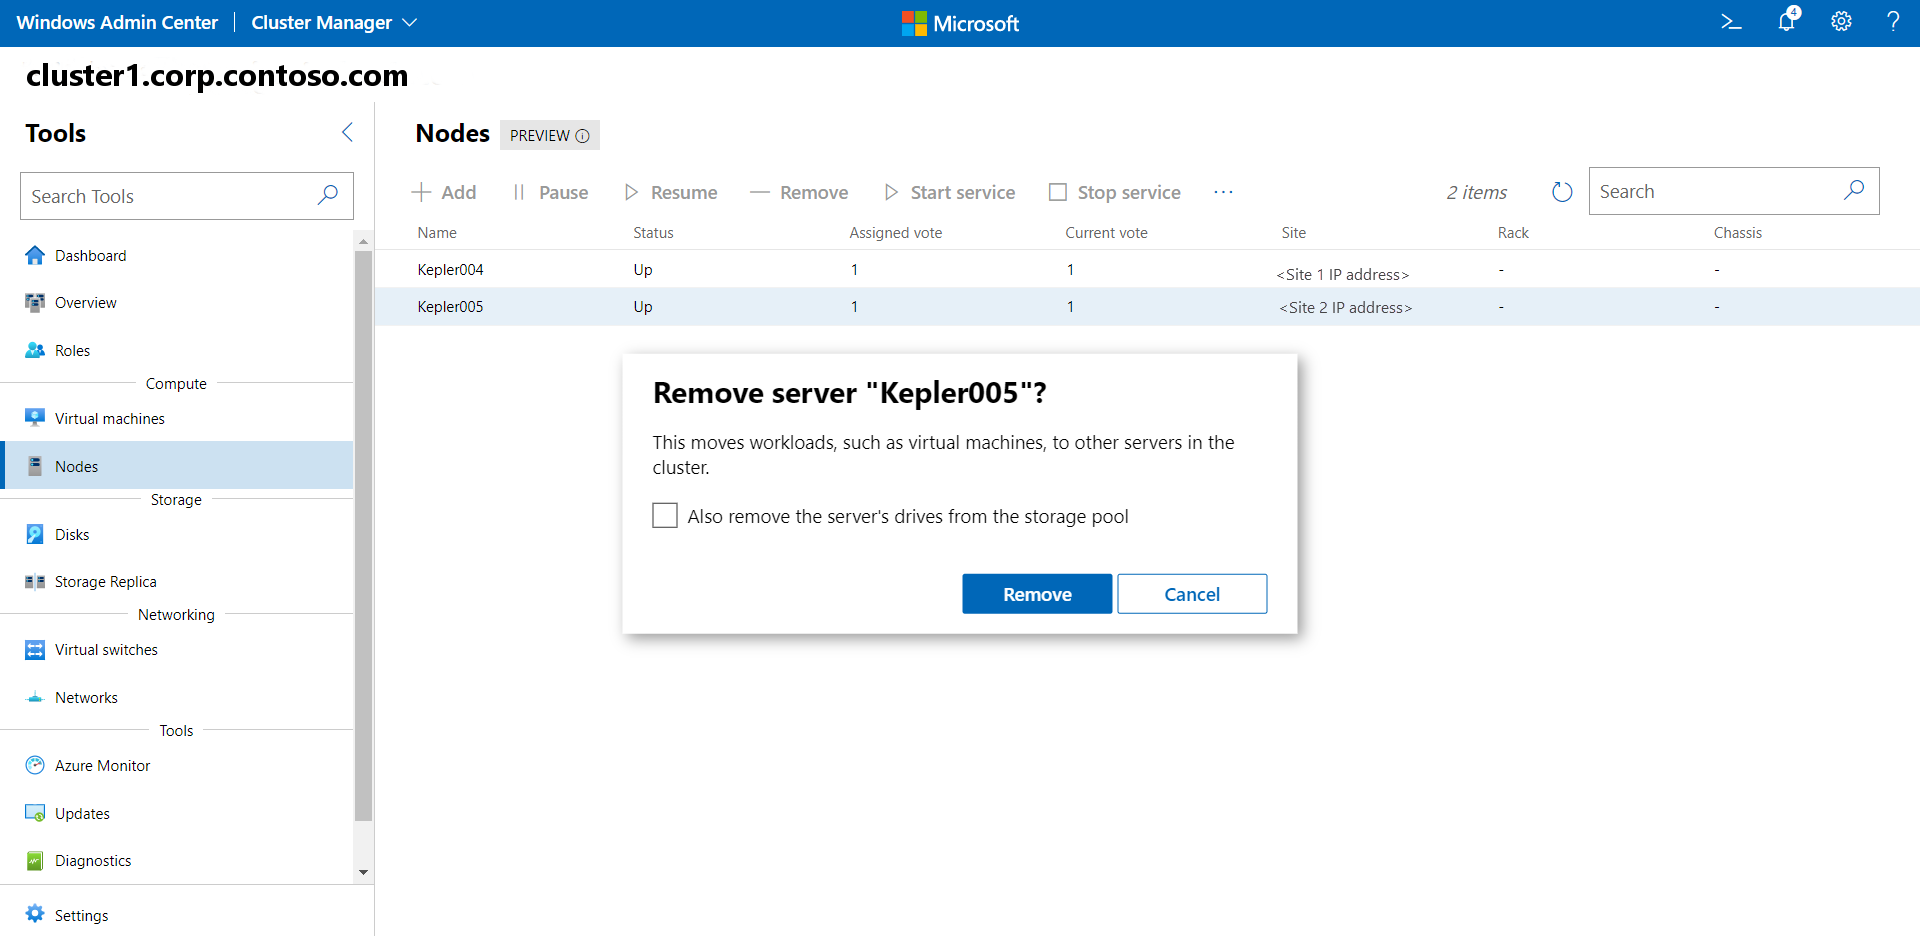
- On the Inventory tab, select the server you want to remove, then select Remove.
- To also remove any server drives from the storage pool, enable that checkbox.
- Verify the server has been successfully removed from the cluster.
Anytime you add or remove servers from a cluster, be sure and run a cluster validation test afterwards.
Remove a server from an Arc VM managed cluster
To remove a server from an Arc VM managed cluster, you must disable Arc VM management on the server before removing it from the cluster.
Follow these steps to remove a server from an Arc VM managed cluster:
To disable Arc VM Management on the server that you want to remove, run the following command:
Remove-MocPhysicalNode -nodeName $nodeNameTo remove the server from the cluster, run the following command:
Remove-ClusterNode -Cluster Cluster1 -Name $nodeName
Add server pairs to a stretched cluster
Stretched clusters require the same number of server nodes and the same number of drives in each site. When adding a server pair to a stretched cluster, their drives are immediately added to the storage pool of both sites in the stretched cluster. If the storage pool at each site is not the same size at the time of addition, it is rejected. This is because the size of the storage pool must be the same between sites.
Take a few minutes to watch the video on adding server nodes to a stretched cluster:
You add or remove servers to a stretched cluster using Windows PowerShell. Using the Get-ClusterFaultDomainXML and Set-ClusterFaultDomainXML cmdlets, you first modify the site (fault domain) information prior to adding the servers.
Then, you can add the server pair to each site simultaneously using the Add-ClusterNode cmdlet, allowing each new server's drives to be added at the same time also.
Typically, you manage clusters from a remote computer, rather than on a server in a cluster. This remote computer is called the management computer.
Note
When running PowerShell commands from a management computer, include the -Cluster parameter with the name of the cluster you are managing.
Ok, let's begin:
Use the following PowerShell cmdlets to determine the state of the cluster:
Returns the list of active servers in the cluster:
Get-ClusterNodeReturns the stats for the cluster storage pool:
Get-StoragePool pool*Lists which servers are on which site (fault domain):
Get-ClusterFaultDomainOpen the
Sites.xmlfile in Notepad or other text editor:Get-ClusterFaultDomainXML | out-file sites.xmlnotepadNavigate to where the
Sites.xmlfile is located locally on your management PC and open the file. TheSites.xmlfile will look similar to this:<Topology> <Site Name="Site1" Description="" Location=""> <Node Name="Server1" Description="" Location=""> <Node Name="Server2" Description="" Location=""> </Site> <Site Name="Site2" Description="" Location=""> <Node Name="Server3" Description="" Location=""> <Node Name="Server4" Description="" Location=""> </Site> <Topology>Using this example, you would add a server to each site (
Server5,Server6) as follows:<Topology> <Site Name="Site1" Description="" Location=""> <Node Name="Server1" Description="" Location=""> <Node Name="Server2" Description="" Location=""> <Node Name="Server5" Description="" Location=""> </Site> <Site Name="Site2" Description="" Location=""> <Node Name="Server3" Description="" Location=""> <Node Name="Server4" Description="" Location=""> <Node Name="Server6" Description="" Location=""> </Site> <Topology>Modify the current site (fault domain) information. The first command sets a variable to obtain the contents of the
Sites.xmlfile and output it. The second command sets the modification based on the variable$XML.$XML = Get-Content .\sites.xml | out-string Set-ClusterFaultDomainXML -xml $XMLVerify that the modifications you made are correct:
Get-ClusterFaultDomainAdd the server pair to your cluster using the
Add-ClusterNodecmdlet:Add-ClusterNode -Name Server5,Server6
Once the servers have been successfully added, the associated drives are automatically added to each site's storage pools. Lastly, the Health Service creates a storage job to include the new drives.
Remove server pairs from a stretched cluster
Before you remove server pairs from a cluster, you must uninstall any VM extensions from your Azure Arc-enabled servers, or else you risk issues installing extensions later if you add the servers back again.
You can remove VM extensions by using the Azure portal, using the Azure CLI, or using Azure PowerShell.
Removing a server pair from a stretched cluster is a similar process to adding a server pair, but using the Remove-ClusterNode cmdlet instead.
Use the following PowerShell cmdlets to determine the state of the cluster:
Returns the list of active servers in the cluster:
Get-ClusterNodeReturns the stats for the cluster storage pool:
Get-StoragePool pool*Lists which servers are on which site (fault domain):
Get-ClusterFaultDomainOpen the
Sites.xmlfile in Notepad or other text editor:Get-ClusterFaultDomainXML | out-file sites.xmlnotepadUsing the previous example, in the
Sites.xmlfile, remove the<Node Name="Server5" Description="" Location="">and the<Node Name="Server6" Description="" Location="">XML entry for each site.Modify the current site (fault domain) information using the following two cmdlets:
$XML = Get-Content .\sites.xml | out-string
Set-ClusterFaultDomainXML -xml $XML
Verify that the modifications you made are correct:
Get-ClusterFaultDomainRun the following cmdlet on the servers to be removed (Server5 and Server6) to disable Azure Arc integration:
Disable-AzureStackHCIArcIntegrationRemove the server pairs from the cluster using the
Remove-ClusterNodecmdlet:Remove-ClusterNode -Name Server5,Server6
Once the servers have been successfully removed, the associated drives are automatically removed from the site pools. Lastly, the Health Service creates a storage job to remove these drives.
Next steps
- You should validate the cluster after adding or removing a server. For more information, see Validate the cluster.

