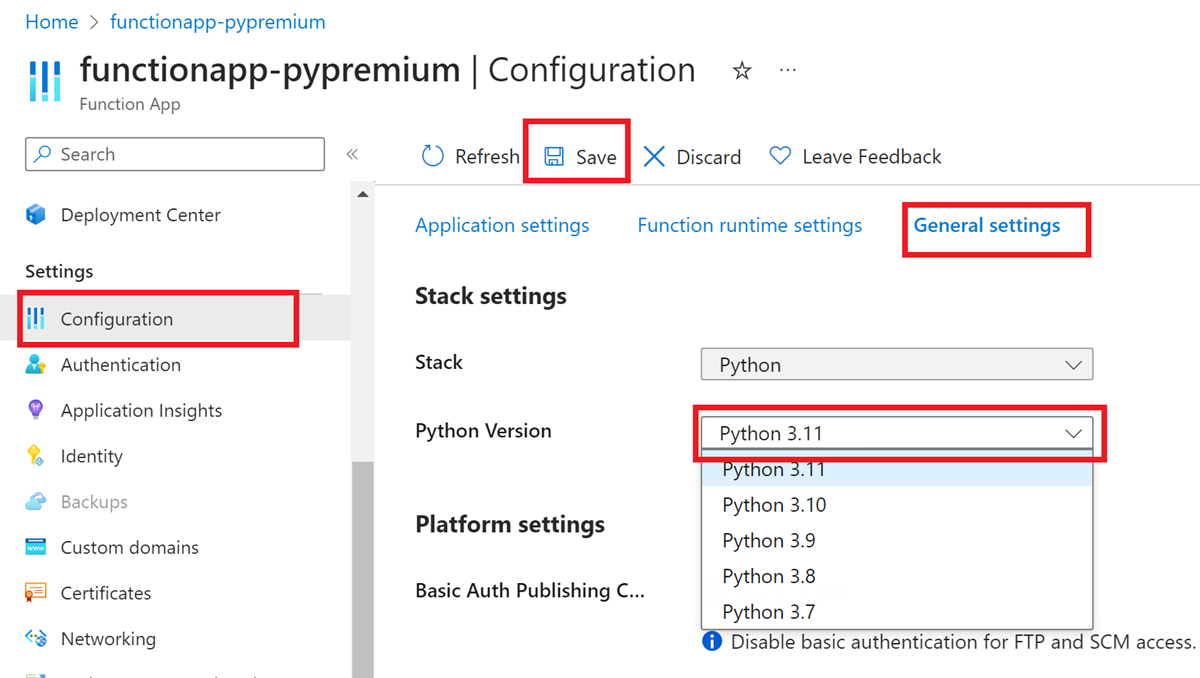
Update language stack versions in Azure Functions
The support for any given language stack in Azure Functions is limited to specific versions. As new versions become available, you might want to update your apps to take advantage of their features. Support in Functions may also end for older versions, typically aligned to the community end-of-support timelines. See the Language runtime support policy for details. To ensure your apps continue to receive support, you should follow the instructions outlined in this article to update them to the latest available versions.
The way that you update your function app depends on:
- The language you use to author your functions; make sure to choose your programming language at the top of the article.
- The operating system on which your app runs in Azure: Windows or Linux.
- The hosting plan.
Note
This article shows you how to update the .NET version of an app using the isolated worker model. Apps that run on older versions of .NET with the in-process model can update to target .NET 8, or they can migrate from the in-process model to the isolated worker model.
Prepare to update
Before you update the stack configuration for your function app in Azure, you should complete these tasks:
1. Verify your functions locally
Make sure that you test and verify your function code locally on the new target version.
Use these steps to update the project on your local computer:
Ensure you have installed the target version of the .NET SDK.
If you are targeting a preview version, consult the Functions guidance for preview .NET versions to ensure that the version is supported. Additional steps may be required for .NET previews.
Update your references to the latest versions of: Microsoft.Azure.Functions.Worker and Microsoft.Azure.Functions.Worker.Sdk.
Update your project's target framework to the new version. For C# projects, you must update the
<TargetFramework>element in the.csprojfile. See Target frameworks for specifics related to the chosen version.Changing your project's target framework might also require changes to parts of your toolchain, outside of project code. For example, in VS Code, you might need to update the
azureFunctions.deploySubpathextension setting through user settings or your project's.vscode/settings.jsonfile. Check for any dependencies on the framework version that may exist outside of your project code, as part of build steps or a CI/CD pipeline.Make any updates to your project code that are required by the new .NET version. Check the version's release notes for specifics. You can also use the .NET Upgrade Assistant to help you update your code in response to changes across major versions.
After you've made those changes, rebuild your project and test it to confirm your app runs as expected.
2. Move to the latest Functions runtime
Make sure your function app is running on the latest version of the Functions runtime (version 4.x). You can determine the runtime version either in the Azure portal or by using the Azure CLI.
Use these steps to determine your Functions runtime version:
In the Azure portal, locate your function app and select Configuration on the left-hand side under Settings.
Select the Function runtime settings tab and check the Runtime version value to see if your function app is running on version 4.x of the Functions runtime (
~4).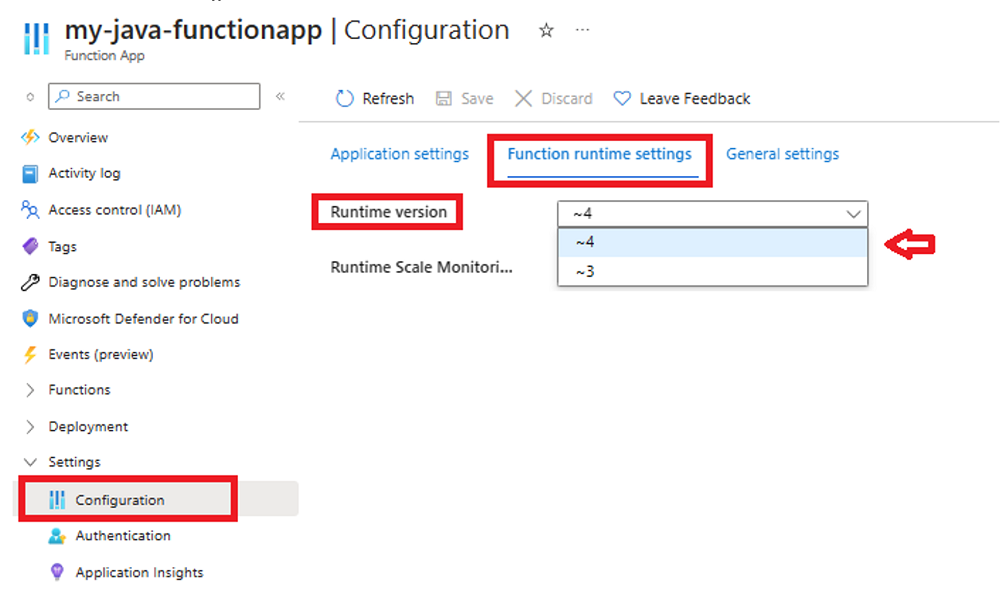
If you need to first update your function app to version 4.x, see Migrate apps from Azure Functions version 1.x to version 4.x or Migrate apps from Azure Functions version 3.x to version 4.x. You should follow the instructions in those articles rather than just changing the FUNCTIONS_EXTENSION_VERSION setting.
Publish app updates
If you updated your app to run correctly on the new version, publish the app updates before you update the stack configuration for your function app.
Tip
To simplify the update process, minimize downtime for your functions, and provide a potential for rollback, you should publish your updated app to a staging slot. For more information, see Azure Functions deployment slots.
When publishing your updated app to a staging slot, make sure to follow the slot-specific update instructions in the rest of this article. You later swap the updated staging slot into production.
Update the stack configuration
The way that you update the stack configuration depends on whether you're running on Windows or on Linux in Azure.
When using a staging slot, make sure to target your updates to the correct slot.
Use the following steps to update the Java version:
In the Azure portal, locate your function app and select Configuration on the left-hand side. When using a staging slot, make sure to first select the specific slot.
In the General settings tab, update Java version to the desired version.
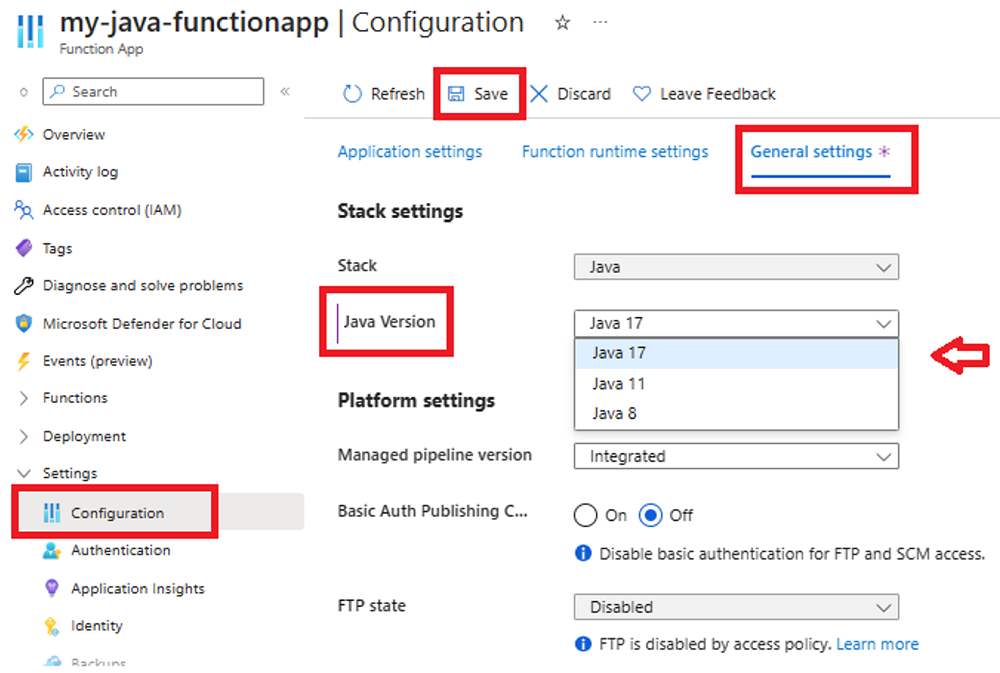
Select Save and when notified about a restart select Continue.
Use the following steps to update the .NET version:
In the Azure portal, locate your function app and select Configuration on the left-hand side. When using a staging slot, make sure to first select the specific slot.
In the General settings tab, update .NET version to the desired version.
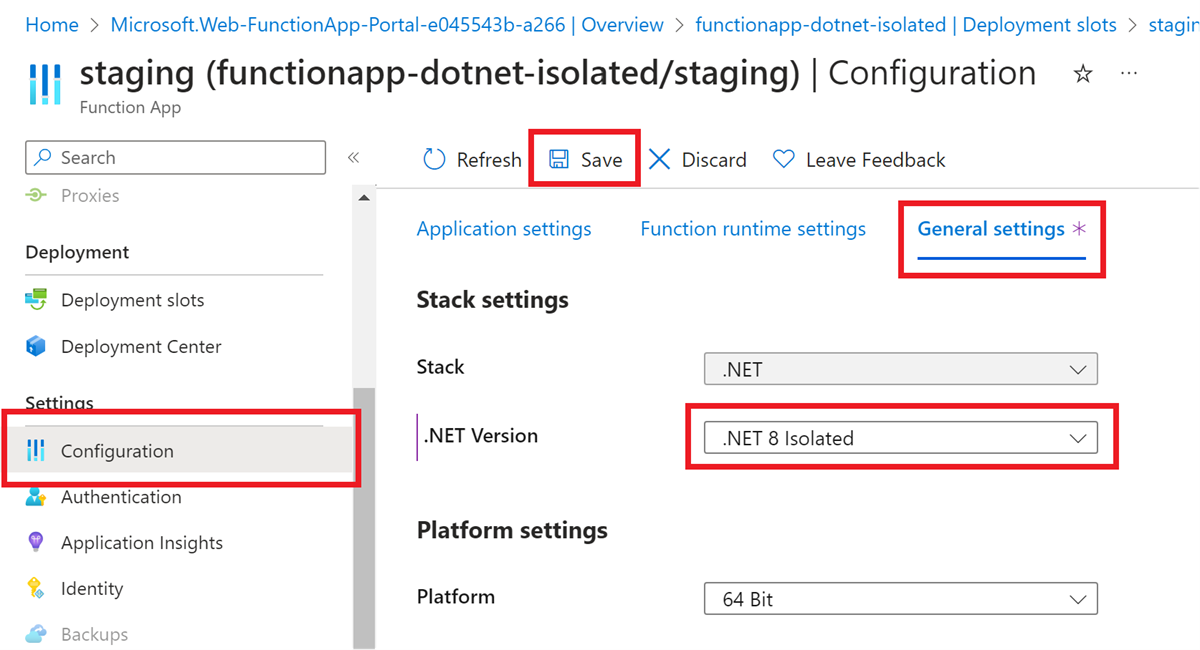
Select Save and when notified about a restart select Continue.
Use the following steps to update the Node.js version:
In the Azure portal, locate your function app and select Configuration on the left-hand side. When using a staging slot, make sure to first select the specific slot.
In the General settings tab, update Node.js version to the desired version.
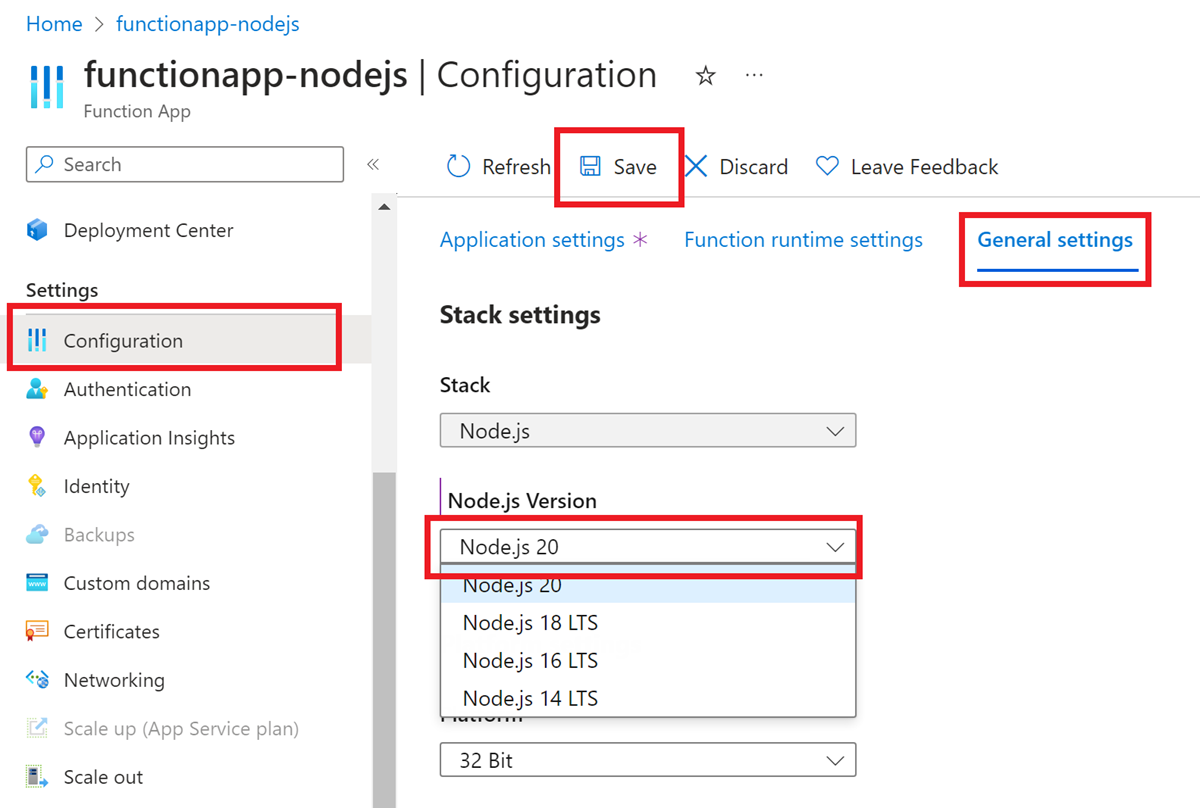
Select Save and when notified about a restart select Continue. This change updates the
WEBSITE_NODE_DEFAULT_VERSIONapplication setting.
Use the following steps to update the PowerShell version:
In the Azure portal, locate your function app and select Configuration on the left-hand side. When using a staging slot, make sure to first select the specific slot.
In the General settings tab, update .NET version to the desired version.
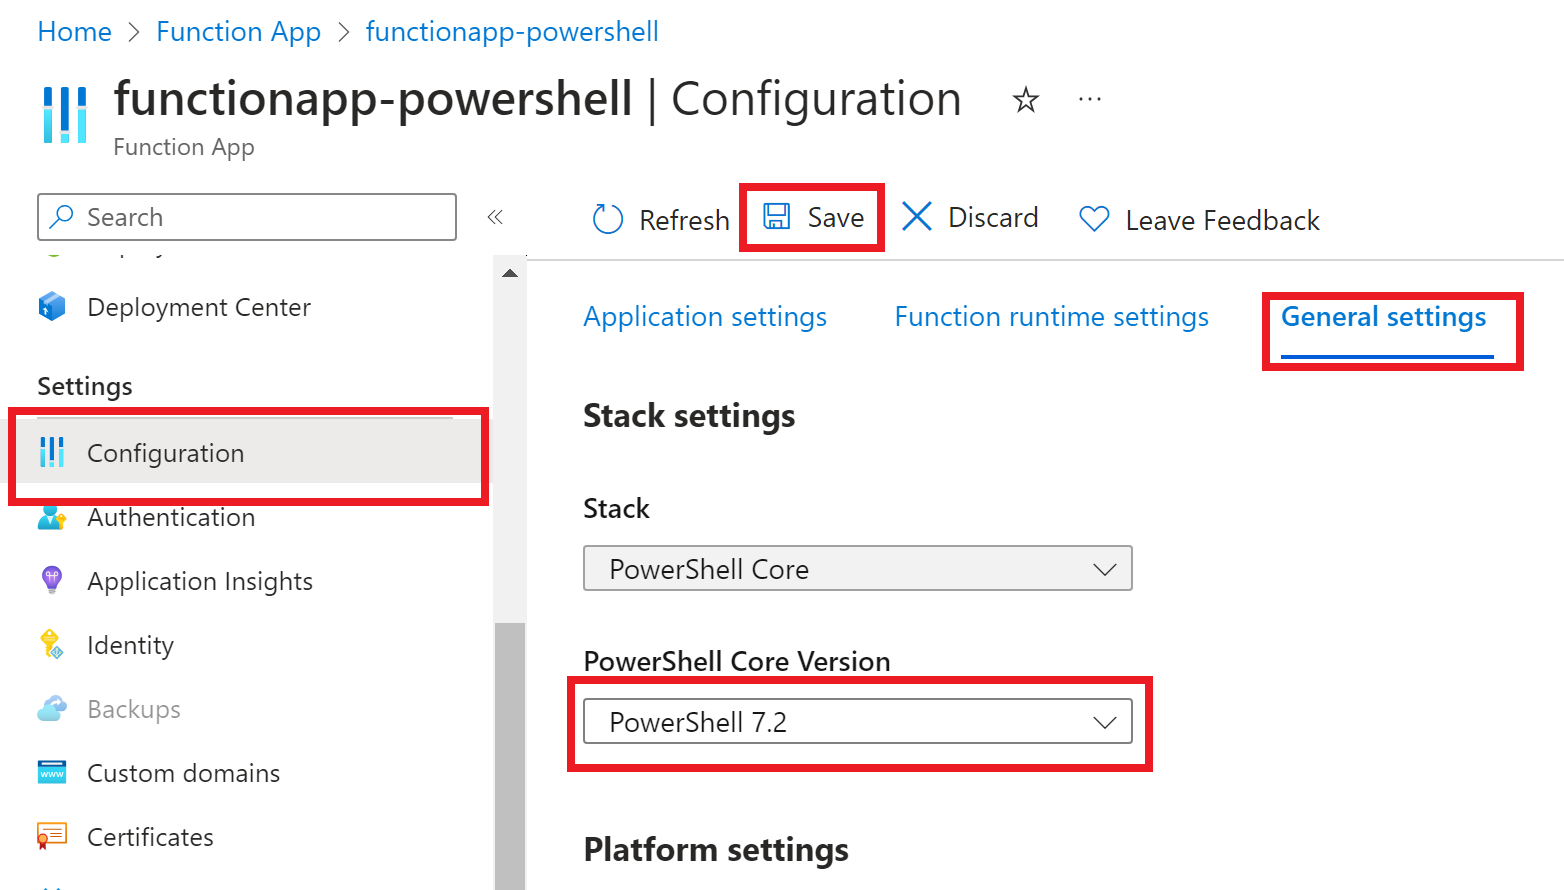
Select Save and when notified about a restart select Continue.
Python apps aren't supported on Windows. Select the Linux tab instead.
Your function app restarts after you update the version.
Swap slots
If you have been performing your code project deployment and updating settings in a staging slot, you finally need to swap the staging slot into production. For more information, see Swap slots.
