Use Microsoft Entra for cache authentication
Azure Cache for Redis offers two methods to authenticate to your cache instance: access keys and Microsoft Entra.
Although access key authentication is simple, it comes with a set of challenges around security and password management. For contrast, in this article, you learn how to use a Microsoft Entra token for cache authentication.
Azure Cache for Redis offers a password-free authentication mechanism by integrating with Microsoft Entra. This integration also includes role-based access control functionality provided through access control lists (ACLs) supported in open-source Redis.
To use the ACL integration, your client application must assume the identity of a Microsoft Entra entity, like service principal or managed identity, and connect to your cache. In this article, you learn how to use your service principal or managed identity to connect to your cache. You also learn how to grant your connection predefined permissions based on the Microsoft Entra artifact that's used for the connection.
Scope of availability
| Tier | Basic, Standard, Premium | Enterprise, Enterprise Flash |
|---|---|---|
| Availability | Yes | No |
Prerequisites and limitations
- Microsoft Entra authentication is supported for SSL connections and TLS 1.2 or higher.
- Microsoft Entra authentication isn't supported in the Enterprise tiers of Azure Cache for Redis Enterprise.
- Some Redis commands are blocked. For a full list of blocked commands, see Redis commands not supported in Azure Cache for Redis.
Important
After a connection is established by using a Microsoft Entra token, client applications must periodically refresh the Microsoft Entra token before expiry. Then the apps must send an AUTH command to the Redis server to avoid disrupting connections. For more information, see Configure your Redis client to use Microsoft Entra.
Enable Microsoft Entra authentication on your cache
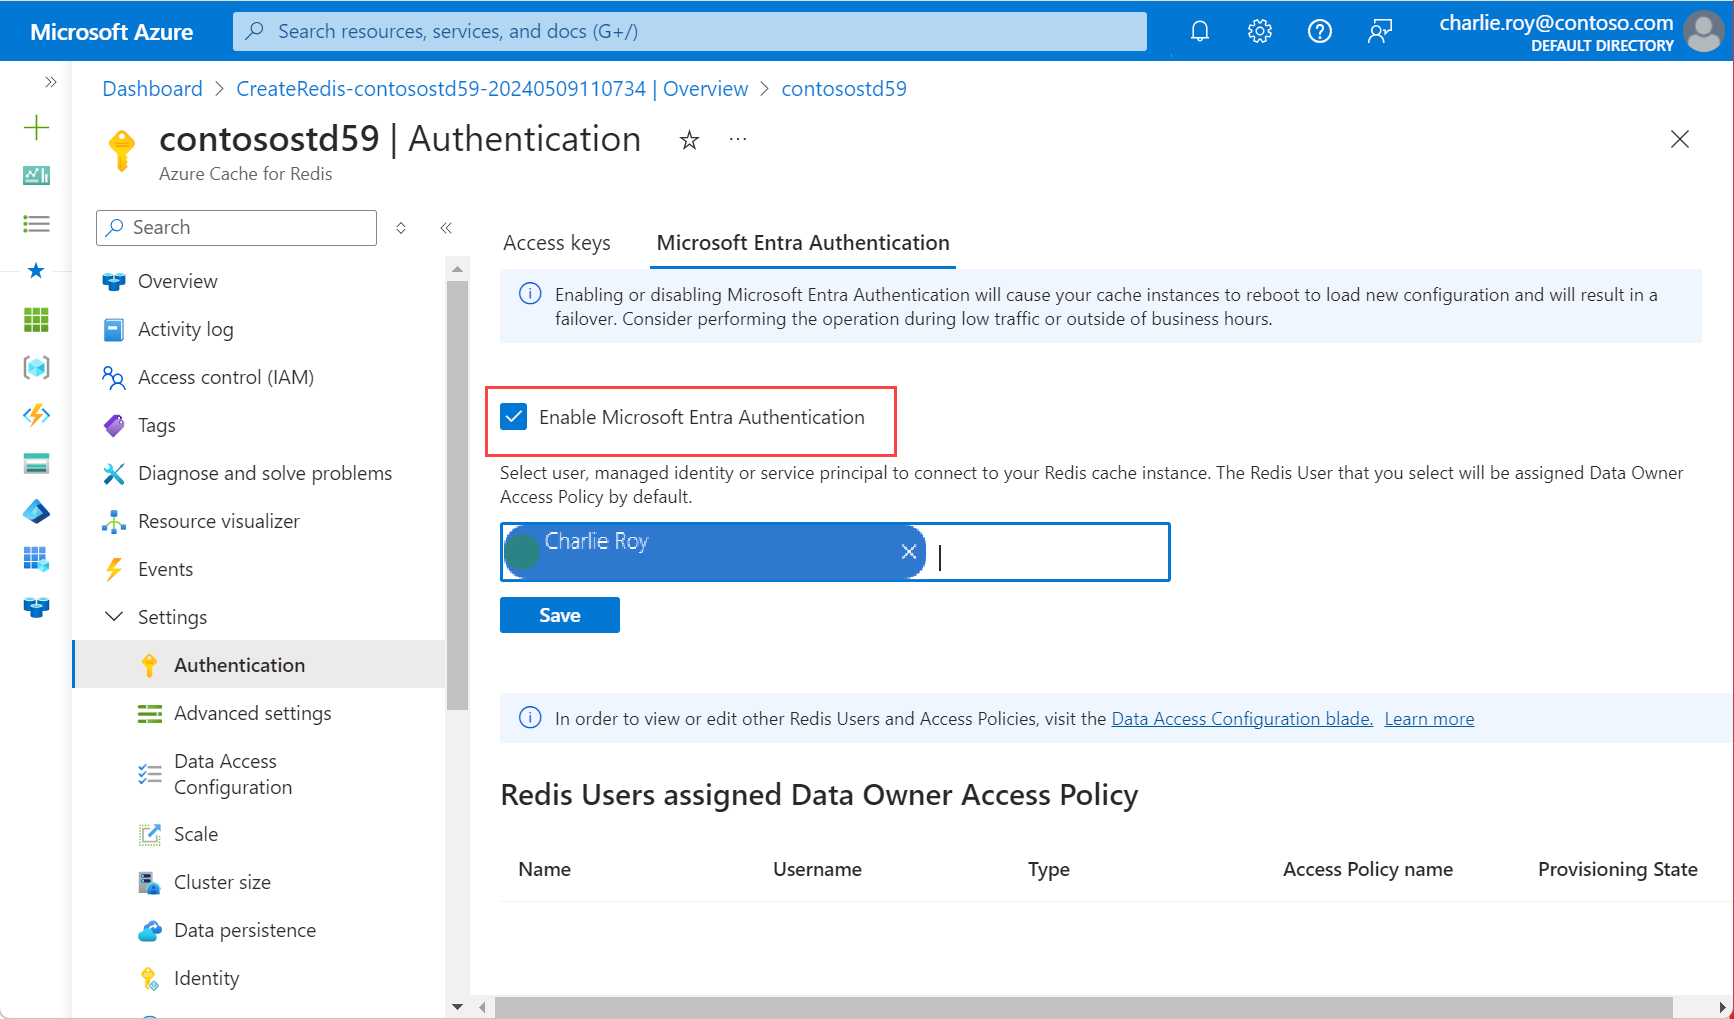
In the Azure portal, select the Azure Cache for Redis instance where you want to configure Microsoft Entra token-based authentication.
On the Resource menu, select Authentication.
On the working pane, select the Microsoft Entra Authentication tab.
Select Enable Microsoft Entra Authentication and enter the name of a valid user. The user you enter is automatically assigned Data Owner Access Policy by default when you select Save. You can also enter a managed identity or service principal to connect to your cache instance.

A pop-up dialog asks if you want to update your configuration and informs you that it takes several minutes. Select Yes.
Important
After the enable operation is finished, the nodes in your cache instance reboot to load the new configuration. We recommend that you perform this operation during your maintenance window or outside your peak business hours. The operation can take up to 30 minutes.
For information on how to use Microsoft Entra with the Azure CLI, see the reference pages for identity.
Disable access key authentication on your cache
Using Microsoft Entra is the secure way to connect your cache. We recommend that you use Microsoft Entra and disable access keys.
When you disable access key authentication for a cache, all existing client connections are terminated, whether they use access keys or Microsoft Entra authentication. Follow the recommended Redis client best practices to implement proper retry mechanisms for reconnecting Microsoft Entra-based connections, if any.
Before you disable access keys
- Ensure that Microsoft Entra authentication is enabled and you have at least one Redis User configured.
- Ensure all applications connecting to your cache instance switch to using Microsoft Entra Authentication.
- Ensure that the metrics Connected Clients and Connected Clients Using Microsoft Entra Token have the same values. If the values for these two metrics aren't the same, that means there are still some connections that were created using access keys and not Microsoft Entra Token.
- Consider disabling access during the scheduled maintenance window for your cache instance.
- Disabling access keys is only available for Basic, Standard, and Premium tier caches.
For geo-replicated caches, you must:
- Unlink the caches.
- Disable access keys.
- Relink the caches.
If you have a cache where you used access keys, and you want to disable access keys, follow this procedure:
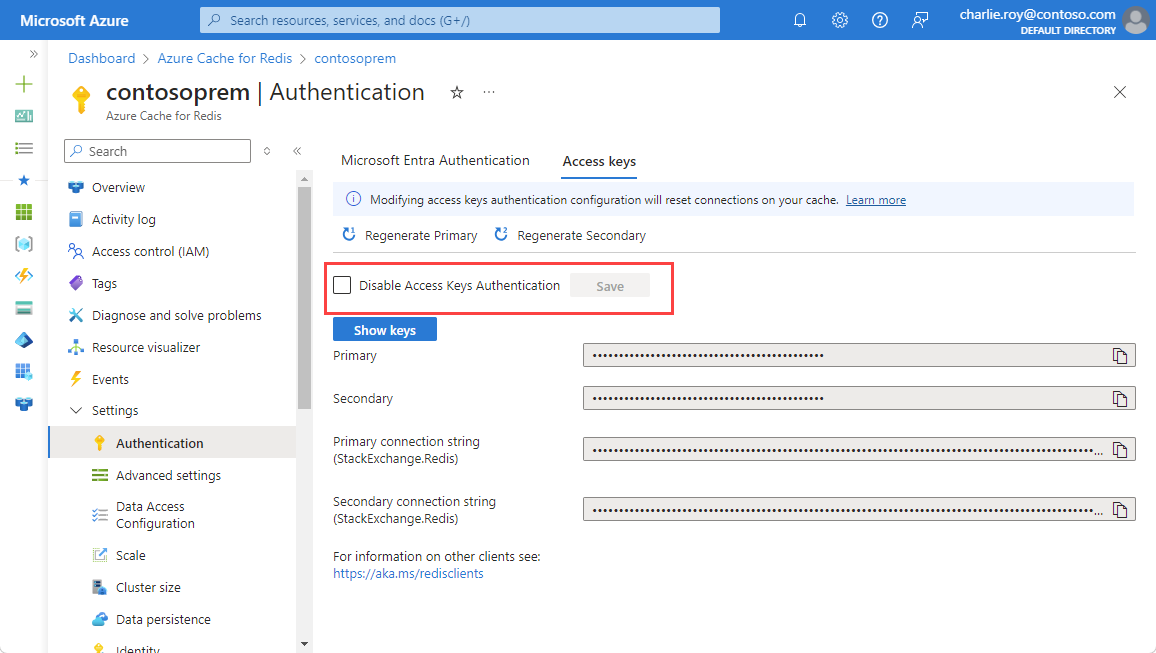
In the Azure portal, select the Azure Cache for Redis instance where you want to disable access keys.
On the Resource menu, select Authentication.
On the working pane, select Access keys.
Select Disable Access Keys Authentication. Then, select Save.

Confirm that you want to update your configuration by selecting Yes.
Important
When the Disable Access Keys Authentication setting is changed for a cache, all existing client connections, using access keys or Microsoft Entra, are terminated. Follow the best practices to implement proper retry mechanisms for reconnecting Microsoft Entra-based connections. For more information, see Connection resilience.
Use data access configuration with your cache
If you want to use a custom access policy instead of Redis Data Owner, go to Data Access Configuration on the Resource menu. For more information, see Configure a custom data access policy for your application.
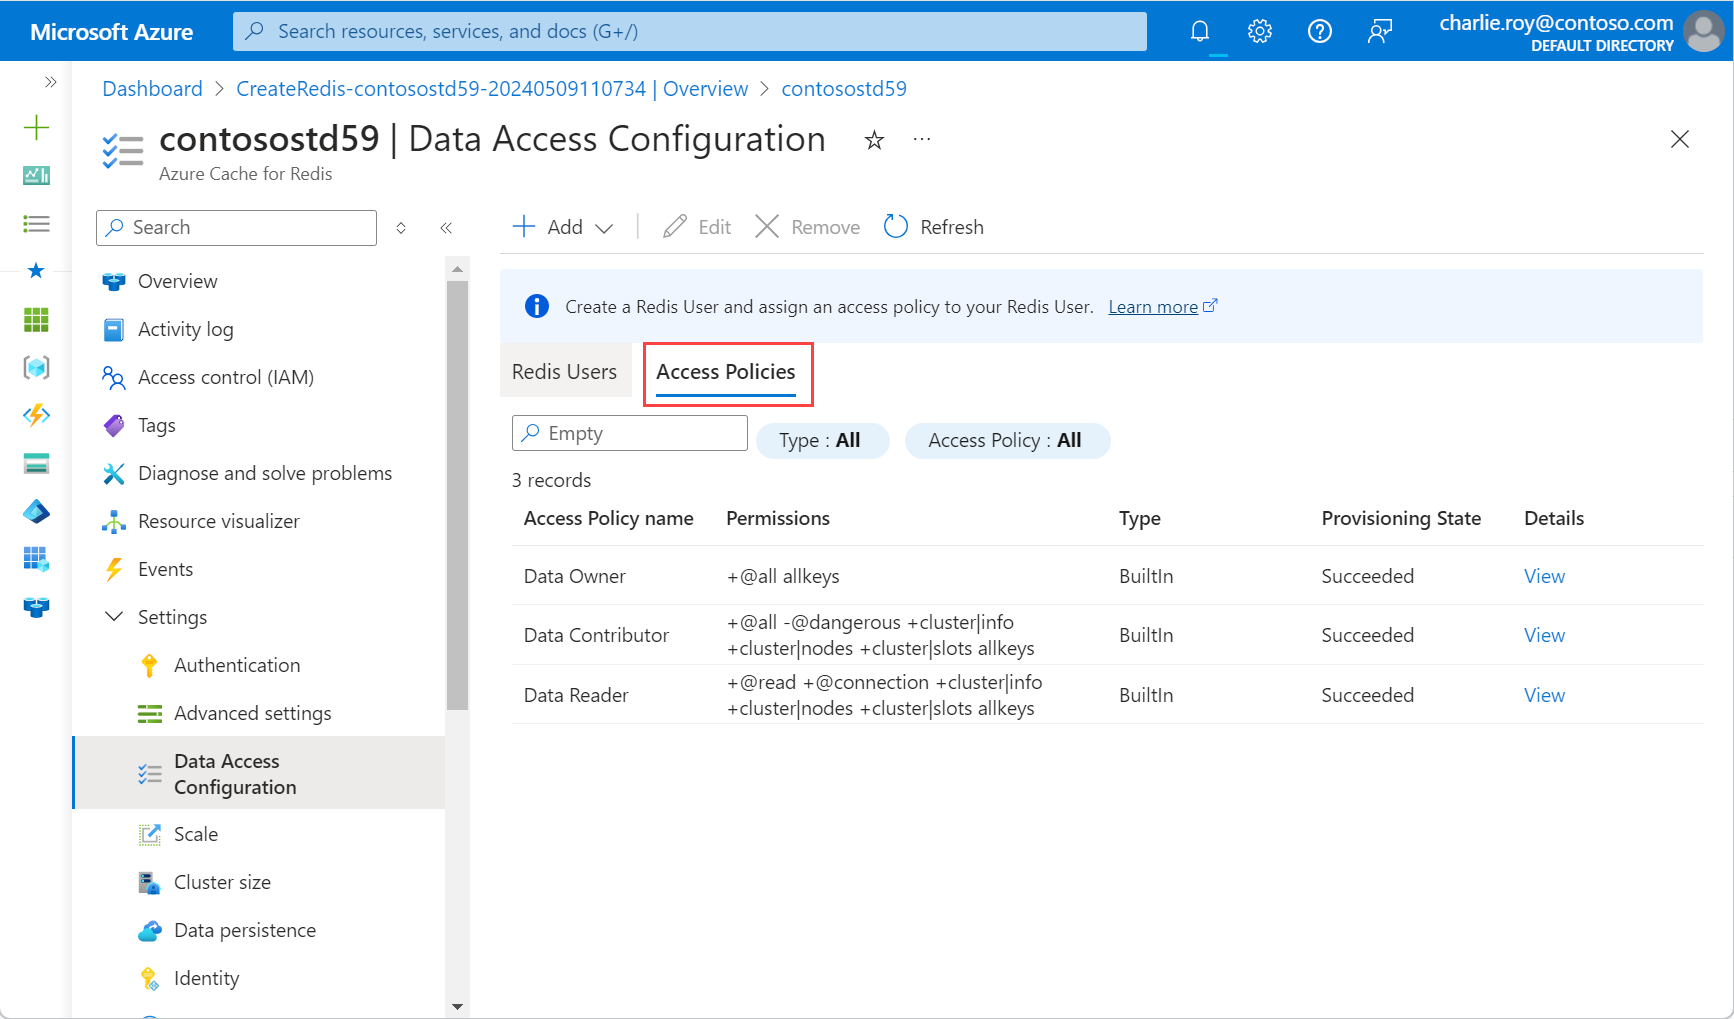
In the Azure portal, select the Azure Cache for Redis instance where you want to add to the data access configuration.
On the Resource menu, select Data Access Configuration.
Select Add and then select New Redis User.
On the Access Policies tab, select one of the available policies in the table: Data Owner, Data Contributor, or Data Reader. Then, select Next: Redis Users.

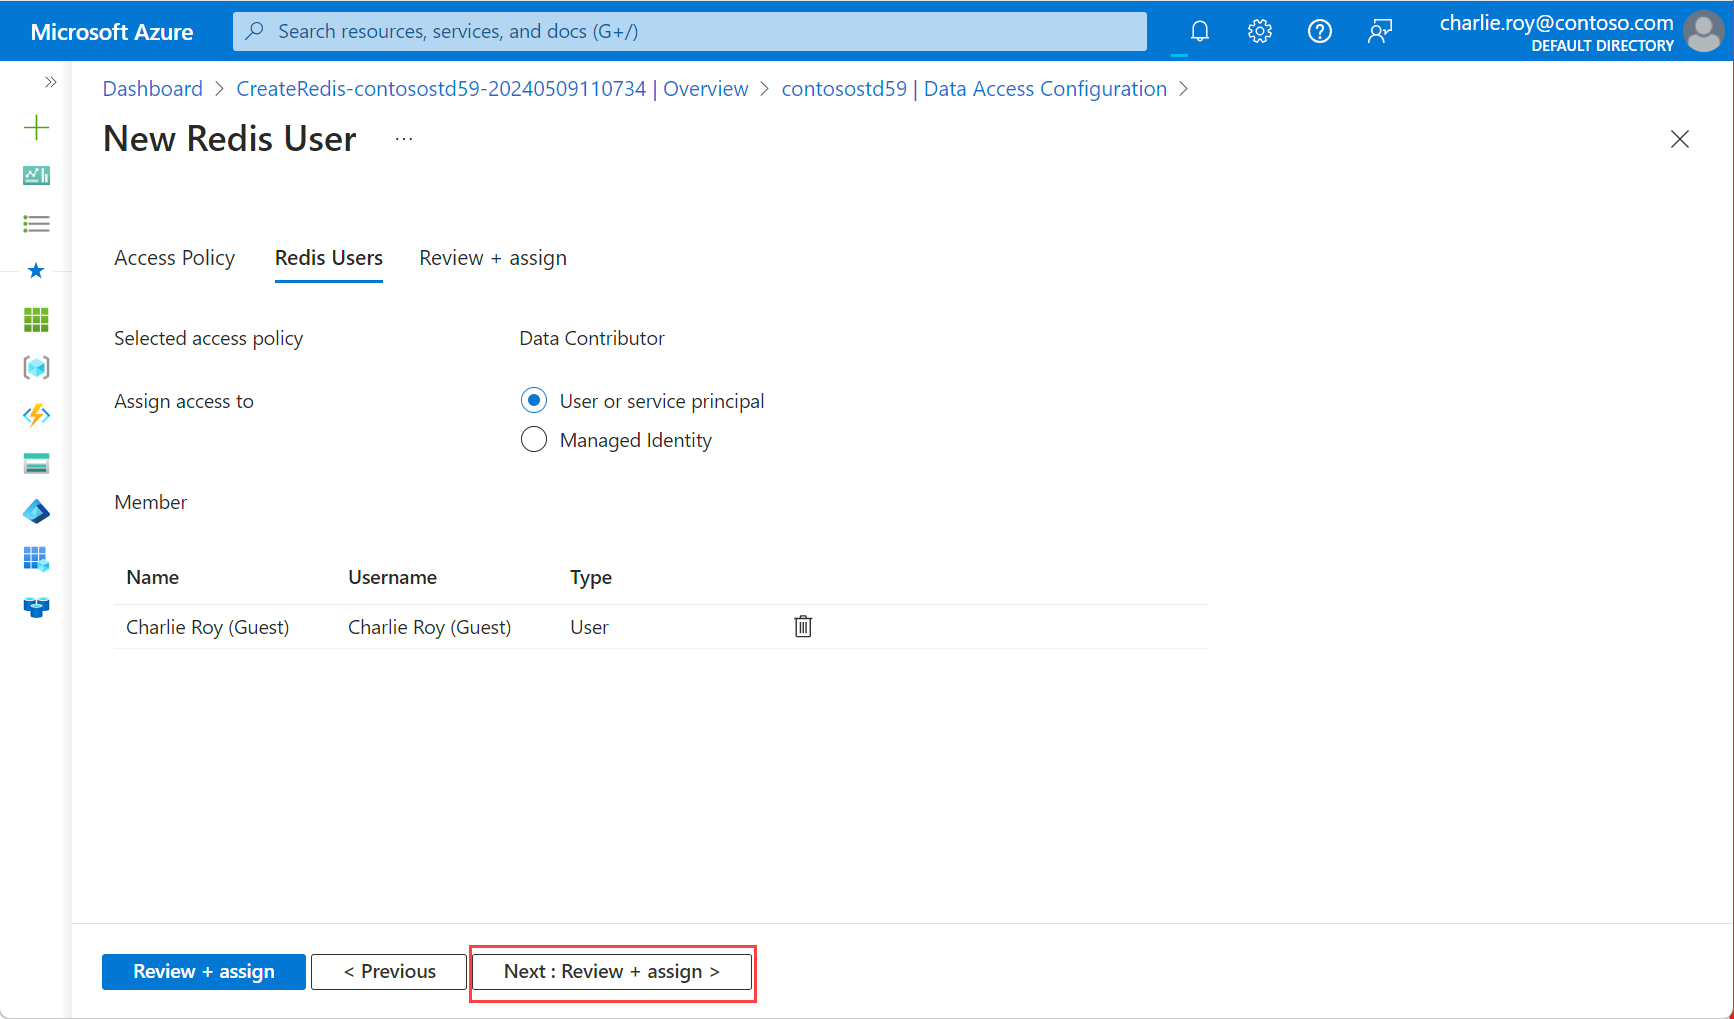
Choose either User or service principal or Managed Identity to determine how to assign access to your Azure Cache for Redis instance. If you select User or service principal and you want to add a user, you must first enable Microsoft Entra authentication.
Then, choose Select members and choose Select. Then, select Next: Review + assign.

A pop-up dialog notifies you that upgrading is permanent and might cause a brief connection blip. Select Yes.
Important
After the enable operation is finished, the nodes in your cache instance reboot to load the new configuration. We recommend that you perform this operation during your maintenance window or outside your peak business hours. The operation can take up to 30 minutes.
Configure your Redis client to use Microsoft Entra
Because most Azure Cache for Redis clients assume that a password and access key are used for authentication, you likely need to update your client workflow to support authentication by using Microsoft Entra. In this section, you learn how to configure your client applications to connect to Azure Cache for Redis by using a Microsoft Entra token.
Microsoft Entra client workflow
Configure your client application to acquire a Microsoft Entra token for scope,
https://redis.azure.com/.defaultoracca5fbb-b7e4-4009-81f1-37e38fd66d78/.default, by using the Microsoft Authentication Library (MSAL).Update your Redis connection logic to use the following
UserandPassword:User= Object ID of your managed identity or service principalPassword= Microsoft Entra token that you acquired by using MSAL
Ensure that your client executes a Redis AUTH command automatically before your Microsoft Entra token expires by using:
User= Object ID of your managed identity or service principalPassword= Microsoft Entra token refreshed periodically
Client library support
The library Microsoft.Azure.StackExchangeRedis is an extension of StackExchange.Redis that enables you to use Microsoft Entra to authenticate connections from a Redis client application to an Azure Cache for Redis. The extension manages the authentication token, including proactively refreshing tokens before they expire to maintain persistent Redis connections over multiple days.
This code sample demonstrates how to use the Microsoft.Azure.StackExchangeRedis NuGet package to connect to your Azure Cache for Redis instance by using Microsoft Entra.
The following table includes links to code samples. They demonstrate how to connect to your Azure Cache for Redis instance by using a Microsoft Entra token. Various client libraries are included in multiple languages.
| Client library | Language | Link to sample code |
|---|---|---|
| StackExchange.Redis | .NET | StackExchange.Redis code sample |
| go-redis | Go | go-redis code sample |
| redis-py | Python | redis-py code sample |
| Jedis | Java | Jedis code sample |
| Lettuce | Java | Lettuce code sample |
| Redisson | Java | Redisson code sample |
| ioredis | Node.js | ioredis code sample |
| node-redis | Node.js | node-redis code sample |
Best practices for Microsoft Entra authentication
- Configure private links or firewall rules to protect your cache from a denial of service attack.
- Ensure that your client application sends a new Microsoft Entra token at least three minutes before token expiry to avoid connection disruption.
- When you call the Redis server
AUTHcommand periodically, consider adding a random delay so that theAUTHcommands are staggered. In this way, your Redis server doesn't receive too manyAUTHcommands at the same time.