Tutorial: Get started with the Azure WebJobs SDK for event-driven background processing
Get started with the Azure WebJobs SDK for Azure App Service to enable your web apps to run background tasks, scheduled tasks, and respond to events.
Use Visual Studio 2022 to create a .NET 8 console app that uses the WebJobs SDK to respond to Azure Storage Queue messages, run the project locally, and finally deploy it to Azure.
In this tutorial, you will learn how to:
- Create a console app
- Add a function
- Test locally
- Deploy to Azure
- Enable Application Insights logging
- Add input/output bindings
Prerequisites
Visual Studio 2022 with the Azure development workload. Install Visual Studio 2022.
An Azure account with an active subscription. Create an account for free.
Create a console app
In this section, you start by creating a project in Visual Studio 2022. Next, you'll add tools for Azure development, code publishing, and functions that listen for triggers and call functions. Last, you'll set up console logging that disables a legacy monitoring tool and enables a console provider with default filtering.
Note
The procedures in this article are verified for creating a C# console app that runs on .NET 8.0.
Create a project
In Visual Studio, select File > New > Project.
Under Create a new project, select Console Application (C#), and then select Next.
Under Configure your new project, name the project WebJobsSDKSample, and then select Next.
Choose your Target framework and select Create. This tutorial has been verified using .NET 6.0.
Install WebJobs NuGet packages
Install the latest WebJobs NuGet package. This package includes Microsoft.Azure.WebJobs (WebJobs SDK), which lets you publish your function code to WebJobs in Azure App Service.
Get the latest stable 4.x version of the Microsoft.Azure.WebJobs.Extensions NuGet package.
In Visual Studio, go to Tools > NuGet Package Manager.
Select Package Manager Console. You'll see a list of NuGet cmdlets, a link to documentation, and a
PM>entry point.In the following command, replace
<4_X_VERSION>with the current version number you found in step 1.Install-Package Microsoft.Azure.WebJobs.Extensions -version <4_X_VERSION>Note
The sample code in this article works with package versions 4.x. Make sure you use a 4.x version because you get build errors when using package versions 5.x.
In the Package Manager Console, execute the command. The extension list appears and automatically installs.
Create the Host
The host is the runtime container for functions that listens for triggers and calls functions. The following steps create a host that implements IHost, which is the Generic Host in ASP.NET Core.
Select the Program.cs tab, remove the existing contents, and add these
usingstatements:using System.Threading.Tasks; using Microsoft.Extensions.Hosting;Also under Program.cs, add the following code:
namespace WebJobsSDKSample
{
    class Program
    {
        static async Task Main()
        {
            var builder = new HostBuilder();
            builder.ConfigureWebJobs(b =>
            {
                b.AddAzureStorageCoreServices();
            });
            var host = builder.Build();
            using (host)
            {
                await host.RunAsync();
            }
        }
    }
}
In ASP.NET Core, host configurations are set by calling methods on the HostBuilder instance. For more information, see .NET Generic Host. The ConfigureWebJobs extension method initializes the WebJobs host. In ConfigureWebJobs, initialize specific binding extensions, such as the Storage binding extension, and set properties of those extensions.
Enable console logging
Set up console logging that uses the ASP.NET Core logging framework. This framework, Microsoft.Extensions.Logging, includes an API that works with a variety of built-in and third-party logging providers.
Get the latest stable version of the
Microsoft.Extensions.Logging.ConsoleNuGet package, which includesMicrosoft.Extensions.Logging.In the following command, replace
<9_X_VERSION>with the current version number you found in step 1. Each type of NuGet Package has a unique version number.Install-Package Microsoft.Extensions.Logging.Console -version <9_X_VERSION>In the Package Manager Console, fill in the current version number and execute the command. The extension list appears and automatically installs.
Under the tab Program.cs, add this
usingstatement:using Microsoft.Extensions.Logging;Continuing under Program.cs, add the
ConfigureLoggingmethod toHostBuilder, before theBuildcommand. TheAddConsolemethod adds console logging to the configuration.builder.ConfigureLogging((context, b) => { b.SetMinimumLevel(LogLevel.Error); b.AddFilter("Function", LogLevel.Information); b.AddFilter("Host", LogLevel.Debug); b.AddConsole(); });This adds logging that captures log output for function executions at the
Informationlevel, the host at theDebuglevel, and theerrorlevel for all other components. TheMainmethod now looks like this:static async Task Main() { var builder = new HostBuilder(); builder.ConfigureWebJobs(b => { b.AddAzureStorageCoreServices(); }); builder.ConfigureLogging((context, b) => { b.SetMinimumLevel(LogLevel.Error); b.AddFilter("Function", LogLevel.Information); b.AddFilter("Host", LogLevel.Debug); b.AddConsole(); }); var host = builder.Build(); using (host) { await host.RunAsync(); } }This addition makes these changes:
- Disables dashboard logging. The dashboard is a legacy monitoring tool, and dashboard logging is not recommended for high-throughput production scenarios.
- Adds the console provider with default filtering.
Now, you can add a function that is triggered by messages arriving in an Azure Storage queue.
Add a function
A function is unit of code that runs on a schedule, is triggered based on events, or is run on demand. A trigger listens to a service event. In the context of the WebJobs SDK, triggered doesn't refer to the deployment mode. Event-driven or scheduled WebJobs created using the SDK should always be deployed as continuous WebJobs with "Always on" enabled.
In this section, you create a function triggered by messages in an Azure Storage queue. First, you need to add a binding extension to connect to Azure Storage.
Install the Storage binding extension
Starting with version 3 of the WebJobs SDK, to connect to Azure Storage services you must install a separate Storage binding extension package.
Note
Beginning with 5.x, Microsoft.Azure.WebJobs.Extensions.Storage has been split by storage service and has migrated the AddAzureStorage() extension method by service type. This version also requires you to update the version of the Microsoft.Azure.WebJobs.Host.Storage assembly used by the SDK.
Get the latest stable version of the Microsoft.Azure.WebJobs.Extensions.Storage NuGet package, version 5.x.
In the following command, replace
<5_X_VERSION>with the current version number you found in step 1. Each type of NuGet Package has a unique version number.Install-Package Microsoft.Azure.WebJobs.Extensions.Storage -Version <5_X_VERSION>In the Package Manager Console, execute the command with the current version number at the
PM>entry point.Also run this command to update the
Microsoft.Azure.WebJobs.Host.Storagepackage to version 4.1.0:Install-Package Microsoft.Azure.WebJobs.Host.Storage -Version 4.1.0Continuing in Program.cs, in the
ConfigureWebJobsextension method, add theAddAzureStorageQueuesmethod on theHostBuilderinstance (before theBuildcommand) to initialize the Storage extension. At this point, theConfigureWebJobsmethod looks like this:builder.ConfigureWebJobs(b => { b.AddAzureStorageCoreServices(); b.AddAzureStorageQueues(); });Add the following code in the
Mainmethod after thebuilderis instantiated:builder.UseEnvironment(EnvironmentName.Development);Running in development mode reduces the queue polling exponential backoff that can significantly delay the amount of time it takes for the runtime to find the message and invoke the function. You should remove this line of code or switch to
Productionwhen you're done with development and testing.The
Mainmethod should now look like the following example:static async Task Main() { var builder = new HostBuilder(); builder.UseEnvironment(EnvironmentName.Development); builder.ConfigureWebJobs(b => { b.AddAzureStorageCoreServices(); b.AddAzureStorageQueues(); }); builder.ConfigureLogging((context, b) => { b.SetMinimumLevel(LogLevel.Error); b.AddFilter("Function", LogLevel.Information); b.AddFilter("Host", LogLevel.Debug); b.AddConsole(); }); var host = builder.Build(); using (host) { await host.RunAsync(); } }
Create a queue triggered function
The QueueTrigger attribute tells the runtime to call this function when a new message is written on an Azure Storage queue called queue. The contents of the queue message are provided to the method code in the message parameter. The body of the method is where you process the trigger data. In this example, the code just logs the message.
In Solution Explorer, right-click the project, select Add > New Item, and then select Class.
Name the new C# class file Functions.cs and select Add.
In Functions.cs, replace the generated template with the following code:
using Microsoft.Azure.WebJobs; using Microsoft.Extensions.Logging; namespace WebJobsSDKSample { public static class Functions { public static void ProcessQueueMessage([QueueTrigger("queue")] string message, ILogger logger) { logger.LogInformation(message); } } }You should mark the Functions class as
public staticin order for the runtime to access and execute the method. In the above code sample, when a message is added to a queue namedqueue, the function executes and themessagestring is written to the logs. The queue being monitored is in the default Azure Storage account, which you create next.
The message parameter doesn't have to be a string. You can also bind to a JSON object, a byte array, or a CloudQueueMessage object. See Queue trigger usage. Each binding type (such as queues, blobs, or tables) has a different set of parameter types that you can bind to.
Create an Azure storage account
The Azure Storage Emulator that runs locally doesn't have all of the features that the WebJobs SDK needs. You'll create a storage account in Azure and configure the project to use it.
To learn how to create a general-purpose v2 storage account, see Create an Azure Storage account.
Locate and copy your connection string
A connection string is required to configure storage. Keep this connection string for the next steps.
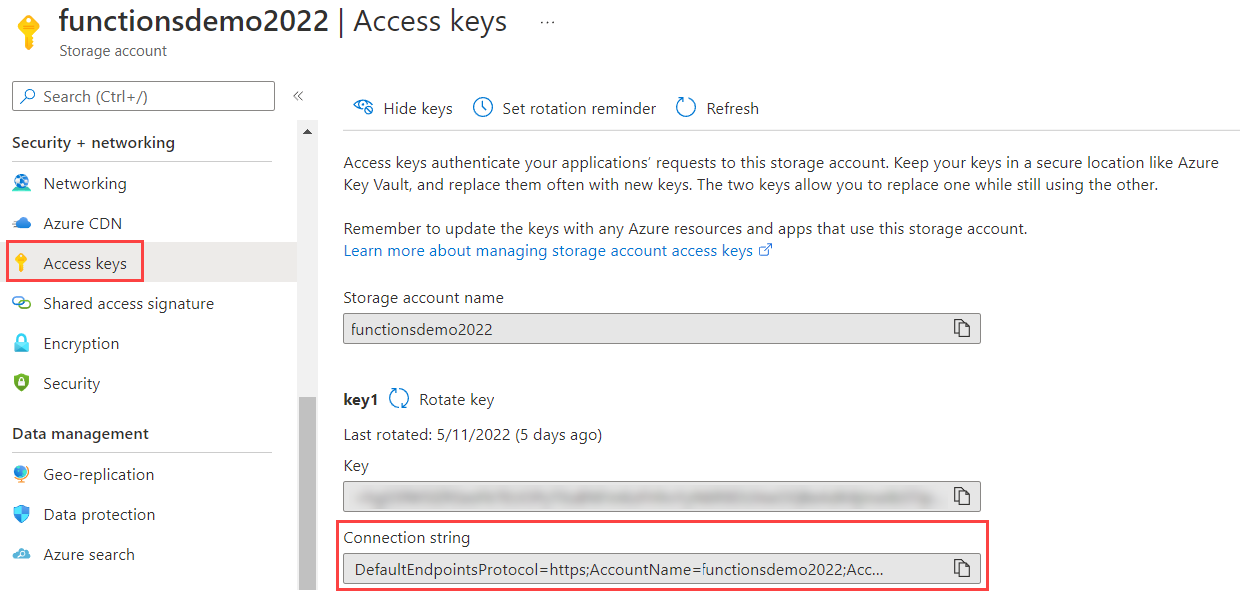
In the Azure portal, navigate to your storage account and select Settings.
In Settings, select Access keys.
For the Connection string under key1, select the Copy to clipboard icon.
Configure storage to run locally
The WebJobs SDK looks for the storage connection string in the Application Settings in Azure. When you run locally, it looks for this value in the local configuration file or in environment variables.
Right-click the project, select Add > New Item, select JavaScript JSON configuration file, name the new file appsettings.json file, and select Add.
In the new file, add a
AzureWebJobsStoragefield, as in the following example:{ "AzureWebJobsStorage": "{storage connection string}" }Replace {storage connection string} with the connection string that you copied previously.
Select the appsettings.json file in Solution Explorer and in the Properties window, set the Copy to Output Directory action to Copy if newer.
Because this file contains a connection string secret, you shouldn't store the file in a remote code repository. After publishing your project to Azure, you can add the same connection string app setting in your app in Azure App Service.
Test locally
Build and run the project locally and create a message queue to trigger the function.
In the Azure portal, navigate to your storage account and select the Queues tab (1). Select + Queue (2) and enter queue as the Queue name (3). Then, select OK (4).

Click the new queue and select Add message.
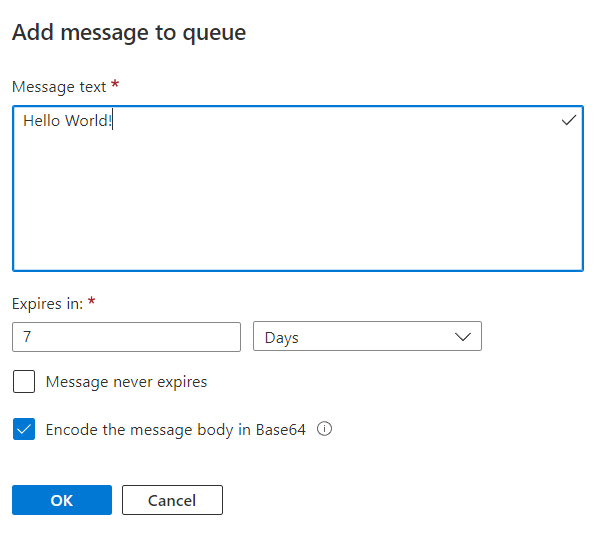
In the Add Message dialog, enter Hello World! as the Message text, and then select OK. There is now a message in the queue.
Press Ctrl+F5 to run the project.
The console shows that the runtime found your function. Because you used the
QueueTriggerattribute in theProcessQueueMessagefunction, the WebJobs runtime listens for messages in the queue namedqueue. When it finds a new message in this queue, the runtime calls the function, passing in the message string value.Go back to the Queue window and refresh it. The message is gone, since it has been processed by your function running locally.
Close the console window or type Ctrl+C.
It's now time to publish your WebJobs SDK project to Azure.
Deploy to Azure
During deployment, you create an app service instance where you'll run your functions. When you publish a .NET console app to App Service in Azure, it automatically runs as a WebJob. To learn more about publishing, see Develop and deploy WebJobs using Visual Studio.
Create Azure resources
In Solution Explorer, right-click the project and select Publish.
In the Publish dialog box, select Azure for Target, and then select Next.
Select Azure WebJobs for Specific target, and then select Next.
Above App Service instances select the plus (+) button to Create a new Azure WebJob.
In the App Service (Windows) dialog box, use the hosting settings in the following table.
Setting Suggested value Description Name Globally unique name Name that uniquely identifies your new function app. Subscription Choose your subscription The Azure subscription to use. Resource group myResourceGroup Name of the resource group in which to create your function app. Choose New to create a new resource group. Hosting Plan App Service plan An App Service plan specifies the location, size, and features of the web server farm that hosts your app. You can save money when hosting multiple apps by configuring the web apps to share a single App Service plan. App Service plans define the region, instance size, scale count, and SKU (Free, Shared, Basic, Standard, or Premium). Choose New to create a new App Service plan. Free and Basic tiers don't support the Always On option to keep your site running continuously. 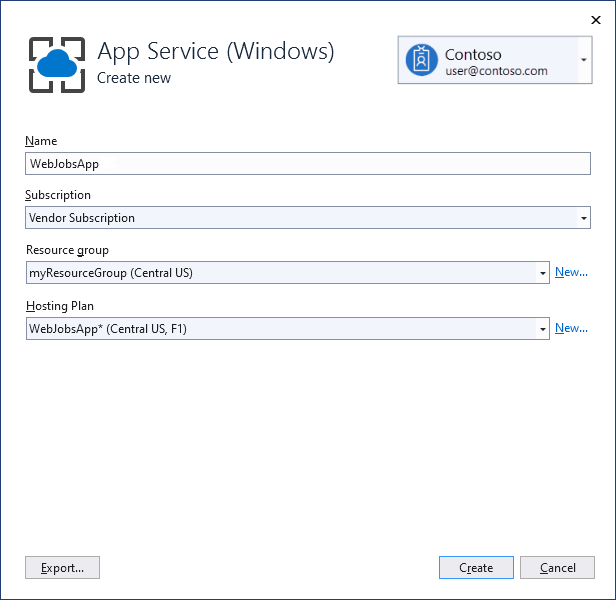
Select Create to create a WebJob and related resources in Azure with these settings and deploy your project code.
Select Finish to return to the Publish page.
Enable Always On
For a continuous WebJob, you should enable the Always on setting in the site so that your WebJobs run correctly. If you don't enable Always on, the runtime goes idle after a few minutes of inactivity.
In the Publish page, select the three dots above Hosting to show Hosting profile section actions and choose Open in Azure portal.
Under Settings, choose Configuration > General settings, set Always on to On, and then select Save and Continue to restart the site.
Publish the project
With the web app created in Azure, it's time to publish the WebJobs project.
In the Publish page under Hosting, select the edit button and change the WebJob Type to
Continuousand select Save. This makes sure that the WebJob is running when messages are added to the queue. Triggered WebJobs are typically used only for manual webhooks.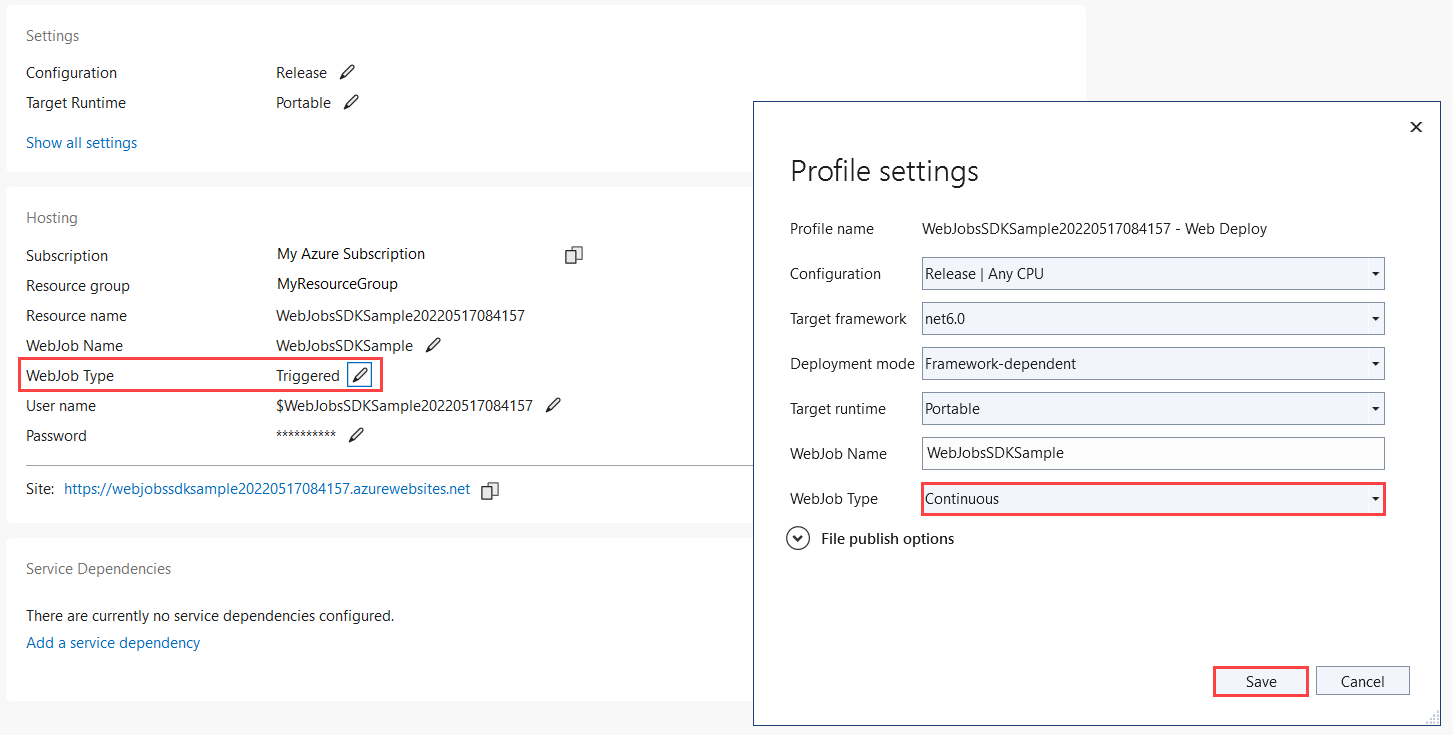
Select the Publish button at the top right corner of the Publish page. When the operation completes, your WebJob is running on Azure.
Create a storage connection app setting
You need to create the same storage connection string setting in Azure that you used locally in your appsettings.json config file. This lets you more securely store the connection string and
In your Publish profile page, select the three dots above Hosting to show Hosting profile section actions and choose Manage Azure App Service settings.
In Application settings, choose + Add setting.
In New app setting name, type
AzureWebJobsStorageand select OK.In Remote, paste in the connection string from your local setting and select OK.
The connection string is now set in your app in Azure.
Trigger the function in Azure
Make sure you're not running locally. Close the console window if it's still open. Otherwise, the local instance might be the first to process any queue messages you create.
In the Queue page in Visual Studio, add a message to the queue as before.
Refresh the Queue page, and the new message disappears because it has been processed by the function running in Azure.
Enable Application Insights logging
When the WebJob runs in Azure, you can't monitor function execution by viewing console output. To be able to monitor your WebJob, you should create an associated Application Insights instance when you publish your project.
Create an Application Insights instance
In your Publish profile page, select the three dots above Hosting to show Hosting profile section actions and choose Open in Azure Portal.
In the web app under Monitoring, choose Application Insights, and select Turn on Application Insights.
Verify the generated Resource name for the instance and the Location, and select Apply and then Yes.
Under Settings, choose Environment variables and verify that a new
APPINSIGHTS_INSTRUMENTATIONKEYwas created. This key is used to connect your WebJob instance to Application Insights.
To take advantage of Application Insights logging, you need to update your logging code as well.
Install the Application Insights extension
Get the latest stable version of the Microsoft.Azure.WebJobs.Logging.ApplicationInsights NuGet package, version 3.x.
In the following command, replace
<3_X_VERSION>with the current version number you found in step 1. Each type of NuGet Package has a unique version number.Install-Package Microsoft.Azure.WebJobs.Logging.ApplicationInsights -Version <3_X_VERSION>In the Package Manager Console, execute the command with the current version number at the
PM>entry point.
Initialize the Application Insights logging provider
Open Program.cs and add the following initializer in the ConfigureLogging after the call to AddConsole:
// If the key exists in settings, use it to enable Application Insights.
string instrumentationKey = context.Configuration["APPINSIGHTS_INSTRUMENTATIONKEY"];
if (!string.IsNullOrEmpty(instrumentationKey))
{
b.AddApplicationInsightsWebJobs(o => o.InstrumentationKey = instrumentationKey);
}
The Main method code should now look like the following example:
static async Task Main()
{
var builder = new HostBuilder();
//builder.UseEnvironment(EnvironmentName.Development);
builder.ConfigureWebJobs(b =>
{
    b.AddAzureStorageCoreServices();
    b.AddAzureStorageQueues();
});
builder.ConfigureLogging((context, b) =>
{
b.SetMinimumLevel(LogLevel.Error);
b.AddFilter("Function", LogLevel.Information);
b.AddFilter("Host", LogLevel.Debug);
b.AddConsole();
// If the key exists in settings, use it to enable Application Insights.
string? instrumentationKey = context.Configuration["APPINSIGHTS_INSTRUMENTATIONKEY"];
if (!string.IsNullOrEmpty(instrumentationKey))
{
b.AddApplicationInsightsWebJobs(o => o.InstrumentationKey = instrumentationKey);
}
});
var host = builder.Build();
using (host)
{
await host.RunAsync();
}
}
This initializes the Application Insights logging provider with default filtering. When running locally, all Information and higher-level logs are written to both the console and Application Insights. When running locally, Application Insights logging is only supported after you also add the APPINSIGHTS_INSTRUMENTATIONKEY to the appsetting.json file in the project.
Republish the project and trigger the function again
In Solution Explorer, right-click the project and select Publish.
As before, use the Azure portal to create a queue message like you did earlier, except enter Hello App Insights! as the message text.
In your Publish profile page, select the three dots above Hosting to show Hosting profile section actions and choose Open in Azure Portal.
In the web app under Settings > Monitor, choose Application Insights, and select View Application Insights data.
Select Search and then select See all data in the last 24 hours.
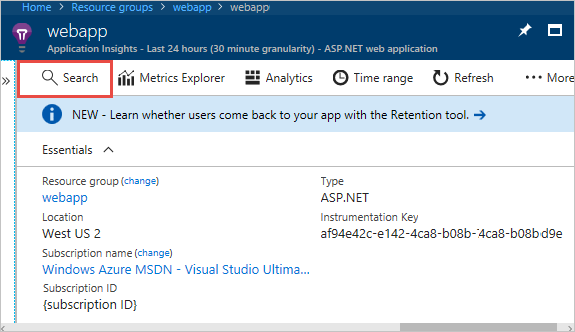
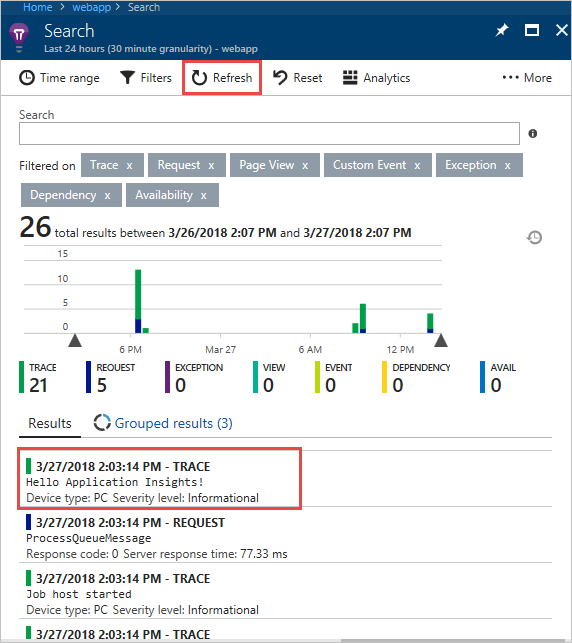
If you don't see the Hello App Insights! message, select Refresh periodically for several minutes. Logs don't appear immediately, because it takes a while for the Application Insights client to flush the logs it processes.
Add input/output bindings
Bindings simplify code that reads and writes data. Input bindings simplify code that reads data. Output bindings simplify code that writes data.
Add bindings
Input bindings simplify code that reads data. For this example, the queue message is the name of a blob, which you'll use to find and read a blob in Azure Storage. You will then use output bindings to write a copy of the file to the same container.
In Functions.cs, add a
using:using System.IO;Replace the
ProcessQueueMessagemethod with the following code:public static void ProcessQueueMessage( [QueueTrigger("queue")] string message, [Blob("container/{queueTrigger}", FileAccess.Read)] Stream myBlob, [Blob("container/copy-{queueTrigger}", FileAccess.Write)] Stream outputBlob, ILogger logger) { logger.LogInformation($"Blob name:{message} \n Size: {myBlob.Length} bytes"); myBlob.CopyTo(outputBlob); }In this code,
queueTriggeris a binding expression, which means it resolves to a different value at runtime. At runtime, it has the contents of the queue message.This code uses output bindings to create a copy of the file identified by the queue message. The file copy is prefixed with copy-.
In Program.cs, in the
ConfigureWebJobsextension method, add theAddAzureStorageBlobsmethod on theHostBuilderinstance (before theBuildcommand) to initialize the Storage extension. At this point, theConfigureWebJobsmethod looks like this:builder.ConfigureWebJobs(b => { b.AddAzureStorageCoreServices(); b.AddAzureStorageQueues(); b.AddAzureStorageBlobs(); });Create a blob container in your storage account.
a. In the Azure portal, navigate to the Containers tab below Data storage and select + Container
b. In the New container dialog, enter container as the container name, and then select Create.
Upload the Program.cs file to the blob container. (This file is used here as an example; you could upload any text file and create a queue message with the file's name.)
a. Select the new container you created
b. Select the Upload button.
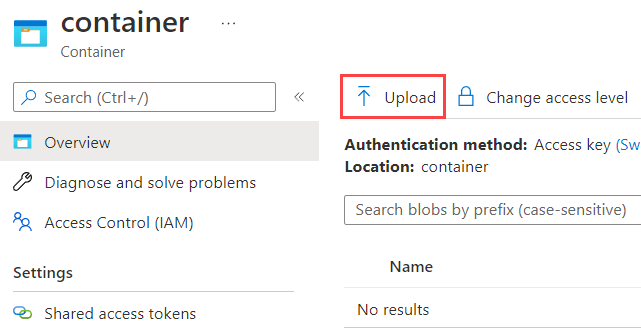
c. Find and select Program.cs, and then select OK.
Republish the project
In Solution Explorer, right-click the project and select Publish.
In the Publish dialog, make sure that the current profile is selected and then select Publish. Results of the publish are detailed in the Output window.
Create a queue message in the queue you created earlier, with Program.cs as the text of the message.
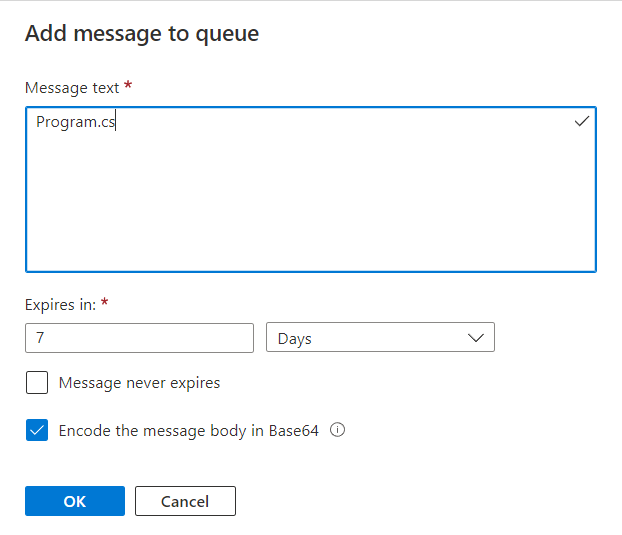
A copy of the file, copy-Program.cs, will appear in the blob container.
Next steps
This tutorial showed you how to create, run, and deploy a WebJobs SDK 3.x project.