Configure your App Service Environment with forced tunneling
Important
This article is about App Service Environment v2, which is used with Isolated App Service plans. App Service Environment v1 and v2 are retired as of 31 August 2024. There's a new version of App Service Environment that is easier to use and runs on more powerful infrastructure. To learn more about the new version, start with the Introduction to the App Service Environment. If you're currently using App Service Environment v1, please follow the steps in this article to migrate to the new version.
As of 31 August 2024, Service Level Agreement (SLA) and Service Credits no longer apply for App Service Environment v1 and v2 workloads that continue to be in production since they are retired products. Decommissioning of the App Service Environment v1 and v2 hardware has begun, and this may affect the availability and performance of your apps and data.
You must complete migration to App Service Environment v3 immediately or your apps and resources may be deleted. We will attempt to auto-migrate any remaining App Service Environment v1 and v2 on a best-effort basis using the in-place migration feature, but Microsoft makes no claim or guarantees about application availability after auto-migration. You may need to perform manual configuration to complete the migration and to optimize your App Service plan SKU choice to meet your needs. If auto-migration isn't feasible, your resources and associated app data will be deleted. We strongly urge you to act now to avoid either of these extreme scenarios.
If you need additional time, we can offer a one-time 30-day grace period for you to complete your migration. For more information and to request this grace period, review the grace period overview, and then go to Azure portal and visit the Migration blade for each of your App Service Environments.
For the most up-to-date information on the App Service Environment v1/v2 retirement, see the App Service Environment v1 and v2 retirement update.
The App Service Environment (ASE) is a deployment of Azure App Service in a customer's Azure Virtual Network. Many customers configure their Azure virtual networks to be extensions of their on-premises networks with VPNs or Azure ExpressRoute connections. Forced tunneling is when you redirect internet bound traffic to your VPN or a virtual appliance instead. Virtual appliances are often used to inspect and audit outbound network traffic.
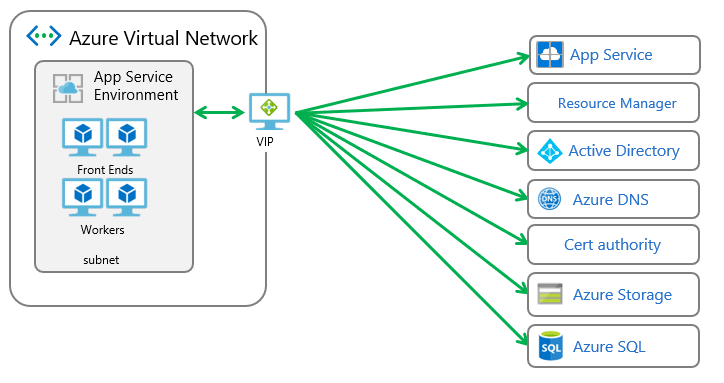
The ASE has a number of external dependencies, which are described in the App Service Environment network architecture document. Normally all ASE outbound dependency traffic must go through the VIP that is provisioned with the ASE. If you change the routing for the traffic to or from the ASE without following the information below, your ASE will stop working.
In an Azure virtual network, routing is done based on the longest prefix match (LPM). If there is more than one route with the same LPM match, a route is selected based on its origin in the following order:
- User-defined route (UDR)
- BGP route (when ExpressRoute is used)
- System route
To learn more about routing in a virtual network, read User-defined routes and IP forwarding.
If you want to route your ASE outbound traffic somewhere other than directly to the internet, you have the following choices:
- Enable your ASE to have direct internet access
- Configure your ASE subnet to ignore BGP routes
- Configure your ASE subnet to use Service Endpoints to Azure SQL and Azure Storage
- Add your own IPs to the ASE Azure SQL firewall
Enable your App Service Environment to have direct internet access
To enable your ASE to go directly to the internet even if your Azure virtual network is configured with ExpressRoute, you can:
- Configure ExpressRoute to advertise 0.0.0.0/0. By default, it routes all outbound traffic on-premises.
- Create a UDR with an address prefix of 0.0.0.0/0, a next hop type of Internet and apply it to the ASE subnet.
If you make these two changes, internet-destined traffic that originates from the App Service Environment subnet isn't forced down the ExpressRoute connection.
If the network is already routing traffic on premises, then you need to create the subnet to host your ASE and configure the UDR for it before attempting to deploy the ASE.
Important
The routes defined in a UDR must be specific enough to take precedence over any routes advertised by the ExpressRoute configuration. The preceding example uses the broad 0.0.0.0/0 address range. It can potentially be accidentally overridden by route advertisements that use more specific address ranges.
App Service Environments aren't supported with ExpressRoute configurations that cross-advertise routes from the Microsoft peering path to the private-peering path. ExpressRoute configurations with Microsoft peering configured receive route advertisements from Microsoft. The advertisements contain a large set of Microsoft Azure address ranges. If the address ranges are cross-advertised on the private-peering path, all outbound network packets from the App Service Environment's subnet are routed to a customer's on-premises network infrastructure. This network flow is not supported by default with App Service Environments. One solution to this problem is to stop cross-advertising routes from the Microsoft peering path to the private-peering path. Another solution is to enable your App Service Environment to work in a forced tunnel configuration.

Configure your ASE subnet to ignore BGP routes
You can configure your ASE subnet to ignore all BGP routes. When configured to ignore BGP routes, the ASE will be able to access its dependencies without any problems. You will need to create UDRs however to enable your apps to access on premises resources.
To configure your ASE subnet to ignore BGP routes:
- create a UDR and assign it to your ASE subnet if you did not have one already.
- In the Azure portal, open the UI for the route table assigned to your ASE subnet. Select Configuration. Set Virtual network gateway route propagation to Disabled. Click Save. The documentation on turning that off is in the Create a route table document.
After you configure the ASE subnet to ignore all BGP routes, your apps will no longer be able to reach on premises. To enable your apps to access resources on-premises, edit the UDR assigned to your ASE subnet and add routes for your on premises address ranges. The Next hop type should be set to Virtual network gateway.
Configure your ASE with Service Endpoints
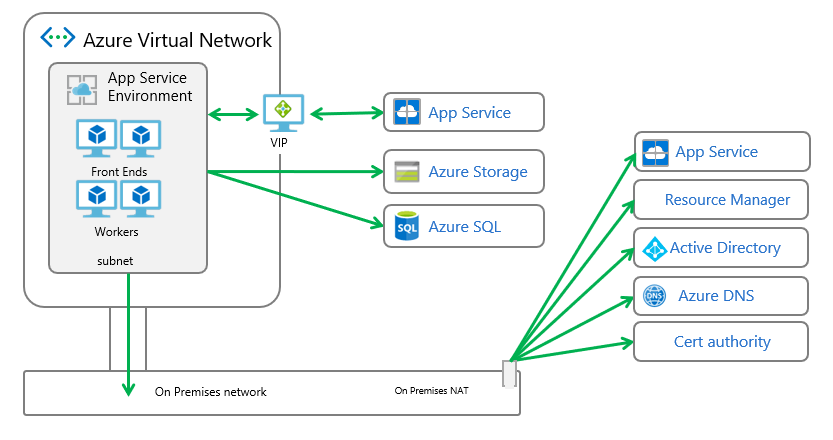
To route all outbound traffic from your ASE, except that which goes to Azure SQL and Azure Storage, perform the following steps:
Create a route table and assign it to your ASE subnet. Find the addresses that match your region here App Service Environment management addresses. Create routes for those addresses or use the AppServiceManagement service tag with a next hop of internet. These routes are needed because the App Service Environment inbound management traffic must reply from the same address it was sent to.
Enable Service Endpoints with Azure SQL and Azure Storage with your ASE subnet. After this step is completed, you can then configure your VNet with forced tunneling.
For details on deploying an ASE with a template, read Creating an App Service Environment using a template.
Service Endpoints enable you to restrict access to multi-tenant services to a set of Azure virtual networks and subnets. You can read more about Service Endpoints in the Virtual Network Service Endpoints documentation.
When you enable Service Endpoints on a resource, there are routes created with higher priority than all other routes. If you use Service Endpoints with a forced tunneled ASE, the Azure SQL and Azure Storage management traffic isn't forced tunneled. The other ASE dependency traffic is forced tunneled and can't be lost or the ASE would not function properly.
When Service Endpoints is enabled on a subnet with an Azure SQL instance, all Azure SQL instances connected to from that subnet must have Service Endpoints enabled. if you want to access multiple Azure SQL instances from the same subnet, you can't enable Service Endpoints on one Azure SQL instance and not on another. Azure Storage does not behave the same as Azure SQL. When you enable Service Endpoints with Azure Storage, you lock access to that resource from your subnet but can still access other Azure Storage accounts even if they do not have Service Endpoints enabled.
If you configure forced tunneling with a network filter appliance, then remember that the ASE has dependencies in addition to Azure SQL and Azure Storage. If traffic is blocked to those dependencies, the ASE will not function properly.

Add your own IPs to the ASE Azure SQL firewall
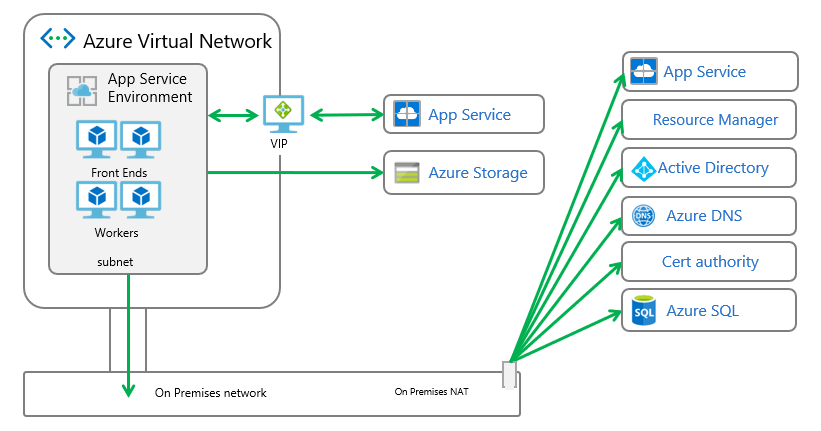
To tunnel all outbound traffic from your ASE, except that which goes to Azure Storage, perform the following steps:
Create a route table and assign it to your ASE subnet. Find the addresses that match your region here App Service Environment management addresses. Create routes for those addresses with a next hop of internet. These routes are needed because the App Service Environment inbound management traffic must reply from the same address it was sent to.
Enable Service Endpoints with Azure Storage with your ASE subnet
Get the addresses that will be used for all outbound traffic from your App Service Environment to the internet. If you're routing the traffic on premises, these addresses are your NATs or gateway IPs. If you want to route the App Service Environment outbound traffic through an NVA, the egress address is the public IP of the NVA.
To set the egress addresses in an existing App Service Environment: Go to resources.azure.com, and go to Subscription/<subscription id>/resourceGroups/<ase resource group>/providers/Microsoft.Web/hostingEnvironments/<ase name>. Then you can see the JSON that describes your App Service Environment. Make sure it says read/write at the top. Select Edit. Scroll down to the bottom. Change the userWhitelistedIpRanges value from null to something like the following. Use the addresses you want to set as the egress address range.
"userWhitelistedIpRanges": ["11.22.33.44/32", "55.66.77.0/24"]Select PUT at the top. This option triggers a scale operation on your App Service Environment and adjusts the firewall.
To create your ASE with the egress addresses: Follow the directions in Create an App Service Environment with a template and pull down the appropriate template. Edit the "resources" section in the azuredeploy.json file, but not in the "properties" block and include a line for userWhitelistedIpRanges with your values.
"resources": [
    {
        "apiVersion": "2015-08-01",
        "type": "Microsoft.Web/hostingEnvironments",
        "name": "[parameters('aseName')]",
        "kind": "ASEV2",
        "location": "[parameters('aseLocation')]",
        "properties": {
            "name": "[parameters('aseName')]",
            "location": "[parameters('aseLocation')]",
            "ipSslAddressCount": 0,
            "internalLoadBalancingMode": "[parameters('internalLoadBalancingMode')]",
            "dnsSuffix" : "[parameters('dnsSuffix')]",
            "virtualNetwork": {
                "Id": "[parameters('existingVnetResourceId')]",
                "Subnet": "[parameters('subnetName')]"
            },
            "userWhitelistedIpRanges":  ["11.22.33.44/32", "55.66.77.0/30"]
        }
    }
]
These changes send traffic to Azure Storage directly from the ASE and allow access to the Azure SQL from additional addresses other than the VIP of the ASE.

Preventing issues
If communication between the ASE and its dependencies is broken, the ASE will go unhealthy. If it remains unhealthy too long, then the ASE will become suspended. To unsuspend the ASE, follow the instructions in your ASE portal.
In addition to simply breaking communication, you can adversely affect your ASE by introducing too much latency. Too much latency can happen if your ASE is too far from your on premises network. Examples of too far would include going across an ocean or continent to reach the on premises network. Latency can also be introduced due to intranet congestion or outbound bandwidth constraints.