Configuring an App Service Environment v1
Important
This article is about App Service Environment v1. App Service Environment v1 and v2 are retired as of 31 August 2024. There's a new version of App Service Environment that is easier to use and runs on more powerful infrastructure. To learn more about the new version, start with the Introduction to the App Service Environment. If you're currently using App Service Environment v1, please follow the steps in this article to migrate to the new version.
As of 31 August 2024, Service Level Agreement (SLA) and Service Credits no longer apply for App Service Environment v1 and v2 workloads that continue to be in production since they are retired products. Decommissioning of the App Service Environment v1 and v2 hardware has begun, and this may affect the availability and performance of your apps and data.
You must complete migration to App Service Environment v3 immediately or your apps and resources may be deleted. We will attempt to auto-migrate any remaining App Service Environment v1 and v2 on a best-effort basis using the in-place migration feature, but Microsoft makes no claim or guarantees about application availability after auto-migration. You may need to perform manual configuration to complete the migration and to optimize your App Service plan SKU choice to meet your needs. If auto-migration isn't feasible, your resources and associated app data will be deleted. We strongly urge you to act now to avoid either of these extreme scenarios.
If you need additional time, we can offer a one-time 30-day grace period for you to complete your migration. For more information and to request this grace period, review the grace period overview, and then go to Azure portal and visit the Migration blade for each of your App Service Environments.
For the most up-to-date information on the App Service Environment v1/v2 retirement, see the App Service Environment v1 and v2 retirement update.
Overview
At a high level, an Azure App Service Environment consists of several major components:
- Compute resources that are running in the App Service Environment hosted service
- Storage
- A database
- A Classic(V1) or Resource Manager(V2) Azure Virtual Network (virtual network)
- A subnet with the App Service Environment hosted service running in it
Compute resources
You use the compute resources for your four resource pools. Each App Service Environment (ASE) has a set of front ends and three possible worker pools. You don't need to use all three worker pools--if you want, you can just use one or two.
The hosts in the resource pools (front ends and workers) aren't directly accessible to tenants. You can't use Remote Desktop Protocol (RDP) to connect to them, change their provisioning, or act as an admin on them.
You can set resource pool quantity and size. In an ASE, you have four size options, which are labeled P1 through P4. For details about those sizes and their pricing, see App Service pricing. Changing the quantity or size is called a scale operation. Only one scale operation can be in progress at a time.
Front ends: The front ends are the HTTP/HTTPS endpoints for your apps that are held in your ASE. You don't run workloads in the front ends.
- An ASE starts with two P2s, which is sufficient for dev/test workloads and low-level production workloads. We strongly recommend P3s for moderate to heavy production workloads.
- For moderate to heavy production workloads, we recommend that you have at least four P3s to ensure there are sufficient front ends running when scheduled maintenance occurs. Scheduled maintenance activities bring down one front end at a time. This reduces overall available front-end capacity during maintenance activities.
- Front ends can take up to an hour to deploy.
- For further scale fine-tuning, you should monitor the CPU percentage, Memory percentage and Active Requests metrics for the front-end pool. If the CPU or Memory percentages are above 70 percent when running P3s, add more front ends. If the Active Requests value averages out to 15,000 to 20,000 requests per front end, you should also add more front ends. The overall goal is to keep CPU and Memory percentages below 70%, and Active Requests averaging out to below 15,000 requests per front end when you're running P3s.
Workers: The workers are where your apps run. When you scale up your App Service plans, that uses up workers in the associated worker pool.
- You can't instantly add workers. They might take up to an hour to deploy.
- Scaling the size of a compute resource for any pool takes < 1 hour per update domain. There are 20 update domains in an ASE. If you scaled the compute size of a worker pool with 10 instances, it could take up to 10 hours to complete.
- If you change the size of the compute resources that are used in a worker pool, you'll cause cold starts of the apps that are running in that worker pool.
The fastest way to change the compute resource size of a worker pool that isn't running any apps is to:
- Scale down the quantity of workers to 2. The minimum scale down size in the portal is 2. It will take a few minutes to deallocate your instances.
- Select the new compute size and number of instances. From here, it will take up to 2 hours to complete.
If your apps require a larger compute resource size, you can't take advantage of the previous guidance. Instead of changing the size of the worker pool that is hosting those apps, you can populate another worker pool with workers of the desired size and move your apps over to that pool.
- Create the additional instances of the needed compute size in another worker pool. This will take up to an hour to complete.
- Reassign your App Service plans that are hosting the apps that need a larger size to the newly configured worker pool. This is a fast operation that should take less than a minute to complete.
- Scale down the first worker pool if you don't need those unused instances anymore. This operation takes a few minutes to complete.
Autoscaling: One of the tools that can help you to manage your compute resource consumption is autoscaling. You can use autoscaling for front-end or worker pools. You can do things such as increase your instances of any pool type in the morning and reduce it in the evening. Or perhaps you can add instances when the number of workers that are available in a worker pool drops below a certain threshold.
If you want to set autoscale rules around compute resource pool metrics, then keep in mind the time that provisioning requires. For more information about autoscaling App Service Environments, see How to configure autoscale in an App Service Environment.
Storage
Each ASE is configured with 500 GB of storage. This space is used across all the apps in the ASE. This storage space is a part of the ASE and currently can't be switched to use your storage space. If you're making adjustments to your virtual network routing or security, you need to still allow access to Azure Storage--or the ASE can't function.
Database
The database holds the information that defines the environment, and the details about the apps that are running within it. This too is a part of the Azure-held subscription. It's not something that you have a direct ability to manipulate. If you're making adjustments to your virtual network routing or security, you need to still allow access to SQL Azure--or the ASE can't function.
Network
The virtual network that is used with your ASE can be one that you made when you created the ASE or one that you made ahead of time. When you create the subnet during ASE creation, it forces the ASE to be in the same resource group as the virtual network. If you need the resource group used by your ASE to be different than that of your virtual network, then you need to create your ASE using an Azure Resource Manager template.
There are some restrictions on the virtual network that is used for an ASE:
- The virtual network must be a regional virtual network.
- There needs to be a subnet with eight or more addresses where the ASE is deployed.
- After a subnet is used to host an ASE, the address range of the subnet can't be changed. For this reason, we recommend that the subnet contains at least 64 addresses to accommodate any future ASE growth.
- There can be nothing else in the subnet but the ASE.
Unlike the hosted service that contains the ASE, the virtual network and subnet are under user control. You can administer your virtual network through the Virtual Network UI or PowerShell. An ASE can be deployed in a Classic or Resource Manager virtual network. The portal and API experiences are slightly different between Classic and Resource Manager VNets but the ASE experience is the same.
The virtual network that is used to host an ASE can use either private RFC1918 IP addresses or it can use public IP addresses. If you wish to use an IP range that isn't covered by RFC1918 (10.0.0.0/8, 172.16.0.0/12, 192.168.0.0/16) then you need to create your virtual network and subnet to be used by your ASE ahead of ASE creation.
Because this capability places the Azure App Service into your virtual network, it means that your apps that are hosted in your ASE can now access resources that are made available through ExpressRoute or site-to-site virtual private networks (VPNs) directly. The apps that are within your App Service Environment don't require extra networking features to access resources available to the virtual network that is hosting your App Service Environment. This means that you don't need to use virtual network Integration or Hybrid Connections to get to resources in or connected to your virtual network. You can still use both of those features though to access resources in networks that aren't connected to your virtual network.
For example, you can use virtual network Integration to integrate with a virtual network that is in your subscription but isn't connected to the virtual network that your ASE is in. You can still also use Hybrid Connections to access resources that are in other networks, just like you normally can.
If you do have your virtual network configured with an ExpressRoute VPN, you should be aware of some of the routing needs that an ASE has. There are some user-defined route (UDR) configurations that are incompatible with an ASE. For more information about running an ASE in a virtual network with ExpressRoute, see Running an App Service Environment in a virtual network with ExpressRoute.
Securing inbound traffic
There are two primary methods to control inbound traffic to your ASE. You can use Network Security Groups(NSGs) to control what IP addresses can access your ASE as described here How to control inbound traffic in an App Service Environment and you can also configure your ASE with an Internal Load Balancer(ILB). These features can also be used together if you want to restrict access using NSGs to your ILB ASE.
When you create an ASE, it will create a VIP in your virtual network. There are two VIP types, external and internal. When you create an ASE with an external VIP then your apps in your ASE will be accessible via an internet routable IP address. When you select Internal your ASE will be configured with an ILB and won't be directly internet accessible. An ILB ASE still requires an external VIP but it's only used for Azure management and maintenance access.
During ILB ASE creation you provide the subdomain used by the ILB ASE and will have to manage your own DNS for the subdomain you specify. Because you set the subdomain name, you also need to manage the certificate used for HTTPS access. After ASE creation, you're prompted to provide the certificate. To learn more about creating and using an ILB ASE read How to Create an ASEv1 from template.
Portal
You can manage and monitor your App Service Environment by using the UI in the Azure portal. If you have an ASE, then you're likely to see the App Service symbol on your sidebar. This symbol is used to represent App Service Environments in the Azure portal:
![]()
To open the UI that lists all of your App Service Environments, you can use the icon or select the chevron (">" symbol) at the bottom of the sidebar to select App Service Environments. By selecting one of the ASEs listed, you open the UI that is used to monitor and manage it.
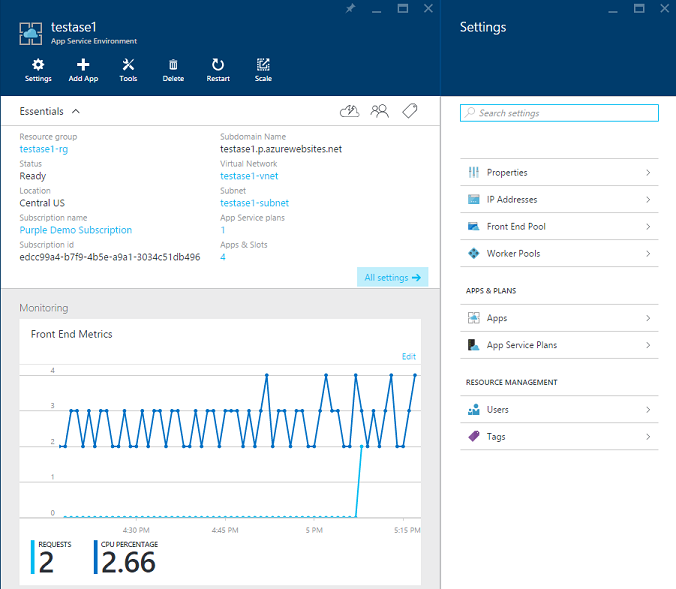
This first blade shows some properties of your ASE, along with a metric chart per resource pool. Some of the properties that are shown in the Essentials block are also hyperlinks that will open up the blade that is associated with it. For example, you can select the Virtual Network name to open up the UI associated with the virtual network that your ASE is running in. App Service plans and Apps each open up blades that list these items that are in your ASE.
Monitoring
The charts allow you to see a variety of performance metrics in each resource pool. For the front-end pool, you can monitor the average CPU and memory. For worker pools, you can monitor the quantity that is used and the quantity that is available.
Multiple App Service plans can make use of the workers in a worker pool. The workload isn't distributed in the same fashion as with the front-end servers, so the CPU and memory usage don't provide much in the way of useful information. It's more important to track how many workers that you have used and are available--especially if you're managing this system for others to use.
You can also use all of the metrics that can be tracked in the charts to set up alerts. Setting up alerts here works the same as elsewhere in App Service. You can set an alert from either the Alerts UI part or from drilling into any metrics UI and selecting Add Alert.
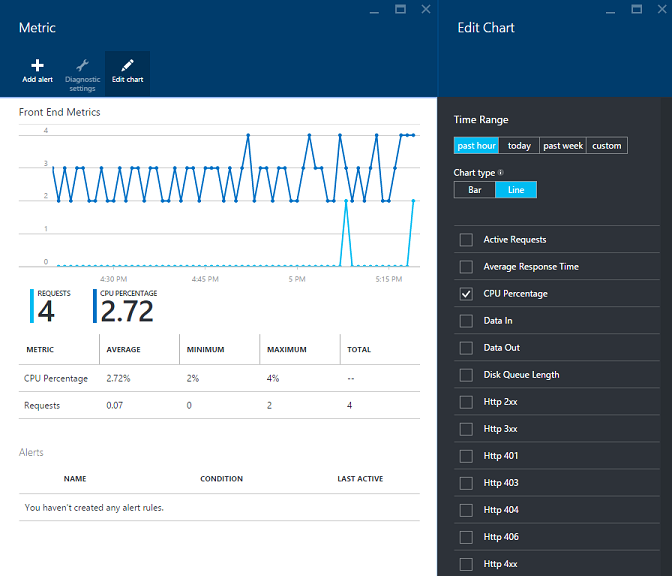
The metrics that were discussed are the App Service Environment metrics. There are also metrics that are available at the App Service plan level. This is where monitoring CPU and memory makes a lot of sense.
In an ASE, all of the App Service plans are dedicated App Service plans. That means that the only apps that are running on the hosts allocated to that App Service plan are the apps in that App Service plan. To see details on your App Service plan, bring up your App Service plan from any of the lists in the ASE UI or from Browse App Service plans (which lists all of them).
Settings
Within the ASE blade, there's a Settings section that contains several important capabilities:
Settings > Properties: The Settings blade automatically opens when you bring up your ASE blade. At the top is Properties. There are many items in here that are redundant to what you see in Essentials, but what is useful is Virtual IP Address, and Outbound IP Addresses.
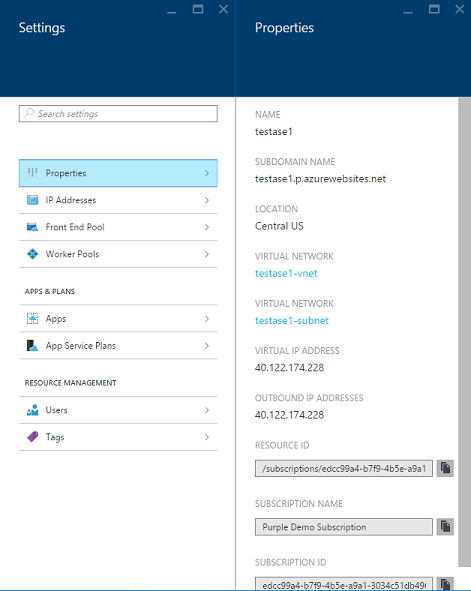
Settings > IP Addresses: When you create an IP Secure Sockets Layer (SSL) app in your ASE, you need an IP SSL address. In order to obtain one, your ASE needs IP SSL addresses that it owns that can be allocated. When an ASE is created, it has one IP SSL address for this purpose, but you can add more. There's a charge for extra IP SSL addresses, as shown in App Service pricing (in the section on SSL connections). The additional price is the IP SSL price.
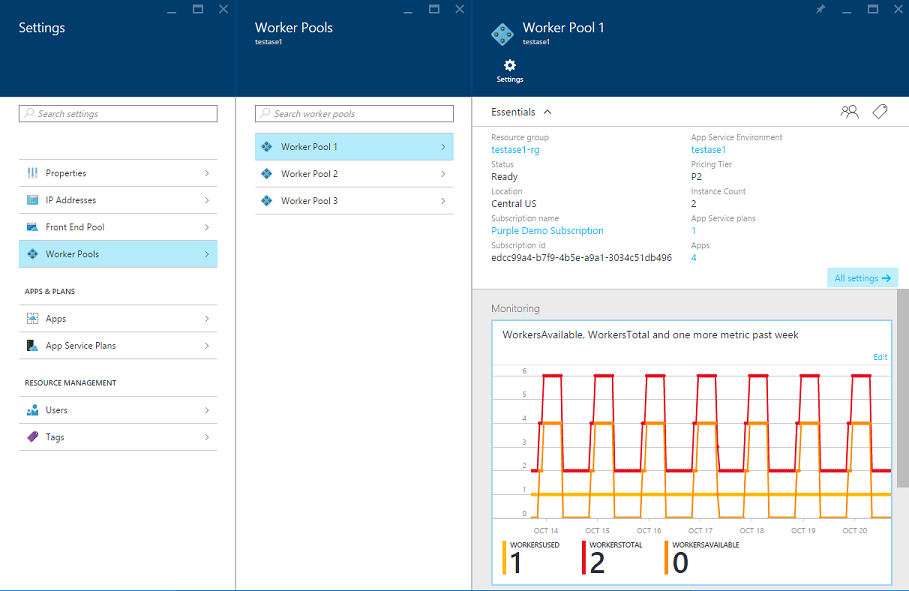
Settings > Front End Pool / Worker Pools: Each of these resource pool blades offers the ability to see information only on that resource pool, in addition to providing controls to fully scale that resource pool.
The base blade for each resource pool provides a chart with metrics for that resource pool. Just like with the charts from the ASE blade, you can go into the chart and set up alerts as desired. Setting an alert from the ASE blade for a specific resource pool does the same thing as doing it from the resource pool. From the worker pool Settings blade, you have access to all the Apps or App Service plans that are running in this worker pool.
Portal scale capabilities
There are three scale operations:
- Changing the number of IP addresses in the ASE that are available for IP SSL usage.
- Changing the size of the compute resource that is used in a resource pool.
- Changing the number of compute resources that are used in a resource pool, either manually or through autoscaling.
In the portal, there are three ways to control how many servers that you have in your resource pools:
- A scale operation from the main ASE blade at the top. You can make multiple scale configuration changes to the front-end and worker pools. They're all applied as a single operation.
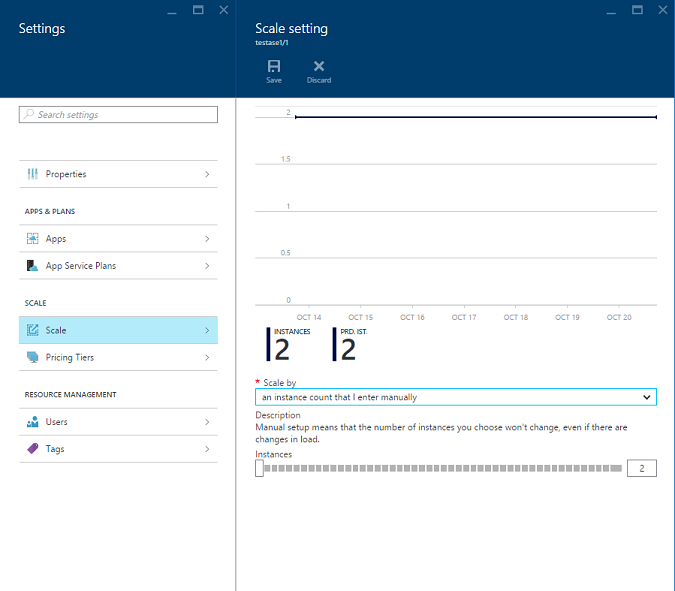
- A manual scale operation from the individual resource pool Scale blade, which is under Settings.
- Autoscaling, which you set up from the individual resource pool Scale blade.
To use the scale operation on the ASE blade, drag the slider to the quantity you want and save. This UI also supports changing the size.
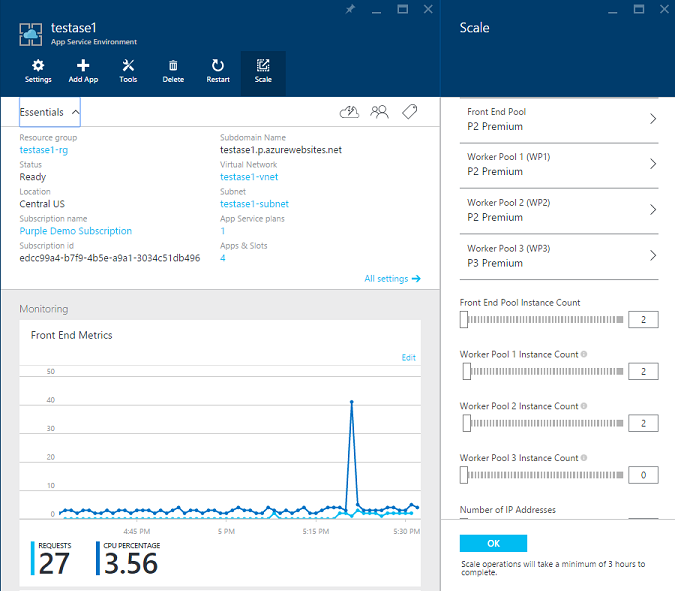
To use the manual or autoscale capabilities in a specific resource pool, go to Settings > Front End Pool / Worker Pools as appropriate. Then open up the pool that you want to change. Go to Settings > Scale Out or Settings > Scale Up. The Scale Out blade enables you to control instance quantity. Scale Up enables you to control resource size.
Fault-tolerance considerations
You can configure an App Service Environment to use up to 55 total compute resources. Of those 55 compute resources, only 50 can be used to host workloads. The reason for this is twofold. There's a minimum of two front-end compute resources. That leaves up to 53 to support the worker-pool allocation. In order to provide fault tolerance, you need to have an additional compute resource that is allocated according to the following rules:
- Each worker pool needs at least one additional compute resource that isn't available to be assigned a workload.
- When the quantity of compute resources in a worker pool goes above a certain value, then another compute resource is required for fault tolerance. This isn't the case in the front-end pool.
Within any single worker pool, the fault-tolerance requirements are that for a given value of X resources assigned to a worker pool:
- If X is between 2 and 20, the amount of usable compute resources that you can use for workloads is X-1.
- If X is between 21 and 40, the amount of usable compute resources that you can use for workloads is X-2.
- If X is between 41 and 53, the amount of usable compute resources that you can use for workloads is X-3.
The minimum footprint has two front-end servers and two workers. With the above statements then, here are a few examples to clarify:
- If you have 30 workers in a single pool, then 28 of them can be used to host workloads.
- If you have two workers in a single pool, then 1 can be used to host workloads.
- If you have 20 workers in a single pool, then 19 can be used to host workloads.
- If you have 21 workers in a single pool, then still only 19 can be used to host workloads.
The fault-tolerance aspect is important, but you need to keep it in mind as you scale above certain thresholds. If you want to add more capacity going from 20 instances, then go to 22 or higher because 21 doesn't add any more capacity. The same is true going above 40, where the next number that adds capacity is 42.
Deleting an App Service Environment
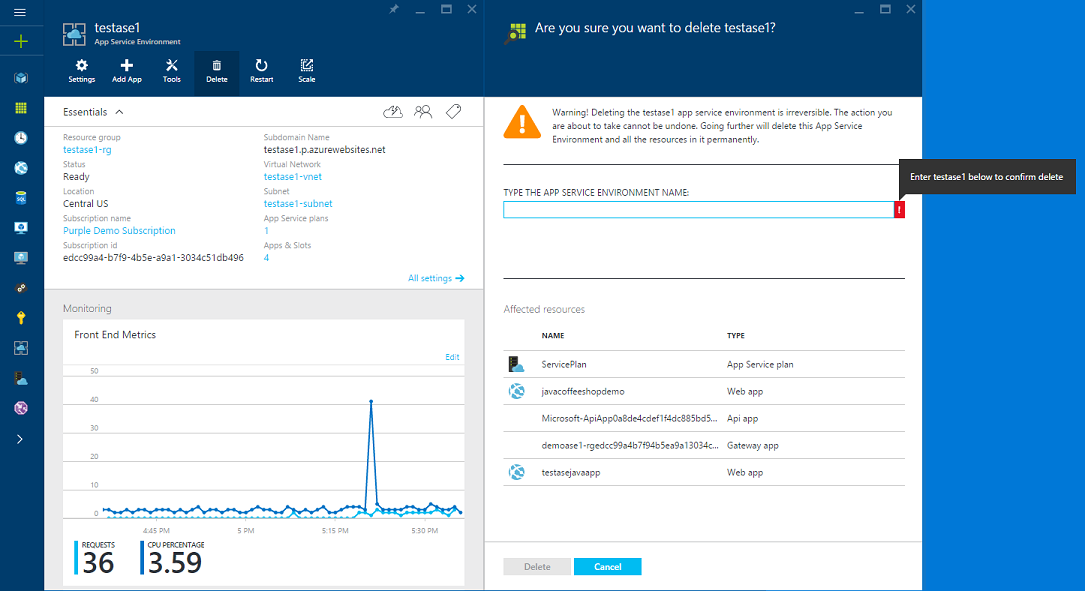
If you want to delete an App Service Environment, then simply use the Delete action at the top of the App Service Environment blade. When you do this, you'll be prompted to enter the name of your App Service Environment to confirm that you really want to do this. Note that when you delete an App Service Environment, you delete all of the content within it as well.
Getting started
To get started with App Service Environments, see How to Create an ASEv1 from template.
Note
If you want to get started with Azure App Service before signing up for an Azure account, go to Try App Service, where you can immediately create a short-lived starter web app in App Service. No credit cards required; no commitments.