How to authorize test console of developer portal by configuring OAuth 2.0 user authorization
APPLIES TO: Developer | Basic | Basic v2 | Standard | Standard v2 | Premium | Premium v2
Many APIs support OAuth 2.0 to secure the API and ensure that only valid users have access, and they can only access resources to which they're entitled. To use Azure API Management's interactive developer console with such APIs, the service allows you to configure an external provider for OAuth 2.0 user authorization.
Configuring OAuth 2.0 user authorization in the test console of the developer portal provides developers with a convenient way to acquire an OAuth 2.0 access token. From the test console, the token is then passed to the backend with the API call. Token validation must be configured separately - either using a JWT validation policy, or in the backend service.
Prerequisites
- An API Management instance.
- An OAuth 2.0 provider.
This article shows you how to configure your API Management service instance to use OAuth 2.0 authorization in the developer portal's test console, but it doesn't show you how to configure an OAuth 2.0 provider.
If you haven't yet created an API Management service instance, see Create an API Management service instance.
Scenario overview
Configuring OAuth 2.0 user authorization in API Management only enables the developer portal's test console (and the test console in the Azure portal) as a client to acquire a token from the authorization server. The configuration for each OAuth 2.0 provider is different, although the steps are similar, and the required pieces of information used to configure OAuth 2.0 in your API Management service instance are the same. This article shows an example using Microsoft Entra ID as an OAuth 2.0 provider.
The following are the high level configuration steps:
Register an application (backend-app) in Microsoft Entra ID to represent the API.
Register another application (client-app) in Microsoft Entra ID to represent a client application that needs to call the API - in this case, the test console of the developer portal.
In Microsoft Entra ID, grant permissions to allow the client-app to call the backend-app.
Configure the test console in the developer portal to call an API using OAuth 2.0 user authorization.
Configure an API to use OAuth 2.0 user authorization.
Add a policy to pre-authorize the OAuth 2.0 token for every incoming request. You can use the
validate-jwtpolicy for any OAuth 2.0 provider.
This configuration supports the following OAuth flow:
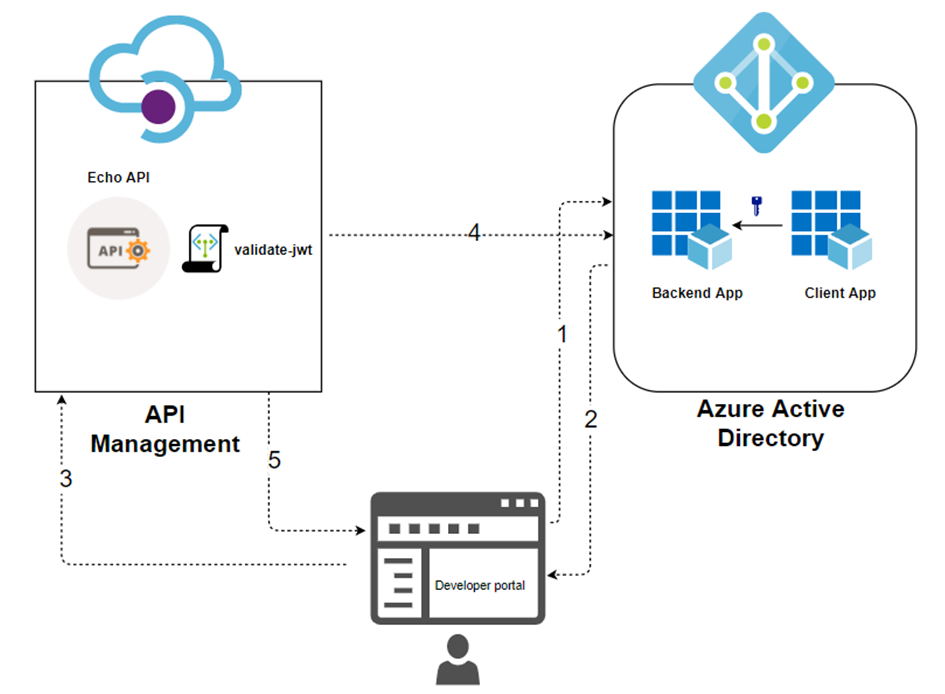
The developer portal requests a token from Microsoft Entra ID using the client-app credentials.
After successful validation, Microsoft Entra ID issues the access/refresh token.
A developer (user of the developer portal) makes an API call with the authorization header.
The token gets validated with the OAuth 2.0 provider by using the
validate-jwtpolicy. For the Microsoft Entra ID provider, API Management also provides thevalidate-azure-ad-tokenpolicy.Based on the validation result, the developer will receive the response in the developer portal.
Authorization grant types
Azure API Management supports the following OAuth 2.0 grant types (flows). A grant type refers to a way for a client application (in this context, the test console in the developer portal) to obtain an access token to your backend API. You may configure one or more grant types, depending on your OAuth 2.0 provider and scenarios.
The following is a high level summary. For more information about grant types, see the OAuth 2.0 Authorization Framework and OAuth grant types.
| Grant type | Description | Scenarios |
|---|---|---|
| Authorization code | Exchanges authorization code for token | Server-side apps such as web apps |
| Authorization code + PKCE | Enhancement to authorization code flow that creates a code challenge that is sent with authorization request | Mobile and public clients that can't protect a secret or token |
| Implicit (deprecated) | Returns access token immediately without an extra authorization code exchange step | Clients that can't protect a secret or token such as mobile apps and single-page apps Generally not recommended because of inherent risks of returning access token in HTTP redirect without confirmation that it's received by client |
| Resource owner password | Requests user credentials (username and password), typically using an interactive form | For use with highly trusted applications Should only be used when other, more secure flows can't be used |
| Client credentials | Authenticates and authorizes an app rather than a user | Machine-to-machine applications that don't require a specific user's permissions to access data, such as CLIs, daemons, or services running on your backend |
Security considerations
Consider how the grant type generates a token, the token's scope, and how the token could be exposed. A compromised token could be used by a malicious actor to access additional resources within the token's scope.
When configuring OAuth 2.0 user authorization in the test console of the developer portal:
Limit the token's scope to the minimum needed for developers to test the APIs. Limit the scope to the test console, or to the affected APIs. The steps to configure token scope depend on your OAuth 2.0 provider. An example is shown later in this article using Microsoft Entra ID.
Depending on your scenarios, you may configure more or less restrictive token scopes for other client applications that you create to access backend APIs.
Take extra care if you enable the Client Credentials flow. The test console in the developer portal, when working with the Client Credentials flow, doesn't ask for credentials. An access token could be inadvertently exposed to developers or anonymous users of the developer console.
Keeping track of key information
Throughout this tutorial you'll be asked to record key information to reference later on:
- Backend Application (client) ID: The GUID of the application that represents the backend API
- Backend Application Scopes: One or more scopes you may create to access the API. The scope format is
api://<Backend Application (client) ID>/<Scope Name>(for example, api://1764e900-1827-4a0b-9182-b2c1841864c2/Read) - Client Application (client) ID: The GUID of the application that represents the developer portal
- Client Application Secret Value: The GUID that serves as the secret for interaction with the client application in Microsoft Entra ID
Register applications with the OAuth server
You'll need to register two applications with your OAuth 2.0 provider: one represents the backend API to be protected, and a second represents the client application that calls the API - in this case, the test console of the developer portal.
The following are example steps using Microsoft Entra ID as the OAuth 2.0 provider. For details about app registration, see Quickstart: Configure an application to expose a web API.
Register an application in Microsoft Entra ID to represent the API
In the Azure portal, search for and select App registrations.
Select New registration.
When the Register an application page appears, enter your application's registration information:
- In the Name section, enter a meaningful application name that will be displayed to users of the app, such as backend-app.
- In the Supported account types section, select an option that suits your scenario.
Leave the Redirect URI section empty. Later, you'll add a redirect URI generated in the OAuth 2.0 configuration in API Management.
Select Register to create the application.
On the app Overview page, find the Application (client) ID value and record it for later.
Under the Manage section of the side menu, select Expose an API and set the Application ID URI with the default value. Record this value for later.
Select the Add a scope button to display the Add a scope page:
- Enter a Scope name for a scope that's supported by the API (for example, Files.Read).
- In Who can consent?, make a selection for your scenario, such as Admins and users. Select Admins only for higher privileged scenarios.
- Enter Admin consent display name and Admin consent description.
- Make sure the Enabled scope state is selected.
Select the Add scope button to create the scope.
Repeat the previous two steps to add all scopes supported by your API.
Once the scopes are created, make a note of them for use in a subsequent step.
Register another application in Microsoft Entra ID to represent a client application
Register every client application that calls the API as an application in Microsoft Entra ID.
In the Azure portal, search for and select App registrations.
Select New registration.
When the Register an application page appears, enter your application's registration information:
- In the Name section, enter a meaningful application name that will be displayed to users of the app, such as client-app.
- In the Supported account types section, select an option that suits your scenario.
In the Redirect URI section, select Web and leave the URL field empty for now.
Select Register to create the application.
On the app Overview page, find the Application (client) ID value and record it for later.
Create a client secret for this application to use in a subsequent step.
- Under the Manage section of the side menu, select Certificates & secrets.
- Under Client secrets, select + New client secret.
- Under Add a client secret, provide a Description and choose when the key should expire.
- Select Add.
When the secret is created, note the key value for use in a subsequent step. You can't access the secret again in the portal.
Grant permissions in Microsoft Entra ID
Now that you've registered two applications to represent the API and the test console, grant permissions to allow the client-app to call the backend-app.
In the Azure portal, search for and select App registrations.
Choose your client-app. Then in the side menu, select API permissions.
Select + Add a permission.
Under Select an API, select My APIs, and then find and select your backend-app (the app registration for your backend API).
Select Delegated Permissions, then select the appropriate permissions to your backend-app.
Select Add permissions.
Optionally:
Navigate to your client-app's API permissions page.
Select Grant admin consent for <your-tenant-name> to grant consent on behalf of all users in this directory.
Configure an OAuth 2.0 authorization server in API Management
In the Azure portal, navigate to your API Management instance.
Under Developer portal in the side menu, select OAuth 2.0 + OpenID Connect.
Under the OAuth 2.0 tab, select + Add.
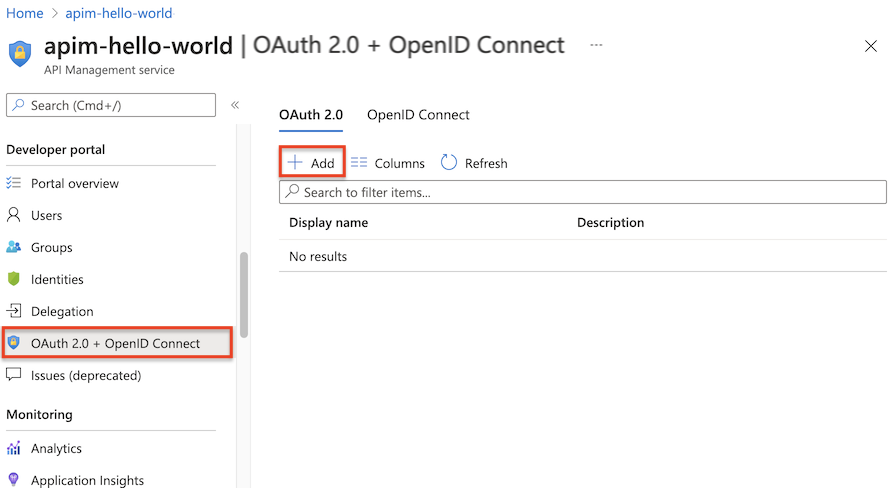
Enter a name and an optional description in the Name and Description fields.
Note
These fields identify the OAuth 2.0 authorization server within the current API Management service. Their values do not come from the OAuth 2.0 server.
Enter the Client registration page URL - for example,
https://contoso.com/login. This page is where users can create and manage their accounts, if your OAuth 2.0 provider supports user management of accounts. The page varies depending on the OAuth 2.0 provider used.If your OAuth 2.0 provider doesn't have user management of accounts configured, enter a placeholder URL here such as the URL of your company, or a URL such as
http://localhost.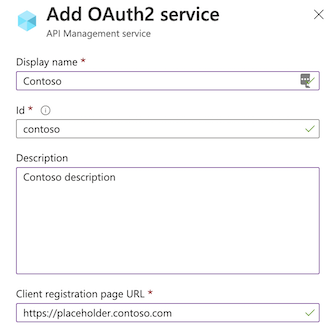
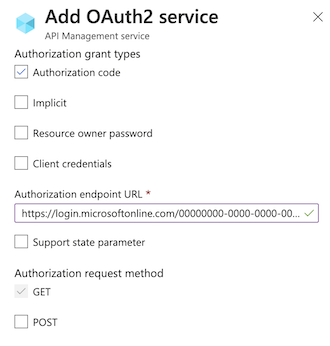
The next section of the form contains the Authorization grant types, Authorization endpoint URL, and Authorization request method settings.
Select one or more desired Authorization grant types. For this example, select Authorization code (the default). Learn more
Enter the Authorization endpoint URL. You can obtain the endpoint URL from the Endpoints page of one of your app registrations. For a single-tenant app in Microsoft Entra ID, this URL will be similar to one of the following URLs, where
{aad-tenant}is replaced with the ID of your Microsoft Entra tenant.Using the v2 endpoint is recommended; however, API Management supports both v1 and v2 endpoints.
https://login.microsoftonline.com/{aad-tenant}/oauth2/v2.0/authorize(v2)https://login.microsoftonline.com/{aad-tenant}/oauth2/authorize(v1)The Authorization request method specifies how the authorization request is sent to the OAuth 2.0 server. Select POST.
Specify Token endpoint URL, Client authentication methods, Access token sending method, and Default scope.
Enter the Token endpoint URL. For a single tenant app in Microsoft Entra ID, it will be similar to one of the following URLs, where
{aad-tenant}is replaced with the ID of your Microsoft Entra tenant. Use the same endpoint version (v2 or v1) that you chose previously.https://login.microsoftonline.com/{aad-tenant}/oauth2/v2.0/token(v2)https://login.microsoftonline.com/{aad-tenant}/oauth2/token(v1)If you use v1 endpoints, add a body parameter:
* Name: resource.
* Value: the back-end app Application (client) ID.If you use v2 endpoints:
* Enter the back-end app scope you created in the Default scope field.
* Set the value for theaccessTokenAcceptedVersionproperty to2in the application manifest for both the backend-app and the client-app registrations.Accept the default settings for Client authentication methods and Access token sending method.
In Client credentials, enter the Client ID and Client secret, which you obtained during the creation and configuration process of your client-app.
After the Client ID and Client secret are specified, the Redirect URI for the authorization code is generated. This URI is used to configure the redirect URI in your OAuth 2.0 server configuration.
In the developer portal, the URI suffix is of the form:
/signin-oauth/code/callback/{authServerName}for authorization code grant flow/signin-oauth/implicit/callbackfor implicit grant flow
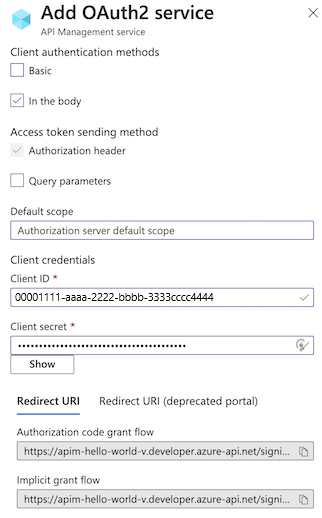
Copy the appropriate Redirect URI to the Authentication page of your client-app registration. In the app registration, select Authentication > + Add a platform > Web, and then enter the Redirect URI.
If Authorization grant types is set to Resource owner password, the Resource owner password credentials section is used to specify those credentials; otherwise you can leave it blank.
Select Create to save the API Management OAuth 2.0 authorization server configuration.
Republish the developer portal.
Important
When making OAuth 2.0-related changes, be sure to republish the developer portal after every modification as relevant changes (for example, scope change) otherwise cannot propagate into the portal and subsequently be used in trying out the APIs.
Configure an API to use OAuth 2.0 user authorization
After saving the OAuth 2.0 server configuration, configure an API or APIs to use this configuration.
Important
- Configuring OAuth 2.0 user authorization settings for an API enables API Management to acquire a token from the authorization server when you use the test console in the Azure portal or developer portal. The authorization server settings are also added to the API definition and documentation.
- For OAuth 2.0 authorization at runtime, the client app must acquire and present the token and you need to configure token validation in API Management or the backend API. For an example, see Protect an API in Azure API Management using OAuth 2.0 authorization with Microsoft Entra ID.
Select APIs from the API Management menu on the left.
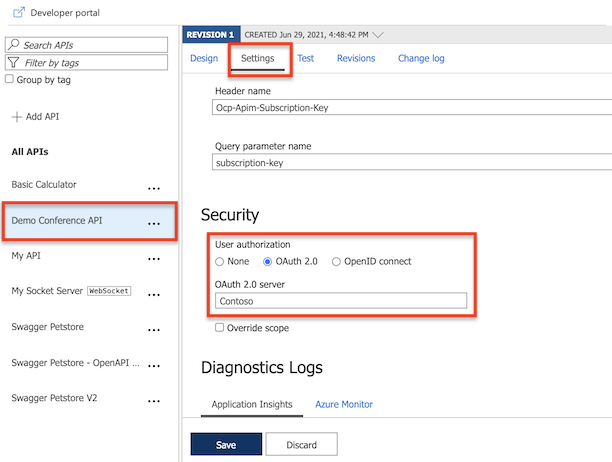
Select the name of the desired API and select the Settings tab. Scroll to the Security section, and then select OAuth 2.0.
Select the desired Authorization server from the drop-down list, and select Save.
Developer portal - test the OAuth 2.0 user authorization
Once you've configured your OAuth 2.0 authorization server and configured your API to use that server, you can test it by going to the developer portal and calling an API.
Select Developer portal in the top menu from your Azure API Management instance Overview page.
Browse to any operation under the API in the developer portal.
Select Try it to bring you to the developer console.
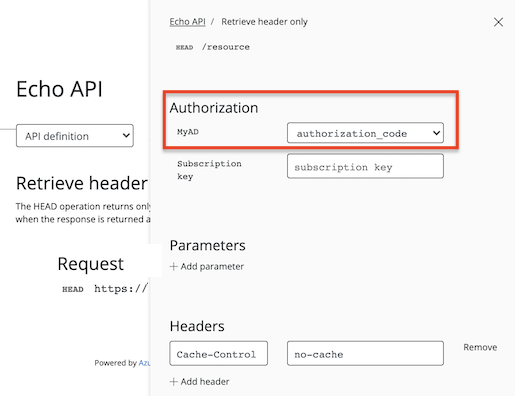
Note a new item in the Authorization section, corresponding to the authorization server you just added.
Select Authorization code from the authorization drop-down list.
Once prompted, sign in to the Microsoft Entra tenant.
- If you are already signed into the account, you might not be prompted.
After successful sign-in, an
Authorizationheader is added to the request, with an access token from Microsoft Entra ID. The following is an abbreviated sample token (Base64 encoded):Authorization: Bearer eyJ0eXAiOi[...]3pkCfvEOyAConfigure the desired values for the remaining parameters, and select Send to call the API.
Configure a JWT validation policy to pre-authorize requests
In the configuration so far, API Management doesn't validate the access token. It only passes the token in the authorization header to the backend API.
To pre-authorize requests, configure a validate-jwt policy to validate the access token of each incoming request. If a request doesn't have a valid token, API Management blocks it. When you use the Microsoft Entra ID provider, you can also use the validate-azure-ad-token policy.
The following example policy, when added to the <inbound> policy section, checks the value of the audience claim in an access token obtained from Microsoft Entra ID that is presented in the Authorization header. It returns an error message if the token is not valid. Configure this policy at a policy scope that's appropriate for your scenario.
- In the
openid-configURL, theaad-tenantis the tenant ID in Microsoft Entra ID. Find this value in the Azure portal, for example, on the Overview page of your Microsoft Entra resource. The example shown assumes a single-tenant Microsoft Entra app and a v2 configuration endpoint. - The value of the
claimis the client ID of the backend-app you registered in Microsoft Entra ID.
<validate-jwt header-name="Authorization" failed-validation-httpcode="401" failed-validation-error-message="Unauthorized. Access token is missing or invalid.">
    <openid-config url="https://login.microsoftonline.com/{aad-tenant}/v2.0/.well-known/openid-configuration" />
    <audiences>
        <audience>{audience-value - (ex:api://guid)}</audience>
    </audiences>
    <issuers>
        <issuer>{issuer-value - (ex: https://sts.windows.net/{tenant id}/)}</issuer>
    </issuers>
    <required-claims>
        <claim name="aud">
            <value>{backend-app-client-id}</value>
        </claim>
    </required-claims>
</validate-jwt>
Note
The preceding openid-config URL corresponds to the v2 endpoint. For the v1 openid-config endpoint, use https://login.microsoftonline.com/{aad-tenant}/.well-known/openid-configuration.
For information on how to configure policies, see Set or edit policies. Refer to the validate-jwt reference for more customization on JWT validations. To validate a JWT that was provided by the Microsoft Entra service, API Management also provides the validate-azure-ad-token policy.
Related content
For more information about using OAuth 2.0 and API Management, see Protect a web API backend in Azure API Management using OAuth 2.0 authorization with Microsoft Entra ID.
Learn more about Microsoft identity platform and OAuth 2.0 authorization code flow