Tutorial: Create and publish a product
APPLIES TO: All API Management tiers
In Azure API Management, a product contains one or more APIs, a usage quota, and the terms of use. After a product is published, developers can subscribe to the product and begin to use the product's APIs.
In this tutorial, you learn how to:
- Create and publish a product
- Add an API to the product
- Access product APIs

Prerequisites
- Learn the Azure API Management terminology.
- Complete the following quickstart: Create an Azure API Management instance.
- Also, complete the following tutorial: Import and publish your first API.
Create and publish a product
Sign in to the Azure portal, and navigate to your API Management instance.
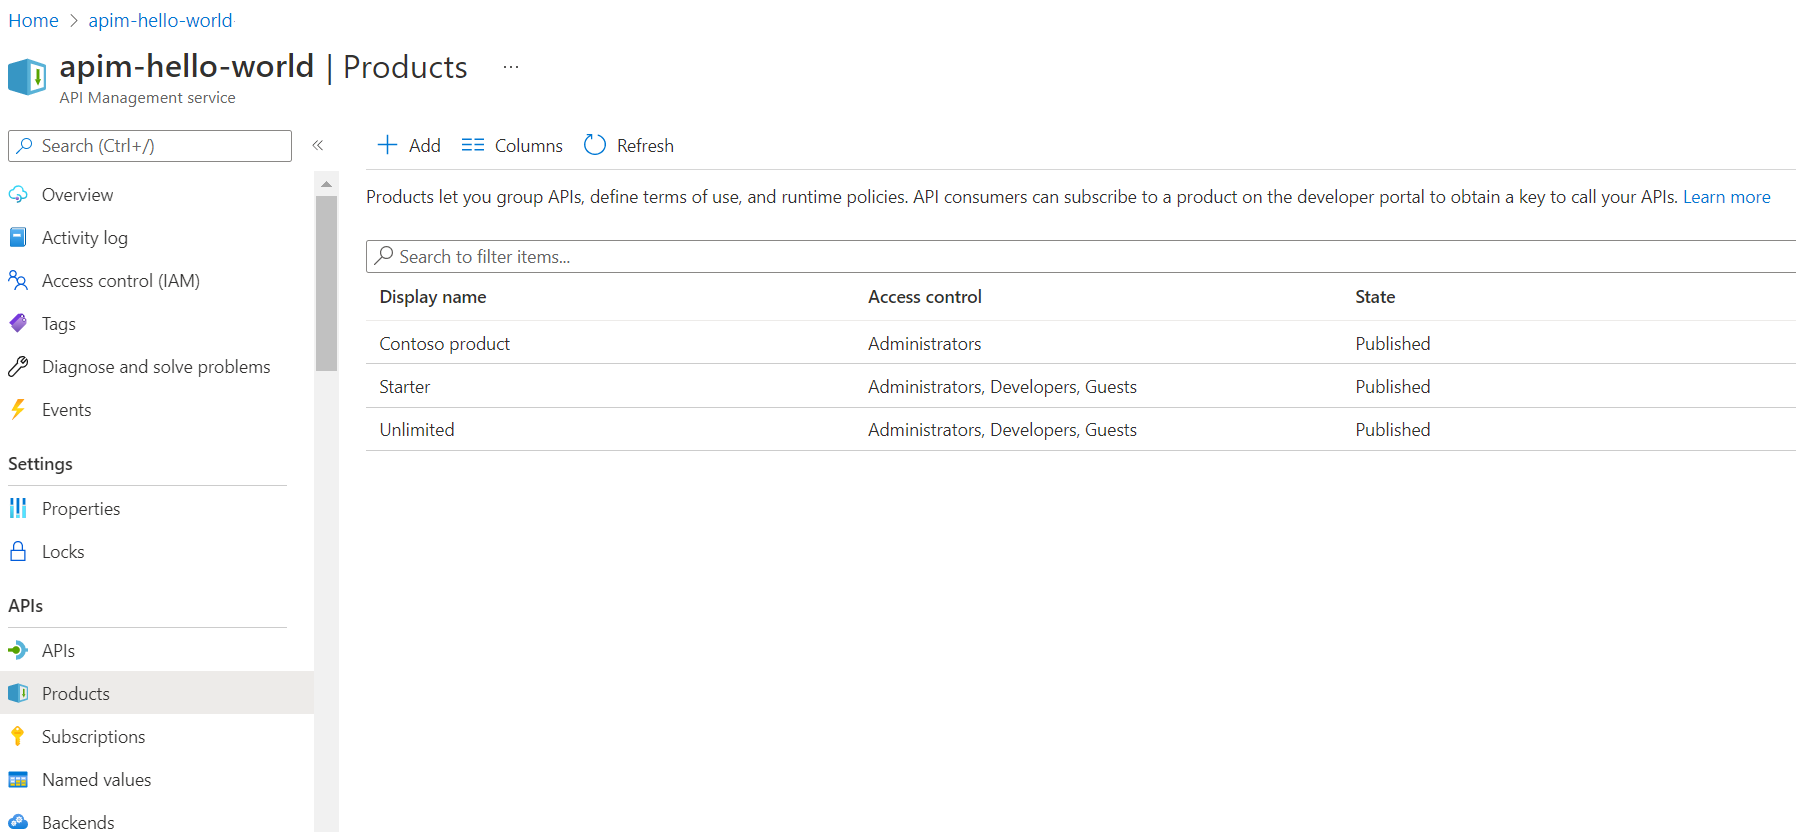
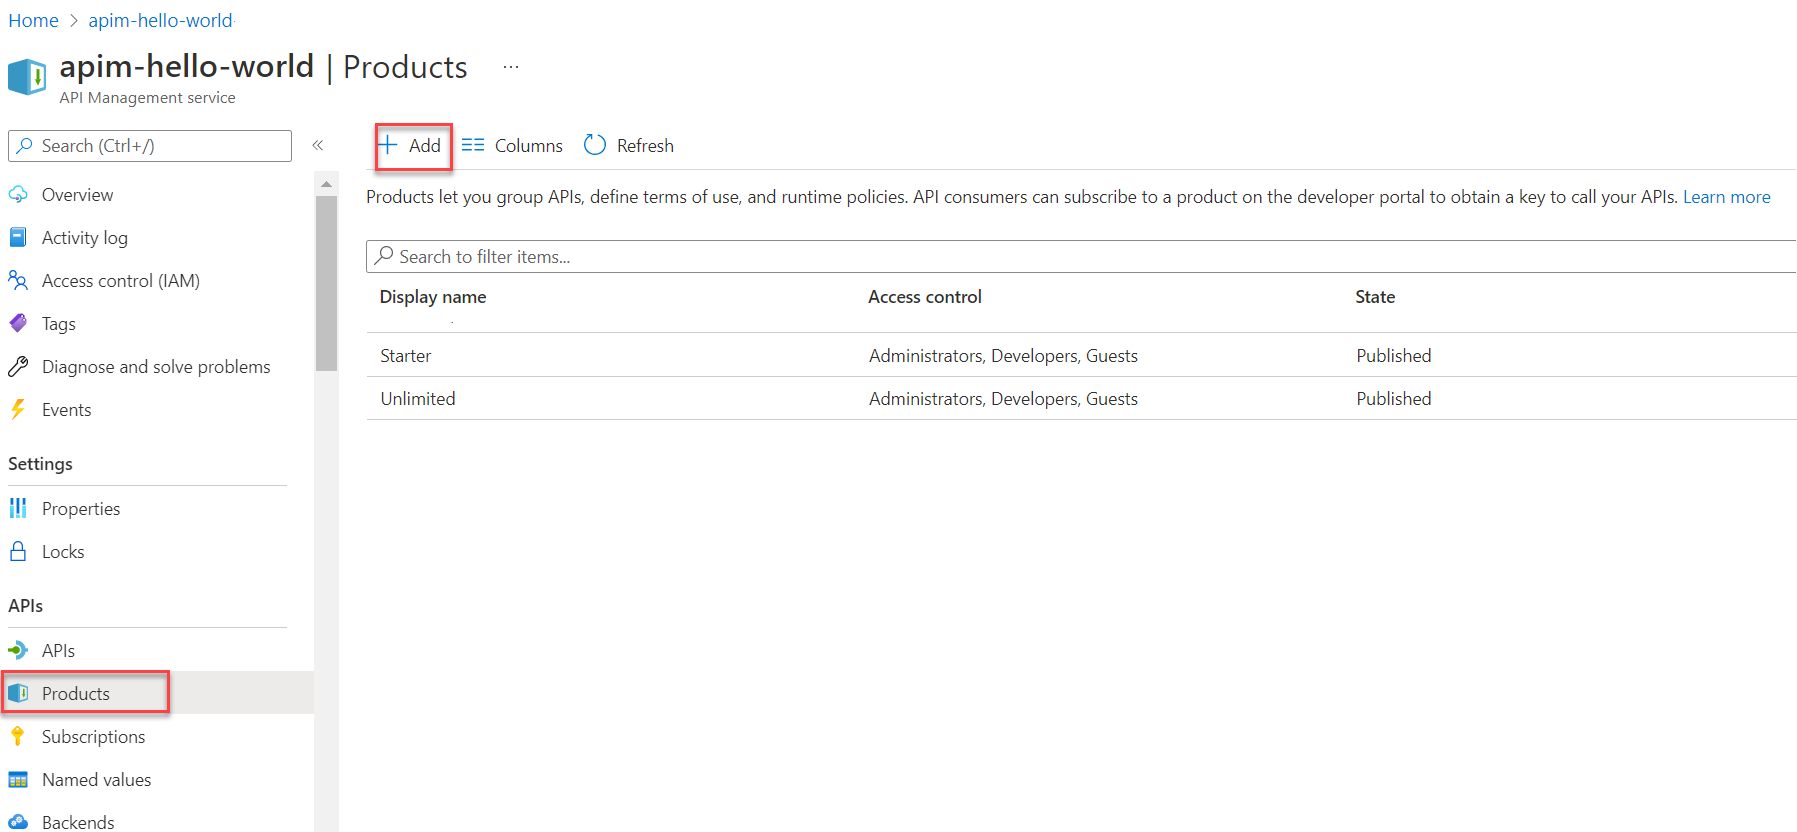
In the left navigation pane, select Products > + Add.

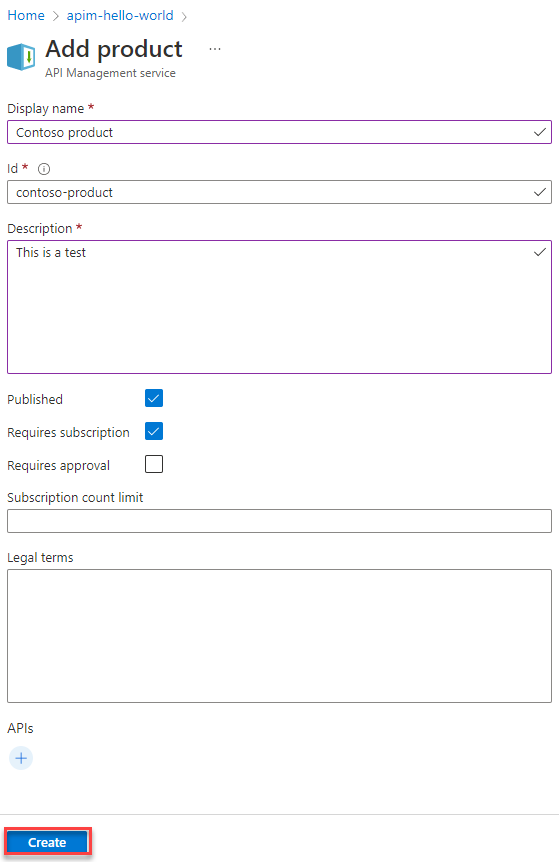
In the Add product window, enter values described in the following table to create your product.

Name Description Display name The name as you want it to be shown in the developer portal. Description Provide information about the product such as its purpose, the APIs it provides access to, and other details. State Select Published if you want to publish the product to the developer portal. Before the APIs in a product can be discovered by developers, the product must be published. By default, new products are unpublished. Requires subscription Select if a user is required to subscribe to use the product (the product is protected) and a subscription key must be used to access the product's APIs. If a subscription isn't required (the product is open), a subscription key isn't required to access the product's APIs. See Access to product APIs later in this article. Requires approval Select if you want an administrator to review and accept or reject subscription attempts to this product. If not selected, subscription attempts are auto-approved. Subscription count limit Optionally limit the count of multiple simultaneous subscriptions. Minimum value: 1 Legal terms You can include the terms of use for the product which subscribers must accept in order to use the product. APIs Select one or more APIs. You can also add APIs after creating the product. For more information, see Add APIs to a product later in this article.
If the product is open (doesn't require a subscription), you can only add an API that isn't associated with another open product.Select Create to create your new product.
Caution
Use care when configuring a product that doesn't require a subscription. This configuration may be overly permissive and may make the product's APIs more vulnerable to certain API security threats.
Add more configurations
Continue configuring the product after saving it. In your API Management instance, select the product from the Products window. Add or update:
| Item | Description |
|---|---|
| Settings | Product metadata and state |
| APIs | APIs associated with the product |
| Policies | Policies applied to product APIs |
| Access control | Product visibility for developers or guests |
| Subscriptions | Product subscribers |
Add APIs to a product
Products are associations of one or more APIs. You can include many APIs and offer them to developers through the developer portal. During the product creation, you can add one or more existing APIs. You can also add APIs to the product later, either from the Products Settings page or while creating an API.
Add an API to an existing product
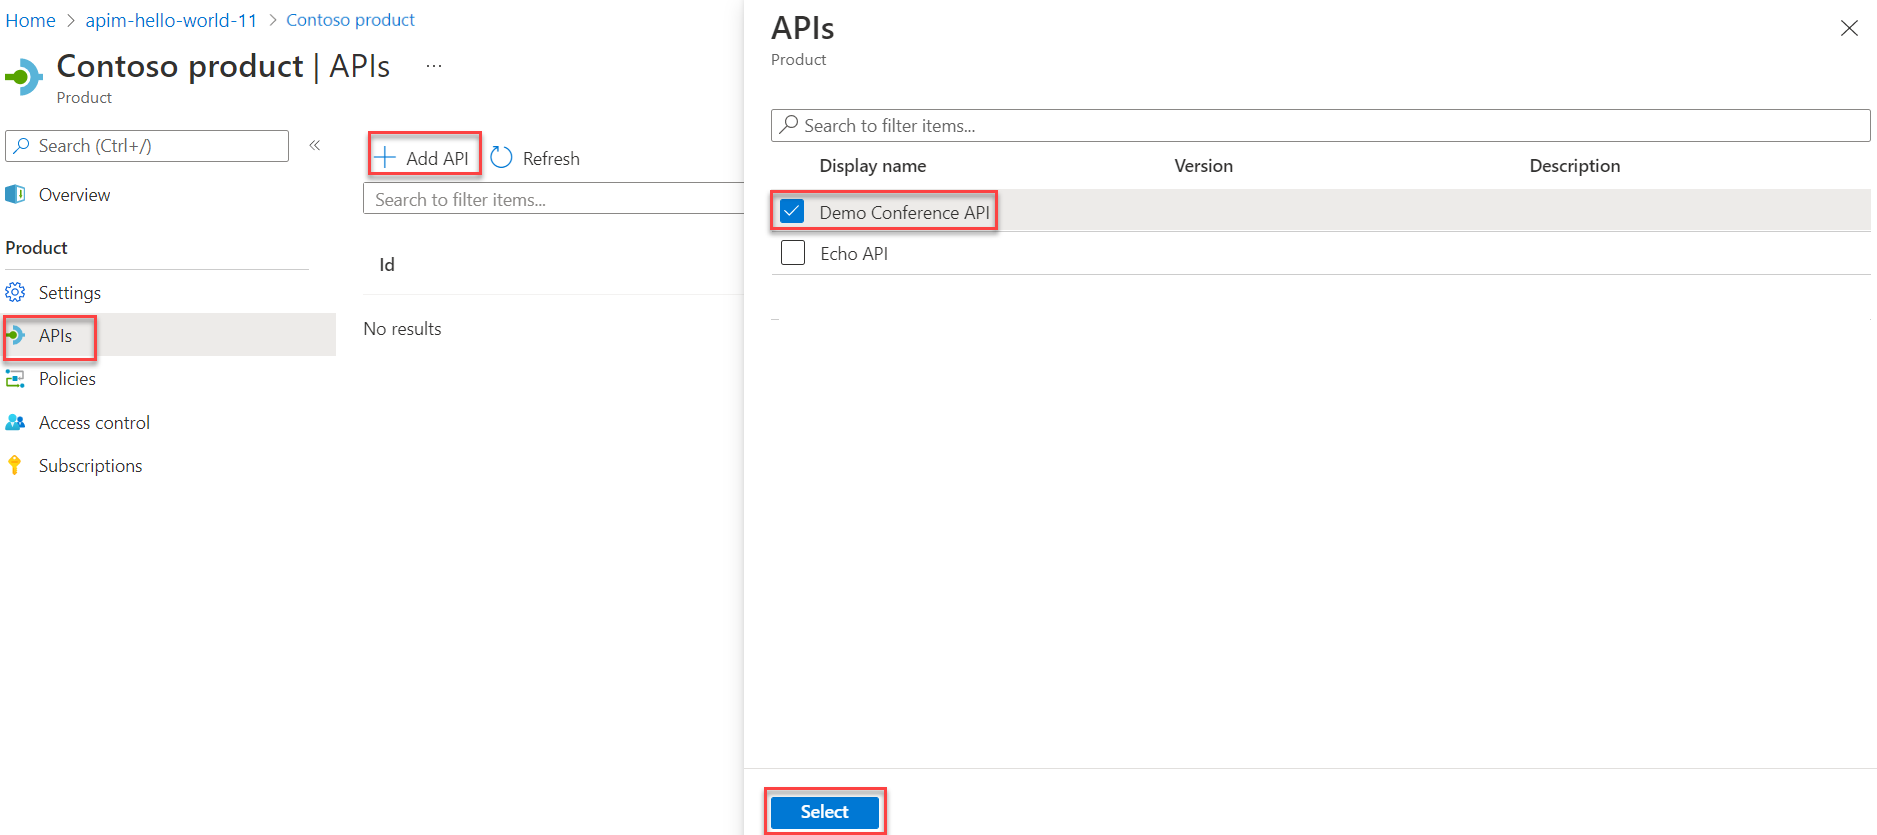
- In the left navigation of your API Management instance, select Products.
- Select a product, and then select APIs.
- Select + Add API.
- Select one or more APIs, and then Select.

Access to product APIs
After you publish a product, developers can access the APIs. Depending on how the product is configured, they may need to subscribe to the product for access.
Protected product - Developers must first subscribe to a protected product to get access to the product's APIs. When they subscribe, they get a subscription key that can access any API in that product. If you created the API Management instance, you are an administrator already, so you are subscribed to every product by default. For more information, see Subscriptions in Azure API Management.
When a client makes an API request with a valid product subscription key, API Management processes the request and permits access in the context of the product. Policies and access control rules configured for the product can be applied.
Tip
You can create or update a user's subscription to a product with custom subscription keys through a REST API or PowerShell command.
Open product - Developers can access an open product's APIs without a subscription key. However, you can configure other mechanisms to secure client access to the APIs, including OAuth 2.0, client certificates, and restricting caller IP addresses.
Note
Open products aren't listed in the developer portal for developers to learn about or subscribe to. They're visible only to the Administrators group. You'll need to use another mechanism to inform developers about APIs that can be accessed without a subscription key.
When a client makes an API request without a subscription key:
API Management checks whether the API is associated with an open product. An API can be associated with at most one open product.
If the open product exists, it then processes the request in the context of that open product. Policies and access control rules configured for the open product can be applied.
For more information, see How API Management handles requests with or without subscription keys.
Next steps
In this tutorial, you learned how to:
- Create and publish a product
- Add an API to the product
- Access product APIs
Advance to the next tutorial:
In this article, you use Terraform to create an Azure API Management instance, an API, a product, a group, and associations between the product and the API, and the product and the group.
Terraform enables the definition, preview, and deployment of cloud infrastructure. Using Terraform, you create configuration files using HCL syntax. The HCL syntax allows you to specify the cloud provider - such as Azure - and the elements that make up your cloud infrastructure. After you create your configuration files, you create an execution plan that allows you to preview your infrastructure changes before they're deployed. Once you verify the changes, you apply the execution plan to deploy the infrastructure.
- Specify the required version of Terraform and the required providers.
- Define variables for the resource group name prefix, resource group location, and the content format and value for the API definition import.
- Create a resource group with a randomized name.
- Create an API Management service with a randomized name.
- Create an API with a randomized name.
- Create a product with a randomized name in the API Management service.
- Create a group with a randomized name.
- Associate the API with the product.
- Associate the group with the product.
- Output the randomized values such as the names of the resource group, API Management service, API, product, and group.
Prerequisites
Create an Azure account with an active subscription. You can create an account for free.
Implement the Terraform code
Note
The sample code for this article is located in the Azure Terraform GitHub repo. You can view the log file containing the test results from current and previous versions of Terraform.
See more articles and sample code showing how to use Terraform to manage Azure resources.
Create a directory in which to test and run the sample Terraform code and make it the current directory.
Create a file named
main.tf, and insert the following code:resource "random_pet" "rg_name" { prefix = var.resource_group_name_prefix } resource "azurerm_resource_group" "rg" { location = var.resource_group_location name = random_pet.rg_name.id } resource "random_string" "apim_service_name" { length = 8 lower = true numeric = false special = false upper = false } resource "azurerm_api_management" "apim_service" { name = "${random_string.apim_service_name.result}-apim-service" location = azurerm_resource_group.rg.location resource_group_name = azurerm_resource_group.rg.name publisher_name = "Example Publisher" publisher_email = "publisher@example.com" sku_name = "Developer_1" tags = { Environment = "Example" } policy { xml_content = <<XML <policies> <inbound /> <backend /> <outbound /> <on-error /> </policies> XML } } resource "random_string" "api_name" { length = 8 lower = true numeric = false special = false upper = false } resource "random_string" "content_value" { length = 8 lower = true numeric = false special = false upper = false } resource "azurerm_api_management_api" "api" { name = "${random_string.api_name.result}-api" resource_group_name = azurerm_resource_group.rg.name api_management_name = azurerm_api_management.apim_service.name revision = "1" display_name = "${random_string.api_name.result}-api" path = "example" protocols = ["https", "http"] description = "An example API" import { content_format = var.open_api_spec_content_format content_value = var.open_api_spec_content_value } } resource "random_string" "product_name" { length = 8 lower = true numeric = false special = false upper = false } resource "azurerm_api_management_product" "product" { product_id = "${random_string.product_name.result}-product" resource_group_name = azurerm_resource_group.rg.name api_management_name = azurerm_api_management.apim_service.name display_name = "${random_string.product_name.result}-product" subscription_required = true approval_required = false published = true description = "An example Product" } resource "random_string" "group_name" { length = 8 lower = true numeric = false special = false upper = false } resource "azurerm_api_management_group" "group" { name = "${random_string.group_name.result}-group" resource_group_name = azurerm_resource_group.rg.name api_management_name = azurerm_api_management.apim_service.name display_name = "${random_string.group_name.result}-group" description = "An example group" } resource "azurerm_api_management_product_api" "product_api" { resource_group_name = azurerm_resource_group.rg.name api_management_name = azurerm_api_management.apim_service.name product_id = azurerm_api_management_product.product.product_id api_name = azurerm_api_management_api.api.name } resource "azurerm_api_management_product_group" "product_group" { resource_group_name = azurerm_resource_group.rg.name api_management_name = azurerm_api_management.apim_service.name product_id = azurerm_api_management_product.product.product_id group_name = azurerm_api_management_group.group.name }Create a file named
outputs.tf, and insert the following code:output "resource_group_name" { value = azurerm_resource_group.rg.name } output "apim_service_name" { value = azurerm_api_management.apim_service.name } output "api_name" { value = azurerm_api_management_api.api.name } output "product_name" { value = azurerm_api_management_product.product.product_id } output "group_name" { value = azurerm_api_management_group.group.name } output "service_id" { description = "The ID of the API Management Service created" value = azurerm_api_management.apim_service.id } output "gateway_url" { description = "The URL of the Gateway for the API Management Service" value = azurerm_api_management.apim_service.gateway_url } output "service_public_ip_addresses" { description = "The Public IP addresses of the API Management Service" value = azurerm_api_management.apim_service.public_ip_addresses } output "api_outputs" { description = "The IDs, state, and version outputs of the APIs created" value = { id = azurerm_api_management_api.api.id is_current = azurerm_api_management_api.api.is_current is_online = azurerm_api_management_api.api.is_online version = azurerm_api_management_api.api.version version_set_id = azurerm_api_management_api.api.version_set_id } } output "product_id" { description = "The ID of the Product created" value = azurerm_api_management_product.product.id } output "product_api_id" { description = "The ID of the Product/API association created" value = azurerm_api_management_product_api.product_api.id } output "product_group_id" { description = "The ID of the Product/Group association created" value = azurerm_api_management_product_group.product_group.id }Create a file named
providers.tf, and insert the following code:terraform { required_version = ">=1.0" required_providers { azurerm = { source = "hashicorp/azurerm" version = "~>3.0" } random = { source = "hashicorp/random" version = "~>3.0" } } } provider "azurerm" { features {} }Create a file named
variables.tf, and insert the following code:variable "resource_group_name_prefix" { type = string default = "rg" description = "Prefix of the resource group name that's combined with a random ID so name is unique in your Azure subscription." } variable "resource_group_location" { type = string default = "eastus" description = "Location of the resource group." } variable "open_api_spec_content_format" { type = string default = "swagger-link-json" description = "The format of the content from which the API Definition should be imported. Possible values are: openapi, openapi+json, openapi+json-link, openapi-link, swagger-json, swagger-link-json, wadl-link-json, wadl-xml, wsdl and wsdl-link." validation { condition = contains(["openapi", "openapi+json", "openapi+json-link", "openapi-link", "swagger-json", "swagger-link-json", "wadl-link-json", "wadl-xml", "wsdl", "wsdl-link"], var.open_api_spec_content_format) error_message = "open_api_spec_content_format must be one of the following: openapi, openapi+json, openapi+json-link, openapi-link, swagger-json, swagger-link-json, wadl-link-json, wadl-xml, wsdl and wsdl-link." } } variable "open_api_spec_content_value" { type = string default = "https://petstore3.swagger.io/api/v3/openapi.json" description = "The Content from which the API Definition should be imported. When a content_format of *-link-* is specified this must be a URL, otherwise this must be defined inline." }
Initialize Terraform
Run terraform init to initialize the Terraform deployment. This command downloads the Azure provider required to manage your Azure resources.
terraform init -upgrade
Key points:
- The
-upgradeparameter upgrades the necessary provider plugins to the newest version that complies with the configuration's version constraints.
Create a Terraform execution plan
Run terraform plan to create an execution plan.
terraform plan -out main.tfplan
Key points:
- The
terraform plancommand creates an execution plan, but doesn't execute it. Instead, it determines what actions are necessary to create the configuration specified in your configuration files. This pattern allows you to verify whether the execution plan matches your expectations before making any changes to actual resources. - The optional
-outparameter allows you to specify an output file for the plan. Using the-outparameter ensures that the plan you reviewed is exactly what is applied.
Apply a Terraform execution plan
Run terraform apply to apply the execution plan to your cloud infrastructure.
terraform apply main.tfplan
Key points:
- The example
terraform applycommand assumes you previously ranterraform plan -out main.tfplan. - If you specified a different filename for the
-outparameter, use that same filename in the call toterraform apply. - If you didn't use the
-outparameter, callterraform applywithout any parameters.
Verify the results
Run az apim show to view the Azure API Management:
az apim show --<apim_service_name> --<resource_group_name>
Clean up resources
When you no longer need the resources created via Terraform, do the following steps:
Run terraform plan and specify the
destroyflag.terraform plan -destroy -out main.destroy.tfplanKey points:
- The
terraform plancommand creates an execution plan, but doesn't execute it. Instead, it determines what actions are necessary to create the configuration specified in your configuration files. This pattern allows you to verify whether the execution plan matches your expectations before making any changes to actual resources. - The optional
-outparameter allows you to specify an output file for the plan. Using the-outparameter ensures that the plan you reviewed is exactly what is applied.
- The
Run terraform apply to apply the execution plan.
terraform apply main.destroy.tfplan
Troubleshoot Terraform on Azure
Troubleshoot common problems when using Terraform on Azure.
