Text to speech with the Audio Content Creation tool
You can use the Audio Content Creation tool in Speech Studio for text to speech without writing any code. The Audio Content Creation tool might provide the final speech audio that you want. You can use the output audio as-is, or as a starting point for further customization.
Build highly natural audio content for various scenarios, such as audiobooks, news broadcasts, video narrations, and chat bots. With Audio Content Creation, you can efficiently fine-tune text to speech voices and design customized audio experiences.
The tool is based on Speech Synthesis Markup Language (SSML). It allows you to adjust text to speech output attributes in real-time or batch synthesis, such as voice characters, voice styles, speaking speed, pronunciation, and prosody.
- No-code approach: You can use the Audio Content Creation tool for text to speech synthesis without writing any code. The output audio might be the final deliverable that you want. For example, you can use the output audio for a podcast or a video narration.
- Developer-friendly: You can listen to the output audio and adjust the SSML to improve speech synthesis. Then you can use the Speech SDK or Speech CLI to integrate the SSML into your applications.
You have easy access to a broad portfolio of languages and voices. These voices include state-of-the-art prebuilt neural voices and your custom neural voice, if you built one.
Get started
The Audio Content Creation tool in Speech Studio is free to access, but you pay for Speech service usage. To work with the tool, you need to sign in with an Azure account and create a Speech resource.
The next sections cover how to create an Azure account and get a Speech resource.
Step 1: Create an Azure account
To work with Audio Content Creation, you need a Microsoft account and an Azure account.
The Azure portal is the centralized place for you to manage your Azure account. You can create the Speech resource, manage the product access, and monitor everything from simple web apps to complex cloud deployments.
Step 2: Create a Speech resource
After you sign up for the Azure account, you need to create a Speech resource in your Azure account to access Speech services. Create a Speech resource on the Azure portal. For more information, see Create an Azure AI services resource.
It takes a few moments to deploy your new Speech resource. After the deployment is complete, you can start using the Audio Content Creation tool.
Note
If you plan to use neural voices, make sure that you create your resource in a region that supports neural voices.
Step 3: Sign in to Audio Content Creation with your Azure account and Speech resource
After you get the Azure account and the Speech resource, sign in to Speech Studio, and then select Audio Content Creation.
Select the Azure subscription and the Speech resource you want to work with, and then select Use resource.
The next time you sign in to Audio Content Creation, you're linked directly to the audio work files under the current Speech resource. You can check your Azure subscription details and status in the Azure portal.
If you don't have an available Speech resource and you're the owner or admin of an Azure subscription, you can create a Speech resource in Speech Studio by selecting Create a new resource.
If you have a user role for a certain Azure subscription, you might not have permissions to create a new Speech resource. To get access, contact your admin.
To switch your Speech resource at any time, select Settings at the top of the page.
To switch directories, select Settings or go to your profile.
Use the tool
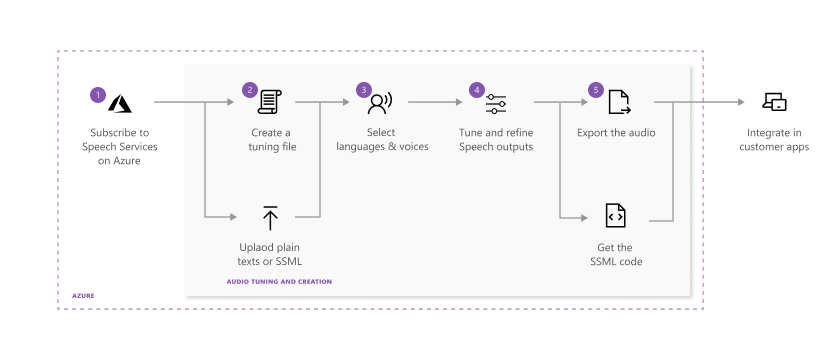
The following diagram displays the process for fine-tuning the text to speech outputs.

Each step in the preceding diagram is described here:
Choose the Speech resource you want to work with.
Create an audio tuning file by using plain text or SSML scripts. Enter or upload your content into Audio Content Creation.
Choose the voice and the language for your script content. Audio Content Creation includes all of the prebuilt text to speech voices. You can use prebuilt neural voices or a custom neural voice.
Note
Gated access is available for custom neural voice, which allows you to create high-definition voices that are similar to natural-sounding speech. For more information, see Gating process.
Select the content you want to preview, and then select Play (via the triangle icon) to preview the default synthesis output.
If you make any changes to the text, select the Stop icon, and then select Play again to regenerate the audio with changed scripts.
Improve the output by adjusting pronunciation, break, pitch, rate, intonation, voice style, and more. For a complete list of options, see Speech Synthesis Markup Language.
For more information about adjusting the speech output, see the how to convert text to speech video on YouTube. However, the video might not be available in all regions and might not be up to date by the time you watch it.
Save and export your tuned audio.
When you save the tuning track in the system, you can continue to work and iterate on the output. When you're satisfied with the output, you can create an audio creation task with the export feature. You can observe the status of the export task and download the output for use with your apps and products.
Create an audio tuning file
You can get your content into the Audio Content Creation tool in either of two ways:
Option 1: Create a new audio tuning file
Select New > Text file to create a new audio tuning file.
Enter or paste your content into the editing window. The allowable number of characters for each file is 20,000 or fewer. If your script contains more than 20,000 characters, you can use Option 2 to automatically split your content into multiple files.
Select Save.
Option 2: Upload an audio tuning file
Select Upload > Text file to import one or more text files. Both plain text and SSML are supported.
If your script file is more than 20,000 characters, split the content by paragraphs, by characters, or by regular expressions.
When you upload your text files, make sure that they meet these requirements:
Property Description File format Plain text (.txt) or SSML text (.txt)
Zip files aren't supported.Encoding format UTF-8 File name Each file must have a unique name. Duplicate files aren't supported. Text length Character limit is 20,000. If your files exceed the limit, split them according to the instructions in the tool. SSML restrictions Each SSML file can contain only a single piece of SSML. Here's a plain text example:
Welcome to use Audio Content Creation to customize audio output for your products.Here's an SSML example:
<speak xmlns="http://www.w3.org/2001/10/synthesis" xmlns:mstts="http://www.w3.org/2001/mstts" version="1.0" xml:lang="en-US">
   <voice name="en-US-AvaMultilingualNeural">
   Welcome to use Audio Content Creation <break time="10ms" />to customize audio output for your products.
   </voice>
</speak>
Export tuned audio
After you review your audio output and are satisfied with your tuning and adjustment, you can export the audio.
Select Export to create an audio creation task.
We recommend Export to Audio library to easily store, find, and search audio output in the cloud. You can better integrate with your applications through Azure blob storage. You can also download the audio to your local disk directly.
Choose the output format for your tuned audio. The supported audio formats and sample rates are listed in the following table:
Format 8 kHz sample rate 16 kHz sample rate 24 kHz sample rate 48 kHz sample rate wav riff-8khz-16bit-mono-pcm riff-16khz-16bit-mono-pcm riff-24khz-16bit-mono-pcm riff-48khz-16bit-mono-pcm mp3 N/A audio-16khz-128kbitrate-mono-mp3 audio-24khz-160kbitrate-mono-mp3 audio-48khz-192kbitrate-mono-mp3 To view the status of the task, select the Task list tab.
If the task fails, see the detailed information page for a full report.
When the task is complete, your audio is available for download on the Audio library pane.
Select the file you want to download and Download.
Now you're ready to use your custom tuned audio in your apps or products.
Configure BYOS and anonymous public read access for blobs
If you lose access permission to your Bring Your Own Storage (BYOS), you can't view, create, edit, or delete files. To resume your access, you need to remove the current storage and reconfigure the BYOS in the Azure portal. To learn more about how to configure BYOS, see Mount Azure Storage as a local share in App Service.
After configuring the BYOS permission, you need to configure anonymous public read access for related containers and blobs. Otherwise, blob data isn't available for public access and your lexicon file in the blob is inaccessible. By default, a container’s public access setting is disabled. To grant anonymous users read access to a container and its blobs, first set Allow Blob public access to Enabled to allow public access for the storage account, then set the container's (named acc-public-files) public access level (anonymous read access for blobs only). To learn more about how to configure anonymous public read access, see Configure anonymous public read access for containers and blobs.
Add or remove Audio Content Creation users
If more than one user wants to use Audio Content Creation, you can grant them access to the Azure subscription and the Speech resource. If you add users to an Azure subscription, they can access all the resources under the Azure subscription. But if you add users to a Speech resource only, they only have access to the Speech resource and not to other resources under this Azure subscription. Users with access to the Speech resource can use the Audio Content Creation tool.
The users you grant access to need to set up a Microsoft account. If they don' have a Microsoft account, they can create one in just a few minutes. They can use their existing email and link it to a Microsoft account, or they can create and use an Outlook email address as a Microsoft account.
Add users to a Speech resource
To add users to a Speech resource so that they can use Audio Content Creation, do the following:
In the Azure portal, select All services from the left navigation pane, and then search for Azure AI services or Speech.
Select your Speech resource.
Note
You can also set up Azure RBAC for whole resource groups, subscriptions, or management groups. Do this by selecting the desired scope level and then navigating to the desired item (for example, selecting Resource groups and then selecting your resource group).
Select Access control (IAM) on the left navigation pane.
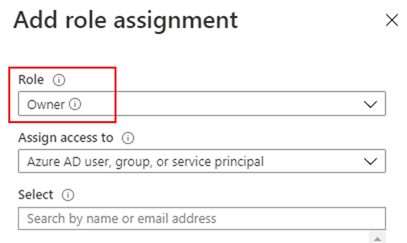
Select Add > Add role assignment.
On the Role tab on the next screen, select a role (such as Owner) that you want to add.
On the Members tab, enter a user's email address and select the user's name in the directory. The email address must be linked to a Microsoft account that's trusted by Microsoft Entra ID. Users can easily sign up for a Microsoft account by using their personal email address.
On the Review + assign tab, select Review + assign to assign the role.
Here's what happens next:
An email invitation is automatically sent to users.
Note
If users don't receive the invitation email, you can search for their account under Role assignments and go into their profile. Look for Identity > Invitation accepted, and select (manage) to resend the email invitation. You can also copy and send the invitation link to them.
They can accept it by selecting Accept invitation > Accept to join Azure in their email.
They're then redirected to the Azure portal. They don't need to take further action in the Azure portal.
After a few moments, users are assigned the role at the Speech resource scope, which gives them access to this Speech resource.
Users now visit or refresh the Audio Content Creation product page, and sign in with their Microsoft account. They select Audio Content Creation block among all speech products. They choose the Speech resource in the pop-up window or in the settings at the upper right.
If they can't find the available Speech resource, they can check to ensure that they're in the right directory. To do so, they select the account profile at the upper right and then select Switch next to Current directory. If there's more than one directory available, it means they have access to multiple directories. They can switch to different directories and go to Settings to see whether the right Speech resource is available.
Users who are in the same Speech resource see each other's work in the Audio Content Creation tool. If you want each individual user to have a unique and private workplace in Audio Content Creation, create a new Speech resource for each user and give each user the unique access to the Speech resource.
Remove users from a Speech resource
To remove a user's permission from a Speech resource, do the following:
Search for Azure AI services in the Azure portal, select the Speech resource that you want to remove users from.
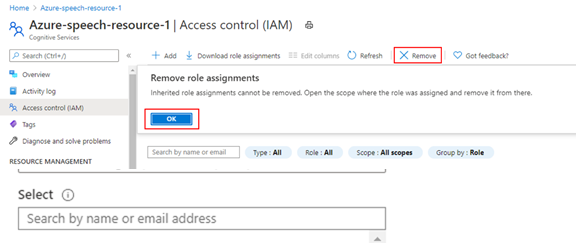
Select Access control (IAM), and then select the Role assignments tab to view all the role assignments for this Speech resource.
Select the users you want to remove, select Remove, and then select OK.

Enable users to grant access to others
If you want to allow a user to grant access to other users, you need to assign them the owner role for the Speech resource and set the user as the Azure directory reader.
Add the user as the owner of the Speech resource. For more information, see Add users to a Speech resource.

In the Azure portal, select the collapsed menu at the upper left, select Microsoft Entra ID, and then select Users.
Search for the user's Microsoft account, go to their detail page, and then select Assigned roles.
Select Add assignments > Directory Readers. If the Add assignments button is unavailable, it means that you don't have access. You must have the role of Owner or User Access Administrator to assign roles to users.