Deploy a language detection container to Azure Kubernetes Service
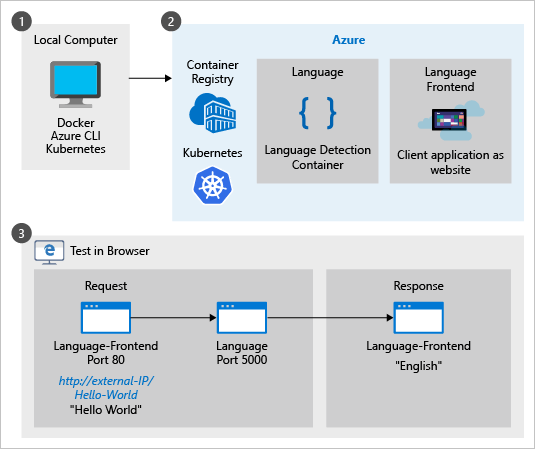
Learn how to deploy the language detection container. This procedure shows you how create the local Docker containers, push the containers to your own private container registry, run the container in a Kubernetes cluster, and test it in a web browser.
Prerequisites
This procedure requires several tools that must be installed and run locally. Do not use Azure Cloud Shell.
- Use an Azure subscription. If you don't have an Azure subscription, create a free account before you begin.
- Git for your operating system so you can clone the sample used in this procedure.
- Azure CLI.
- Docker engine and validate that the Docker CLI works in a console window.
- kubectl.
- An Azure resource with the correct pricing tier. Not all pricing tiers work with this container:
- Language resource with F0 or Standard pricing tiers only.
- Azure AI services resource with the S0 pricing tier.
Running the sample
This procedure loads and runs the Azure AI services container sample for language detection. The sample has two containers, one for the client application and one for the Azure AI services container. We'll push both of these images to the Azure Container Registry. Once they are on your own registry, create an Azure Kubernetes Service to access these images and run the containers. When the containers are running, use the kubectl CLI to watch the containers performance. Access the client application with an HTTP request and see the results.

The sample containers
The sample has two container images, one for the frontend website. The second image is the language detection container returning the detected language (culture) of text. Both containers are accessible from an external IP when you are done.
The language-frontend container
This website is equivalent to your own client-side application that makes requests of the language detection endpoint. When the procedure is finished, you get the detected language of a string of characters by accessing the website container in a browser with http://<external-IP>/<text-to-analyze>. An example of this URL is http://132.12.23.255/helloworld!. The result in the browser is English.
The language container
The language detection container, in this specific procedure, is accessible to any external request. The container hasn't been changed in any way so the standard Azure AI services container-specific language detection API is available.
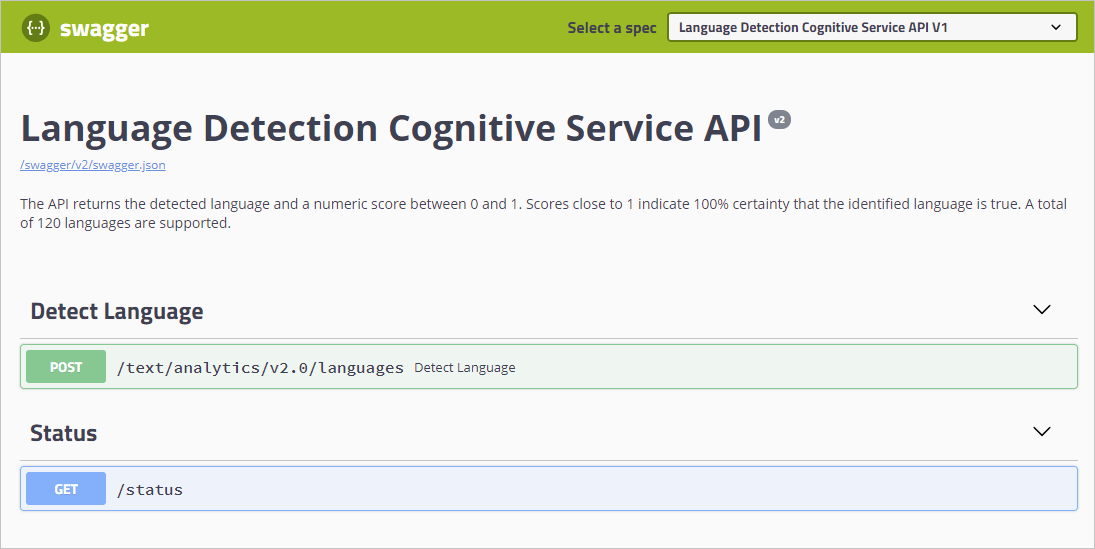
For this container, that API is a POST request for language detection. As with all Azure AI containers, you can learn more about the container from its hosted Swagger information, http://<external-IP>:5000/swagger/index.html.
Port 5000 is the default port used with the Azure AI containers.
Create Azure Container Registry service
To deploy the container to the Azure Kubernetes Service, the container images need to be accessible. Create your own Azure Container Registry service to host the images.
Sign in to the Azure CLI
az loginCreate a resource group named
cogserv-container-rgto hold every resource created in this procedure.az group create --name cogserv-container-rg --location westusCreate your own Azure Container Registry with the format of your name then
registry, such aspattyregistry. Do not use dashes or underline characters in the name.az acr create --resource-group cogserv-container-rg --name pattyregistry --sku BasicSave the results to get the loginServer property. This is part of the hosted container's address, used later in the
language.ymlfile.az acr create --resource-group cogserv-container-rg --name pattyregistry --sku Basic{ "adminUserEnabled": false, "creationDate": "2019-01-02T23:49:53.783549+00:00", "id": "/subscriptions/xxxxxxxx-xxxx-xxxx-xxxx-xxxxxxxxxxxx/resourceGroups/cogserv-container-rg/providers/Microsoft.ContainerRegistry/registries/pattyregistry", "location": "westus", "loginServer": "pattyregistry.azurecr.io", "name": "pattyregistry", "provisioningState": "Succeeded", "resourceGroup": "cogserv-container-rg", "sku": { "name": "Basic", "tier": "Basic" }, "status": null, "storageAccount": null, "tags": {}, "type": "Microsoft.ContainerRegistry/registries" }Sign in to your container registry. You need to log in before you can push images to your registry.
az acr login --name pattyregistry
Get website Docker image
The sample code used in this procedure is in the Azure AI containers samples repository. Clone the repository to have a local copy of the sample.
git clone https://github.com/Azure-Samples/cognitive-services-containers-samplesOnce the repository is on your local computer, find the website in the \dotnet\Language\FrontendService directory. This website acts as the client application calling the language detection API hosted in the language detection container.
Build the Docker image for this website. Make sure the console is in the \FrontendService directory where the Dockerfile is located when you run the following command:
docker build -t language-frontend -t pattiyregistry.azurecr.io/language-frontend:v1 .To track the version on your container registry, add the tag with a version format, such as
v1.Push the image to your container registry. This can take a few minutes.
docker push pattyregistry.azurecr.io/language-frontend:v1If you get an
unauthorized: authentication requirederror, sign in with theaz acr login --name <your-container-registry-name>command.When the process is done, the results should be similar to:
The push refers to repository [pattyregistry.azurecr.io/language-frontend]
82ff52ee6c73: Pushed
07599c047227: Pushed
816caf41a9a1: Pushed
2924be3aed17: Pushed
45b83a23806f: Pushed
ef68f6734aa4: Pushed
v1: digest: sha256:31930445deee181605c0cde53dab5a104528dc1ff57e5b3b34324f0d8a0eb286 size: 1580
Get language detection Docker image
Pull the latest version of the Docker image to the local machine. This can take a few minutes. If there is a newer version of this container, change the value from
1.1.006770001-amd64-previewto the newer version.docker pull mcr.microsoft.com/azure-cognitive-services/language:1.1.006770001-amd64-previewTag image with your container registry. Find the latest version and replace the version
1.1.006770001-amd64-previewif you have a more recent version.docker tag mcr.microsoft.com/azure-cognitive-services/language pattiyregistry.azurecr.io/language:1.1.006770001-amd64-previewPush the image to your container registry. This can take a few minutes.
docker push pattyregistry.azurecr.io/language:1.1.006770001-amd64-preview
Get Container Registry credentials
The following steps are needed to get the required information to connect your container registry with the Azure Kubernetes Service you create later in this procedure.
Create service principal.
az ad sp create-for-rbacSave the results
appIdvalue for the assignee parameter in step 3,<appId>. Save thepasswordfor the next section's client-secret parameter<client-secret>.{ "appId": "xxxxxxxx-xxxx-xxxx-xxxx-xxxxxxxxxxxx", "displayName": "azure-cli-2018-12-31-18-39-32", "name": "http://azure-cli-2018-12-31-18-39-32", "password": "xxxxxxxx-xxxx-xxxx-xxxx-xxxxxxxxxxxx", "tenant": "xxxxxxxx-xxxx-xxxx-xxxx-xxxxxxxxxxxx" }Get your container registry ID.
az acr show --resource-group cogserv-container-rg --name pattyregistry --query "id" --output tableSave the output for the scope parameter value,
<acrId>, in the next step. It looks like:/subscriptions/xxxxxxxx-xxxx-xxxx-xxxx-xxxxxxxxxxxx/resourceGroups/cogserv-container-rg/providers/Microsoft.ContainerRegistry/registries/pattyregistrySave the full value for step 3 in this section.
To grant the correct access for the AKS cluster to use images stored in your container registry, create a role assignment. Replace
<appId>and<acrId>with the values gathered in the previous two steps.az role assignment create --assignee <appId> --scope <acrId> --role Reader
Create Azure Kubernetes Service
Create the Kubernetes cluster. All the parameter values are from previous sections except the name parameter. Choose a name that indicates who created it and its purpose, such as
patty-kube.az aks create --resource-group cogserv-container-rg --name patty-kube --node-count 2 --service-principal <appId> --client-secret <client-secret> --generate-ssh-keysThis step can take a few minutes. The result is:
{
  "aadProfile": null,
  "addonProfiles": null,
  "agentPoolProfiles": [
    {
      "count": 2,
      "dnsPrefix": null,
      "fqdn": null,
      "maxPods": 110,
      "name": "nodepool1",
      "osDiskSizeGb": 30,
      "osType": "Linux",
      "ports": null,
      "storageProfile": "ManagedDisks",
      "vmSize": "Standard_DS1_v2",
      "vnetSubnetId": null
    }
  ],
  "dnsPrefix": "patty-kube--65a101",
  "enableRbac": true,
  "fqdn": "patty-kube--65a101-341f1f54.hcp.westus.azmk8s.io",
  "id": "/subscriptions/xxxxxxxx-xxxx-xxxx-xxxx-xxxxxxxxxxxx/resourcegroups/cogserv-container-rg/providers/Microsoft.ContainerService/managedClusters/patty-kube",
  "kubernetesVersion": "1.9.11",
  "linuxProfile": {
    "adminUsername": "azureuser",
    "ssh": {
      "publicKeys": [
        {
          "keyData": "ssh-rsa AAAAB3NzaC...ohR2d81mFC
        }
      ]
    }
  },
  "location": "westus",
  "name": "patty-kube",
  "networkProfile": {
    "dnsServiceIp": "10.0.0.10",
    "dockerBridgeCidr": "172.17.0.1/16",
    "networkPlugin": "kubenet",
    "networkPolicy": null,
    "podCidr": "10.244.0.0/16",
    "serviceCidr": "10.0.0.0/16"
  },
  "nodeResourceGroup": "MC_patty_westus",
  "provisioningState": "Succeeded",
  "resourceGroup": "cogserv-container-rg",
  "servicePrincipalProfile": {
    "clientId": "xxxxxxxx-xxxx-xxxx-xxxx-xxxxxxxxxxxx",
    "keyVaultSecretRef": null,
    "secret": null
  },
  "tags": null,
  "type": "Microsoft.ContainerService/ManagedClusters"
}
The service is created but it doesn't have the website container or language detection container yet.
Get credentials of the Kubernetes cluster.
az aks get-credentials --resource-group cogserv-container-rg --name patty-kube
Load the orchestration definition into your Kubernetes service
This section uses the kubectl CLI to talk with the Azure Kubernetes Service.
Before loading the orchestration definition, check kubectl has access to the nodes.
kubectl get nodesThe response looks like:
NAME                       STATUS    ROLES     AGE       VERSION
aks-nodepool1-13756812-0   Ready     agent     6m        v1.9.11
aks-nodepool1-13756812-1   Ready     agent     6m        v1.9.11
Copy the following file and name it
language.yml. The file has aservicesection and adeploymentsection each for the two container types, thelanguage-frontendwebsite container and thelanguagedetection container.# A service which exposes the .net frontend app container through a dependable hostname: http://language-frontend:5000 apiVersion: v1 kind: Service metadata: name: language-frontend labels: run: language-frontend spec: selector: app: language-frontend type: LoadBalancer ports: - name: front port: 80 targetPort: 80 protocol: TCP --- # A deployment declaratively indicating how many instances of the .net frontend app container we want up apiVersion: apps/v1beta1 kind: Deployment metadata: name: language-frontend spec: replicas: 1 template: metadata: labels: app: language-frontend spec: containers: - name: language-frontend image: # < URI of the Frontend App image > ports: - name: public-port containerPort: 80 livenessProbe: httpGet: path: /status port: public-port initialDelaySeconds: 30 timeoutSeconds: 1 periodSeconds: 10 imagePullSecrets: - name: # < Name of the registry secret providing access to the frontend image > automountServiceAccountToken: false --- # A service which exposes the cognitive-service containers through a dependable hostname: http://language:5000 apiVersion: v1 kind: Service metadata: name: language labels: run: language spec: selector: app: language type: LoadBalancer ports: - name: language port: 5000 targetPort: 5000 protocol: TCP --- # A deployment declaratively indicating how many instances of the cognitive-service container we want up apiVersion: apps/v1beta1 kind: Deployment metadata: name: language spec: replicas: 1 template: metadata: labels: app: language spec: containers: - name: language image: # < URI of the Language Image > ports: - name: public-port containerPort: 5000 livenessProbe: httpGet: path: /status port: public-port initialDelaySeconds: 30 timeoutSeconds: 1 periodSeconds: 10 args: - "eula=accept" - "apikey=" # < API Key for the Language Service > - "billing=" # < Language billing endpoint URI > imagePullSecrets: - name: # < Name of the registry secret providing access to the Language image > automountServiceAccountToken: falseChange the language-frontend deployment lines of
language.ymlbased on the following table to add your own container registry image names, client secret, and Language service settings.Language-frontend deployment settings Purpose Line 32
imagepropertyImage location for the frontend image in your Container Registry <container-registry-name>.azurecr.io/language-frontend:v1Line 44
namepropertyContainer Registry secret for the image. Referred to as <client-secret>in a previous section.Change the language deployment lines of
language.ymlbased on the following table to add your own container registry image names, client secret, and Language service settings.Language deployment settings Purpose Line 78
imagepropertyImage location for the language image in your Container Registry <container-registry-name>.azurecr.io/language:1.1.006770001-amd64-previewLine 95
namepropertyContainer Registry secret for the image. Referred to as <client-secret>in a previous section.Line 91
apiKeypropertyYour Language service resource key Line 92
billingpropertyThe billing endpoint for your Language service resource. https://westus.api.cognitive.microsoft.com/text/analytics/v2.1Because the apiKey and billing endpoint are set as part of the Kubernetes orchestration definition, the website container doesn't need to know about these or pass them as part of the request. The website container refers to the language detection container by its orchestrator name
language.Load the orchestration definition file for this sample from the folder where you created and saved the
language.yml.kubectl apply -f language.ymlThe response is:
service "language-frontend" created
deployment.apps "language-frontend" created
service "language" created
deployment.apps "language" created
Get external IPs of containers
For the two containers, verify the language-frontend and language services are running and get the external IP address.
kubectl get all
NAME                                     READY     STATUS    RESTARTS   AGE
pod/language-586849d8dc-7zvz5            1/1       Running   0          13h
pod/language-frontend-68b9969969-bz9bg   1/1       Running   1          13h

NAME                        TYPE           CLUSTER-IP    EXTERNAL-IP     PORT(S)          AGE
service/kubernetes          ClusterIP      10.0.0.1      <none>          443/TCP          14h
service/language            LoadBalancer   10.0.39.169   104.42.172.68   5000:30161/TCP   13h
service/language-frontend   LoadBalancer   10.0.42.136   104.42.37.219   80:30943/TCP     13h

NAME                                      DESIRED   CURRENT   UP-TO-DATE   AVAILABLE   AGE
deployment.extensions/language            1         1         1            1           13h
deployment.extensions/language-frontend   1         1         1            1           13h

NAME                                                 DESIRED   CURRENT   READY     AGE
replicaset.extensions/language-586849d8dc            1         1         1         13h
replicaset.extensions/language-frontend-68b9969969   1         1         1         13h

NAME                                DESIRED   CURRENT   UP-TO-DATE   AVAILABLE   AGE
deployment.apps/language            1         1         1            1           13h
deployment.apps/language-frontend   1         1         1            1           13h

NAME                                           DESIRED   CURRENT   READY     AGE
replicaset.apps/language-586849d8dc            1         1         1         13h
replicaset.apps/language-frontend-68b9969969   1         1         1         13h
If the EXTERNAL-IP for the service is shown as pending, rerun the command until the IP address is shown before moving to the next step.
Test the language detection container
Open a browser and navigate to the external IP of the language container from the previous section: http://<external-ip>:5000/swagger/index.html. You can use the Try it feature of the API to test the language detection endpoint.

Test the client application container
Change the URL in the browser to the external IP of the language-frontend container using the following format: http://<external-ip>/helloworld. The English culture text of helloworld is predicted as English.
Clean up resources
When you are done with the cluster, delete the Azure resource group.
az group delete --name cogserv-container-rg