Upgrade from ASP.NET MVC and Web API to ASP.NET Core MVC
This article shows how to upgrade an ASP.NET Framework MVC or Web API app to ASP.NET Core MVC using the Visual Studio .NET Upgrade Assistant and the incremental update approach.
Upgrade using the .NET Upgrade Assistant
If your .NET Framework project has supporting libraries in the solution that are required, they should be upgraded to .NET Standard 2.0, if possible. For more information, see Upgrade supporting libraries.
- Install the .NET Upgrade Assistant Visual Studio extension.
- Open the ASP.NET MVC or Web API solution in Visual Studio.
- In Solution Explorer, right click on the project to upgrade and select Upgrade. Select Side-by-side incremental project upgrade, which is the only upgrade option.
- For the upgrade target, select New project.
- Name the project and select the template. If the project you're migrating is a API project, select ASP.NET Core Web API. If it's an MVC project or MVC and Web API, select ASP.NET Core MVC.
- Select Next
- Select the target framework version and then select Next. For more information, see .NET and .NET Core Support Policy.
- Review the Summary of changes, then select Finish.
- The Summary step displays
<Framework Project>is now connected to<Framework ProjectCore>via Yarp proxy. and a pie chart showing the migrated endpoints. Select Upgrade Controller and then select a controller to upgrade. - Select the component to upgrade, then select Upgrade selection.
Incremental update
Follow the steps in Get started with incremental ASP.NET to ASP.NET Core migration to continue the update process.
This article shows how to start migrating an ASP.NET MVC project to ASP.NET Core MVC. In the process, it highlights related changes from ASP.NET MVC.
Migrating from ASP.NET MVC is a multi-step process. This article covers:
- Initial setup.
- Basic controllers and views.
- Static content.
- Client-side dependencies.
For migrating configuration and Identity code, see Migrate configuration to ASP.NET Core and Migrate Authentication and Identity to ASP.NET Core.
Prerequisites
- Visual Studio 2019 16.4 or later with the ASP.NET and web development workload
- .NET Core 3.1 SDK
Create the starter ASP.NET MVC project
Create an example ASP.NET MVC project in Visual Studio to migrate:
- From the File menu, select New > Project.
- Select ASP.NET Web Application (.NET Framework) and then select Next.
- Name the project WebApp1 so the namespace matches the ASP.NET Core project created in the next step. Select Create.
- Select MVC, and then select Create.
Create the ASP.NET Core project
Create a new solution with a new ASP.NET Core project to migrate to:
- Launch a second instance of Visual Studio.
- From the File menu, select New > Project.
- Select ASP.NET Core Web Application and then select Next.
- In the Configure your new project dialog, Name the project WebApp1.
- Set the location to a different directory than the previous project to use the same project name. Using the same namespace makes it easier to copy code between the two projects. Select Create.
- In the Create a new ASP.NET Core Web Application dialog, confirm that .NET Core and ASP.NET Core 3.1 are selected. Select the Web Application (Model-View-Controller) project template, and select Create.
Configure the ASP.NET Core site to use MVC
In ASP.NET Core 3.0 and later projects, .NET Framework is no longer a supported target framework. Your project must target .NET Core. The ASP.NET Core shared framework, which includes MVC, is part of the .NET Core runtime installation. The shared framework is automatically referenced when using the Microsoft.NET.Sdk.Web SDK in the project file:
<Project Sdk="Microsoft.NET.Sdk.Web">
For more information, see Framework reference.
In ASP.NET Core, the Startup class:
- Replaces Global.asax.
- Handles all app startup tasks.
For more information, see App startup in ASP.NET Core.
In the ASP.NET Core project, open the Startup.cs file:
public class Startup
{
    public Startup(IConfiguration configuration)
    {
        Configuration = configuration;
    }

    public IConfiguration Configuration { get; }

    // This method gets called by the runtime. Use this method to add services to the container.
    public void ConfigureServices(IServiceCollection services)
    {
        services.AddControllersWithViews();
    }

    // This method gets called by the runtime. Use this method to configure the HTTP request pipeline.
    public void Configure(IApplicationBuilder app, IWebHostEnvironment env)
    {
        if (env.IsDevelopment())
        {
            app.UseDeveloperExceptionPage();
        }
        else
        {
            app.UseExceptionHandler("/Home/Error");
            // The default HSTS value is 30 days. You may want to change this for production scenarios, see https://aka.ms/aspnetcore-hsts.
            app.UseHsts();
        }
        app.UseHttpsRedirection();
        app.UseStaticFiles();

        app.UseRouting();

        app.UseAuthorization();

        app.UseEndpoints(endpoints =>
        {
            endpoints.MapControllerRoute(
                name: "default",
                pattern: "{controller=Home}/{action=Index}/{id?}");
        });
    }
}
ASP.NET Core apps must opt in to framework features with middleware. The previous template-generated code adds the following services and middleware:
- The AddControllersWithViews extension method registers MVC service support for controllers, API-related features, and views. For more information on MVC service registration options, see MVC service registration
- The UseStaticFiles extension method adds the static file handler
Microsoft.AspNetCore.StaticFiles. TheUseStaticFilesextension method must be called beforeUseRouting. For more information, see Static files in ASP.NET Core. - The UseRouting extension method adds routing. For more information, see Routing in ASP.NET Core.
This existing configuration includes what is needed to migrate the example ASP.NET MVC project. For more information on ASP.NET Core middleware options, see App startup in ASP.NET Core.
Migrate controllers and views
In the ASP.NET Core project, a new empty controller class and view class would be added to serve as placeholders using the same names as the controller and view classes in any ASP.NET MVC project to migrate from.
The ASP.NET Core WebApp1 project already includes a minimal example controller and view by the same name as the ASP.NET MVC project. So those will serve as placeholders for the ASP.NET MVC controller and views to be migrated from the ASP.NET MVC WebApp1 project.
- Copy the methods from the ASP.NET MVC
HomeControllerto replace the new ASP.NET CoreHomeControllermethods. There's no need to change the return type of the action methods. The ASP.NET MVC built-in template's controller action method return type is ActionResult; in ASP.NET Core MVC, the action methods returnIActionResultinstead.ActionResultimplementsIActionResult. - In the ASP.NET Core project, right-click the Views/Home directory, select Add > Existing Item.
- In the Add Existing Item dialog, navigate to the ASP.NET MVC WebApp1 project's Views/Home directory.
- Select the
About.cshtml,Contact.cshtml, andIndex.cshtmlRazor view files, then select Add, replacing the existing files.
For more information, see Handle requests with controllers in ASP.NET Core MVC and Views in ASP.NET Core MVC.
Test each method
Each controller endpoint can be tested, however, layout and styles are covered later in the document.
- Run the ASP.NET Core app.
- Invoke the rendered views from the browser on the running ASP.NET Core app by replacing the current port number with the port number used in the ASP.NET Core project. For example,
https://localhost:44375/home/about.
Migrate static content
In ASP.NET MVC 5 and earlier, static content was hosted from the web project's root directory and was intermixed with server-side files. In ASP.NET Core, static files are stored within the project's web root directory. The default directory is {content root}/wwwroot, but it can be changed. For more information, see Static files in ASP.NET Core.
Copy the static content from the ASP.NET MVC WebApp1 project to the wwwroot directory in the ASP.NET Core WebApp1 project:
- In the ASP.NET Core project, right-click the wwwroot directory, select Add > Existing Item.
- In the Add Existing Item dialog, navigate to the ASP.NET MVC WebApp1 project.
- Select the favicon.ico file, then select Add, replacing the existing file.
Migrate the layout files
Copy the ASP.NET MVC project layout files to the ASP.NET Core project:
- In the ASP.NET Core project, right-click the Views directory, select Add > Existing Item.
- In the Add Existing Item dialog, navigate to the ASP.NET MVC WebApp1 project's Views directory.
- Select the
_ViewStart.cshtmlfile then select Add.
Copy the ASP.NET MVC project shared layout files to the ASP.NET Core project:
- In the ASP.NET Core project, right-click the Views/Shared directory, select Add > Existing Item.
- In the Add Existing Item dialog, navigate to the ASP.NET MVC WebApp1 project's Views/Shared directory.
- Select the
_Layout.cshtmlfile, then select Add, replacing the existing file.
In the ASP.NET Core project, open the _Layout.cshtml file. Make the following changes to match the completed code shown below:
Update the Bootstrap CSS inclusion to match the completed code below:
- Replace
@Styles.Render("~/Content/css")with a<link>element to loadbootstrap.css(see below). - Remove
@Scripts.Render("~/bundles/modernizr").
The completed replacement markup for Bootstrap CSS inclusion:
<link rel="stylesheet"
    href="https://maxcdn.bootstrapcdn.com/bootstrap/3.3.7/css/bootstrap.css"
    integrity="sha384-BVYiiSIFeK1dGmJRAkycuHAHRg32OmUcww7on3RYdg4Va+PmSTsz/K68vbdEjh4u"
    crossorigin="anonymous">
Update the jQuery and Bootstrap JavaScript inclusion to match the completed code below:
- Replace
@Scripts.Render("~/bundles/jquery")with a<script>element (see below). - Replace
@Scripts.Render("~/bundles/bootstrap")with a<script>element (see below).
The completed replacement markup for jQuery and Bootstrap JavaScript inclusion:
<script src="https://code.jquery.com/jquery-3.3.1.js"></script>
<script src="https://maxcdn.bootstrapcdn.com/bootstrap/3.3.7/js/bootstrap.js"
    integrity="sha384-Tc5IQib027qvyjSMfHjOMaLkfuWVxZxUPnCJA7l2mCWNIpG9mGCD8wGNIcPD7Txa" crossorigin="anonymous"></script>
The updated _Layout.cshtml file is shown below:
<!DOCTYPE html>
<html>
<head>
<meta charset="utf-8" />
<meta name="viewport" content="width=device-width, initial-scale=1.0">
<title>@ViewBag.Title - My ASP.NET Application</title>
<link rel="stylesheet"
href="https://maxcdn.bootstrapcdn.com/bootstrap/3.3.7/css/bootstrap.css"
integrity="sha384-BVYiiSIFeK1dGmJRAkycuHAHRg32OmUcww7on3RYdg4Va+PmSTsz/K68vbdEjh4u"
crossorigin="anonymous">
</head>
<body>
<div class="navbar navbar-inverse navbar-fixed-top">
<div class="container">
<div class="navbar-header">
<button type="button" class="navbar-toggle" data-toggle="collapse" data-target=".navbar-collapse">
<span class="icon-bar"></span>
<span class="icon-bar"></span>
<span class="icon-bar"></span>
</button>
@Html.ActionLink("Application name", "Index", "Home", new { area = "" }, new { @class = "navbar-brand" })
</div>
<div class="navbar-collapse collapse">
<ul class="nav navbar-nav">
<li>@Html.ActionLink("Home", "Index", "Home")</li>
<li>@Html.ActionLink("About", "About", "Home")</li>
<li>@Html.ActionLink("Contact", "Contact", "Home")</li>
</ul>
</div>
</div>
</div>
<div class="container body-content">
@RenderBody()
<hr />
<footer>
<p>© @DateTime.Now.Year - My ASP.NET Application</p>
</footer>
</div>
<script src="https://code.jquery.com/jquery-3.3.1.js"></script>
<script src="https://maxcdn.bootstrapcdn.com/bootstrap/3.3.7/js/bootstrap.js"
integrity="sha384-Tc5IQib027qvyjSMfHjOMaLkfuWVxZxUPnCJA7l2mCWNIpG9mGCD8wGNIcPD7Txa" crossorigin="anonymous"></script>
@RenderSection("scripts", required: false)
</body>
</html>
View the site in the browser. It should render with the expected styles in place.
Configure bundling and minification
ASP.NET Core is compatible with several open-source bundling and minification solutions such as WebOptimizer and other similar libraries. ASP.NET Core doesn't provide a native bundling and minification solution. For information on configuring bundling and minification, see Bundling and Minification.
Solve HTTP 500 errors
There are many problems that can cause an HTTP 500 error message that contains no information on the source of the problem. For example, if the Views/_ViewImports.cshtml file contains a namespace that doesn't exist in the project, an HTTP 500 error is generated. By default in ASP.NET Core apps, the UseDeveloperExceptionPage extension is added to the IApplicationBuilder and executed when the environment is Development. This is detailed in the following code:
public class Startup
{
    public Startup(IConfiguration configuration)
    {
        Configuration = configuration;
    }

    public IConfiguration Configuration { get; }

    // This method gets called by the runtime. Use this method to add services to the container.
    public void ConfigureServices(IServiceCollection services)
    {
        services.AddControllersWithViews();
    }

    // This method gets called by the runtime. Use this method to configure the HTTP request pipeline.
    public void Configure(IApplicationBuilder app, IWebHostEnvironment env)
    {
        if (env.IsDevelopment())
        {
            app.UseDeveloperExceptionPage();
        }
        else
        {
            app.UseExceptionHandler("/Home/Error");
            // The default HSTS value is 30 days. You may want to change this for production scenarios, see https://aka.ms/aspnetcore-hsts.
            app.UseHsts();
        }
        app.UseHttpsRedirection();
        app.UseStaticFiles();

        app.UseRouting();

        app.UseAuthorization();

        app.UseEndpoints(endpoints =>
        {
            endpoints.MapControllerRoute(
                name: "default",
                pattern: "{controller=Home}/{action=Index}/{id?}");
        });
    }
}
ASP.NET Core converts unhandled exceptions into HTTP 500 error responses. Normally, error details aren't included in these responses to prevent disclosure of potentially sensitive information about the server. For more information, see Developer Exception Page.
Next steps
Additional resources
This article shows how to start migrating an ASP.NET MVC project to ASP.NET Core MVC 2.2. In the process, it highlights many of the things that have changed from ASP.NET MVC. Migrating from ASP.NET MVC is a multi-step process. This article covers:
- Initial setup
- Basic controllers and views
- Static content
- Client-side dependencies.
For migrating configuration and Identity code, see Migrate configuration to ASP.NET Core and Migrate Authentication and Identity to ASP.NET Core.
Note
The version numbers in the samples might not be current, update the projects accordingly.
Create the starter ASP.NET MVC project
To demonstrate the upgrade, we'll start by creating an ASP.NET MVC app. Create it with the name WebApp1 so the namespace matches the ASP.NET Core project created in the next step.
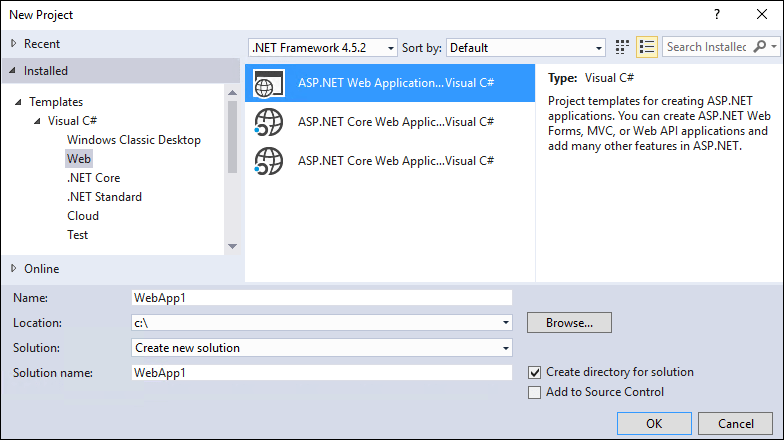
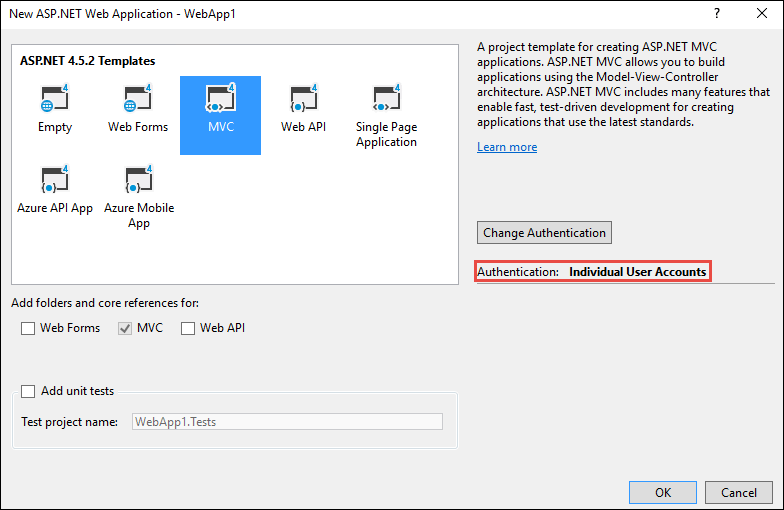
Optional: Change the name of the Solution from WebApp1 to Mvc5. Visual Studio displays the new solution name (Mvc5), which makes it easier to tell this project from the next project.
Create the ASP.NET Core project
Create a new empty ASP.NET Core web app with the same name as the previous project (WebApp1) so the namespaces in the two projects match. Having the same namespace makes it easier to copy code between the two projects. Create this project in a different directory than the previous project to use the same name.

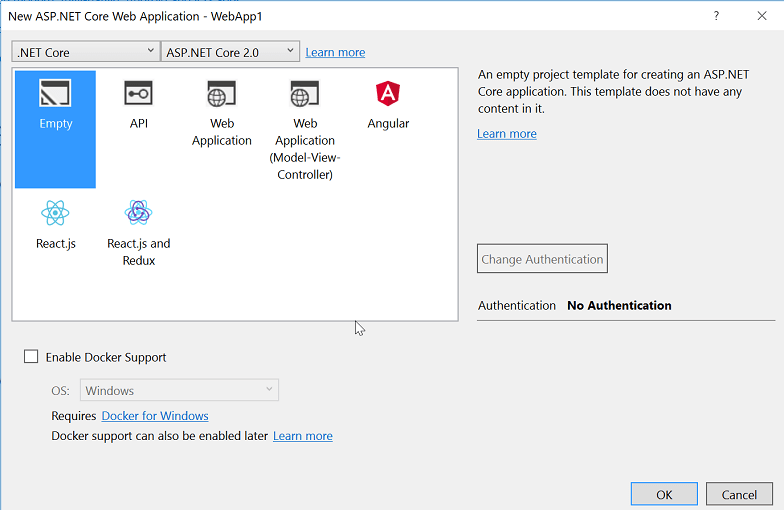
- Optional: Create a new ASP.NET Core app using the Web Application project template. Name the project WebApp1, and select an authentication option of Individual User Accounts. Rename this app to FullAspNetCore. Creating this project saves time in the conversion. The end result can be viewed in the template-generated code, code can be copied to the conversion project, or compared with the template-generated project.
Configure the site to use MVC
- When targeting .NET Core, the Microsoft.AspNetCore.App metapackage is referenced by default. This package contains packages commonly used by MVC apps. If targeting .NET Framework, package references must be listed individually in the project file.
Microsoft.AspNetCore.Mvc is the ASP.NET Core MVC framework. Microsoft.AspNetCore.StaticFiles is the static file handler. ASP.NET Core apps explicitly opt in for middleware, such as for serving static files. For more information, see Static files.
- Open the
Startup.csfile and change the code to match the following:
public class Startup
{
    // This method gets called by the runtime. Use this method to add services to the container.
    // For more information on how to configure your application, visit https://go.microsoft.com/fwlink/?LinkID=398940
    public void ConfigureServices(IServiceCollection services)
    {
        services.AddMvc();
    }

    // This method gets called by the runtime. Use this method to configure the HTTP request pipeline.
    public void Configure(IApplicationBuilder app, IHostingEnvironment env)
    {
        if (env.IsDevelopment())
        {
            app.UseDeveloperExceptionPage();
        }

        app.UseStaticFiles();

        app.UseMvc(routes =>
        {
            routes.MapRoute(
                name: "default",
                template: "{controller=Home}/{action=Index}/{id?}");
        });
    }
}
The UseStaticFiles extension method adds the static file handler. For more information, see Application Startup and Routing.
Add a controller and view
In this section, a minimal controller and view are added to serve as placeholders for the ASP.NET MVC controller and views migrated in the next section.
Add a Controllers directory.
Add a Controller Class named
HomeController.csto the Controllers directory.

Add a Views directory.
Add a Views/Home directory.
Add a Razor View named
Index.cshtmlto the Views/Home directory.
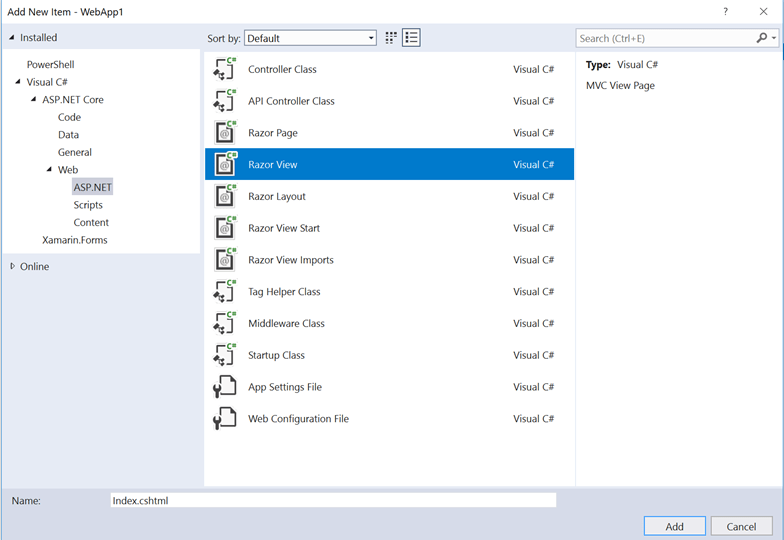
The project structure is shown below:
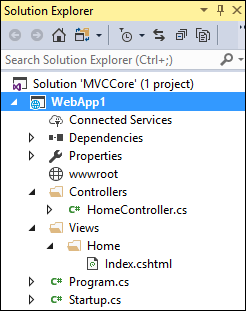
Replace the contents of the Views/Home/Index.cshtml file with the following markup:
<h1>Hello world!</h1>
Run the app.

For more information, see Controllers and Views.
The following functionality requires migration from the example ASP.NET MVC project to the ASP.NET Core project:
client-side content (CSS, fonts, and scripts)
controllers
views
models
bundling
filters
Log in/out, Identity (This is done in the next tutorial.)
Controllers and views
Copy each of the methods from the ASP.NET MVC
HomeControllerto the newHomeController. In ASP.NET MVC, the built-in template's controller action method return type is ActionResult; in ASP.NET Core MVC, the action methods returnIActionResultinstead.ActionResultimplementsIActionResult, so there's no need to change the return type of the action methods.Copy the
About.cshtml,Contact.cshtml, andIndex.cshtmlRazor view files from the ASP.NET MVC project to the ASP.NET Core project.
Test each method
The layout file and styles have not been migrated yet, so the rendered views only contain the content in the view files. The layout file generated links for the About and Contact views will not be available yet.
Invoke the rendered views from the browser on the running ASP.NET core app by replacing the current port number with the port number used in the ASP.NET core project. For example: https://localhost:44375/home/about.
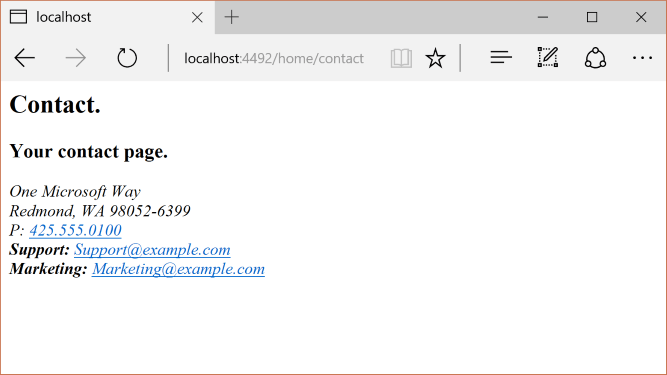
Note the lack of styling and menu items. The styling will be fixed in the next section.
Static content
In ASP.NET MVC 5 and earlier, static content was hosted from the root of the web project and was intermixed with server-side files. In ASP.NET Core, static content is hosted in the wwwroot directory. Copy the static content from the ASP.NET MVC app to the wwwroot directory in the ASP.NET Core project. In this sample conversion:
- Copy the favicon.ico file from the ASP.NET MVC project to the wwwroot directory in the ASP.NET Core project.
The ASP.NET MVC project uses Bootstrap for its styling and stores the Bootstrap files in the Content and Scripts directories. The template, which generated the ASP.NET MVC project, references Bootstrap in the layout file (Views/Shared/_Layout.cshtml). The bootstrap.js and bootstrap.css files could be copied from the ASP.NET MVC project to the wwwroot directory in the new project. Instead, this document adds support for Bootstrap (and other client-side libraries) using CDNs, in the next section.
Migrate the layout file
Copy the
_ViewStart.cshtmlfile from the ASP.NET MVC project's Views directory into the ASP.NET Core project's Views directory. The_ViewStart.cshtmlfile has not changed in ASP.NET Core MVC.Create a Views/Shared directory.
Optional: Copy
_ViewImports.cshtmlfrom the FullAspNetCore MVC project's Views directory into the ASP.NET Core project's Views directory. Remove any namespace declaration in the_ViewImports.cshtmlfile. The_ViewImports.cshtmlfile provides namespaces for all the view files and brings in Tag Helpers. Tag Helpers are used in the new layout file. The_ViewImports.cshtmlfile is new for ASP.NET Core.Copy the
_Layout.cshtmlfile from the ASP.NET MVC project's Views/Shared directory into the ASP.NET Core project's Views/Shared directory.
Open _Layout.cshtml file and make the following changes (the completed code is shown below):
Replace
@Styles.Render("~/Content/css")with a<link>element to loadbootstrap.css(see below).Remove
@Scripts.Render("~/bundles/modernizr").Comment out the
@Html.Partial("_LoginPartial")line (surround the line with@*...*@). For more information, see Migrate Authentication and Identity to ASP.NET CoreReplace
@Scripts.Render("~/bundles/jquery")with a<script>element (see below).Replace
@Scripts.Render("~/bundles/bootstrap")with a<script>element (see below).
The replacement markup for Bootstrap CSS inclusion:
<link rel="stylesheet"
    href="https://maxcdn.bootstrapcdn.com/bootstrap/3.3.7/css/bootstrap.css"
    integrity="sha384-BVYiiSIFeK1dGmJRAkycuHAHRg32OmUcww7on3RYdg4Va+PmSTsz/K68vbdEjh4u"
    crossorigin="anonymous">
The replacement markup for jQuery and Bootstrap JavaScript inclusion:
<script src="https://code.jquery.com/jquery-3.3.1.js"></script>
<script src="https://maxcdn.bootstrapcdn.com/bootstrap/3.3.7/js/bootstrap.js"
    integrity="sha384-Tc5IQib027qvyjSMfHjOMaLkfuWVxZxUPnCJA7l2mCWNIpG9mGCD8wGNIcPD7Txa" crossorigin="anonymous"></script>
The updated _Layout.cshtml file is shown below:
<!DOCTYPE html>
<html>
<head>
<meta charset="utf-8" />
<meta name="viewport" content="width=device-width, initial-scale=1.0">
<title>@ViewBag.Title - My ASP.NET Application</title>
<link rel="stylesheet"
href="https://maxcdn.bootstrapcdn.com/bootstrap/3.3.7/css/bootstrap.css"
integrity="sha384-BVYiiSIFeK1dGmJRAkycuHAHRg32OmUcww7on3RYdg4Va+PmSTsz/K68vbdEjh4u"
crossorigin="anonymous">
</head>
<body>
<div class="navbar navbar-inverse navbar-fixed-top">
<div class="container">
<div class="navbar-header">
<button type="button" class="navbar-toggle" data-toggle="collapse" data-target=".navbar-collapse">
<span class="icon-bar"></span>
<span class="icon-bar"></span>
<span class="icon-bar"></span>
</button>
@Html.ActionLink("Application name", "Index", "Home", new { area = "" }, new { @class = "navbar-brand" })
</div>
<div class="navbar-collapse collapse">
<ul class="nav navbar-nav">
<li>@Html.ActionLink("Home", "Index", "Home")</li>
<li>@Html.ActionLink("About", "About", "Home")</li>
<li>@Html.ActionLink("Contact", "Contact", "Home")</li>
</ul>
@*@Html.Partial("_LoginPartial")*@
</div>
</div>
</div>
<div class="container body-content">
@RenderBody()
<hr />
<footer>
<p>© @DateTime.Now.Year - My ASP.NET Application</p>
</footer>
</div>
<script src="https://code.jquery.com/jquery-3.3.1.js"></script>
<script src="https://maxcdn.bootstrapcdn.com/bootstrap/3.3.7/js/bootstrap.js"
integrity="sha384-Tc5IQib027qvyjSMfHjOMaLkfuWVxZxUPnCJA7l2mCWNIpG9mGCD8wGNIcPD7Txa"
crossorigin="anonymous"></script>
@RenderSection("scripts", required: false)
</body>
</html>
View the site in the browser. It should now load correctly, with the expected styles in place.
- Optional: Try using the new layout file. Copy the layout file from the FullAspNetCore project. The new layout file uses Tag Helpers and has other improvements.
Configure bundling and minification
For information about how to configure bundling and minification, see Bundling and Minification.
Solve HTTP 500 errors
There are many problems that can cause an HTTP 500 error messages that contain no information on the source of the problem. For example, if the Views/_ViewImports.cshtml file contains a namespace that doesn't exist in the project, a HTTP 500 error is generated. By default in ASP.NET Core apps, the UseDeveloperExceptionPage extension is added to the IApplicationBuilder and executed when the configuration is Development. See an example in the following code:
public class Startup
{
    // This method gets called by the runtime. Use this method to add services to the container.
    // For more information on how to configure your application, visit https://go.microsoft.com/fwlink/?LinkID=398940
    public void ConfigureServices(IServiceCollection services)
    {
        services.AddMvc();
    }

    // This method gets called by the runtime. Use this method to configure the HTTP request pipeline.
    public void Configure(IApplicationBuilder app, IHostingEnvironment env)
    {
        if (env.IsDevelopment())
        {
            app.UseDeveloperExceptionPage();
        }

        app.UseStaticFiles();

        app.UseMvc(routes =>
        {
            routes.MapRoute(
                name: "default",
                template: "{controller=Home}/{action=Index}/{id?}");
        });
    }
}
ASP.NET Core converts unhandled exceptions into HTTP 500 error responses. Normally, error details aren't included in these responses to prevent disclosure of potentially sensitive information about the server. For more information, see Developer Exception Page.
Additional resources
This article shows how to start migrating an ASP.NET MVC project to ASP.NET Core MVC 2.1. In the process, it highlights many of the things that have changed from ASP.NET MVC. Migrating from ASP.NET MVC is a multi-step process. This article covers:
- Initial setup
- Basic controllers and views
- Static content
- Client-side dependencies.
For migrating configuration and Identity code, see Migrate configuration to ASP.NET Core and Migrate Authentication and Identity to ASP.NET Core.
Note
The version numbers in the samples might not be current, update the projects accordingly.
Create the starter ASP.NET MVC project
To demonstrate the upgrade, we'll start by creating an ASP.NET MVC app. Create it with the name WebApp1 so the namespace matches the ASP.NET Core project created in the next step.


Optional: Change the name of the Solution from WebApp1 to Mvc5. Visual Studio displays the new solution name (Mvc5), which makes it easier to tell this project from the next project.
Create the ASP.NET Core project
Create a new empty ASP.NET Core web app with the same name as the previous project (WebApp1) so the namespaces in the two projects match. Having the same namespace makes it easier to copy code between the two projects. Create this project in a different directory than the previous project to use the same name.


- Optional: Create a new ASP.NET Core app using the Web Application project template. Name the project WebApp1, and select an authentication option of Individual User Accounts. Rename this app to FullAspNetCore. Creating this project saves time in the conversion. The end result can be viewed in the template-generated code, code can be copied to the conversion project, or compared with the template-generated project.
Configure the site to use MVC
- When targeting .NET Core, the Microsoft.AspNetCore.App metapackage is referenced by default. This package contains packages commonly used by MVC apps. If targeting .NET Framework, package references must be listed individually in the project file.
Microsoft.AspNetCore.Mvc is the ASP.NET Core MVC framework. Microsoft.AspNetCore.StaticFiles is the static file handler. ASP.NET Core apps explicitly opt in for middleware, such as for serving static files. For more information, see Static files.
- Open the
Startup.csfile and change the code to match the following:
public class Startup
{
    // This method gets called by the runtime. Use this method to add services to the container.
    // For more information on how to configure your application, visit https://go.microsoft.com/fwlink/?LinkID=398940
    public void ConfigureServices(IServiceCollection services)
    {
        services.AddMvc();
    }

    // This method gets called by the runtime. Use this method to configure the HTTP request pipeline.
    public void Configure(IApplicationBuilder app, IHostingEnvironment env)
    {
        if (env.IsDevelopment())
        {
            app.UseDeveloperExceptionPage();
        }

        app.UseStaticFiles();

        app.UseMvc(routes =>
        {
            routes.MapRoute(
                name: "default",
                template: "{controller=Home}/{action=Index}/{id?}");
        });
    }
}
The UseStaticFiles extension method adds the static file handler. The UseMvc extension method adds routing. For more information, see Application Startup and Routing.
Add a controller and view
In this section, a minimal controller and view are added to serve as placeholders for the ASP.NET MVC controller and views migrated in the next section.
Add a Controllers directory.
Add a Controller Class named
HomeController.csto the Controllers directory.

Add a Views directory.
Add a Views/Home directory.
Add a Razor View named
Index.cshtmlto the Views/Home directory.

The project structure is shown below:

Replace the contents of the Views/Home/Index.cshtml file with the following markup:
<h1>Hello world!</h1>
Run the app.

For more information, see Controllers and Views.
The following functionality requires migration from the example ASP.NET MVC project to the ASP.NET Core project:
client-side content (CSS, fonts, and scripts)
controllers
views
models
bundling
filters
Log in/out, Identity (This is done in the next tutorial.)
Controllers and views
Copy each of the methods from the ASP.NET MVC
HomeControllerto the newHomeController. In ASP.NET MVC, the built-in template's controller action method return type is ActionResult; in ASP.NET Core MVC, the action methods returnIActionResultinstead.ActionResultimplementsIActionResult, so there's no need to change the return type of the action methods.Copy the
About.cshtml,Contact.cshtml, andIndex.cshtmlRazor view files from the ASP.NET MVC project to the ASP.NET Core project.
Test each method
The layout file and styles have not been migrated yet, so the rendered views only contain the content in the view files. The layout file generated links for the About and Contact views will not be available yet.
- Invoke the rendered views from the browser on the running ASP.NET core app by replacing the current port number with the port number used in the ASP.NET core project. For example:
https://localhost:44375/home/about.

Note the lack of styling and menu items. The styling will be fixed in the next section.
Static content
In ASP.NET MVC 5 and earlier, static content was hosted from the root of the web project and was intermixed with server-side files. In ASP.NET Core, static content is hosted in the wwwroot directory. Copy the static content from the ASP.NET MVC app to the wwwroot directory in the ASP.NET Core project. In this sample conversion:
- Copy the favicon.ico file from the ASP.NET MVC project to the wwwroot directory in the ASP.NET Core project.
The ASP.NET MVC project uses Bootstrap for its styling and stores the Bootstrap files in the Content and Scripts directories. The template, which generated the ASP.NET MVC project, references Bootstrap in the layout file (Views/Shared/_Layout.cshtml). The bootstrap.js and bootstrap.css files could be copied from the ASP.NET MVC project to the wwwroot directory in the new project. Instead, this document adds support for Bootstrap (and other client-side libraries) using CDNs, in the next section.
Migrate the layout file
Copy the
_ViewStart.cshtmlfile from the ASP.NET MVC project's Views directory into the ASP.NET Core project's Views directory. The_ViewStart.cshtmlfile has not changed in ASP.NET Core MVC.Create a Views/Shared directory.
Optional: Copy
_ViewImports.cshtmlfrom the FullAspNetCore MVC project's Views directory into the ASP.NET Core project's Views directory. Remove any namespace declaration in the_ViewImports.cshtmlfile. The_ViewImports.cshtmlfile provides namespaces for all the view files and brings in Tag Helpers. Tag Helpers are used in the new layout file. The_ViewImports.cshtmlfile is new for ASP.NET Core.Copy the
_Layout.cshtmlfile from the ASP.NET MVC project's Views/Shared directory into the ASP.NET Core project's Views/Shared directory.
Open _Layout.cshtml file and make the following changes (the completed code is shown below):
Replace
@Styles.Render("~/Content/css")with a<link>element to loadbootstrap.css(see below).Remove
@Scripts.Render("~/bundles/modernizr").Comment out the
@Html.Partial("_LoginPartial")line (surround the line with@*...*@). For more information, see Migrate Authentication and Identity to ASP.NET CoreReplace
@Scripts.Render("~/bundles/jquery")with a<script>element (see below).Replace
@Scripts.Render("~/bundles/bootstrap")with a<script>element (see below).
The replacement markup for Bootstrap CSS inclusion:
<link rel="stylesheet"
    href="https://maxcdn.bootstrapcdn.com/bootstrap/3.3.7/css/bootstrap.css"
    integrity="sha384-BVYiiSIFeK1dGmJRAkycuHAHRg32OmUcww7on3RYdg4Va+PmSTsz/K68vbdEjh4u"
    crossorigin="anonymous">
The replacement markup for jQuery and Bootstrap JavaScript inclusion:
<script src="https://code.jquery.com/jquery-3.3.1.js"></script>
<script src="https://maxcdn.bootstrapcdn.com/bootstrap/3.3.7/js/bootstrap.js"
    integrity="sha384-Tc5IQib027qvyjSMfHjOMaLkfuWVxZxUPnCJA7l2mCWNIpG9mGCD8wGNIcPD7Txa" crossorigin="anonymous"></script>
The updated _Layout.cshtml file is shown below:
<!DOCTYPE html>
<html>
<head>
<meta charset="utf-8" />
<meta name="viewport" content="width=device-width, initial-scale=1.0">
<title>@ViewBag.Title - My ASP.NET Application</title>
<link rel="stylesheet"
href="https://maxcdn.bootstrapcdn.com/bootstrap/3.3.7/css/bootstrap.css"
integrity="sha384-BVYiiSIFeK1dGmJRAkycuHAHRg32OmUcww7on3RYdg4Va+PmSTsz/K68vbdEjh4u"
crossorigin="anonymous">
</head>
<body>
<div class="navbar navbar-inverse navbar-fixed-top">
<div class="container">
<div class="navbar-header">
<button type="button" class="navbar-toggle" data-toggle="collapse" data-target=".navbar-collapse">
<span class="icon-bar"></span>
<span class="icon-bar"></span>
<span class="icon-bar"></span>
</button>
@Html.ActionLink("Application name", "Index", "Home", new { area = "" }, new { @class = "navbar-brand" })
</div>
<div class="navbar-collapse collapse">
<ul class="nav navbar-nav">
<li>@Html.ActionLink("Home", "Index", "Home")</li>
<li>@Html.ActionLink("About", "About", "Home")</li>
<li>@Html.ActionLink("Contact", "Contact", "Home")</li>
</ul>
@*@Html.Partial("_LoginPartial")*@
</div>
</div>
</div>
<div class="container body-content">
@RenderBody()
<hr />
<footer>
<p>© @DateTime.Now.Year - My ASP.NET Application</p>
</footer>
</div>
<script src="https://code.jquery.com/jquery-3.3.1.js"></script>
<script src="https://maxcdn.bootstrapcdn.com/bootstrap/3.3.7/js/bootstrap.js"
integrity="sha384-Tc5IQib027qvyjSMfHjOMaLkfuWVxZxUPnCJA7l2mCWNIpG9mGCD8wGNIcPD7Txa"
crossorigin="anonymous"></script>
@RenderSection("scripts", required: false)
</body>
</html>
View the site in the browser. It should now load correctly, with the expected styles in place.
- Optional: Try using the new layout file. Copy the layout file from the FullAspNetCore project. The new layout file uses Tag Helpers and has other improvements.
Configure bundling and minification
For information about how to configure bundling and minification, see Bundling and Minification.
Solve HTTP 500 errors
There are many problems that can cause an HTTP 500 error messages that contain no information on the source of the problem. For example, if the Views/_ViewImports.cshtml file contains a namespace that doesn't exist in the project, a HTTP 500 error is generated. By default in ASP.NET Core apps, the UseDeveloperExceptionPage extension is added to the IApplicationBuilder and executed when the configuration is Development. See an example in the following code:
public class Startup
{
    // This method gets called by the runtime. Use this method to add services to the container.
    // For more information on how to configure your application, visit https://go.microsoft.com/fwlink/?LinkID=398940
    public void ConfigureServices(IServiceCollection services)
    {
        services.AddMvc();
    }

    // This method gets called by the runtime. Use this method to configure the HTTP request pipeline.
    public void Configure(IApplicationBuilder app, IHostingEnvironment env)
    {
        if (env.IsDevelopment())
        {
            app.UseDeveloperExceptionPage();
        }

        app.UseStaticFiles();

        app.UseMvc(routes =>
        {
            routes.MapRoute(
                name: "default",
                template: "{controller=Home}/{action=Index}/{id?}");
        });
    }
}
ASP.NET Core converts unhandled exceptions into HTTP 500 error responses. Normally, error details aren't included in these responses to prevent disclosure of potentially sensitive information about the server. For more information, see Developer Exception Page.
Additional resources
ASP.NET Core
