Using a DataTriggerBehavior to change an ItemTemplate in a Windows Store App
Visual Studio 2013 comes with the Behaviors SDK that can be used when developing Windows 8.1 Store Applications. One of the components of the SDK is a DataTriggerBehavior which allows you to specify a specific action when the data, a DataTriggerBehavior is bound to, changes. For this blog I will illustrate how to use the DataTriggerBehavior with a ChangePropertyAction that changes the ItemTemplate of a FlipView.
The View
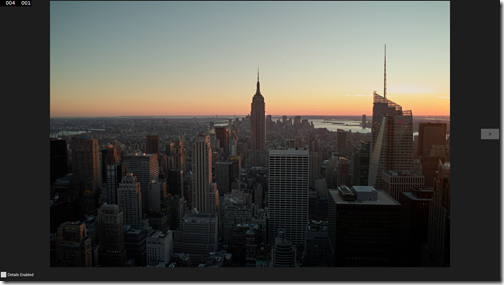
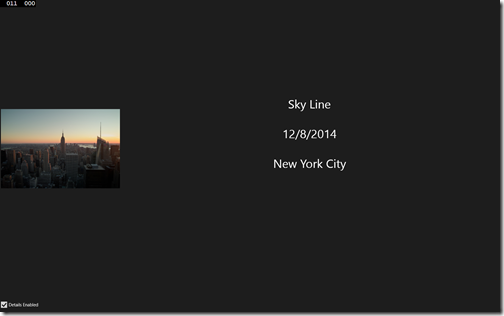
This is a very simple example to illustrate how to use the DataTriggerBehavior. The View will be a FlipView that can have one of two templates. The first template shows only an image, and the second template shows the Image with some details.
ImageOnlyTemplate:
ImageDetailsTemplate:
The XAML
The XAML for the view listed above is below. It contains a StaticResource for two different DataTemplates that can be applied to the FlipView, with the default being the ImageOnlyTemplate. Later we will use Blend to control which template is applied with a DataTriggerBehavior.
 <Page
    x:Class="DTB.PictureView"
    xmlns="https://schemas.microsoft.com/winfx/2006/xaml/presentation"
    xmlns:x="https://schemas.microsoft.com/winfx/2006/xaml"
    xmlns:local="using:DTB"
    xmlns:d="https://schemas.microsoft.com/expression/blend/2008"
    xmlns:mc="https://schemas.openxmlformats.org/markup-compatibility/2006"
    xmlns:Interactivity="using:Microsoft.Xaml.Interactivity"
    xmlns:Core="using:Microsoft.Xaml.Interactions.Core"
    mc:Ignorable="d">

    <Page.Resources>
        <DataTemplate x:Key="ImageOnlyTemplate" >
            <Grid>
                <Image Source="{Binding ImagePath}"/>
            </Grid>
        </DataTemplate>
        <DataTemplate x:Key="ImageDetailsTemplate" >
            <Grid>
                <Grid.ColumnDefinitions>
                    <ColumnDefinition Width="100" />
                    <ColumnDefinition Width="*" />
                </Grid.ColumnDefinitions>
                <Grid Grid.Column="0">
                    <Grid.RowDefinitions>
                        <RowDefinition Height="100" />
                        <RowDefinition Height="20" />
                        <RowDefinition Height="20" />
                        <RowDefinition Height="20" />
                    </Grid.RowDefinitions>
                    <TextBlock Text="{Binding Title}" Grid.Row="1"/>
                    <TextBlock Text="{Binding Date}" Grid.Row="2"/>
                    <TextBlock Text="{Binding Location}" Grid.Row="3"/>
                </Grid>
                <Image Grid.Column="1" Source="{Binding ImagePath}"/>
            </Grid>
        </DataTemplate>
    </Page.Resources>

    <Grid Background="{ThemeResource ApplicationPageBackgroundThemeBrush}">
        <Grid.RowDefinitions>
            <RowDefinition Height="*"/>
            <RowDefinition Height="50"/>
        </Grid.RowDefinitions>

        <FlipView Grid.Row="0" x:Name="imagesFlipView"   VerticalContentAlignment="Top"
                    ItemsSource="{Binding Pictures}"
                    ItemTemplate="{StaticResource ImageOnlyTemplate}"
                    HorizontalAlignment="Stretch" Grid.ColumnSpan="2" >
        </FlipView>
        <CheckBox Grid.Row="1" Click="CheckBox_Click" Content="Details Enabled" IsThreeState="False" IsChecked="{Binding ShowDetails, Mode=TwoWay}"/>
    </Grid>
</Page>
The View Model
The View Model consists of a Pictures Property which is used as the ItemsSource for the FlipView, and a ShowDetails property that will be used for triggering our DataTriggerBehavior. The ShowDetails property is bound to our check box as a way to change the property for demonstration purposes. The view model property used for the trigger could change from a background thread, or even when data is returned from a call to a resource on the internet. However, for this blog I will change it manually. The code for the view model is listed below:
 using DTB.Common;
using DTB.Data;
using System;
using System.Collections.Generic;
using System.Collections.ObjectModel;
using System.ComponentModel;
using System.Linq;
using System.Text;
using System.Threading.Tasks;

namespace DTB
{
    public class PictureViewVM : INotifyPropertyChanged
    {
        public event PropertyChangedEventHandler PropertyChanged;

        private void RaisePropertyChanged(string propName)
        {
            if (PropertyChanged != null)
                PropertyChanged(this, new PropertyChangedEventArgs(propName));
        }

        public PictureViewVM(ObservableCollection<SampleDataItem> items)
        {
            _pictures = items;
            _showDetails = false;
        }

        private ObservableCollection<SampleDataItem> _pictures;

        public ObservableCollection<SampleDataItem> Pictures
        {
            get { return _pictures; }
            set { _pictures = value; RaisePropertyChanged("Pictures"); }
        }

        private bool _showDetails;

        public bool ShowDetails
        {
            get { return _showDetails; }
            set { _showDetails = value; RaisePropertyChanged("ShowDetails"); }
        }
    }
}
Implementing the DataTriggerBehavior in Blend
I am listing the final XAML For the Grid here for those folks that want to get something working quickly. Follow the steps after the XAML to learn how to use Blend to generate the Behaviors and Actions.
 <Grid Background="{ThemeResource ApplicationPageBackgroundThemeBrush}">
    <Grid.RowDefinitions>
        <RowDefinition Height="*"/>
        <RowDefinition Height="50"/>
    </Grid.RowDefinitions>

    <Interactivity:Interaction.Behaviors>
        <Core:DataTriggerBehavior Binding="{Binding ShowDetails}" Value="True">
            <Core:ChangePropertyAction PropertyName="ItemTemplate" TargetObject="{Binding ElementName=imagesFlipView}" Value="{StaticResource ImageDetailsTemplate}"/>
        </Core:DataTriggerBehavior>
        <Core:DataTriggerBehavior Binding="{Binding ShowDetails}" Value="False">
            <Core:ChangePropertyAction PropertyName="ItemTemplate" TargetObject="{Binding ElementName=imagesFlipView}" Value="{StaticResource ImageOnlyTemplate}"/>
        </Core:DataTriggerBehavior>
    </Interactivity:Interaction.Behaviors>

    <FlipView Grid.Row="0" x:Name="imagesFlipView"   VerticalContentAlignment="Top"
        ItemsSource="{Binding Pictures}"
        ItemTemplate="{StaticResource ImageOnlyTemplate}"
        HorizontalAlignment="Stretch" Grid.ColumnSpan="2" />
    <CheckBox x:Name="checkBox" Grid.Row="1" Click="CheckBox_Click" Content="Details Enabled" IsThreeState="False" IsChecked="{Binding ShowDetails, Mode=TwoWay}"/>
</Grid>
From Visual Studio Right click the PictureView.xaml and choose Open In Blend…
This will open Blend for Visual Studio 2013 and load in the PictureView.xaml page. Once loaded choose the main Grid on the Objects and Timeline and then Choose Behaviors on the Assets tab:
Drag the DataTriggerBehavior onto the Grid, select it in the Objects and Timeline window, then locate the Properties Tab which should now contain the properties for the DataTriggerBehavior:
Click the little square next to the Binding edit box and choose “Create Data Binding…”. This should bring up the data binding Window. Set it to look like the following and click OK.
Back in the Properties tab set the ComparisonCondition to “Equal” and the Value to “True”. When finished the properties for the DataTriggerBehavior should look like the following:
Now we need to add the Action to take when the DataTriggerBehavior condition is true. In this case when the ShowDetails property is true we want to set the ItemTemplate on our FlipView to be the ItemDetailsTemplate. Click the “…” Button next to the Actions(Collection), and then in the dropdown choose <Other Type…>. When the selection dialog appears select ChangePropertyAction and click OK. Back in the Actions dialog click Add.

When the selection Dialog box appears select ChangePropertyAction and click OK, then back in the Actions dialog click Add. This will bring up the properties for the actions in the right hand side. Select the little square next to TargetObject and choose Create Data Binding… and set the data binding as follows and click OK:

In the PropertyName dropdown set the value to ItemTemplate.
Click the little square next to the Value Box and select Local Resource->ImageDetailsTemplate.
When finished the Actions dialog should look like this. Click OK To finish setting up the Action for our DataTriggerBehavior

Repeat steps 3-10 to set up a DataTriggerBehavior for when ShowDetails is false. In step 9 set the Value to Local Resource->ImageOnlyTemplate
Save the file in Blend and go back to Visual Studio.
Running the Application
If you build and run the application in Visual Studio you should get a flip view with 6 items. When you click the Details Enabled checkbox the FlipView item template should change to the ImageDetailsTemplate. When you uncheck it, it should switch back to the ImageOnlyTemplate. I hope this blog has been useful for learning how to use a DataTriggerBehavior with a ChangePropertyAction. Until next time, have fun coding!
Don’t forget to follow the Windows Store Developer Solutions team on Twitter @wsdevsol. Comments are welcome, both below and on twitter.
- Bret Bentzinger(Microsoft) @awehellyeah


