How to Layout a Data Entry Form
This article has a corresponding video that can be viewed here.
The WPF & Silverlight Designer provides the ability to quickly layout a data entry form. This walk-through will provide a workflow for laying out Labels and TextBoxes using the Grid control as the layout panel.
Table of Contents
- Completed Form UserControl
- Step One – Add Rows and Columns and Controls
- Step Two – Auto Size Label Controls
- Step Three – Auto Size TextBox Controls
- Step Four – Auto Size Rows
- Step Five – Size Columns
- Video
- Comments
Completed Form UserControl
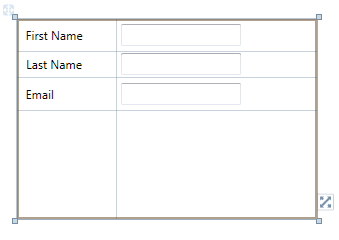
Figure 1 Completed Form
Step One – Add Rows and Columns and Controls
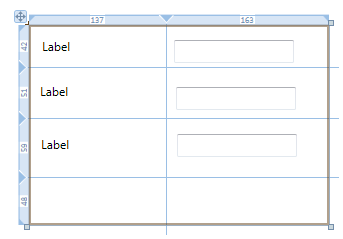
Figure 2 Data Entry Form Step One
- Add a new UserControl to your project.
- Select the root Grid by clicking inside the UserControl.
- Add a column by clicking on the upper Grid rail in the desired location.
- Add three rows by clicking on the Grid rail in the desired location.
- Drop the required Label controls in the first column.
- Drop the required TextBoxes or other controls in the second column.
| Tip |
Notice that the column width is 137. The default width of a Label control when added from the ToolBox is 120. Making the target column wider than the Label makes it easy to initially drop the Label control on the design surface. The row heights are also unimportant at this stage. Creating the rows taller than the Label or TextBox control makes it easy to create the controls. |
Step Two – Auto Size Label Controls
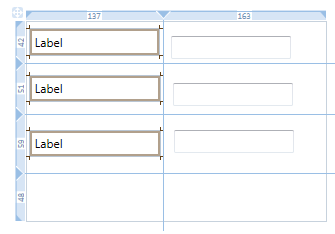
Figure 3 Data Entry Form Step Two
- Multi-select the Label controls by CTRL+clicking each control on the design surface or use the Document Outline.
- Using the Properties Window set the following properties:
- Height to Auto
- Width to Auto
- VerticalAlignment to Center
- HorizontalAlignment to Stretch
- Margin to 3.5
| Note |
The Margin of 3.5 conforms to the spacing requirements documented here: https://msdn.microsoft.com/en-us/library/aa511279.aspx#spacing |
Step Three – Auto Size TextBox Controls
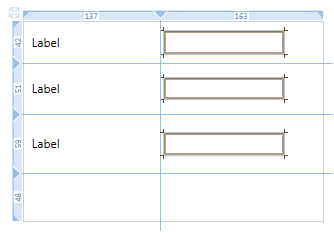
Figure 4 Data Entry Form Step Three
- Multi-select the TextBox controls by CTRL+clicking each control or use the Document Outline.
- Using the Properties Window set the following properties:
- Height to Auto
- Width to desired fixed value or Auto
- VerticalAlignment to Center
- HorizontalAlignment to Left or Stretch. If using fixed width use Left or if using Auto width use Stretch.
- Margin to 3.5
Step Four – Auto Size Rows
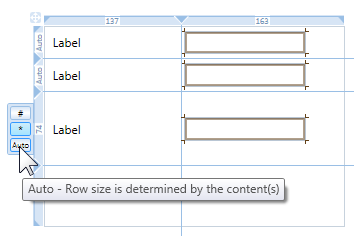
Figure 5 Resizing Grid Rows
- Resize the rows with Labels to Auto.
- Hover the mouse over the left grid rail.
- The Grid Row size selector will appear.
- Click on Auto.
- Repeat for each row.
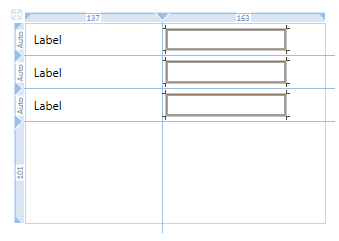
Figure 6 Data Entry Form Step Four
Figure 6 above shows the form with each row with controls set to Auto size.
Step Five – Size Columns
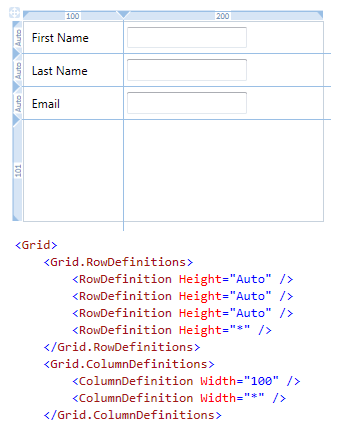
Figure 7 Data Entry Form Step Five
- Assign the Content property to each Label control.
- Set column one of the Grid to fixed size of 100.
- If you need to localize your application you can leave the Label column set to Auto size. Then when the Label text grows wider when a different language is used at runtime the Label column will automatically grow in size.
- If space is a consideration, the TextBlock control provides text wrapping. Using the same technique also set the MaxWidth property on the column. This will ensure that the column is never wider than this value. If the TextBlock text is wider than the MaxWidth it will wrap its text. Since the rows are Auto sized, when the text wraps that row's height will be increased to accommodate the wrapped text.
- Set column two of the Grid to Star size.
| Note |
The Grid row and column size selector does not allow changing of the numeric values for Fixed or Star sizes. Instead use the Properties Window or XAML editor. |
Comments
Microsoft values you opinion about our products and documentation. In addition to your general feedback it is very helpful to understand:
- How the above features enable your workflow
- What is missing from the above feature that would be helpful to you
Thank you for your feedback and have a great day,
Karl Shifflett
Visual Studio Cider Team