How to Insert a Row in a Data Entry Form
This article has a corresponding video that can be viewed here.
A common task after a form is developed is inserting a new row in the form. This short walk-through will show you how to insert a new row in an existing data entry form.
For this exercise our requirement is to insert a Label and TextBox for the middle initial. This row needs to be inserted between the first and last name rows.
Inserting a row is easy. Remember that when you create a row using the Grid designer, you are in effect splitting a row.
Table of Contents
- Steps
- Step One – Verify the Grid Can Grow
- Step Two – Set Target Row to be Split to Fixed Size
- Step Three – Increase Target Row Size
- Step Four - Add New Row by Splitting the Target Row
- Step Five – Set Split Row Sizes
- Step Six – Add New Controls, Set Control Sizing, Auto Size Row
- Comments
- Video
Steps
- Verify the grid can grow, if not provide additional space for the new row
- Set the target row to be split to Fixed sizing
- Increase target row size
- Add new row by splitting the target row
- Set split row sizing
- Add new controls, set control sizing, set row sizing
Before and After Inserting a New Row
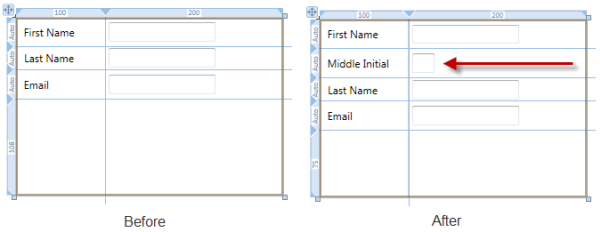
Figure 1 Before and After
Step One – Verify the Grid Can Grow
- Check to see if the Grid can grow.
- If the Grid has a Star size row this takes care of this requirement.
- If not resize the container that the Grid is a child of to allow the Grid to grow in height.
Step Two – Set Target Row to be Split to Fixed Size

Figure 2 Setting Target Row to Fixed Size
- Using the Grid row size selector, set the row you need to split to Fixed size.
Step Three – Increase Target Row Size
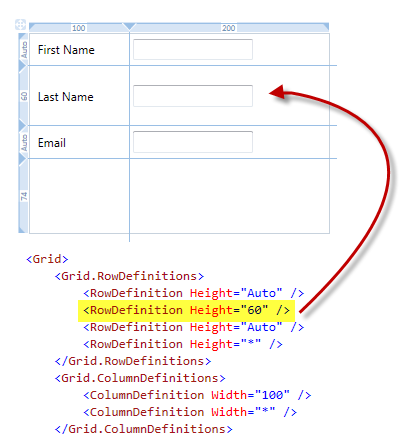
Figure 3 Increase Target Row Size
- In the XAML editor or Properties Window, set the row height you are splitting to a higher value. For this example the row was resized to 60.
Step Four - Add New Row by Splitting the Target Row
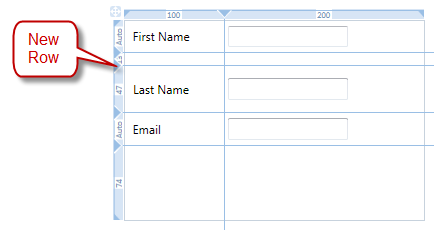
Figure 4 Add New Row by Splitting the Target Row
- Click on the Grid rail to add a new row.
- If you click above or below the existing controls you won't cause those controls to span across two rows.
- If you add the row and the Grid line is touching the existing controls, those controls will be spanned across two rows. In this case after you have inserted the new row, you'll need to also remove the Grid.RowSpan attached property from those controls.
- In Figure 4 above the new row was added above the existing controls in the row.
- When the new row is inserted, controls in higher numbered rows have their Grid.Row attached property automatically incremented.
Step Five – Set Split Row Sizes
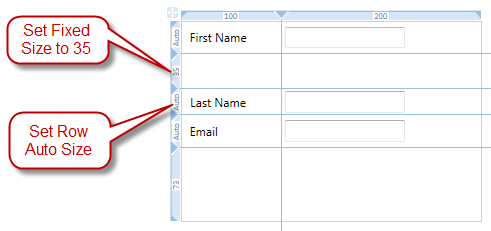
Figure 5 Inserting Row Step Three
- Use the Grid row size selector and set the last name row to Auto size.
- Use the XAML editor or Properties Window and set the new row's Fixed size to 35.
Step Six – Add New Controls, Set Control Sizing, Auto Size Row
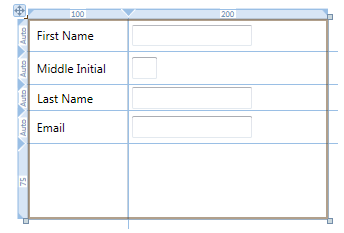
Figure 6 Add New Controls, Set Control Sizing, Auto Size Row
- Drag a Label to the first column, second row.
- Using the designer, resize the Label so that it fits in the first column.
- Using the Properties Window set the following properties on the new Label:
- Height to Auto
- Width to Auto
- VerticalAlignment to Center
- HorizontalAlignment to Stretch
- Margin to 3.5
- Content to Middle Initial
- Drag a TextBox to the second column, second row.
- Using the Properties Window set the following properties on the new TextBox:
- Height to Auto
- Width to 25
- VerticalAlignment to Center
- HorizontalAlignment to Left or Stretch. If using fixed width use Left or if using Auto width use Stretch.
- Margin to 3.5
- Using the Grid row size selector, set the new row to Auto size.
| Note |
The Margin of 3.5 conforms to the spacing requirements documented here: https://msdn.microsoft.com/en-us/library/aa511279.aspx#spacing |
You have just quickly inserted a new row in your data entry form.
Comments
Microsoft values your opinion about our products and documentation. In addition to your general feedback it is very helpful to understand:
- How the above features enable your workflow
- What is missing from the above feature that would be helpful to you
Thank you for your feedback and have a great day,
Karl Shifflett
Visual Studio Cider Team