Deploying files using Mapped Folders
With Visual Studio 2010 SharePoint Developer Tools, the concept of the Mapped Folder was introduced. A mapped folder is a convenient way for developers to specify a location for any files that need to be deployed on to the SharePoint file system, all from within in a Visual Studio solution. Mapped folders can be included as part of a deployment package (.WSP) and the files will get copied to the correct location when the WSP is installed on to the server.
Let’s take a quick look at how a developer might use a mapped folder. Say a developer wants to develop a custom application page for their SharePoint site that will consume a custom image. The SharePoint server has a designated location for both application pages and images. With mapped folders, the developer can ensure that their files will be deployed to the correct location. Here’s an example:
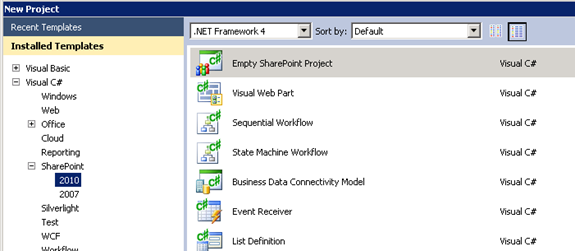
First we need to create a project. In this example, we will start by creating an Empty SharePoint project (Installed Templates->Visual Basic/C#->SharePoint->2010).
Next, we’ll create our custom image that we want to display. First, let’s setup a mapped folder to the Images directory on the SharePoint farm. To do this, we simply right-click on the project node and select “Add->SharePoint “Images” Mapped Folder”:
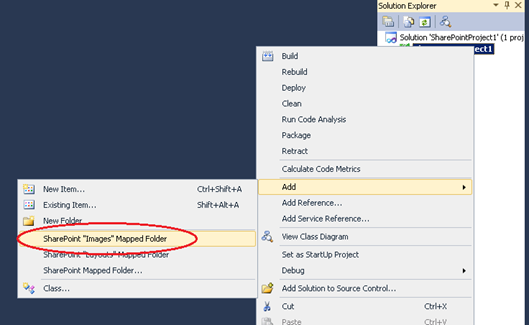
This will create a mapped folder named “Images” in our project. (You can also create it via the “Project->Add SharePoint “Images” Mapped Folder on the main menu bar”)
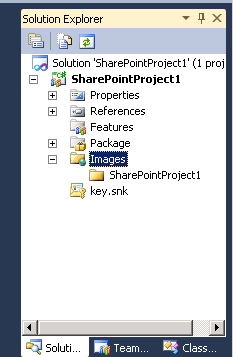
In the Solution Explorer, mapped folders look very similar to normal folders but have a small green globe in the bottom right corner of the icon. You’ll notice that underneath the mapped folder there is a sub folder with the same name as the project. This is to help organize images specific to your project and keep developers from inadvertently overwriting another item with the same name.
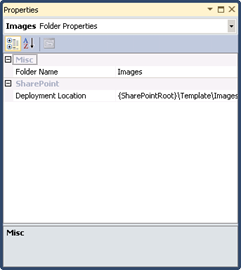
Also, if you select the mapped folder and open the property window (F4), you’ll see two entries: Folder Name and Deployment Location. The Deployment Location indicates the location relative to the SharePoint root directory ({SharePointRoot}) on the SharePoint farm.
Now that we have our mapped folder, we can right-click on the project directory underneath it and add our image file (“Add->New Item’). In this example, I’ve added a bitmap image named ”Bob.bmp”.
The next step is to create the application page and modify it to show our image. To start, right-click on the project node in the Solution Explorer and select “Add->New Item”. When the Add New Item dialog appears, the “2010” node under SharePoint will be selected. From the list of templates, select the “Application Page” item, give it the name you want, and click “Add”. You’ll notice that when the application page is added to the project, it automatically gets created under the “Layouts” mapped folder, which is the default location on the SharePoint file system for application pages:
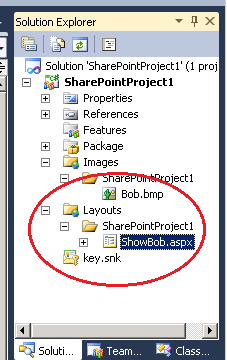
Following its creation, the .aspx file we just added should be opened in the designer. Locate the <asp:Content> element with the ID equal to “Main”. Within that element add an image element and set the ImageUrl attribute to point to the image in your product. It should look like this:
 <asp:Content ID="Main" ContentPlaceHolderID="PlaceHolderMain" runat="server">
<asp:Label ID="Label1" runat="server" Text="Label" Font-Size="Medium">This is Bob.......</asp:Label>
<asp:Image ID="Image1" runat="server" ImageUrl="~/_layouts/Images/SharePointProject1/Bob.bmp" />
</asp:Content>
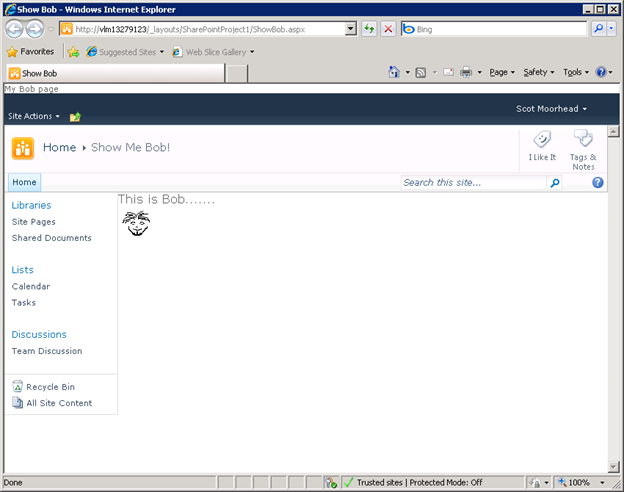
The last thing we’ll want to do to make testing our project easier is to set the application page to be our startup item when we F5. To do this, select the project node in the Solution Explorer and open the property window (F4). In the property window, select the “Startup Item” property and choose our application page from the drop down list. Now when we F5, it will take us right to our application page:
A couple of things to know about mapped folders. First, since mapped folders effectively deploy files onto the SharePoint file system, they are only allowed in farm level solutions. Sandboxed solutions are restricted to only deploying content to the content database on the server. In VS, when you try add a mapped folder to a sandboxed solution, the package validation will generate an error regarding this.
Second, as you saw when we added the application page, some items go into certain mapped folders by default when they are added to the project. Another example is User Control items (.ascx) which are automatically placed into the User Control mapped folder. While these are the SharePoint “default” locations, there may be times you need to place one of these files in a different location, and this can be done by mapping the folder to a different location.
Finally, you can create a mapped folder to any folder under the SharePoint root on the farm by opening the Add SharePoint Mapped Folder dialog (Project->Add SharePoint Mapped Folder… from main menu, Add->SharePoint Mapped Folder… from project context menu:

For instance, if you had a custom web service you wanted to deploy to the SharePoint server, you could simply add a mapped folder that points to the ISAPI directory on the SharePoint file system and dropped the web service in there. Then, when the package gets deployed to the server, the web service will automatically be placed in the ISAPI directory and available for consumption.
Additional Resources
MSDN: How to: Add and Remove Mapped Folders
Scot Moorhead
Comments
Anonymous
March 14, 2010
It seems like if I add a mapped folder for "features", my features don't get installed when I deploy the .wsp.Anonymous
March 14, 2010
Mapped folders are designed for the deployment of files as 'TemplateFile' or 'RootFile'. They do not work for files in the 'features' section of the hive as these files need to be marked as a 'FeatureManifest' in the package manfiest. To deploy features, you will have to add features to the 'Features' collection in the solution explorer.Anonymous
August 01, 2010
I was trying to deploy a logo to my Custom Template for branding purposes (actually my Custom Template is based on the Publishing site collection and it shipped with the "Adventure Works" logo) but it doesn't work... If I add an image to my mapped images folder I can display it inside my applications pages, this means that it's there and that is actually mapped right, but if I put the same link in the SiteLogoUrl it doesn't change the logo. This shouldn't be too difficult as specified in the MSDN documentation about the Project Element in Onet.xml: SiteLogoUrl: Optional Text. Specifies a server-relative URL for a custom image to use for the site logo. For example, /_layouts//images/MyCustomLogo.gif. SiteLogoDescription: Optional Text. Provides a description of the site logo. Anyone can help me? Thank you.Anonymous
August 01, 2010
Nicola, you are likely missing the sub-folder which is created for you automatically when you add a Images mapped folder. Take a look at the mapped folder in your Visual Studio project, under the Images mapped folder you will likely see a folder with the same name as your project. We add this additional sub-folder to help avoid collision between images with the same name from different projects. You can rename, or even delete this, if you like, but you need to make sure to take into consideration when you point at the images you deploy. For example, I just created a project named SharePointProject15, then added a Images mapped folder, and then added an imaged named "Cross logo.jpg". If I want to use this image as my site image, I set it to "/_layouts/images/SharePointProject15/Cross logo.jpg". Hope this helps, Mike Morton Senior Program Manager Visual StudioAnonymous
August 10, 2010
Thanks! good post..was helpful.Anonymous
January 18, 2012
Thank you for the post. It is very detailed. I am looking for a way to place a .sitemap file in a new folder inside the 14templatelayouts1033STYLES directory, and remove both the folder and the .sitemap file when the solution is retracted. I can put it in the right place using mapped folders as you describe, but how do remove the file from the server when the .wsp is retracted? Thanks again, robAnonymous
November 05, 2013
Thanks for the postAnonymous
September 11, 2014
How do I not overwrite a file upon deployment? I have some settings in an xml doc in the layouts folder. I would like to NOT overwrite the file when deploying the solution, because if the file exists, it is likely to have been customized and newer than the xml file in the project.Anonymous
November 16, 2014
The comment has been removedAnonymous
April 01, 2015
Thanks for the clear and precise explanation. I still find this handy even so many years after it was written.