Working with multiple network adapters in a virtual machine
Thanks for coming back to the CORE Team blog site. This blog will address working with multiple network adapters in a virtual machine. Many of you out there may not be interested in this because you work with virtual machines that only use a single network adapter. However, for those of us that frequently work with virtualized Failover Clusters, virtualized iSCSI Target Servers or even virtualized RRAS servers, we find ourselves in a position where virtual machines require more than one network adapter. I hope that the information here will provide some needed relief for you.
We all know that we cannot 'hot-add' network adapters to running virtual machines. The choices we have are to either configure all the network adapters before starting the virtual machine, or configure them one at a time, which requires the virtual machine to be shut down first. As an example, here is what I typically have to deal with when configuring nodes in a Failover Cluster. I require three networks; one for Public access, one for Cluster only communications, and one for connectivity to the shared storage provided by an iSCSI target.
I think we can all agree that the information displayed is insufficient to assist with the configuration of each of the networks. Let us address each scenario individually.
Windows Server 2012
The great thing about Windows Server 2012 is that there is lots of PowerShell help available to assist. We will use PowerShell to work through configuring the networks in the virtual machine. As shown above, here is the starting point -
One thing that I like to do is to make sure the Hyper-V virtual switch configuration makes sense for what I am doing. My virtual switch names are Public, Cluster and iSCSI because they make sense and meet my needs. Using that information, I use the Get-VMNetworkAdapter cmdlet to get the information I will need.
Get-VMNetworkAdapter -VMName 2012-Test | ft -Autosize Name,SwitchName,MacAddress,IPAddresses |
In the virtual machine, I use the Get-NetAdapter cmdlet to get additional information I will need.
Get-NetAdapter | ft -Autosize Name,InterfaceDescription,ifIndex, MacAddress |
Using the MacAddress information, I can sort out the 'players.'
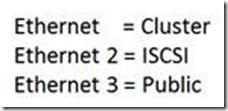
Using the Get-NetAdapter and Rename-NetAdapter cmdlets, change the name of the connections in the virtual machine.
Get-NetAdapter -Name 'Ethernet' | Rename-NetAdapter -NewName Cluster Get-NetAdapter -Name 'Ethernet 2' | Rename-NetAdapter -NewName ISCSI Get-NetAdapter -Name 'Ethernet 3' | Rename-NetAdapter -NewName Public |
Once the names of the adapters are changed, it is time to configure the IP addressing. To accomplish this, use the New-NetIPAddress cmdlet.
New-NetIPaddress -InterfaceIndex 13 -IPAddress 1.0.0.3 -PrefixLength 8 -DefaultGateway 1.0.0.10 New-NetIPaddress -InterfaceIndex 14 -IPAddress 192.168.0.3 -PrefixLength 24 New-NetIPaddress -InterfaceIndex 15 -IPAddress 172.16.0.3 -PrefixLength 16 If name resolution is required, configure a DNS server address on the Public interface Set-DnsClientServerAddress -InterfaceIndex 13 -ServerAddresses ("1.0.0.110","1.0.0.100") |
To verify the new IP addresses, in the Hyper-V Host, re-run the Get-VMNetworkAdapter cmdlet or in the virtual machine run ipconfig /all.
This completes the configuration of the network adapters and it was accomplished without having to reboot the virtual machine.
Windows Server 2008 R2
Windows Server 2008 R2 includes PowerShell as well, but it does not come close to being as useful, or as powerful, as the PowerShell functionality found in Windows Server 2012. To complete the very same process as was executed in Windows Server 2012 requires a little different strategy. As shown above, here is the starting point.
Use the Get-VMNetworkAdapter cmdlet to get the information I will need.
Get-VMNetworkAdapter -VMName Contoso-FS2 | ft -Autosize Name,SwitchName,MacAddress,IPAddresses |
Windows Server 2008 R2 comes with PowerShell Version 2.0 installed. Use PowerShell to obtain the network adapter information we need.
Get-WmiObject -query "select * from Win32_NetworkAdapter where name like 'Microsoft Hyper-V Network Adapter%'" | FL Name,MACAddress |
Using the MacAddress information, I can sort out the 'players.'
Next, use the netsh command to finish the configuration. First, rename the adapters.
Netsh interface set interface name="Local Area Connection" NewName="Public" Netsh interface set interface name="Local Area Connection 2" NewName="Cluster" Netsh interface set interface name="Local Area Connection 3" NewName="ISCSI" |
Use the netsh interface show interface command sequence to show the new names for the interfaces.
Set the IP Address configuration (set the Default Gateway on Public) on each interface and verify using ipconfig /all.
Netsh interface ip set address name="Public" static 1.0.0.4 255.0.0.0 1.0.0.10 1 Netsh interface ip set address name="Cluster" static 172.16.0.4 255.255.0.0 Netsh interface ip set address name="ISCSI" static 192.168.0.4 255.255.255.0 |
If name resolution is required, configure a DNS server.
Netsh interface ip set dnsservers name= "Public" static 1.0.0.110 primary |
This completes the configuration for the Windows Server 2008 R2 virtual machine network adapters. Again, the configuration was accomplished without rebooting the virtual machine.
I would also like to acknowledge the help from my teammate - Sean Dwyer. Thanks, and come back again soon.
Chuck Timon
Senior Support Escalation Engineer
Microsoft Enterprise Platforms Support
High Availability\Virtualization Team
Sean Dwyer
Senior Support Escalation Engineer
Microsoft Enterprise Platforms Support
High Availability\Virtualization Team


