Installing Volume Activation Services Role in Windows Server 2012 to setup a KMS Host
Hi,
Today’s blog will walk you through installing the Volume Activation services role on Windows Server 2012 so you can setup a new Windows Server 2012 KMS host.
Initial Configuration of a new Windows Server 2012 KMS host
1. After installing Windows Server 2012 open Server Manager and choose “Add roles and features”
2. Choose Role-Based or Feature-Based installation
3. Choose your local Windows Server 2012 Server from the Server Pool. Note: These steps do not cover adding the role to offline virtual hard disk.
4. Choose “Volume Activation Services” role.
Figure 1: Add roles and feature wizard
5. When complete you will see Yellow Triangle in Server manager which means that the role is installed but there is additional post deployment configuration required. Click Volume Activation Tools.
Figure 2. Additional Post Deployment Configuration
6. Choose Key Management Service (KMS) then select the Windows Server 2012 computer you want to create as KMS host. You can also enter different credentials to connect to the server
Figure 3. Select volume Activation Method
7. Enter your KMS Host Key (CSVLK). Note: You can only install a Windows Server 2012 CSVLK at this point. A Windows Server 2012 CSVLK can activate Windows Vista, Windows Server 2008, Windows 7, Windows Server 2008 R2, Windows 8, and Windows Server 2012 KMS clients.
Figure 4. Install your KMS Host Key (CSVLK)
8. Click yes for warning on that you are replacing the currently installed key
Figure 5. Uninstall existing key
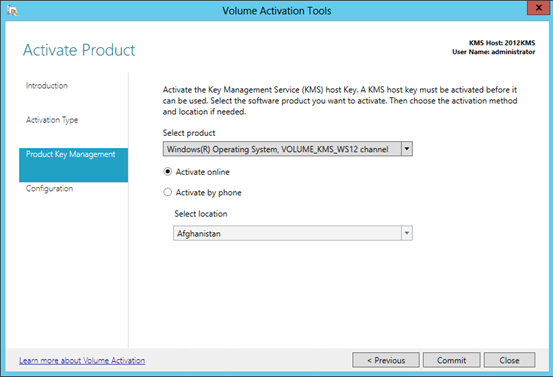
9. Click Activate Product
Figure 6. Activate product
10. Select the product and type of activation(Online or Phone) and click Commit
Figure 7. Activate online or phone
11. On the summary page click Close to accept defaults or click Next to configure options
Figure 8. Default KMS Configuration
12. If you click Next you can configure the following options:
- Volume License Activation Interval(Default 2 hours): How often the KMS client attempts activation before it is activated and during Grace and Notifications
- Volume License renewal Interval(Default 7 days): How often KMS client renews it’s activation
- KMS TCP Listening port(Default 1688): Port used by KMS
- KMS Firewall Exceptions: Which firewall profile to add KMS exception to
- DNS records (Default Yes): Publish the KMS record to DNS. If unchecked you can create the record manually using these steps
- Publish to custom DNS zones: Names of additional DNS zones to publish the KMS record to
Figure 9. Customize default KMS Host configuration
13. Click Commit to save changes
Changing Configuration of KMS Host
Once you have configured the KMS host you can check the configuration by opening Server Manager, Click Tools, “Volume activation tools”. You will need to enter the computername and now you get a prompt where you can choose “Skip to Configuration”
Figure 10. Skip to Configuration
The Configuration screen shows some of the common configuration options available. See above for additional information on these options. In previous versions of Windows some of these options were only available when using slmgr.vbs or specific registry keys. Windows Server 2012 adds GUI option to configure these options now
Figure 11. KMS Host Configuration
You should also verify that the KMS host registered in DNS. For additional information see the following KB article:
Event ID 12293: 0x80072338 error registering KMS host in DNS
To manage KMS hosts, Active Directory Based activation, or get detailed information about activation for client machines you should install VAMT 3.0 which is available to install as part of the Automated Deployment Kit. This can be installed on the KMS host or client machine.
Good luck with your activations :)
Scott McArthur
Senior Support Escalation Engineer
Microsoft Commercial Support & Services


