Managing Load Test Results
This post will give you an overview of the new Load Test Result Manager Feature in the Orcas release of Visual Studio. One set of issues that we heard after the release of VS 2005 was it was difficult to manage load test results. If you wanted to open a result, you had to find the correct trx file and there was not a good way to search through trx files. Another issue around management was how to delete old runs from the repository. Again the problem here was locating the runs you wanted to delete. A third issue around results management was it was difficult to move the results of a load test run from one database to another. Maybe you wanted to move the results from a SQL express database to a SQL Server install. Or maybe you ran the tests on a private network somewhere and then needed to get the results back to your machine to do the analysis. Moving results around with VS 2005 was not easy.
Each of these issues has been covered with the new Load Test Result Manager Feature. I’ll walk you through how perform each of the above tasks.
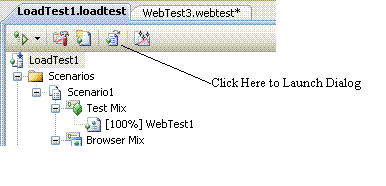
1. Launch the dialog – The only way to launch the dialog is from a load test. So either launch the dialog from an existing load test or create a new load test and then click the “Open and Manage Results” button on the load test toolbar.
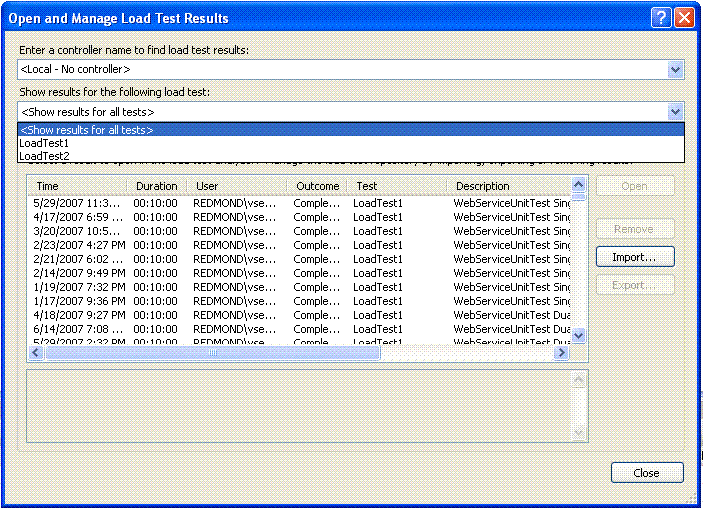
2. Here is what the dialog will look like when launched:
3. The way the dialog determines which database to connect to is by selecting either a controller or <Local – No controller>. Controllers have database connection strings associated with them as does the < Local – No controller > instance. You can change the database connection string by launching the Administer Test Controller dialog from the top level Test menu. The easiest way to point to a particular database is to change the connection string associated with < Local – No controller > Then in the Open and Manage Results, select <Local – No controller> as the controller.
4. After selecting a controller, the dialog will populate the results pane. By default, the Load Test Selected in the “Show results from following Load Test” dropdown will be the load test that the dialog was launched from. This drop down will be populated with all load tests in the database, which will make it easy to filter the results based on the load test name. You will also have the option to display all load tests in the database.
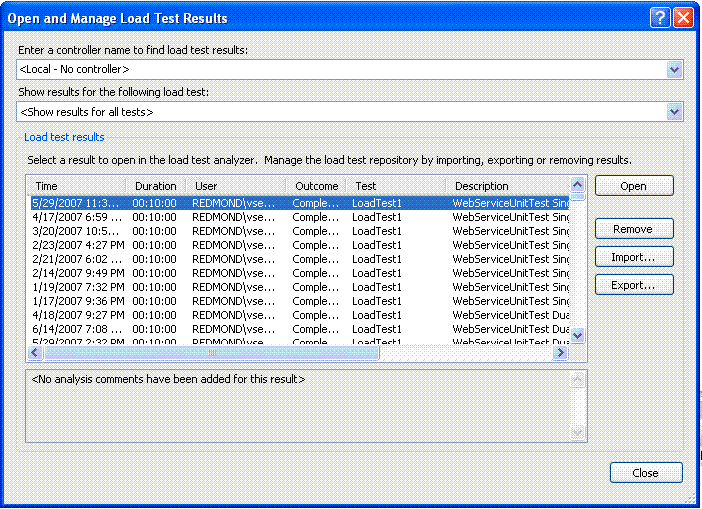
5. Here is what the populate dialog will look like after selecting a controller and load test.
6. Before going into the operations allowed from this dialog, I want to point out the Description column and the read only text box below the results grid. These controls are populated by filling out information in the Analysis dialog in the Load Test Execution UI. By adding analysis comments to the load test, it will be much easier to select which version of a load test you want to load. On the analysis dialog, you can enter a short description and a long description. The short description will appear in the results grid, and the long description will appear in the text area below the results grid. Check out this blog post on the Analysis dialog: Analysis Dialog
7. Opening a result: Simply select a single result and click Open. This will load the results into the Post Run window in VS.
8. Removing results: Select the results you would like to delete from the database and click Remove.
9. Moving results: First use this dialog to connect to the database that has the results from your load test runs. Then select which runs you would like to move and click export. This will create an load test archive file. You can then take these results and restore them on any machine you like. To import them into another database, use this dialog to connect to the new database. Then click the import button and find your archive file. After the operation is complete, your tests will appear in the results grid. You will have had to already created the load test database on the new machine. This can be done by running the loadtestresultsrepository.sql which is located in the \Program Files\Microsoft Visual Studio 9.0\Common7\IDE folder.
This feature will definitely make it much easier to manager load test results. This was available in the beta 1 version of Orcas, so you could downloadthe beta and use it today.
Comments
Anonymous
June 14, 2007
Check out this post for information on how to use the new Manage Load Test Results Feature: http://blogs.msdn.com/slumley/pages/managing-load-test-results.aspAnonymous
June 14, 2007
This post will give you an overview of the new Load Test Summary Report available in the Orcas releaseAnonymous
June 28, 2007
Lot's of new stuff for web, load, and unit tests in Orcas. Follow the links for more info. Web test ·Anonymous
August 17, 2007
Orcas - Visual Studio Team System 2008 - new features coming for Web and Load testing and a feature ofAnonymous
September 21, 2007
One of the activities I get involved in with customers as an ADC is to work with customers in our performanceAnonymous
September 21, 2007
One of the activities I get involved in with customers as an ADC is to work with customers in our performanceAnonymous
October 23, 2007
Technorati tags: VSTS , Team Test , Ed Glas A giant thank you goes out to Mr Glas for consilidating andAnonymous
December 17, 2007
Visual Studio Team System for Testers Content Index for Web Tests and Load Tests Getting Started OnlineAnonymous
April 03, 2008
In VSTS 2008, it is now possible to easily export load test results from one test environment and importAnonymous
July 24, 2008
Check out these videos on MSDN. Here's the landing page for VSTS videos. Here are the testing relatedAnonymous
December 22, 2008
The comment has been removedAnonymous
February 01, 2011
this blog helped me how to manage the load tests,thanx


