Windows Server 2012 Active Directory Certificate Services System State Backup and Restore
Windows Server 2012 System State Backup allows an administrator to back-up several Operating System components including those required for a successful restore of a Certification Authority. Any certification authority backup should include the private key, certificate database, logs and the certification authority’s registry configuration.
Windows Server Backup Feature should be installed on the certification authority to take a System State Backup. It has been enhanced in Windows Server 2012 to allow the administrator to take a System State Backup using the feature’s Graphical User Interface (GUI), and the command line. Furthermore, System State Backup in Windows Server 2012 allows the administrator to back-up the certification authority’s Private Key without the need to install any hotfixes.
Note: Windows Server 2008 and 2008 R2 required installing a hotfix to back-up the private key using System State Backup
Steps Required to Back-up the Certification Authority Using System State Backup
There are two easy steps to prepare the certification authority for a System State Backup.
1. Install Windows Server Backup Feature
2. Schedule a System State Backup
Install Windows Server Backup Feature
Windows Server Backup is not enabled by default on Windows Server 2012. The feature needs to be installed before taking or scheduling a System State Backup.
1. Log on to the certification authority and select Manage in Server Manager
2. Click Add Roles and Features
3. Click Next in Before you begin screen
4. Select Role-based or feature-based installation and then click Next
5. Select the local server in Select destination server screen
6. Click Next in Select server roles screen
7. Select Windows Server Backup in Select features screen and then click Next
8. Select Install in Confirm installation selections screen
9. Click Close
Note: The Winddows Server Backup feature can be installed using Install-WidnowsFeature –name Windows-Server-Backup cmdlet
Schedule a System State Backup
Windows Server Backup allows administrators to back-up the system to a non-critical volume only, setting a registry key as described in KB944530 provides a workaround to this limitation, but it is not recommended to run in production because it might cause a critical volume to fill up quickly. In general, make sure you have a volume, or disk or network share designated to a certification authority’s backup other than your c: drive.
Using the Graphical User Interface (GUI)
1. Log on the certification authority and select Tools in Server Manager
2. Click Windows Server Backup
3. Select Local Backup
4. Click Backup Sched
5. Click Next in Getting Started screen
6. Click Custom – I want to choose custom volumes, file for backup and then click Next
7. Click Add Items in Select Items for Backup screen
8. Select System State and then click OK
9. Click Next in Select Items for Backup screen
10. Choose the backup run time frequency in Specify Backup Time and then click Next
11. Select the backup destination in Specify Destination and then click Next
Note: The rest of this document assumes having a dedicated volume to back-up the certification authority to. The wording might be slightly different is you chose a network share for your backup location.
12. Click Add in Select Destination, select the dedicated volume and then select OK
13. Click Next
14. Review the scheduled backup settings in the Confirmation screen and then click Finish
Using the Command Line
Windows Server Backup can be configured using the command line. The command line tool Wbadmin has many verbs that can identify backups, volumes, disks, create jobs and many more. The disk identifier has to be known before scheduling any backup job.
The disk identifier is retrieved by running Wbadmin get disks
Note the Volumes label in the screen shot. The scheduled backup should target non-System Reserved volumes. The volume that has the Disk Identifier {eb9c44d8-0000-0000-0000-000000000000} is the clear choice for the backup files.
The next step is creating a scheduled task to take a System State Backup to the volume specified. This is also achieved using the Wbadmin command line tool with the enable backup verb. For example, run the following command to set up a backup job to run daily at 10:00 PM and include System State Backup
Wbadmin enable backup –addtargret: {eb9c44d8-0000-0000-0000-000000000000} –schedule:22:00 –SystemState
Note: If you prefer to take a one time System State Backup, then run Wbadmin Start SystemStateBackup –backuptarget:<non-critical volume DriveLetter>
Using PowerShell
Setting a schedule System State Backup might seem intimidating at first. The tasks involve creating a backup policy, a backup directory, a schedule, and then trying all of that to the policy. Let us go through them one at a time
The first command stores the result of the New-WBPolicy cmdlet in the variable named $Policy
PS C:\> $Policy = New-WBPolicySetting the volume as the System State Backup Path
This command creates a WBBackupTarget object that uses a volume with drive letter E: as the backup storage location. You can add multiple volumes for storage to the WBPolicy object that contains the backup policy.
PS C:\> $volumeBackupLocation = New-WBBackupTarget -VolumePath E:
This command adds the system state to the backup policy in the $Policy variable.
PS c:\> Add-WBSystemState -Policy $Policy
This command adds the backup location – volume E - to the backup policy in the $Policy variable
PS C:\> Add-WBBackupTarget -Policy $Policy -Target $volumeBackupLocation
This command sets the backup schedule configured in the $Policy variable to run daily at 10 PM
PS C:\> Set-WBSchedule -Policy $Policy –Schedule 22:00:00
This is the last command, where it sets the backup schedule based on the $Policyvariable
PS C:\> Set-wbpolicy –policy $Policy
Steps Required to Restore the Certification Authority from System State Backup
The steps listed in this section detail three different approaches to restore the certification authority using Windows Server Backup Graphical User Interface (GUI), Windows Server Backup Command Line, and Windows Server Backup PowerShell.
General Steps Required to Restore the Certification Authority
The general steps to restore the certification authority are the preliminary steps required before attempting any other restore activity. These steps are:
1. Install Windows Server 2012 Standard or Datacenter Edition depending on the certification authority’s previously installed operating system version.
2. Join the server to the same domain or workgroup
3. Access to System State backup media
4. Install Windows Server Backup Feature
Restore the Certification Authority Using Windows Server Backup GUI
1. Select Tools in Server Manager
2. Select Windows Server Backup
3. Select Local Backup
4. In Actions menu, select Recover
5. In Getting Started windowSelect This Server (local Servername) and then select Next
5. In Select Backup Date window , choose the backup to restore from and then click Next
6. In Select Recovery Type window, select System State and then then click Next
7. In Select Location for System State Recovery window, select Original Location and then click Next
8. Review your selections in the Confirmation window, make sure Automatically reboot the server to complete the recovery process is selected and then click Recover
9. Click Yes in the screen warning you about the ability to cancel, or pause System State backup once the recovery operation is started
10. At this point, System State recovery will restore the certification authority, and automatically reboot the server
11. Press Enter to continue after you log on the server after it reboots to confirm System State recovery
Restore the Certification Authority Using Windows Server Backup Command Line
1. Start the Command Prompt (Admin)
2. List the backup history by running wbadmin get versions and note the version identifier of the latest backup. The backup’s Can recover value should clearly indicate System State is included in the backup.
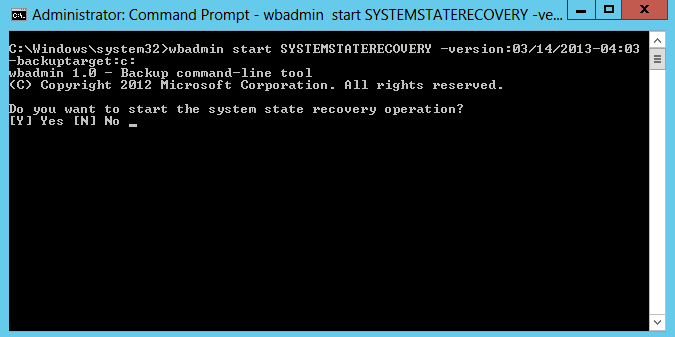
3. Start System State recovery by typing wbadmin start Systemstaterecvoery –version:<version identifier value> -backuptarget:<Backuplocation>
For example, the version identifier from my latest backup is 03/14/2013-04:03 and stored on C: , hence the command is wbadmin start systemstaterecovery –version:03/14/2013-04:03 –backuptarget:c:
4. Type Y and the then hit Enter to start System State recovery
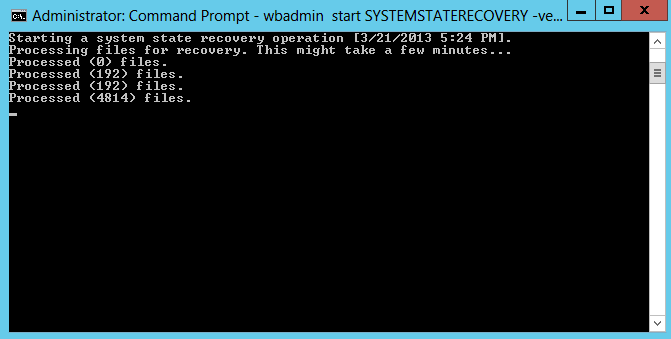
5. Type Y and then hit Enter to confirm. System State recovery will start restoring files
6. Type Y and then hit Enter to restart the system to complete the System State restore
Restore the Certification Authority Using Windows Server Backup PowerShell Cmdlets
1. Start PowerShell as an Administrator
2. Set the $Backup variable using Get-WBBackupset cmdlet
PS C:\ $Backup = Get-Wbbackupset
3. Start the system state recovery from the backup set in $Backup.
PS C:\ Start-WbSystemStateRecovery –backupset $Backup
4. Type Y when prompted to restore System State to the original location
5. Type Y to confirm the required system restart
Amer F. Kamal
Sr. Premier Field Engineer
Comments
- Anonymous
March 12, 2014
thank you for this topic - Anonymous
March 30, 2014
Excelent work! Thank you!!! - Anonymous
April 09, 2014
Bizim çiftlik oynuyorum ama oyunlarım açılmıyor yardımcı olursanız çok sevinirim - Anonymous
July 21, 2014
Very useful topic. Thank you very much! - Anonymous
June 24, 2015
Bookmark this! http://aka.ms/PkiLinks
Having taken some recent internal PKI training, I decided to


