Creating and deploying a WCF service on Windows Azure and consuming it in Windows 8 Store App
In this blog post, I will go through the steps involved in the creation of a WCF service that generates random numbers. I would also be deploying the service to Windows Azure. I will then discuss the process of creating a Windows 8 Store App that uses this WCF service. This blog post assumes you have created a Windows Azure account. You haven’t please see more information on account creation on their website. You also need to install Windows Azure SDK for Windows. You can install it from here.
Step 1: Create a WCF service
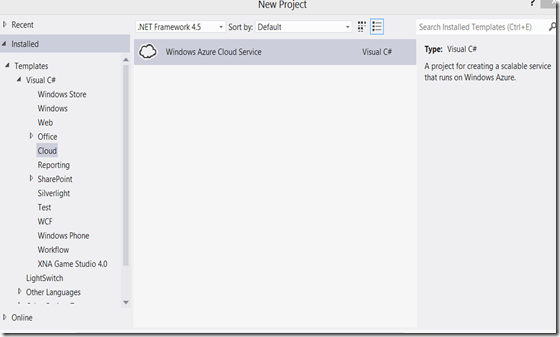
Open Visual Studio 2012, and go to File->New->Project->Under Cloud, select Windows Azure Cloud Service. Rename the project to “RandomNumbers” or a name of your preference.
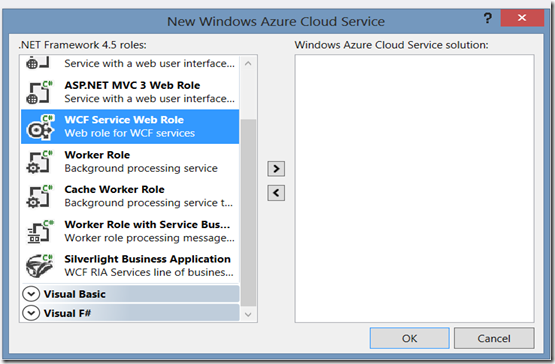
Right after you create the project, another screen pops up as shown below. Select “WCF Service Web Role” under C# from the list of options and hit the “>” button.
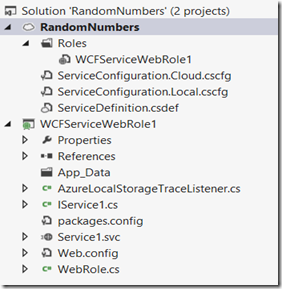
This is how my project looks in the solution explorer after I hit the “OK” button in the above screen.
I will rename my Service1 class and IService1 interface to RandomNumbers and IRandomNumbers throughout the project using “Rename” command in the Refactor menu. I will the rename the respective files too. The renaming is just for convenience of referring them back in this article. You can name them differently if you want.
Now, it’s time to create a simple function that generates random numbers between 1 and 100.
I will replace the functions in the RandomNumber.svc.cs with the following function:
C#
public string GetNumber()
{
Random number = new Random();
return number.Next(1, 100).ToString();
}
Go to the IRandomNumbers interface and replace the operation contracts by this one:
C#
[OperationContract]
string GetNumber();
The interface or service contract defines the methods that will be exposed when the WCF service is deployed.
Now you can build your solution and create packages to upload to Azure.
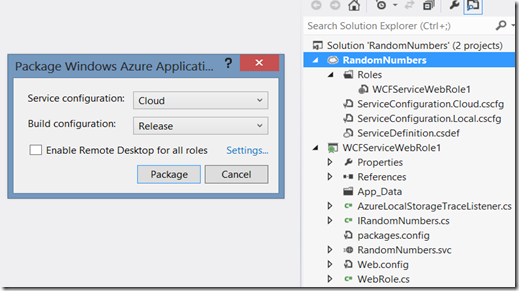
Right click on the ‘RandomNumbers’ project and click on the ‘Packages’ option. A dialog similar to below will pop up:
To create packages to be deployed to Azure, hit the ‘Package’ button in the dialog as shown above. It creates two files in the ‘<YourProjectName>\bin\Release\app.publish’ folder.
Step 2: Deploy the service on Windows Azure
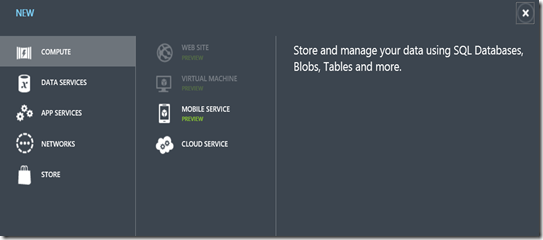
Go to Windows Azure website and click on the ‘Portal’ link on the top right corner. Or go to: https://manage.windowsazure.com/#Workspace/All/dashboard . I am assuming that you have a Windows Azure account if not please read more on account creation on the their website. Once you are in the portal, click on the ‘New’ button on the bottom right corner. A dialog similar to below will pop up:
Select ‘Cloud Service’ from the screen and then ‘Quick Create’ option. In the below screen, you may enter ‘randomnumbers’ in the URL field. If the term is already in use then you have to provide a different one. Click on ‘Create Cloud Service’ to proceed further.
A row appears in the ‘cloud services’ section that displays that the service was created. But it is not up and running as yet since we haven’t pushed any code to production or staging environment.
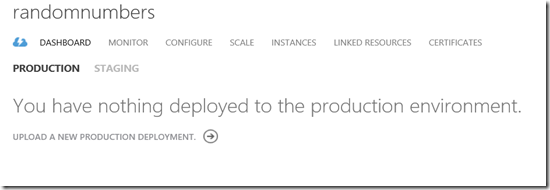
When I click on the ‘randomnumbers’ cell, it displays a dashboard. I will click on the ‘Upload a new production deployment’ link to upload my code to production.
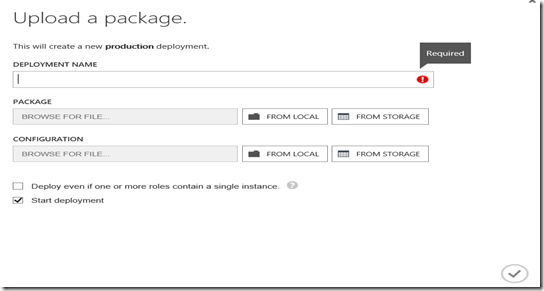
I will enter ‘testing’ in the ‘Deployment name’ field. I need to upload the package and configuration files that I have created in Step 1. For uploading the package, I will click on the ‘From Local’ button for that row. I will browse to the ‘app.publish’ folder and select the ‘RandomNumbers’ file. Note that it has a ‘.cspkg’ extension. In a similar fashion, I will select the ‘ServiceConfiguration.Cloud.cscfg’ from the local folder for the Configuration field.
You need to check the ‘Deploy even if one or more roles contain a single instance’ and hit the button on the bottom right corner to start deployment.
Within few seconds your code will be deployed and the service will be up and running. You will see notifications similar to the ones below:
Now, I can browse to my service by using the link: ‘https://randomnumbers.cloudapp.net/RandomNumbers.svc’. You can get the link for your site URL by navigating to the Dashboard of ‘randomnumbers’ and in the quick glance section on the right.
Once you go to the web address mentioned under site URL, you see some files listed similar to as shown below:
And then you can click on the ‘RandomNumbers.svc’ to navigate to the service.
Step 3: Using the service in your Windows 8 Store App
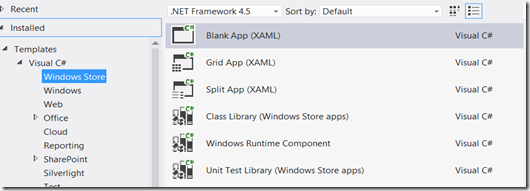
Using the service in Windows 8 Store App is very easy. I have created a project in Visual Studio 2012 using the ‘Blank App’ template.
As a next step I right click on my Project in Solution Explorer and click on ‘Add Service Reference’. A dialog similar to one below pops up:
I have the web link to the service from Step 2. ‘https://randomnumbers.cloudapp.net/RandomNumbers.svc’. I will enter it in the Address field of the screen shown above and hit the ‘GO’ button. It will then look for the service and retrieve information about the interface and the operations exposed. I can then hit the ‘OK’ button and continue.
For demonstrating simple call to the service, I am calling the service in OnNavigatedTo() method on MainPage.xaml.cs. In the following code, I call the GetNumberAsync() method of the service that I created in Step 1 that generates random numbers. After I get a random number from the service I am updating the text field of my TextBlock element named ‘RandomNumberField’ on MainPage.xaml.
C#
RandomNumberConsumer.ServiceReference1.RandomNumbersClient client = new ServiceReference1.RandomNumbersClient();
this.RandomNumberField.Text = await client.GetNumberAsync();
await client.CloseAsync();
You are now ready to run the App and see it in action.
For more details on the process of creating and deploying WCF service on Windows Azure:
https://aka.ms/WCFserviceOnAzure
Also refer the following link for more information on building a client application for WCF service:
Comments
Anonymous
June 05, 2013
Thanks Nisha ..Anonymous
November 06, 2013
Nice one. A lot of other tutorials were out of date.Anonymous
November 07, 2013
Thanks :)Anonymous
February 07, 2014
Brilliant Nisha! How would you make this a REST-enabled WCF service hosted in Azure? For now, I am reading this post blogs.msdn.com/.../implementing-rest-service-in-wcf-hosted-workerrole.aspx. Thanks!Anonymous
February 16, 2014
Excellent Nisha! Deploying to Azure made understandable.Anonymous
July 05, 2014
!!Really Brilliant. Only your post cleared lost of confusion regarding WCF hosting in azure. Thanks for the post.Anonymous
August 31, 2014
Great Work. Best azure starter on the internet for complete noobs.. Thanks Alot!!!Anonymous
October 15, 2014
Any ideas on how to secure the wcf though?Anonymous
February 09, 2015
Excellent Article. I tried this ..it worked :)Anonymous
February 19, 2015
thanks.Anonymous
February 19, 2015
Thanks Nisha, any idea how update the service without putting it out of service? Do i add more webroles or more services inside the web role and how do i update it on azure without taking it offline?Anonymous
April 08, 2015
Thank you! Good article for starters in Azure like me.Anonymous
September 17, 2015
I cannot find the Upload a new production deployment link. Please help
