Automating Deployment on Azure Web Apps
Editor’s note: The following post was written by Windows Development MVP Matias Quaranta as part of our Technical Tuesday series.
In today’s agile development teams we require more than the old deployment methods like FTP or WebDeploy where one member had the “Deploy” task on the delivery pipeline. I’ll go as far as to say that an automated integration and deployment strategy is a necessity to any team that wants to focus on what really matters, writing code and building products.
Opening concepts
Before we talk about Azure’s implementation and mechanics, let’s define clearly the concepts of Continuous Integration, Continuous Delivery, and Continuous Deployment. On a common scenario, the development team interacts with a source control repository by committing changes to the repository files, Continuous Integration refers to automating the processes involved in integrating the changes that each developer makes into the repository and verifying that these changes don’t break the project. Once the project is validated, Continuous Delivery involves automating the process by which the project’s code is rapidly and safely deployed to a staging environment where you are confident that, if you choose, that code can be deployed on a production environment. Continuous Deployment refers to automating this last step and ensuring that the code is delivered to production without incurring in downtime (or reducing this downtime to a minimum without breaking a possible SLA).
Integrating repositories
From the beginning, the Azure Web Apps service allows for automatic integration with source control repositories (GitHub, BitBucket, Visual Studio Online among the most used). This integration allows Azure to detect changes that development teams commit by registering WebHooks on said repositories. These WebHooks notify Azure once the selected branch has received new commits/pushes, Azure pulls the latest source code version and proceeds to compile / deploy it.
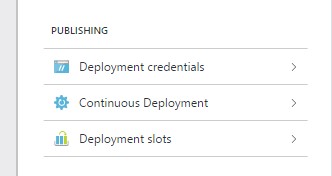
To create this integration, we just need to go into the Settings panel of our Azure Web App and select “Continuous Deployment”.
On the next screen we can select which provider suits us better, validate our credentials and pick the branch of the repository on which we want the deploy process to be based on.

Once configured, Azure will make a first pull of the source code, detect what kind of Web App it is (.Net, Node.js, Python, etc.) and build / validate it. Note that this validating process does not (at this time at least) run any kind of Unit Testing, it will basically try to “build” the project, if the building fails, that version of the source code won’t be deployed.

Once the first deploy is done, we have successfully configured an automated integration from our repository to our Web App, future commits/pushes on the repository will trigger new pulling/building/deployment process. One interesting feature is that Azure allows us to go back to previous successful deployments if we need to.

The responsible for this process is called Kudu, and it’s the environment on which Azure Web Apps “live”. Kudu is an Open Source project whose main objective is the automation of Git/Mercurial deployments on Azure, but also provides extensions that add additional features like logging and analytics or integration with third-party services.
Introducing Deployment Slots
We might be tempted to think this is the correct way of creating a Continuous Deployment pipeline for a production level application, but we would be making a potential mistake, if we go back to our concepts, we’ll see that to achieve Continuous Deployment we first need to achieve Continuous Delivery.
The scenario that we just configured will deploy new code versions directly to our production environment, but like we probably know by experience, a fresh application requires some sort of initialization sequence on its first requests, this is known as a cold start and can probably cause downtime when it occurs.
We need to deliver our code to a staging environment before, that’s where Deployment Slots come in. With Deployment Slots you can create environments that run in the same instances as your Azure Web App (no additional cost) but have different URLs, storage, application and integration settings. You can effectively create different versions of your Web App, each integrated with different repository branches if you needed.
In our scenario, we’ll create first a Deployment Slot called staging:

Then, we’ll set the integration with our repository like we did before. You might wonder, if we leave both production AND staging integrated, changes will be deployed to both, and you’d be right. That’s why we must Disconnect the repository from our production environment:

Once done, all code changes will be detected by our staging environment, deployed there and we can test and view them by accessing their own private URLs (commonly the URL pattern is https://mysite-{slot_name}.azurewebsites.net). If we are happy with the changes, we can Swap the slots, effectively sending the Staging version to Production and achieving Continuous Delivery.

AN IMPORTANT NOTE ABOUT SWAPPING
Up until this point, we managed to integrate our repositories and configure slots to achieve Continuous Delivery. The next step is to automate the Swapping process. On the Settings blade, you’ll find the Auto Swap feature.
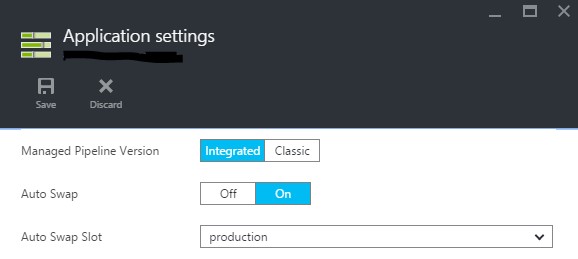
The Auto Swap process will kick in once the pull from the repository is built and ready. It will first make an HTTP Request to the Web App in our staging slot and wait for an HTTP OK (200), if it receives it, it will automatically swap the slot contents with the selected destination (production most likely). This HTTP Request is done to provide a warm up process of the Web App and avoid cold starts once the swapping is made.
Conclusion
Following these steps you will effectively achieve Continuous Deployment and incur no extra charges on your Web App, creating a failsafe deploy pipeline and letting your development team focus on your core activity.

About the author
Matias is a Microsoft MVP, Azure & Web Engineer, open source contributor and firm believer in the freedom of knowledge.
Comments
- Anonymous
November 29, 2015
The comment has been removed- Anonymous
December 18, 2015
Like Matt mentioned, you can set Application Settings for each Slot and mark them as "Slot Settings". Your app will then inherit those settings from the slot it's running on.By default, settings also get swapped unless you mark them as Slot Settings (I believe that part was left out of the post).
- Anonymous
- Anonymous
December 01, 2015
Hey Marcin, you would do this via the application settings in the azure portal and set them to be sticky to the slot. Whatever settings are in the azure portal will override your web config. Thanks, Matt Watson Stackify APM