Automating Mount Point Setup and Maintenance for AutoReseed - Managing Exchange 2013 With DSC - Part 3
Managing Exchange 2013 With DSC
Part 1 - Introducing xExchange
Part 2 - The QuickStart Template
Part 3 - Automating Mount Point Setup and Maintenance for AutoReseed
Part 4 - Using a DSC Pull Server to Deploy the xExchange Module
Part 5 - Installing Exchange Using DSC
Automating Mount Point Setup and Maintenance for AutoReseed
xExchAutoMountPoint is a resource within the xExchange module that was designed specifically to be used with AutoReseed, a feature introduced in Exchange 2013. Setting up AutoReseed requires that you create a relatively complex mount point structure, where volumes for databases and spare volumes will be mounted. Database mount points go under C:\ExchangeDatabases, and spare volumes go under C:\ExchangeVolumes. On larger servers with 4 databases copies per disk, you could easily end up with over 100 mount points per server.
The Exchange Server Role Requirements Calculator already has the capability of generating CSV’s defining the required databases and copies per server, and can also generate PowerShell scripts for creating mount points, databases, and database copies using those CSV's. If all you want to do is configure the server once and forget it, those scripts are more than sufficient for the job.
Seeing as how these scripts already existed, a big driver for creating the xExchAutoMountPoint resource was to deal with what happens after a failed disk is replaced. Right now the (simplified) AutoReseed process for a fully configured and operational server is as follows:
Server has a disk failure
AutoReseed detects the failed disk, remaps a spare volume as a database volume, and initiates a reseed from a known good copy
Administrator pulls the failed disk, and replaces it with a good disk
Administrator assigns the new disk a mount point in C:\ExchangeVolumes
Administrator formats the volume
(OPTIONAL) Administrator applies Bitlocker to volume
With xExchAutoMountPoint (and optionally the xBitlocker module and xBLAutoBitlocker resource), the last three steps can be completely automated. Note that this requires that the configuration is setup in pull mode, where the configuration is regularly inspected for differences. Using these resources with pull mode, the new workflow would be as follows:
Server has a disk failure
AutoReseed detects the failed disk, remaps a spare volume as a database volume, and initiates a reseed from a known good copy
Administrator pulls the failed disk, and replaces it with a good disk
xExchAutoMountPoint determines that the number of active ExchangeVolumes mount points is less than the required number of mount points, and that there is an available disk with no assigned mount points
xExchAutoMountPoint assigns an ExchangeVolumes mount point to the new disk, and formats it
(OPTIONAL) xBLAutoBitlocker determines that there is a Fixed data disk online that has a mount point assigned, but is not Bitlocker'ed, and applies Bitlocker
So essentially, all the administrator has to do is pull the failed disk, and replace it with a new disk. xExchAutoMountPoint and xBLAutoBitlocker take care of the work that is required to get the new disk ready for AutoReseed.
When to Run xExchAutoMountPoint?
Before jumping into examples, I wanted to quickly comment on when you should run xExchAutoMountPoint. Depending on the pre-validation you do on your servers, you may actually want to run xExchAutoMountPoint in two different scripts.
Many administrators like to run Jetstress against their database volumes prior to installing Exchange so that they can burn in their disks, and verify disk performance. If you are one of these administrators, you may want to run a script with xExchAutoMountPoint by itself prior to installing Exchange. That way you can create your mount point structure for Jetstress. After Jetstress has been run and Exchange is installed, if you are going to implement the rest of your Exchange configuration in pull mode, you could add the xExchAutoMountPoint resource in that configuration script as well. That way you can have mount points recreated automatically after disk failures.
Example 1 - Manually Specifying Database and Disk Structure for AutoReseed
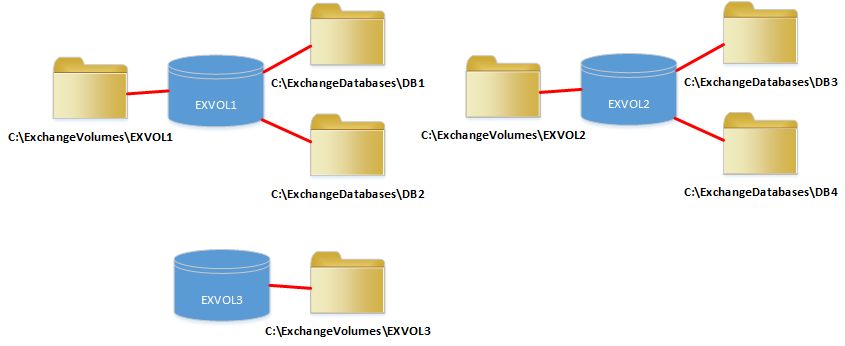
For this first example, I will show how to manually feed database information into the xExchAutoMountPoint resource. I will be working with 2 servers, and 4 total databases. Both servers will have 2 disks for databases, where each disk has 2 database copies per disk. The servers will also have a third disk to use as a spare.
The following graphic shows what this example looks like. Each folder in the graphic is a mount point that will be assigned to the specified volume. Remember that even though the disks have multiple mount points, each mount point on a single disk shows the same physical disk contents.
Now I will show the configuration scripts which implement this design. Both scripts are included in the xExchange\Examples\ConfigureAutoMountPoints-Manual folder of the xExchange module.
ConfigureAutoMountPoints-Manual.ps1
 Configuration ConfigureAutoMountPointsManual
{
    Import-DscResource -Module xExchange

    Node $AllNodes.NodeName
    {
        xExchAutoMountPoint AMP
        {
            Identity                       = $Node.NodeName
            AutoDagDatabasesRootFolderPath = 'C:\ExchangeDatabases'
            AutoDagVolumesRootFolderPath   = 'C:\ExchangeVolumes'
            DiskToDBMap                    = $Node.DiskToDBMap
            SpareVolumeCount               = 1
            VolumePrefix                   = 'EXVOL'
        }
    }
}
Note the following:
I hardcoded AutoDagDatabasesRootFolderPath and AutoDagVolumesRootFolderPath within the config script, as these would be the same regardless of how many servers and databases I was configuring. When working with DSC in general, if a setting is going to be the same for every single machine being configured, I'll hardcode it directly in the configuration script. If the settings are not going to be the same for each target machine, I'll probably abstract them to the configuration data file.
Even though both servers in this example have copies of the exact same databases, I specify what the DiskToDBMap should look like in the configuration data file instead of hard coding it in the script. In larger DAG's, it is likely that each server will have copies of different databases, and as such will require different mount point structures. It makes more sense to put the DiskToDBMap in the configuration data file, where you can specify a different map per server.
I specify a SpareVolumeCount of 1, as I plan on having 1 spare disk for AutoReseed.
I specify a VolumePrefix of EXVOL. This does two things. First, when volumes are created, they will be assigned a volume label of EXVOL#, where # increments depending on the number of total disks being used for AutoReseed. Second, it specifies that ExchangeVolume mount points will be created under C:\ExchangeVolumes\EXVOL# . Note that EXVOL is the default value for VolumePrefix, so I could actually omit VolumePrefix altogether in this example.
ConfigureAutoMountPoints-Manual-Config.psd1
 @{
    AllNodes = @(
        @{
            NodeName    = 'e15-1'
            DiskToDBMap = 'DB1,DB2','DB3,DB4'
        }

        @{
            NodeName    = 'e15-2'
            DiskToDBMap = 'DB1,DB2','DB3,DB4'
        }
    );
}
The main thing to note here is the format for DiskToDBMap. The expected input here is a string array (string[]), where each string in the array contains a comma separated list of DB mount points that should be created on a single disk. For both nodes in this example, DB1 and DB2 will be placed on one disk, and DB3 and DB4 will be placed on another.
The Exchange Server Role Requirements Calculator and Servers.csv
Manually filling out the DiskToDBMap is easy enough in small environments, but can quickly become unwieldy in larger DAGs. I figured that out pretty fast once I started trying to fill out the map for my customer who has over 200 databases per DAG, and over 80 copies per server. To make this easier, I wrote a helper script which is included in the xExchange module, and is located at xExchange\Examples\HelperScripts\ExchangeConfigHelper.psm1. The function that we will use, DBMapFromServersCsv, takes the Servers.csv file that is generated by the calculator, and turns the relevant disk information into a DiskToDBMap.
The Sample Topology
For the topology, I'm using a copy of the Exchange Server Role Requirements Calculator which defines the following:
1 DAG
4 servers
10 data disks + 1 spare per server
40 database copies per server
4 database copies per disk
An important thing to note in the calculator is the server names that were put into the Input tab. The server names I use are in the format SRV -nn- ##, where nn is the DAG identifier, and ## is the node identifier. As an example, the first server in the first DAG would be SRV-01-01.
In this example, I'm just configuring servers in a single DAG, but in real life, you may be configuring multiple DAGs. Since the calculator will only generate CSV files for a single DAG, we need a way to be able to reuse the same CSV files for multiple DAGs which share a similar structure. To do this, I put a placeholder for the DAG number in the server name. This way, even if I'm configuring SRV-01-01, SRV-02-01, or SRV-03-01, they can all use the same definition for SRV-nn-01.
On the Input tab, right next to the server names, I also define the database prefix. Here, I again use -nn- instead of a specific DAG number so that the same Servers.csv file can be used for multiple DAGs.
Generating Servers.csv
With the calculator configured, we need to generate the Servers.csv file which will be fed into the configuration script. To do this, go to the Distribution tab, and hit the Export DB Mount List button.
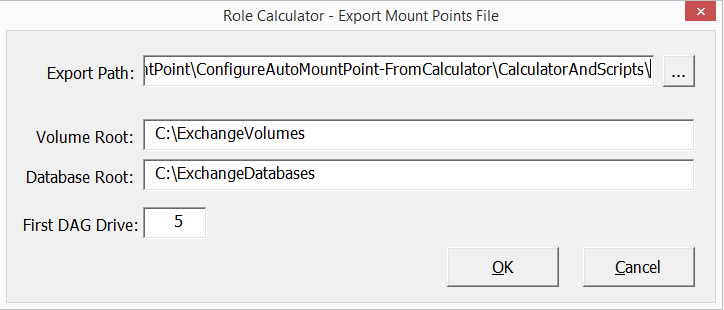
After hitting the button, the following window comes up. For xExchAutoMountPoint, the only thing we care about is the Export Path, where Servers.csv will be created. The other properties are configured directly in the configuration script and don't need to be pulled from Servers.csv.
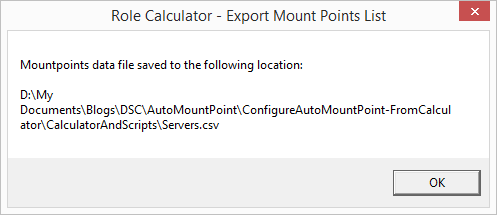
After hitting OK, you'll get the following confirmation showing where Servers.csv was sent to:
Here's a screenshot of what the Servers.csv file looks like. The two columns that are consumed by the helper function, DBMapFromServersCsv, are ServerName and DbMap:
Using the Helper Module
To demonstrate what the helper function does, I wrote a simple test script which shows it's output. For demo purposes, I put ExchangeConfigHelper.psm1, Servers.csv, and TestHelper.ps1 all in the same folder:
TestHelper.ps1 looks as follows:
 Import-Module .\ExchangeConfigHelper.psm1

$dbMap = DBMapFromServersCsv `
    -ServersCsvPath "Servers.csv" `
    -ServerNameInCsv "SRV-nn-01" `
    -DbNameReplacements @{"-nn-" = "-01-"}

$dbMap
The important points of this script are as follows:
I have to import the ExchangeConfigHelper.psm1 module, as that is where the DBMapFromServersCsv function lives
ServersCsvPath is the path to the Servers.csv file on the machine which will be compiling the configuration. If no folder path is specified, it will use the current directory
I pass in SRV-nn-01 for ServerNameInCsv, as that will be the ServerName in Servers.csv that the DbMap property will be processed for
For DbNameReplacements, I pass in a hashtable, where the key ' -nn- ' is what should be replaced, and the value ' -01- ' is what it should be replaced with. If you want to make multiple replacements, you can seperate the key value pairs with a semicolon. Note that due to the way a hashtable operates, the replacements will be processed in a (seemingly) random order, and not necessarily the order you put them in. As such you may need to carefully plan out what multiple replacements look like so they do not interfere with each other.
After running the test script, we can see what the $dbMap variable looks like. Each line in the output is a separate string in a string array:
DAG-01-DB01,DAG-01-DB02,DAG-01-DB03,DAG-01-DB04
DAG-01-DB05,DAG-01-DB06,DAG-01-DB07,DAG-01-DB08
DAG-01-DB09,DAG-01-DB10,DAG-01-DB11,DAG-01-DB12
DAG-01-DB13,DAG-01-DB14,DAG-01-DB15,DAG-01-DB16
DAG-01-DB17,DAG-01-DB18,DAG-01-DB19,DAG-01-DB20
DAG-01-DB21,DAG-01-DB22,DAG-01-DB23,DAG-01-DB24
DAG-01-DB25,DAG-01-DB26,DAG-01-DB27,DAG-01-DB28
DAG-01-DB29,DAG-01-DB30,DAG-01-DB31,DAG-01-DB32
DAG-01-DB33,DAG-01-DB34,DAG-01-DB35,DAG-01-DB36
DAG-01-DB37,DAG-01-DB38,DAG-01-DB39,DAG-01-DB40
This is equivalent to if I had manually typed the following in the configuration data file (although everything would be on a single line; you can't define an array across multiple lines like I do here):
 DiskToDBMap = 'DAG-01-DB01,DAG-01-DB02,DAG-01-DB03,DAG-01-DB04',`
                'DAG-01-DB05,DAG-01-DB06,DAG-01-DB07,DAG-01-DB08',`
                'DAG-01-DB09,DAG-01-DB10,DAG-01-DB11,DAG-01-DB12',`
                'DAG-01-DB13,DAG-01-DB14,DAG-01-DB15,DAG-01-DB16',`
                'DAG-01-DB17,DAG-01-DB18,DAG-01-DB19,DAG-01-DB20',`
                'DAG-01-DB21,DAG-01-DB22,DAG-01-DB23,DAG-01-DB24',`
                'DAG-01-DB25,DAG-01-DB26,DAG-01-DB27,DAG-01-DB28',`
                'DAG-01-DB29,DAG-01-DB30,DAG-01-DB31,DAG-01-DB32',`
                'DAG-01-DB33,DAG-01-DB34,DAG-01-DB35,DAG-01-DB36',`
                'DAG-01-DB37,DAG-01-DB38,DAG-01-DB39,DAG-01-DB40'
Example 2 - Using Servers.csv as Input for xExchAutoMountPoint
Now that we know how to generate a Servers.csv file, and also how to work with the DBMapFromServersCsv helper function, we can look at the next demo scripts. These show how to use Servers.csv to populate the DiskToDBMap. Both scripts are included in the xExchange\Examples\ConfigureAutoMountPoints-FromCalculator folder of the xExchange module.
ConfigureAutoMountPoints-FromCalculator.ps1
 Configuration ConfigureAutoMountPointsFromCalculator
{
    Import-DscResource -Module xExchange

    Import-Module "$((Get-Item -LiteralPath "$($PSScriptRoot)").Parent.FullName)\HelperScripts\ExchangeConfigHelper.psm1"

    Node $AllNodes.NodeName
    {
        $dagSettings = $ConfigurationData[$Node.DAGId]

        $dbMap = DBMapFromServersCsv `
                    -ServersCsvPath "$($PSScriptRoot)\CalculatorAndScripts\Servers.csv" `
                    -ServerNameInCsv $Node.ServerNameInCsv `
                    -DbNameReplacements $dagSettings.DbNameReplacements

        xExchAutoMountPoint AMP
        {
            Identity                       = $Node.NodeName
            AutoDagDatabasesRootFolderPath = 'C:\ExchangeDatabases'
            AutoDagVolumesRootFolderPath   = 'C:\ExchangeVolumes'
            DiskToDBMap                    = $dbMap
            SpareVolumeCount               = 1
            VolumePrefix                   = 'EXVOL'
        }
    }
}
There are a few things worth noting here. First, since we're using the helper module, we have to import it. The location I have specified is relative to the location of the configuration script, ConfigureAutoMountPoints-FromCalculator.ps1, as it is located in the xExchange download.
Import-Module "$((Get-Item -LiteralPath "$($PSScriptRoot)").Parent.FullName)\HelperScripts\ExchangeConfigHelper.psm1"
Instead of using a relative location for the helper module, you could just as easily specify the exact location:
Import-Module "C:\HelperScripts\ExchangeConfigHelper.psm1"
The next line locates the DAG settings for the node being processed, and put's them in a variable for easy usage later:
$dagSettings = $ConfigurationData[$Node.DAGId]
Now I get the DBMap using the helper function, as I did earlier, and send it to the variable $dbMap. This time however, I pass in a variable for ServerNameInCsv and DbNameReplacements, so that the same script can be used to configure multiple nodes. Both of these variables are defined in the configuration data file.
 $dbMap = DBMapFromServersCsv `
    -ServersCsvPath "$($PSScriptRoot)\CalculatorAndScripts\Servers.csv" `
    -ServerNameInCsv $Node.ServerNameInCsv `
    -DbNameReplacements $dagSettings.DbNameReplacements
The xExchAutoMountPoint resource looks almost the same as in the manual example. The only difference is for DiskToDBMap, we are passing in $dbMap, which was generated by the helper function.
 xExchAutoMountPoint AMP
{
    Identity                       = $Node.NodeName
    AutoDagDatabasesRootFolderPath = 'C:\ExchangeDatabases'
    AutoDagVolumesRootFolderPath   = 'C:\ExchangeVolumes'
    DiskToDBMap                    = $dbMap
    SpareVolumeCount               = 1
    VolumePrefix                   = 'EXVOL'
}
ConfigureAutoMountPoints-FromCalculator-Config.psd1
 @{
    AllNodes = @(
        @{
            NodeName        = 'SRV-01-01'
            ServerNameInCsv = 'SRV-nn-01'
            DAGId           = "DAG1"
        }

        @{
            NodeName        = 'SRV-01-02'
            ServerNameInCsv = 'SRV-nn-02'
            DAGId           = "DAG1"
        }
        @{
            NodeName        = 'SRV-01-03'
            ServerNameInCsv = 'SRV-nn-03'
            DAGId           = "DAG1"
        }

        @{
            NodeName        = 'SRV-01-04'
            ServerNameInCsv = 'SRV-nn-04'
            DAGId           = "DAG1"
        }
    );

    DAG1 = @{
        DbNameReplacements = @{"-nn-" = "-01-"}
    }
}
There's a couple things of note in this configuration data file. First, this data file makes use of a new node in the hashtable which is a sibling of AllNodes. This node is named DAG1, and can be used to define properties that are specific to that DAG. In this example, the only thing defined in here is the replacements to make in the database names when taken out of Servers.csv.
 DAG1 = @{
    DbNameReplacements = @{"-nn-" = "-01-"}
}
When looking up DAG settings for a node in the configuration script, the DAG1 node is referenced via the DAGId property in the node:
DAGId = "DAG1"
Summary
In conclusion, the xExchAutoMountPoint resource can be used to automatically create the ExchangeDatabases and ExchangVolumes mount points that are required for AutoReseed. You can use it a single time during the initial setup of your Exchange servers to create your mount points, but you can also use it on a regular basis to set new disks back up automatically after failed disks are replaced. For smaller environments, you can fill out the disk and database information directly in your configuration scripts. For larger environments, it is probably a good idea to use Servers.csv from the Exchange Server Role Requirements Calculator as input.
Related Reading
AutoReseed: Exchange 2013 Help
https://technet.microsoft.com/en-us/library/dn789209(v=exchg.150).aspx
Configure AutoReseed for a database availability group
https://technet.microsoft.com/en-us/library/jj619303(v=exchg.150).aspx
Comments
- Anonymous
October 27, 2014
Managing Exchange 2013 With DSC
Part 1 - Introducing xExchange
Part 2 - The QuickStart Template - Anonymous
October 27, 2014
Managing Exchange 2013 With DSC
Part 1 - Introducing xExchange
Part 2 - The QuickStart Template - Anonymous
November 10, 2014
Managing Exchange 2013 With DSC
Part 1 - Introducing xExchange
Part 2 - The QuickStart Template - Anonymous
December 18, 2014
Managing Exchange 2013 With DSC
Part 1 - Introducing xExchange
Part 2 - The QuickStart Template


