Azure Service Fabric – Common Networking Scenarios
One of the more common questions we have seen when creating Service Fabric clusters is how to integrate the cluster with various Azure networking features. This blog post will show how to create clusters using the following features:
Existing Virtual Network / Subnet
Static Public IP Address
Internal Only Load Balancer
Internal + External Load Balancer
A key concept to keep in mind is that Service Fabric simply runs in a standard Virtual Machine Scale Set, so any functionality you can use in a Virtual Machine Scale Set can also be used with a Service Fabric Cluster, and the networking portions of the ARM template will be identical. And once you can achieve #1 above (deploying into an existing VNet) then it is easy to incorporate other networking features such as ExpressRoute, VPN gateway, Network Security Group (NSG), VNet peering, etc.
The only Service Fabric specific aspect is that the Azure Management Portal internally uses the Service Fabric Resource Provider (SFRP) to call into a cluster in order to get information about nodes and applications, and SFRP requires publicly accessible inbound access to the HTTP Gateway port (19080 by default) on the management endpoint. This port is used by Service Fabric Explorer to browse and manage your cluster, and it is also used by the Service Fabric Resource Provider to query information about your cluster in order to display in the Azure Management Portal. If this port is not accessible from the SFRP then you will see a message such as ‘Nodes Not Found’ in the management portal and your node and application list will appear empty. This means that if you wish to have visibility of your cluster via the Azure Management Portal then your load balancer must expose a public IP address and your NSG must allow incoming 19080 traffic. If you do not meet these requirements then the Azure Management Portal will not be able to display current status of your cluster, but otherwise your cluster will not be affected and you can use Service Fabric Explorer to get the current status, so this may be an acceptable limitation based on your networking requirements. Note that this is a temporary limitation that we are planning to remove in the coming months, at which time your cluster can be publicly inaccessible without any loss of management portal functionality.
Templates
All of the templates can be found here and you should be able to deploy them as-is using the below powershell commands – just make sure you go through the ‘Initial Setup’ section first if deploying the existing VNet template or the static public IP template.
Initial Setup
Existing Virtual Network
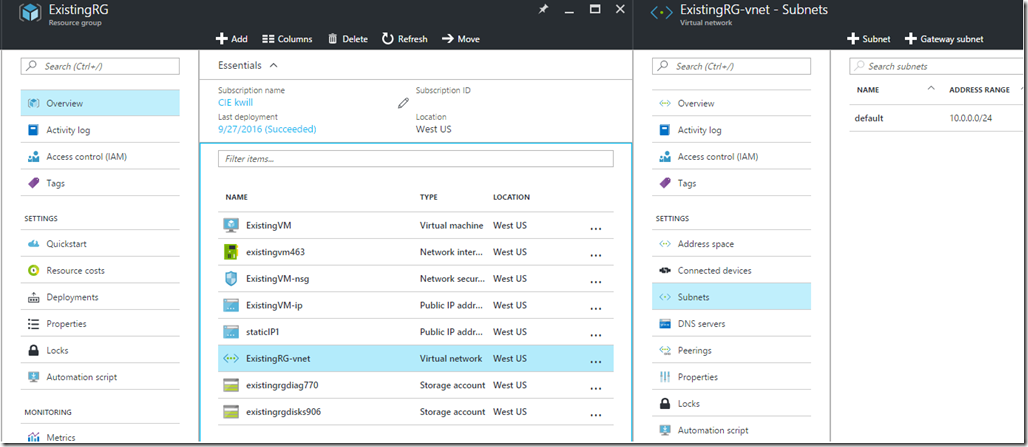
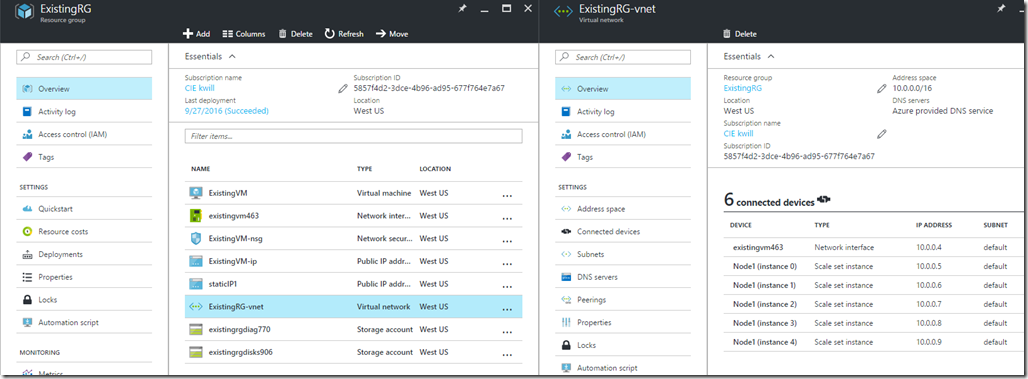
I am starting with an existing Virtual Network named ‘ExistingRG-vnet’ in the resource group ‘ExistingRG’, with a subnet named ‘default’. These resources are the default ones created when using the Azure management portal to create a standard IaaS Virtual Machine. You could also just create the VNet and subnet without creating the Virtual Machine, but because the main goal of adding a cluster to an existing VNet is to provide network connectivity to other VMs, creating the VM gives a concrete example of how this is typically used. The VM with it’s public IP can also be used as a jump box if your SF cluster only uses an internal load balancer without a public IP address.
Static Public IP Address
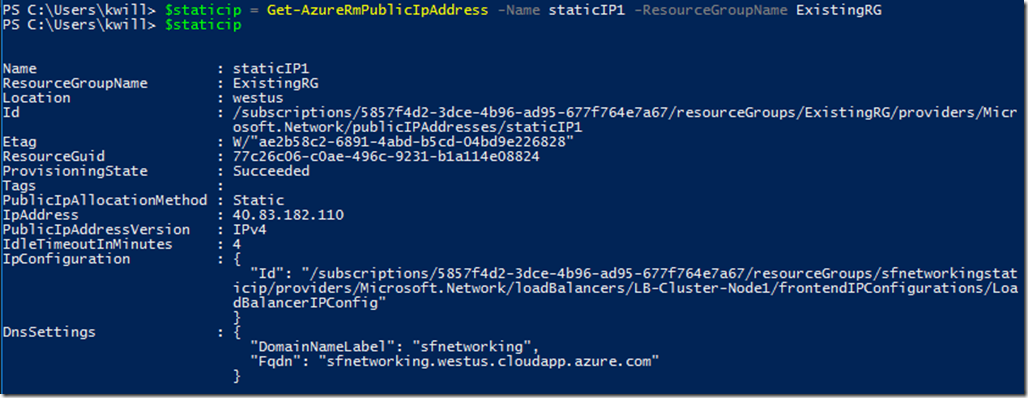
Because a static public IP address is generally a dedicated resource that is managed separately from the VM(s) it is assigned to, it is usually provisioned in a dedicated networking resource group (as opposed to within the Service Fabric cluster resource group itself). Create a static public IP address with the name ‘staticIP1’ in the same ExistingRG resource group, either via the portal or Powershell:
 PS C:\Users\kwill> New-AzureRmPublicIpAddress -Name staticIP1 -ResourceGroupName ExistingRG -Location westus -AllocationMethod Static -DomainNameLabel sfnetworking

Name                     : staticIP1
ResourceGroupName        : ExistingRG
Location                 : westus
Id                       : /subscriptions/1237f4d2-3dce-1236-ad95-123f764e7123/resourceGroups/ExistingRG/providers/Micr
                           osoft.Network/publicIPAddresses/staticIP1
Etag                     : W/"fc8b0c77-1f84-455d-9930-0404ebba1b64"
ResourceGuid             : 77c26c06-c0ae-496c-9231-b1a114e08824
ProvisioningState        : Succeeded
Tags                     :
PublicIpAllocationMethod : Static
IpAddress                : 40.83.182.110
PublicIpAddressVersion   : IPv4
IdleTimeoutInMinutes     : 4
IpConfiguration          : null
DnsSettings              : {
                             "DomainNameLabel": "sfnetworking",
                             "Fqdn": "sfnetworking.westus.cloudapp.azure.com"
                           }
Service Fabric Template
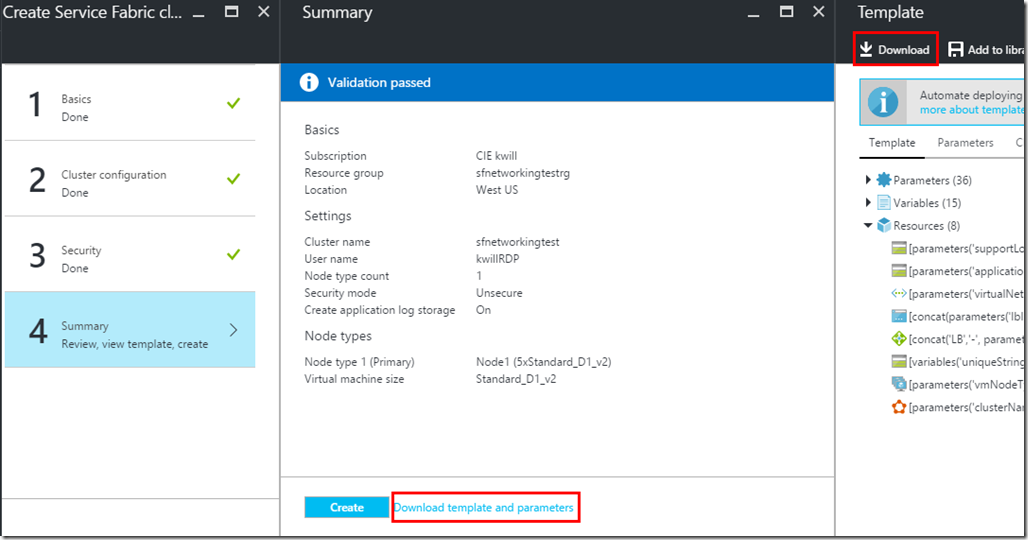
I am using the Service Fabric template.json that can be downloaded from the portal just prior to creating a cluster using the standard portal wizard:
You can also use one of the templates in the template gallery such as the 5 Node Service Fabric Cluster.
Existing Virtual Network / Subnet
[Jan 24, 2016: There is another sample of this outside the Service Fabric scope at https://github.com/gbowerman/azure-myriad/tree/master/existing-vnet]
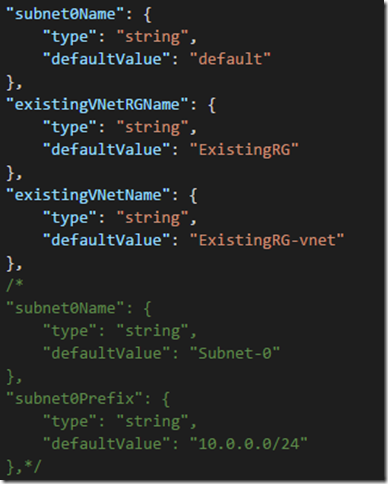
1. Change the subnet parameter to the name of the existing subnet and add two new parameters to reference the existing VNet:
         "subnet0Name": {
            "type": "string",
            "defaultValue": "default"
        },
        "existingVNetRGName": {
            "type": "string",
            "defaultValue": "ExistingRG"
        },
        "existingVNetName": {
            "type": "string",
            "defaultValue": "ExistingRG-vnet"
        },
        /*
        "subnet0Name": {
            "type": "string",
            "defaultValue": "Subnet-0"
        },
        "subnet0Prefix": {
            "type": "string",
            "defaultValue": "10.0.0.0/24"
        },*/
2. Change the vnetID variable to point to the existing VNet:
         /*old "vnetID": "[resourceId('Microsoft.Network/virtualNetworks',parameters('virtualNetworkName'))]",*/
        "vnetID": "[concat('/subscriptions/', subscription().subscriptionId, '/resourceGroups/', parameters('existingVNetRGName'), '/providers/Microsoft.Network/virtualNetworks/', parameters('existingVNetName'))]",
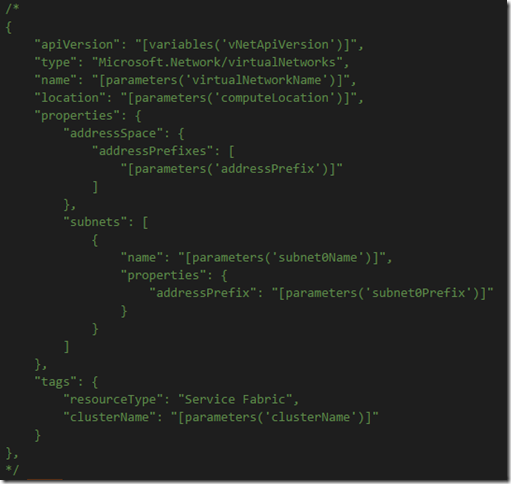
3. Remove the Microsoft.Network/virtualNetworks from the Resources so that Azure does not try to create a new VNet:
4. Comment out the VNet from the dependsOn attribute of the Microsoft.Compute/virtualMachineScaleSets so that we don’t depend on creating a new VNet:
5. Deploy the template:
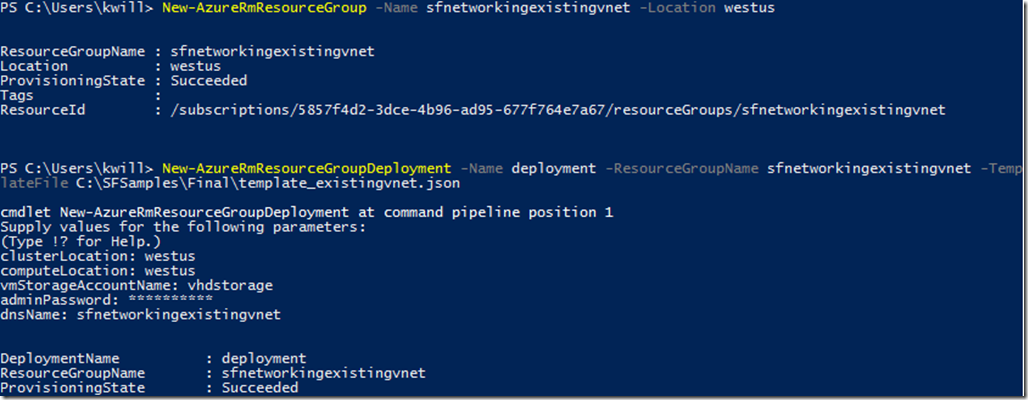
 New-AzureRmResourceGroup -Name sfnetworkingexistingvnet -Location westus

New-AzureRmResourceGroupDeployment -Name deployment -ResourceGroupName sfnetworkingexistingvnet -TemplateFile C:\SFSamples\Final\template_existingvnet.json
After the deployment your Virtual Network should include the new VMSS VMs:
And the Virtual Machine Scale Set node type should show the existing VNet and subnet:
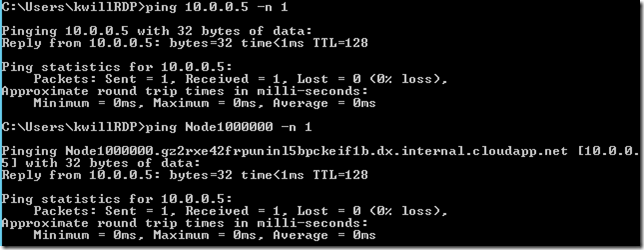
You can also RDP to the existing VM that was already in the VNet and ping the new VMSS VMs:
Static Public IP Address
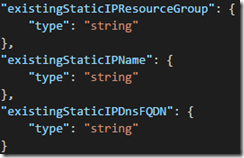
1. Add parameters for the name of the existing static IP resource group, name, and FQDN:
         "existingStaticIPResourceGroup": {
            "type": "string"
        },
        "existingStaticIPName": {
            "type": "string"
        },
        "existingStaticIPDnsFQDN": {
            "type": "string"
        }
2. Remove the dnsName parameter since the static IP already has one:
3. Add a variable to reference the existing static IP:
"existingStaticIP": "[concat('/subscriptions/', subscription().subscriptionId, '/resourceGroups/', parameters('existingStaticIPResourceGroup'), '/providers/Microsoft.Network/publicIPAddresses/', parameters('existingStaticIPName'))]",
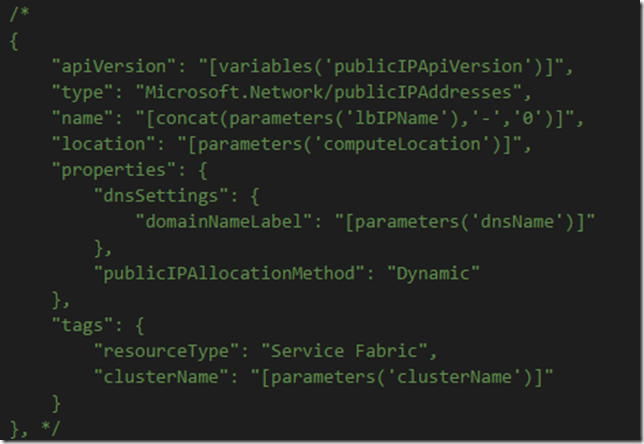
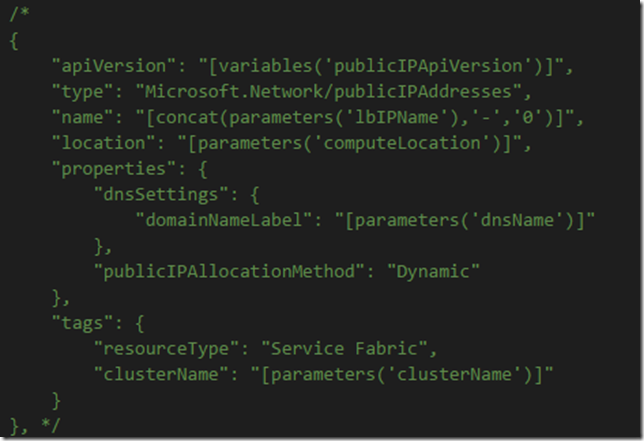
4. Remove the Microsoft.Network/publicIPAddresses from the Resources so that Azure does not try to create a new IP address:
5. Comment out the IP address from the dependsOn attribute of the Microsoft.Network/loadBalancers so that we don't depend on creating a new IP address:
6. Change the publicIPAddress element of the frontendIPConfigurations in the Microsoft.Network/loadBalancers resource to reference the existing static IP instead of a newly created one:
                 "frontendIPConfigurations": [
                    {
                        "name": "LoadBalancerIPConfig",
                        "properties": {
                            "publicIPAddress": {
                                /*"id": "[resourceId('Microsoft.Network/publicIPAddresses',concat(parameters('lbIPName'),'-','0'))]"*/
                                "id": "[variables('existingStaticIP')]"
                            }
                        }
                    }
                ],
7. Change the managementEndpoint in the Microsoft.ServiceFabric/clusters resource to the DNS FQDN of the static IP. If you are using a secure cluster make sure you change ‘https://’ to ‘https://’. (Note: This instruction is only for Service Fabric clusters. If you are only using a VMSS then skip this step):
                 "fabricSettings": [],
                /*"managementEndpoint": "[concat('https://',reference(concat(parameters('lbIPName'),'-','0')).dnsSettings.fqdn,':',parameters('nt0fabricHttpGatewayPort'))]",*/
                "managementEndpoint": "[concat('https://',parameters('existingStaticIPDnsFQDN'),':',parameters('nt0fabricHttpGatewayPort'))]",
8. Deploy the template:
New-AzureRmResourceGroup -Name sfnetworkingstaticip -Location westus
$staticip = Get-AzureRmPublicIpAddress -Name staticIP1 -ResourceGroupName ExistingRG
$staticip
New-AzureRmResourceGroupDeployment -Name deployment -ResourceGroupName sfnetworkingstaticip -TemplateFile C:\SFSamples\Final\template_staticip.json -existingStaticIPResourceGroup $staticip.ResourceGroupName -existingStaticIPName $staticip.Name -existingStaticIPDnsFQDN $staticip.DnsSettings.Fqdn
After the deployment you will see that your load balancer is bound to the public static IP address from the other resource group:
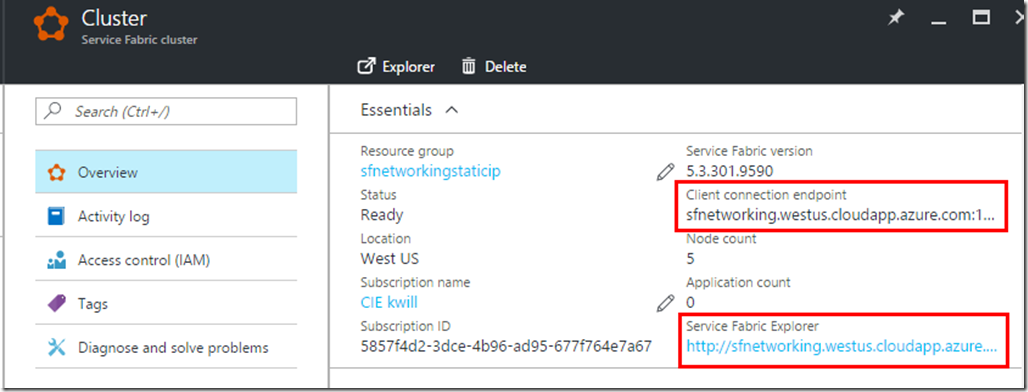
And the Service Fabric client connection endpoint and SFX endpoint point to the DNS FQDN of the static IP address:
Internal Only Load Balancer
This scenario replaces the external load balancer in the default Service Fabric template with an internal only load balancer. See above for the Azure Management Portal and SFRP implications.
1. Remove the dnsName parameter since it is not needed:
2. Optionally add a static IP address parameter, if using static allocation method. If using dynamic allocation method then this is not needed:
         "internalLBAddress": {
            "type": "string",
            "defaultValue": "10.0.0.250"
        }
3. Remove the Microsoft.Network/publicIPAddresses from the Resources so that Azure does not try to create a new IP address:
4. Remove the IP address dependsOn attribute of the Microsoft.Network/loadBalancers so that we don't depend on creating a new IP address, and add the VNet depends on since the load balancer now depends on the subnet from the VNet:
             "apiVersion": "[variables('lbApiVersion')]",
            "type": "Microsoft.Network/loadBalancers",
            "name": "[concat('LB','-', parameters('clusterName'),'-',parameters('vmNodeType0Name'))]",
            "location": "[parameters('computeLocation')]",
            "dependsOn": [
                /*"[concat('Microsoft.Network/publicIPAddresses/',concat(parameters('lbIPName'),'-','0'))]"*/
                "[concat('Microsoft.Network/virtualNetworks/',parameters('virtualNetworkName'))]"
            ],
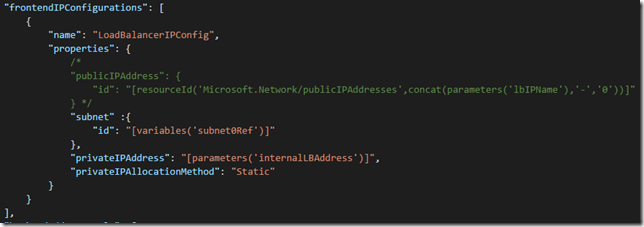
5. Change the load balancer’s frontendIPConfigurations from using a publicIPAddress to using a subnet and privateIPAddress. Note that this uses a predefined static internal IP address, you could switch this to a dynamic IP address by removing the privateIPAddress element and changing the privateIPAllocationMethod to “Dynamic”.
                 "frontendIPConfigurations": [
                    {
                        "name": "LoadBalancerIPConfig",
                        "properties": {
                            /*
                            "publicIPAddress": {
                                "id": "[resourceId('Microsoft.Network/publicIPAddresses',concat(parameters('lbIPName'),'-','0'))]"
                            } */
                            "subnet" :{
                                "id": "[variables('subnet0Ref')]"
                            },
                            "privateIPAddress": "[parameters('internalLBAddress')]",
                            "privateIPAllocationMethod": "Static"
                        }
                    }
                ],
6. In the Microsoft.ServiceFabric/clusters resource change the managementEndpoint to point to the internal load balancer address. If you are using a secure cluster make sure you change ‘https://’ to ‘https://’. (Note: This instruction is only for Service Fabric clusters. If you are only using a VMSS then skip this step):
                 "fabricSettings": [],
                /*"managementEndpoint": "[concat('https://',reference(concat(parameters('lbIPName'),'-','0')).dnsSettings.fqdn,':',parameters('nt0fabricHttpGatewayPort'))]",*/
                "managementEndpoint": "[concat('https://',reference(variables('lbID0')).frontEndIPConfigurations[0].properties.privateIPAddress,':',parameters('nt0fabricHttpGatewayPort'))]",
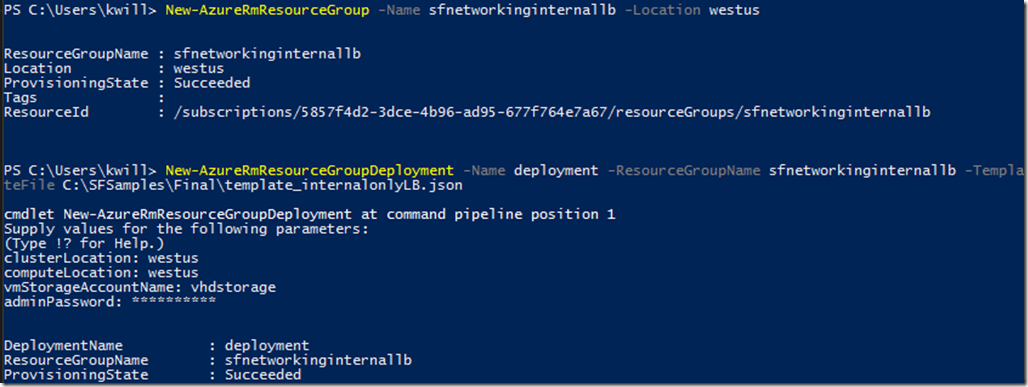
7. Deploy the template:
 New-AzureRmResourceGroup -Name sfnetworkinginternallb -Location westus

New-AzureRmResourceGroupDeployment -Name deployment -ResourceGroupName sfnetworkinginternallb -TemplateFile C:\SFSamples\Final\template_internalonlyLB.json
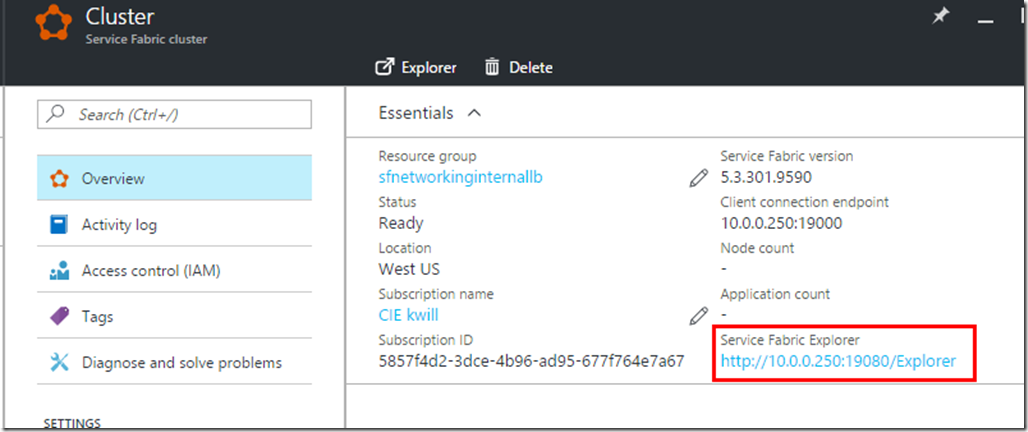
After the deployment you will see that your load balancer is using the private static 10.0.0.250 IP address:
If you have another machine in that same VNet then you can also browse to the internal SFX endpoint and see that it connects to one of the nodes behind the load balancer:
Internal and External Load Balancer
This scenario will take the existing single node type external load balancer and add an additional internal load balancer for the same node type. A back end port attached to a back end address pool can only be assigned to a single load balancer so you will have to decide which load balancer should have your application ports and which load balancer should have your management endpoints (port 19000/19080). Keep in mind the SFRP restrictions from above if you decide to put the management endpoints on the internal load balancer. This sample keeps the management endpoints on the external load balancer and adds a port 80 application port and places it on the internal load balancer.
If you want a two node type cluster, with one node type on the external load balancer and the other on the internal load balancer, then simply take the portal-created two node type template (which will come with 2 load balancers) and switch the second load balancer to an internal load balancer per the ‘Internal Only Load Balancer’ section above.
1. Add the static internal LB IP address parameter (see notes above if dynamic IP address is desired):
         "internalLBAddress": {
            "type": "string",
            "defaultValue": "10.0.0.250"
        }
2. Add application port 80 parameter:
         "loadBalancedAppPort1": {
            "type": "int",
            "defaultValue": 80,
            "metadata": {
                "description": "Input endpoint1 for the application to use. Replace it with what your application uses"
            }
        },
3. Add internal versions of the existing networking variables by copy/paste and adding “-Int” to the naming:
         /* Add internal LB networking variables */
        "lbID0-Int": "[resourceId('Microsoft.Network/loadBalancers', concat('LB','-', parameters('clusterName'),'-',parameters('vmNodeType0Name'), '-Internal'))]",
        "lbIPConfig0-Int": "[concat(variables('lbID0-Int'),'/frontendIPConfigurations/LoadBalancerIPConfig')]",
        "lbPoolID0-Int": "[concat(variables('lbID0-Int'),'/backendAddressPools/LoadBalancerBEAddressPool')]",
        "lbProbeID0-Int": "[concat(variables('lbID0-Int'),'/probes/FabricGatewayProbe')]",
        "lbHttpProbeID0-Int": "[concat(variables('lbID0-Int'),'/probes/FabricHttpGatewayProbe')]",
        "lbNatPoolID0-Int": "[concat(variables('lbID0-Int'),'/inboundNatPools/LoadBalancerBEAddressNatPool')]",
        /* internal LB networking variables end */
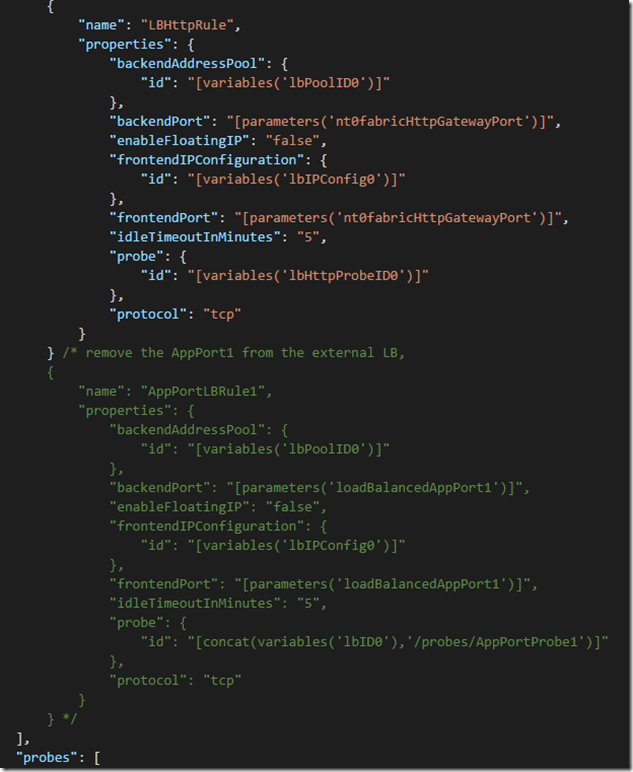
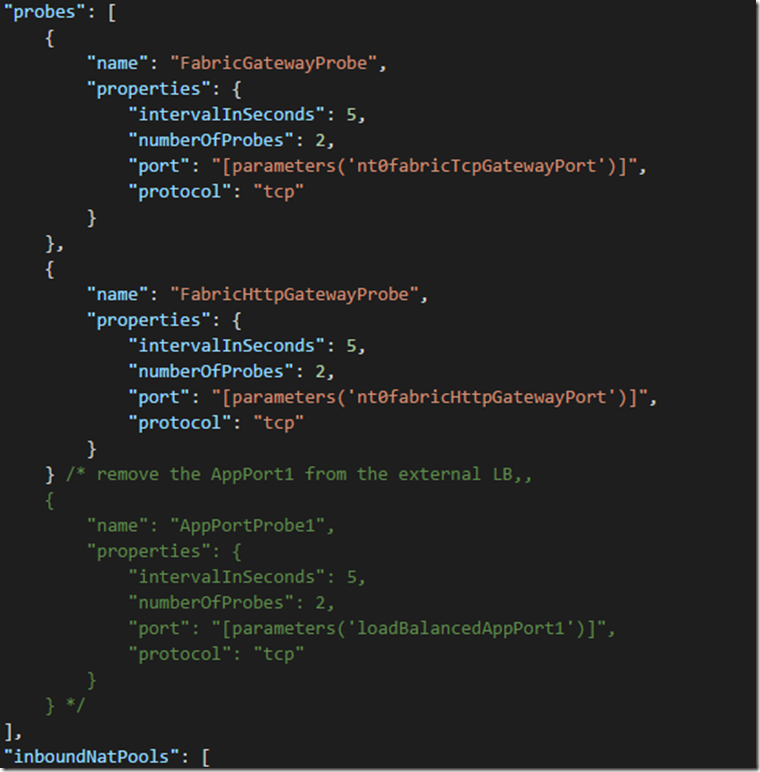
4. If you are starting with the portal generated template with an application port 80 then the default portal template will add AppPort1 (port 80) on the external load balancer. In this case remove the it from the external load balancer loadBalancingRules and probes so you can add it to the internal load balancer:
5. Add a second Microsoft.Network/loadBalancers resource. This will look very similar to the internal load balancer created in the previous ‘Internal Only Load Balancer’ section, but using the ‘-Int’ load balancer variables and only implementing the application port 80. This also removes the inboundNatPools in order to keep RDP endpoints on the public load balancer – if you want RDP in the internal load balancer then move the inboundNatPools from the external load balancer to this internal load balancer.
         /* Add a second load balancer, configured with a static privateIPAddress and the "-Int" LB variables */
        {
            "apiVersion": "[variables('lbApiVersion')]",
            "type": "Microsoft.Network/loadBalancers",
            /* Add '-Internal' to name */
            "name": "[concat('LB','-', parameters('clusterName'),'-',parameters('vmNodeType0Name'), '-Internal')]",
            "location": "[parameters('computeLocation')]",
            "dependsOn": [
                /* Remove public IP dependsOn, add vnet dependsOn
                "[concat('Microsoft.Network/publicIPAddresses/',concat(parameters('lbIPName'),'-','0'))]"
                */
                "[concat('Microsoft.Network/virtualNetworks/',parameters('virtualNetworkName'))]"
            ],
            "properties": {
                "frontendIPConfigurations": [
                    {
                        "name": "LoadBalancerIPConfig",
                        "properties": {
                            /* Switch from Public to Private IP address
                            /*
                            "publicIPAddress": {
                                "id": "[resourceId('Microsoft.Network/publicIPAddresses',concat(parameters('lbIPName'),'-','0'))]"
                            }
                            */
                            "subnet" :{
                                "id": "[variables('subnet0Ref')]"
                            },
                            "privateIPAddress": "[parameters('internalLBAddress')]",
                            "privateIPAllocationMethod": "Static"
                        }
                    }
                ],
                "backendAddressPools": [
                    {
                        "name": "LoadBalancerBEAddressPool",
                        "properties": {}
                    }
                ],
                "loadBalancingRules": [
                    /* Add the AppPort rule, making sure to reference the "-Int" versions of the backendAddressPool, frontendIPConfiguration, and probe variables */
                    {
                        "name": "AppPortLBRule1",
                        "properties": {
                            "backendAddressPool": {
                                "id": "[variables('lbPoolID0-Int')]"
                            },
                            "backendPort": "[parameters('loadBalancedAppPort1')]",
                            "enableFloatingIP": "false",
                            "frontendIPConfiguration": {
                                "id": "[variables('lbIPConfig0-Int')]"
                            },
                            "frontendPort": "[parameters('loadBalancedAppPort1')]",
                            "idleTimeoutInMinutes": "5",
                            "probe": {
                                "id": "[concat(variables('lbID0-Int'),'/probes/AppPortProbe1')]"
                            },
                            "protocol": "tcp"
                        }
                    }
                ],
                "probes": [
                   /* Add the probe for the app port */
                   {
                        "name": "AppPortProbe1",
                        "properties": {
                            "intervalInSeconds": 5,
                            "numberOfProbes": 2,
                            "port": "[parameters('loadBalancedAppPort1')]",
                            "protocol": "tcp"
                        }
                    }
                ],
                "inboundNatPools": [
                ]
            },
            "tags": {
                "resourceType": "Service Fabric",
                "clusterName": "[parameters('clusterName')]"
            }
        },
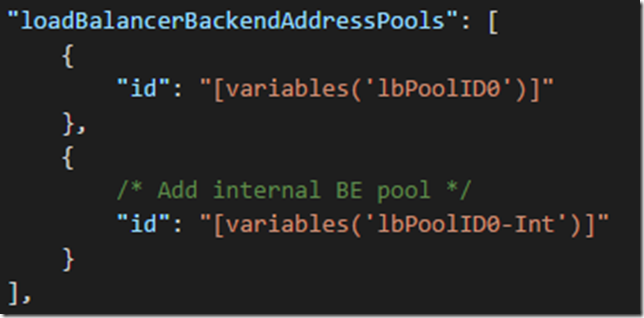
6. In the networkProfile for the Microsoft.Compute/virtualMachineScaleSets resource add the internal back end address pool:
                                                 "loadBalancerBackendAddressPools": [
                                                    {
                                                        "id": "[variables('lbPoolID0')]"
                                                    },
                                                    {
                                                        /* Add internal BE pool */
                                                        "id": "[variables('lbPoolID0-Int')]"
                                                    }
                                                ],
7. Deploy the template:
 New-AzureRmResourceGroup -Name sfnetworkinginternalexternallb -Location westus

New-AzureRmResourceGroupDeployment -Name deployment -ResourceGroupName sfnetworkinginternalexternallb -TemplateFile C:\SFSamples\Final\template_internalexternalLB.json
After the deployment you will see two load balancers in the resource group, and browsing through the load balancers you will see the public IP address and management endpoints (port 19000/19080) assigned to the public IP address, and the static internal IP address and application endpoint (port 80) assigned to the internal load balancer, and both load balancers using the same VMSS backend pool.
Comments
- Anonymous
January 24, 2017
The comment has been removed - Anonymous
March 02, 2017
For the example with two load balancers, for correctness, should we not also add a dependency on the internal load balance for the VMSS? - Anonymous
March 31, 2017
Hi.I got an error on one SF cluster. I have deployed two identical cluster in two different regions and only one of the shows the error. The error showed up after a running for a couple of days and now the VMSS vms dosen't start. I have deployed a cluster with one internal LB and one external LB. Have you seen this error before?When I check resources.azure.com for both regions I can see that the one with the error has a couple of inboundNatRules that I have not specified in the template with the same name as below.Load balancer rules inboundNatRules/DebuggerListenerNatPool-2ctdlffhg1.0 /inboundNatRules/DebuggerListenerNatPool-1xkuoxvelk.0 with floating IP disabled use the same backend port 30398 and protocol Tcp, and must not be used with the same backend IPDo you have any advice? - Anonymous
May 03, 2017
Is the management port limitation discussed in the paragraph 1 still there? - Anonymous
September 27, 2017
Hello all,One point you should take into consideration:Between steps 4. and 5. of this article for Existing Virtual Network / Subnet, there is one more thing to take into consideration:In the template.json there will remain a Subnet0Prefix at the end which will be undeclared and will cause the cluster to be provisioned with nodes stuck in "Waiting for nodes".Please make sure to delete that occurrence of "Subnet0Prefix"Regards,Radu
