WiX Heat Extension: Setting Up a Custom Extension Project
As most of you already know, the Windows Installer XML Toolset (WiX) is made to flexible. Most of the tools have the ability to be extended by using your own custom assembly. This is great when you have a custom action, specialized UI, preprocessor or anything else you might need in order to get your product out the door. There is documentation in the WiX help file on how to get going with other extensions but I noticed Heat didn’t have anything of the sort. Here is my stab at getting all of you developers up and running.
Architecture
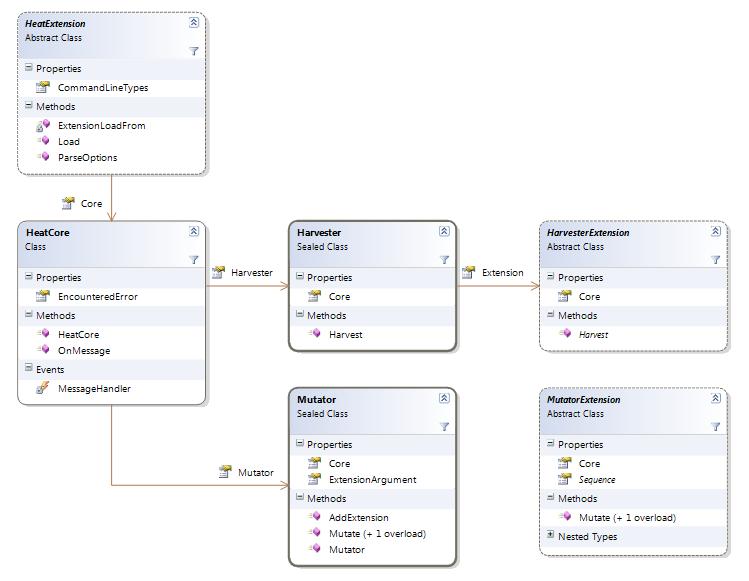
The first point to know about Heat would be around the architecture. The entire engine is written to be extensible. The core, which contains one harvester, has its extension set during the command line switch parsing.

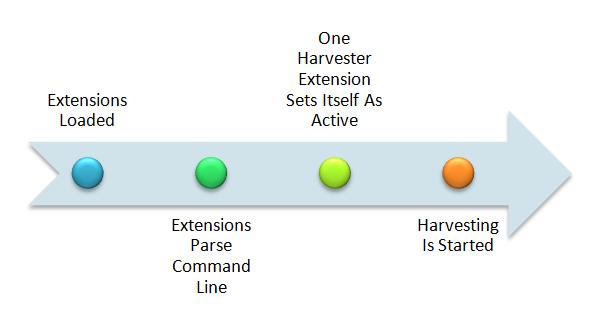
Heat loads all the extensions from the heat.exe.config file and then parses the command line for additional extensions. Each extension is passed the command line switches that were given to Heat so they can determine if they should become the active harvestor extension.

Getting Started
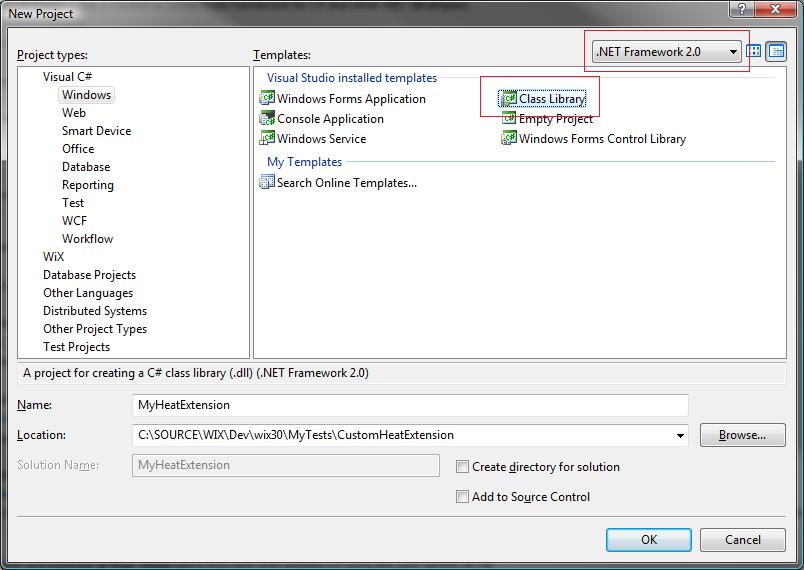
The examples I will be using are going to be via C#. Create your new extension project using the language of your choice. This should be a Class Library project. I have decided to use the .NET 2.0 Framework to keep in line with the Windows Installer XML Toolset (WiX) and to keep from requiring a higher version of .NET on the machine (this is your choice however).

Setting Up The Project
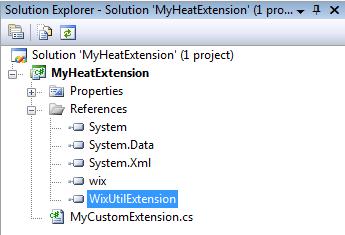
 Now that you have created your project you will need to add a few dependencies. The main one is to the wix.dll which can be found in the same directory as Heat.exe. If you are looking to write your own directory harvester you will want to add a reference to the WixUtilExtension.dll if you don’t want to rewrite all the work done to harvest an individual file. The FileHarvester has some great functionality around harvesting self-registering files.
Now that your project has its core dependencies added it is time to create a shell class that will become your harvester extension. For my example I will be calling my extension "MyCustomExtension".
 namespace MyHeatExtension
{
    using System;
    using System.Collections.Generic;

    using Microsoft.Tools.WindowsInstallerXml.Tools;

    public class MyCustomExtension : HeatExtension
    {
    }
}
Next you will need to add a reference to your extension in the AssemblyInfo.cs file. This helps the extension loader to find out which class in your Assembly should be treated as your harvester.
 using System.Reflection;
using System.Runtime.CompilerServices;
using System.Runtime.InteropServices;

using MyHeatExtension;
using Microsoft.Tools.WindowsInstallerXml.Tools;

[assembly: AssemblyTitle("MyCustomExtension Heat Extension")]
[assembly: AssemblyDescription("This is an extension to heat.exe which is part of the WIX Toolset.")]
[assembly: AssemblyConfiguration("")]
[assembly: AssemblyCompany("MyCompany")]
[assembly: AssemblyProduct("MyHeatExtension")]
[assembly: AssemblyCopyright("Copyright © MyCompany 2009")]
[assembly: AssemblyCulture("en-us")]
[assembly: AssemblyVersion("0.5.0.0")]
[assembly: AssemblyFileVersion("0.5.0.0")]

[assembly: ComVisible(false)]

[assembly: AssemblyDefaultHeatExtension(typeof(MyCustomExtension))]
Overrides
At this point I like to do a build on the project to make sure everything is working as expected. Once your compile has worked and your assembly built it is time to start coding. Going back to class diagram and looking at the HeatExtension class there are a couple exposed properties and methods. Two of these are pinnacle to our successful create of the extension; CommandLineTypes and ParseOptions.
CommandLineTypes
 /// <SUMMARY>
/// Gets the supported command line types for this extension.
/// </SUMMARY>
/// <VALUE>The supported command line types for this extension.</VALUE>
public override HeatCommandLineOption[] CommandLineTypes
{
    get
    {
        return new HeatCommandLineOption[]
        {
            new HeatCommandLineOption("mydirext", "harvest a directory my way")
        };
    }
}
ParseOptions
 /// <SUMMARY>
/// Parse the command line options for this extension.
/// </SUMMARY>
/// <PARAM name="type">The active harvester type.</PARAM>
/// <PARAM name="args">The option arguments.</PARAM>
public override void ParseOptions(string type, string[] args)
{
    bool activated = false;

    if (String.Equals(type, "mydirext", StringComparison.OrdinalIgnoreCase))
    {
        this.Core.Harvester.Extension = new MyHarvesterExtension();
        activated = true;
    }

    if (activated)
    {
        //TODO: Parse the command line if needed and add mutators if needed.
    }
}
Summary
You are now at the point to start diving in and looking into what it takes to actually make your HarvesterExtension and MutatorExtension if you need it. As my schedule allows I plan on adding other parts to this to help in the creation of a HarvesterExtension and MutatorExtension. I realize that much of this is undocumented so I hope that you find these blogs of use.
As always, comments and feedback welcome.
Comments
Anonymous
August 03, 2009
Just found this blog and read through all the articles, this one is particularly helpful. Look forward to seeing more HeatExtension examples. Cheers SteveAnonymous
October 18, 2011
Is there any way to override the preprocessorextension with a custom one?