I2Cの温度センサーをWindows 10 IoT Core for Raspberry PI2で使う
今後、https://www.WindowsOnDevices.com から紹介されている、Win10 IoT Core for Raspberry PI2の基本情報は紹介するとして、
https://ms-iot.github.io/content/en-US/win10/samples/I2CAccelerometer.htm
で紹介されているI2Cのセンサー制御サンプルを参考にしながら、I2Cで制御可能な安価な温度センサーTMP102から温度を取得する方法を紹介します。
開発環境やRPI2のROM等の、セットアップ方法は、https://ms-iot.github.io/content/en-US/win10/SetupRPI.htm を参考にしてください。
温度センサー
TMP102 https://www.tij.co.jp/product/jp/tmp102
私が使ったのは、こちら。https://www.sparkfun.com/products/11931 700円ぐらいで購入可能。
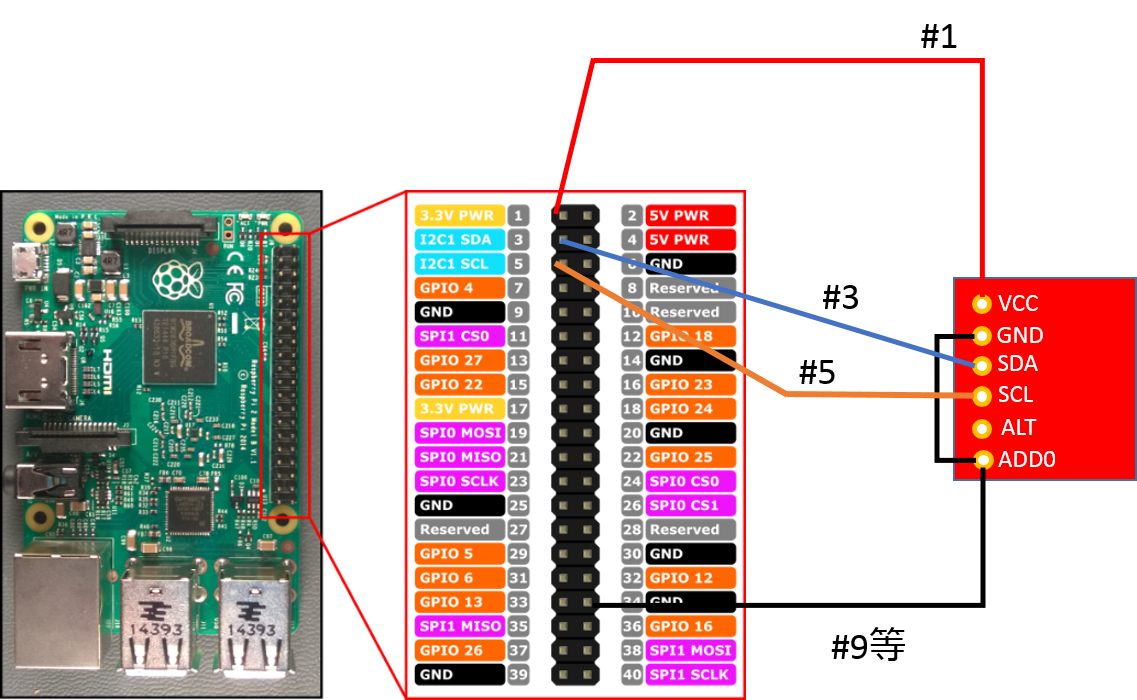
これを図の様につないで、
※GNDはRaspberry PI2側の黒いピン(GND)と書かれているピンならどれでもOK)
ADD0はGNDと接続。
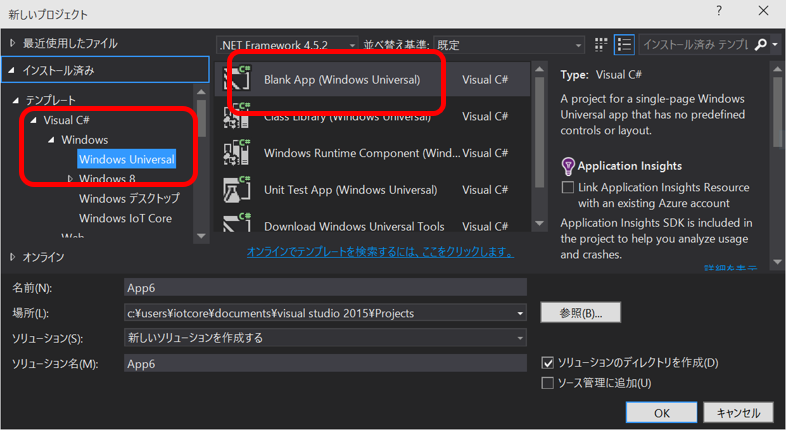
Windows 10 Tech PreviewでVisual Studio 2015RCを起動し、新規プロジェクトで、”C#”→”Universal App”→”Blank App”でプロジェクトを作成します。
ソリューションエクスプローラーで、参照を右クリックし、追加で、
Windows Universal の拡張の”Windows IoT Extension SDK”を追加します。
MainPage.xaml.csを開いて、I2C制御のコードを、以下の様に記述します。
public sealed partial class MainPage : Page
{
private const string I2C_CONTROLLER_NAME = "I2C1";
private const byte TMP102_I2C_ADDR = 0x48;
private I2cDevice I2CTMP102;
private const byte I2CTMP102_REG_READ_TEMP = 0x00;
private const byte I2CTMP102_REG_CONFIG = 0x01;
private const byte I2CTMP102_REG_READ_MIN_TEMP = 0x02;
private const byte I2CTMP102_REG_READ_MAX_TEMP = 0x03;
private DispatcherTimer periodicTimer;
private async void InitI2CTemp102()
{
try
{
string
aqs = I2cDevice.GetDeviceSelector(I2C_CONTROLLER_NAME);
var dis = await DeviceInformation.FindAllAsync(aqs);
var settings = new I2cConnectionSettings(TMP102_I2C_ADDR);
settings.BusSpeed = I2cBusSpeed.FastMode;
I2CTMP102 = await I2cDevice.FromIdAsync(dis[0].Id, settings);
if (I2CTMP102 != null)
{
double currentTemp = TakeMeasurementTemperature();
periodicTimer = new DispatcherTimer();
periodicTimer.Interval = TimeSpan.FromMilliseconds(1000);
periodicTimer.Tick += PeriodicTimer_TickMeasureTemperature;
periodicTimer.Start();
}
}
catch (Exception ex)
{
Debug.WriteLine(ex.Message);
}
}
private double TakeMeasurementTemperature()
{
byte[] writeBuf = new byte[] { I2CTMP102_REG_READ_TEMP };
byte[] readBuf = new byte[2];
I2CTMP102.WriteRead(writeBuf, readBuf);
int valh = ((int)readBuf[0]) << 4;
int vall = ((int)readBuf[1] >> 4);
int val = valh + vall;
double unit = 0.0625;
if ((val & 0x800) != 0)
{
val = 0x1000 - val;
unit *= -1;
}
double reading = val * unit;
return reading;
}
private void PeriodicTimer_TickMeasureTemperature(object sender, object e)
{
var currentTemp = TakeMeasurementTemperature();
}
public MainPage()
{
this.InitializeComponent();
this.Loaded += MainPage_Loaded;
}
private void MainPage_Loaded(object sender, RoutedEventArgs e)
{
InitI2CTemp102();
}
}
TMP102_I2C_ADDRは、ADD0とGNDをつないでいるので”0x48”です。温度は、0x00のレジスターをwriteBufで指定して読み込むと、12Bitで温度がreadBufに格納されて帰ってきます。1バイト目に12ビットの上位8ビット、2バイト目の上位4ビットに、12ビットの下位4ビットが格納されています。単位が、0.0625℃なので、その値をかければ温度が算出できます。12ビットの最上位が1の場合は、補数表示された負の値です。
センサーの詳細は、https://focus.tij.co.jp/jp/lit/ds/symlink/tmp102.pdf から公開されています。上のコードとこのデータシートを見比べると、他のI2Cセンサーを使う場合の一助になると思います。


